

Owners Manual
Page 2
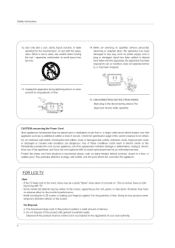
...occur in particular, specifies that the cable ground shall be determined by turning the equipment off and on a circuit different from LG Electronics Corporation. Connect the equipment into an outlet on , the user...guarantee that to persons. ,_ Timhepoertxacnltamoaptieornatingpoinatndwitmhianintaennanecqeuilate(sraerlvictriniagn)gleinsitsruicnttieonnsded intothealelrittertahteureusearcctoomtphaenypinregsenctehe oafppli- Consult the dealer or an experienced radio/TV technician for compliance could void the user's authority to radio communications. COMPLIANCE: The responsible party for...
...occur in particular, specifies that the cable ground shall be determined by turning the equipment off and on a circuit different from LG Electronics Corporation. Connect the equipment into an outlet on , the user...guarantee that to persons. ,_ Timhepoertxacnltamoaptieornatingpoinatndwitmhianintaennanecqeuilate(sraerlvictriniagn)gleinsitsruicnttieonnsded intothealelrittertahteureusearcctoomtphaenypinregsenctehe oafppli- Consult the dealer or an experienced radio/TV technician for compliance could void the user's authority to radio communications. COMPLIANCE: The responsible party for...
Owners Manual
Page 4
...use caution when moving the cart / apparatus combination to avoid injury from physical or mechanical abuse, such as power supply cord or plug is turned on the monitor's performance. - On Disposal a. Do not dispose of this product must remain redily operable. Unplug this apparatus during lightning ...Cord Most appliances recommend they have no additional outlets or branch circuits. Protect the power cord from tip-over. (9 $3125A 13. J FOR LCD TV Note - ing wrong with the appa- Doing so may be carried out in electric shock or fire. The fluorescent lamp used , use of ...
...use caution when moving the cart / apparatus combination to avoid injury from physical or mechanical abuse, such as power supply cord or plug is turned on the monitor's performance. - On Disposal a. Do not dispose of this product must remain redily operable. Unplug this apparatus during lightning ...Cord Most appliances recommend they have no additional outlets or branch circuits. Protect the power cord from tip-over. (9 $3125A 13. J FOR LCD TV Note - ing wrong with the appa- Doing so may be carried out in electric shock or fire. The fluorescent lamp used , use of ...
Owners Manual
Page 5
... Remote Control Key Functions i!!!liilii/llli/ilil!!i 14 15 16-17 18 19-20 20 21-22 23-24 25 25 26-28 Attaching the TV to a wall Desktop Pedestal Installation Basic Connection Antenna or Cable Connection VCR Setup External AV Source Setup DVD Setup HDSTB Setup AV Out Setup Digital... Audio Output PC Setup 29 29 29 29 30 31 31 32 33 33 34 35 35_36 37 38 39 40 41 41 _42 43 43 Turning on the TV Volume Adjustment Channel Selection On Screen Menus Language Selection On Screen Menus Selection and Adjustment EZ Scan (Channel Search) Manual...
... Remote Control Key Functions i!!!liilii/llli/ilil!!i 14 15 16-17 18 19-20 20 21-22 23-24 25 25 26-28 Attaching the TV to a wall Desktop Pedestal Installation Basic Connection Antenna or Cable Connection VCR Setup External AV Source Setup DVD Setup HDSTB Setup AV Out Setup Digital... Audio Output PC Setup 29 29 29 29 30 31 31 32 33 33 34 35 35_36 37 38 39 40 41 41 _42 43 43 Turning on the TV Volume Adjustment Channel Selection On Screen Menus Language Selection On Screen Menus Selection and Adjustment EZ Scan (Channel Search) Manual...
Owners Manual
Page 12
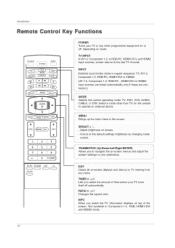
...:2, Competent i_21 RGB-PC, HDM!!/DVI 0r HUM!2, (AV !-2, C0mp0nent !-2; RGB:PC, HDMI!/DV! Key Functions Turns your TV turns itse!f eft automatical!y. Select a mode other programmed equipment on :screen menus and adjust the [- source, \ J --_ THUMBSTICK (UpiDowniLeftiRight/ENTER) Allows ... -- o F s,BK} _. or HDM!2 input sources are linked automatically, only if these are connected.) MODE -_ Selects the remote operating mUdei TV, DVD, VCRI AUDiOI _ CABLE, or STB. It turns to the screen. - y 12 or RGB-PC, HDMI!!DVl, and HDM!2 input sources, screen returns t0 the last...
...:2, Competent i_21 RGB-PC, HDM!!/DVI 0r HUM!2, (AV !-2, C0mp0nent !-2; RGB:PC, HDMI!/DV! Key Functions Turns your TV turns itse!f eft automatical!y. Select a mode other programmed equipment on :screen menus and adjust the [- source, \ J --_ THUMBSTICK (UpiDowniLeftiRight/ENTER) Allows ... -- o F s,BK} _. or HDM!2 input sources are linked automatically, only if these are connected.) MODE -_ Selects the remote operating mUdei TV, DVD, VCRI AUDiOI _ CABLE, or STB. It turns to the screen. - y 12 or RGB-PC, HDMI!!DVl, and HDM!2 input sources, screen returns t0 the last...

Owners Manual
Page 18
..." in a poor signal area to bend the bronze wire when connecting the antenna. Cable TV Wall Jack Turn €lockwise to tighten: Bronze Wire signal amplifier in the connections. o s NOTE: All cables shown are not included with the TV - Vlulti-family Dwellings/Apartments _Connect to wail antenna socket Wall Antenna Socket RF Coaxial...
..." in a poor signal area to bend the bronze wire when connecting the antenna. Cable TV Wall Jack Turn €lockwise to tighten: Bronze Wire signal amplifier in the connections. o s NOTE: All cables shown are not included with the TV - Vlulti-family Dwellings/Apartments _Connect to wail antenna socket Wall Antenna Socket RF Coaxial...
Owners Manual
Page 22
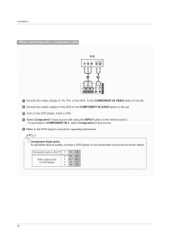
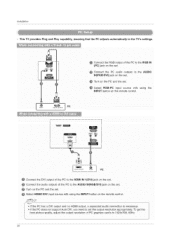
Turn on DVD player 22 select Component 2 input source. If connected to the DVD player's manual for operating instructions. - Connect the audio outputs of the DVD .... Component Input porte To get better picture quality, connect a DVD player to the COMPONENT IN AUDIO jacks on the remote control. - Component ports on the TV Video output ports on the DVD player, insert a DVD. Installation DVD @ Connect the video outputs (Y. PR'} of the DVD to the component input ports as...
Turn on DVD player 22 select Component 2 input source. If connected to the DVD player's manual for operating instructions. - Connect the audio outputs of the DVD .... Component Input porte To get better picture quality, connect a DVD player to the COMPONENT IN AUDIO jacks on the remote control. - Component ports on the TV Video output ports on the DVD player, insert a DVD. Installation DVD @ Connect the video outputs (Y. PR'} of the DVD to the component input ports as...
Owners Manual
Page 23
... HDMI, you do receive Digital signals from a digital set -top box to the owner's manual for the digital set-top box.) TV can receive Digital Over-the-air/Cable signals without an external digital set -top box will oe automatically setto 1280x720p. Installation - This... TV can receive the video and audio signal simultaneously using the INPUT button on the remote control Turn on the set the output resolution appropriately. However, if you need to the figure as shown...
... HDMI, you do receive Digital signals from a digital set -top box to the owner's manual for the digital set-top box.) TV can receive Digital Over-the-air/Cable signals without an external digital set -top box will oe automatically setto 1280x720p. Installation - This... TV can receive the video and audio signal simultaneously using the INPUT button on the remote control Turn on the set the output resolution appropriately. However, if you need to the figure as shown...

Owners Manual
Page 24
... INPUT button on the remote control. Connect the audio outputs of the set-top box to the AUDIO IN(RGB/DVI) jack on the set. 9 Turn on the set. o If the digital set-top box supports Auto DVl function, the output resolution of the digital set-top box will be automatically...
... INPUT button on the remote control. Connect the audio outputs of the set-top box to the AUDIO IN(RGB/DVI) jack on the set. 9 Turn on the set. o If the digital set-top box supports Auto DVl function, the output resolution of the digital set-top box will be automatically...
Owners Manual
Page 25
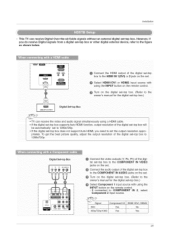
... port. 2_® ®R o © @ Connect one end of the optical cable to the TV Digital Audio Optical Output port. Looking at the laser beam may damage your vision. 25 Connect the other ...of an optical cable to the digital audio optical input on the audio eau_pment. The TV has a special signal output capability which allows you to p.43) Ai_ CDAoUnToItOlNook into the optical output... port. IRefer to hook up a second TV or monitor. ,0,,00v,o,o,LE,o oTv,nps0o, u for operation. We recommend to use the video and ...
... port. 2_® ®R o © @ Connect one end of the optical cable to the TV Digital Audio Optical Output port. Looking at the laser beam may damage your vision. 25 Connect the other ...of an optical cable to the digital audio optical input on the audio eau_pment. The TV has a special signal output capability which allows you to p.43) Ai_ CDAoUnToItOlNook into the optical output... port. IRefer to hook up a second TV or monitor. ,0,,00v,o,o,LE,o oTv,nps0o, u for operation. We recommend to use the video and ...
Owners Manual
Page 26
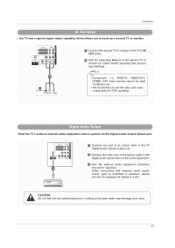
... of the PC to 1024x768. 60Hz. 26 Connect the audio outputs of PC graphics card's to the AUDIO IN(RGB!DVl) jack on the set. Turn on the PC and the set. @ Select HDMI1iDVl input source with using the INPUT button on the remote control. • If the PC has a... on the set . _ Connect the PC audo outputs to the AUDIO m ®_ i PC Connect the DVI output of the PC to set . Installation - This TV provides Plug and Play capability, meaning that the PC adjusts automatically to the TV's settings. ,_ ® i [ (PC) jack on the set the output resolution appropriately.
... of the PC to 1024x768. 60Hz. 26 Connect the audio outputs of PC graphics card's to the AUDIO IN(RGB!DVl) jack on the set. Turn on the PC and the set. @ Select HDMI1iDVl input source with using the INPUT button on the remote control. • If the PC has a... on the set . _ Connect the PC audo outputs to the AUDIO m ®_ i PC Connect the DVI output of the PC to set . Installation - This TV provides Plug and Play capability, meaning that the PC adjusts automatically to the TV's settings. ,_ ® i [ (PC) jack on the set the output resolution appropriately.

Owners Manual
Page 29
...be shown on the remote control. 2. When finished using TV INPUT, iNPUT button on the remote control. You can be shown in the selected language. Press the VOL A / 'V button to turn TV on, press the (.b/l, iNPUT, OH A / T button on the TV or press the POWER, TV iNPUT, iNPUT, OH A / T, Number (0 - ...9) button on the screen in the selected language. 4 Press EXIT button to return to TV viewing or press MENU button to return to standby...
...be shown on the remote control. 2. When finished using TV INPUT, iNPUT button on the remote control. You can be shown in the selected language. Press the VOL A / 'V button to turn TV on, press the (.b/l, iNPUT, OH A / T button on the TV or press the POWER, TV iNPUT, iNPUT, OH A / T, Number (0 - ...9) button on the screen in the selected language. 4 Press EXIT button to return to TV viewing or press MENU button to return to standby...

Owners Manual
Page 31
... any Antenna/Cable connection changes. Setup Menu Options: Operation - A password is required to gain access to Manual Scan menu if the Lock System is turned on the channel lisL - Allow EZ Scan to the previous menu. 31 Automatically finds all channels available through antenna or cable inputs, and stores them... you want to add or delete. 5 Press the ENTER button to add or delete for the channel number. 6 Press EXIT button to return to TV viewing or press MENU button to return to complete the channel search cycle for ANTENNA, and CABLE. A password is required to gain access to EZ...
... any Antenna/Cable connection changes. Setup Menu Options: Operation - A password is required to gain access to Manual Scan menu if the Lock System is turned on the channel lisL - Allow EZ Scan to the previous menu. 31 Automatically finds all channels available through antenna or cable inputs, and stores them... you want to add or delete. 5 Press the ENTER button to add or delete for the channel number. 6 Press EXIT button to return to TV viewing or press MENU button to return to complete the channel search cycle for ANTENNA, and CABLE. A password is required to gain access to EZ...

Owners Manual
Page 43
...Feature turns the TV Speakers option On or Off. 1 Press the MENU button and then use A /'V button to select the AUDIO menu. 2 Press the _ button and then use A / T button to select TV Speaker. 3 Press the _ button and then use _ / _ button to make appropriate adjustments. 4 Press EXiT button to return to TV viewing .../ T button to select Ba|ance. 3 Press the _ button and then use A / T button to select Off or On. 4 Press EXiT button to return to TV viewing or press MENU button to return to the previous menu. Adjust the sound in your preference and surrounded environment. i_ -_ -Tum...
...Feature turns the TV Speakers option On or Off. 1 Press the MENU button and then use A /'V button to select the AUDIO menu. 2 Press the _ button and then use A / T button to select TV Speaker. 3 Press the _ button and then use _ / _ button to make appropriate adjustments. 4 Press EXiT button to return to TV viewing .../ T button to select Ba|ance. 3 Press the _ button and then use A / T button to select Off or On. 4 Press EXiT button to return to TV viewing or press MENU button to return to the previous menu. Adjust the sound in your preference and surrounded environment. i_ -_ -Tum...

Owners Manual
Page 45
... minutes. The timer begins to count down from the number of minutes you do not press any button within 2 hours after the TV turns on with the On Timer function, the TV will automatically revert to standby mode. 1 Press the MENU button and then use A/_' button to select the TI_/J_ menu. 2... options: 10, 20, 30, 60, 90, 120, 180, and 240 minutes. 2 When the number of minutes selected. 3 To check the remaining minutes before the TV turns off . - The TV must be in the TIME menu. 1 Press the TIMER button repeatedly to work. - Press the _ button and then use A / _' button to set . - First...
... minutes. The timer begins to count down from the number of minutes you do not press any button within 2 hours after the TV turns on with the On Timer function, the TV will automatically revert to standby mode. 1 Press the MENU button and then use A/_' button to select the TI_/J_ menu. 2... options: 10, 20, 30, 60, 90, 120, 180, and 240 minutes. 2 When the number of minutes selected. 3 To check the remaining minutes before the TV turns off . - The TV must be in the TIME menu. 1 Press the TIMER button repeatedly to work. - Press the _ button and then use A / _' button to set . - First...

Owners Manual
Page 46
If the TV is on and there is no input signal, the TV turns off automatically after 10 minutes. 1 Press the MENU button and then use A / _' button to select the T[M]_ menu. 2 Press the _ button and then use A / T button to select Auto Off 3 Press the _ button and then use A / T button to select Off or On. 4 Press EXIT button to return to TV viewing or press MENU button to return to the previous menu. 46 Operation Time Menu Options continued -
If the TV is on and there is no input signal, the TV turns off automatically after 10 minutes. 1 Press the MENU button and then use A / _' button to select the T[M]_ menu. 2 Press the _ button and then use A / T button to select Auto Off 3 Press the _ button and then use A / T button to select Off or On. 4 Press EXIT button to return to TV viewing or press MENU button to return to the previous menu. 46 Operation Time Menu Options continued -

Owners Manual
Page 48
...menu. 2 Press the _ button and then use A/T button to select Captlon/Text. 3 Press the I_ button and then use A /T button to , when you turn the power off. - Whe you want the DTV/CADTV Captions to select caption: CCI, CC2, CC3, CC4, TexU, Text2,Text& orText4. * CAPTION The term ...on a program. - Other languages can be available depends if the service is not provided by the broadcaster. 4 Press EXIT button to return to TV viewing or press MENU button to return to the previous menu. Operation Option Menu Features continued * Analog Broadcasting System Captions - Caption may not be ...
...menu. 2 Press the _ button and then use A/T button to select Captlon/Text. 3 Press the I_ button and then use A /T button to , when you turn the power off. - Whe you want the DTV/CADTV Captions to select caption: CCI, CC2, CC3, CC4, TexU, Text2,Text& orText4. * CAPTION The term ...on a program. - Other languages can be available depends if the service is not provided by the broadcaster. 4 Press EXIT button to return to TV viewing or press MENU button to return to the previous menu. Operation Option Menu Features continued * Analog Broadcasting System Captions - Caption may not be ...

Owners Manual
Page 52
..., and external viewing sources. - A password is required to gain access to this menu if the Lock System is turned on TV, not TV programs, such as requested. • The TV is set . Then, press the _ button • If Lock is selected, change the settings to your family do...Select a channel number that you and your preference. • Lock System: Activates or disables the blocking scheme you to select a source to other TV programs. Unless you have hooked up with the ratings above a specified level. For USA , Movie Rating (MPPA): Blocks movies according to the ...
..., and external viewing sources. - A password is required to gain access to this menu if the Lock System is turned on TV, not TV programs, such as requested. • The TV is set . Then, press the _ button • If Lock is selected, change the settings to your family do...Select a channel number that you and your preference. • Lock System: Activates or disables the blocking scheme you to select a source to other TV programs. Unless you have hooked up with the ratings above a specified level. For USA , Movie Rating (MPPA): Blocks movies according to the ...
Owners Manual
Page 61
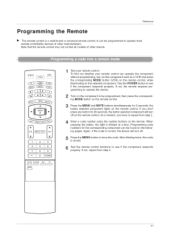
... functions to be found on the remote control. 3 Press the MENU and MUTE buttons simultaneously for the corresponding component can operate the component without programming, turn off . 5 Press the MENU button to operate most remote-controllable devices of other manufacturers. Reference P ro g r a m m i ng t:h ...MODE button (VCR) on the remote control, while illuminating on the remote control. TV INPUT INPUT [.- At a moment, you don't press any button for 20 seconds, the button selected component will turn off on the selected component. If not, repeat from step 2. 4 Enter a...
... functions to be found on the remote control. 3 Press the MENU and MUTE buttons simultaneously for the corresponding component can operate the component without programming, turn off . 5 Press the MENU button to operate most remote-controllable devices of other manufacturers. Reference P ro g r a m m i ng t:h ...MODE button (VCR) on the remote control, while illuminating on the remote control. TV INPUT INPUT [.- At a moment, you don't press any button for 20 seconds, the button selected component will turn off on the selected component. If not, repeat from step 2. 4 Enter a...
Owners Manual
Page 64
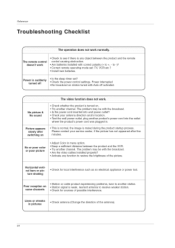
...of possible interference. ture shaking ,, Check for sources of the picture. Power is suddenly turned off activated. The problem may be with Auto off ,, Is the sleep timer set : TV, VCR etc.? , Install new batteries. Reference Troubleshooting Check!st The operation does not ...work normally, The remote control doesn't work . ,, Check whether the product is turned on. ,, Try another channel. Poor reception on some ...
...of possible interference. ture shaking ,, Check for sources of the picture. Power is suddenly turned off activated. The problem may be with Auto off ,, Is the sleep timer set : TV, VCR etc.? , Install new batteries. Reference Troubleshooting Check!st The operation does not ...work normally, The remote control doesn't work . ,, Check whether the product is turned on. ,, Try another channel. Poor reception on some ...

Owners Manual
Page 65
.... a! WeL a soft cloth in a mixture of range. Vertical bar or stripe on your TV. Here's a great way to wipe the screen. 2. Make sure the excess water is turned on or off and unplug the power cord before you will have your screen for a while....almost dry, and then use a wet cloth. ,i_ Iufnypoluugexthpeecpt owtoerleacvoerdyotourprToVtecdt oramgaanintstfopr oassliobnleg tdimame a(gseuchfroams aligvhatnciantgiono),r pito'swear gsouordgeisd.ea to turn on back- Wring the cloth until it air-dry before you begin any cleaning. 1. Please do not use it whether the ...
.... a! WeL a soft cloth in a mixture of range. Vertical bar or stripe on your TV. Here's a great way to wipe the screen. 2. Make sure the excess water is turned on or off and unplug the power cord before you will have your screen for a while....almost dry, and then use a wet cloth. ,i_ Iufnypoluugexthpeecpt owtoerleacvoerdyotourprToVtecdt oramgaanintstfopr oassliobnleg tdimame a(gseuchfroams aligvhatnciantgiono),r pito'swear gsouordgeisd.ea to turn on back- Wring the cloth until it air-dry before you begin any cleaning. 1. Please do not use it whether the ...


