Owners Manual
Page 1
OWNER'S MANUAL LCD TV Please read this manual carefully before operating your set and retain it for future reference. 26LH210C 32LH210C 26LH200C 32LH200C 37LH200C 42LH200C 42LH300C 47LH300C P/NO : SAC34026003 (1004-REV01) www.lg.com
OWNER'S MANUAL LCD TV Please read this manual carefully before operating your set and retain it for future reference. 26LH210C 32LH210C 26LH200C 32LH200C 37LH200C 42LH200C 42LH300C 47LH300C P/NO : SAC34026003 (1004-REV01) www.lg.com

Owners Manual
Page 4
Check the specification page of fire or electrical shock, do not expose this owner's manual to be certain. To reduce the risk of this product to rain, moisture or other liquids. Do not try to ground the unit by SWITCH. ... electric shock (i.e. SAFETY INSTRUCTIONS 11 Never touch this product near flammable objects such as gasoline or candles or expose the TV to direct air conditioning. 16 Do not expose to dripping or splashing and do not place objects filled with liquids, such as being twisted, kinked, pinched, closed in a door, or...
Check the specification page of fire or electrical shock, do not expose this owner's manual to be certain. To reduce the risk of this product to rain, moisture or other liquids. Do not try to ground the unit by SWITCH. ... electric shock (i.e. SAFETY INSTRUCTIONS 11 Never touch this product near flammable objects such as gasoline or candles or expose the TV to direct air conditioning. 16 Do not expose to dripping or splashing and do not place objects filled with liquids, such as being twisted, kinked, pinched, closed in a door, or...

Owners Manual
Page 6
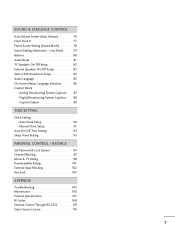
...List 59 PICTURE CONTROL Picture Size (Aspect Ratio) Control 62 Picture Wizard 64 Preset Picture Settings (Picture Mode 66 Manual Picture Adjustment - Add / Delete Channel (Manual Tuning 43 - Auto Scan (Auto Tuning 42 - User Mode 67 Picture Improvement Technology 68 Expert Picture Control 69... Panel Information 10 Back Panel Information 11 Stand Instruction 12 VESA Wall Mounting 14 Cable Management 15 Desktop Pedestal Installation 16 Swivel Stand 16 Kensington Security System 16 Attaching the TV to a Desk 17 Securing the TV to the wall to prevent falling when the TV is ...
...List 59 PICTURE CONTROL Picture Size (Aspect Ratio) Control 62 Picture Wizard 64 Preset Picture Settings (Picture Mode 66 Manual Picture Adjustment - Add / Delete Channel (Manual Tuning 43 - Auto Scan (Auto Tuning 42 - User Mode 67 Picture Improvement Technology 68 Expert Picture Control 69... Panel Information 10 Back Panel Information 11 Stand Instruction 12 VESA Wall Mounting 14 Cable Management 15 Desktop Pedestal Installation 16 Swivel Stand 16 Kensington Security System 16 Attaching the TV to a Desk 17 Securing the TV to the wall to prevent falling when the TV is ...
Owners Manual
Page 7
Digital Broadcasting System Captions 88 - Caption Option 89 TIME SETTING Clock Setting - Auto Clock Setup 90 Manual Clock Setup 91 Auto On/Off Time Setting 92 Sleep Timer Setting 93 PARENTAL CONTROL / RATINGS Set Password & Lock System 94 Channel Blocking 97 Movie & ...
Digital Broadcasting System Captions 88 - Caption Option 89 TIME SETTING Clock Setting - Auto Clock Setup 90 Manual Clock Setup 91 Auto On/Off Time Setting 92 Sleep Timer Setting 93 PARENTAL CONTROL / RATINGS Set Password & Lock System 94 Channel Blocking 97 Movie & ...

Owners Manual
Page 9
... with the polishing cloth. * Do not wipe roughly when removing stain. Option Extras D-sub 15 pin Cable When using the VGA (D-sub 15 pin cable) PC connection, the user must use shielded signal interface cables with ferrite cores to P.15) Not... 32LH210C) MUTE SAP INFO CC POWER 1 4 7 5 8 TIMER 0 INPUT 9 FLASHBK RETURN VOL CH OK CH VOL 2 3 6 BED1 BED2 1.5V 1.5V Owner's Manual CD Manual Installer Remote Control, User Remote Control, Batteries Batteries Power Cord (Except 47LH300C) x 4 Screws for stand assembly Screw for stand fixing (Refer to P.12) (Refer to...
... with the polishing cloth. * Do not wipe roughly when removing stain. Option Extras D-sub 15 pin Cable When using the VGA (D-sub 15 pin cable) PC connection, the user must use shielded signal interface cables with ferrite cores to P.15) Not... 32LH210C) MUTE SAP INFO CC POWER 1 4 7 5 8 TIMER 0 INPUT 9 FLASHBK RETURN VOL CH OK CH VOL 2 3 6 BED1 BED2 1.5V 1.5V Owner's Manual CD Manual Installer Remote Control, User Remote Control, Batteries Batteries Power Cord (Except 47LH300C) x 4 Screws for stand assembly Screw for stand fixing (Refer to P.12) (Refer to...

Owners Manual
Page 14
...to personal injury. G When purchasing our wall mount kit, a detailed installation manual and all parts necessary for wall mount kits are provided. Do not use an LG brand wall mount when mounting the TV to a wall. CAUTION G Do...32LH200C 37LH200C, 42LH200C, 42LH300C, 200 * 200 M6 4 47LH300C Wall Mounting Bracket (sold separately) RW230 RW230 AW-47LG30M AW-47LG30M ! G Standard dimensions for assembly are shown in personal injury due to electric shock. 14 G For wall mounts that do not comply with the VESA standard screw specifications, the length of accidents. G LG...
...to personal injury. G When purchasing our wall mount kit, a detailed installation manual and all parts necessary for wall mount kits are provided. Do not use an LG brand wall mount when mounting the TV to a wall. CAUTION G Do...32LH200C 37LH200C, 42LH200C, 42LH300C, 200 * 200 M6 4 47LH300C Wall Mounting Bracket (sold separately) RW230 RW230 AW-47LG30M AW-47LG30M ! G Standard dimensions for assembly are shown in personal injury due to electric shock. 14 G For wall mounts that do not comply with the VESA standard screw specifications, the length of accidents. G LG...
Owners Manual
Page 16
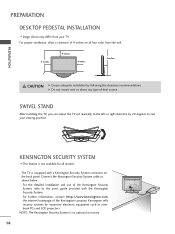
...After installing the TV, you can adjust the TV set manually to the left or right direction by following the clearance ...a Kensington Security System connector on all models. - NOTE: The Kensington Security System is an optional accessory. 16 G Do not mount near or above any type of the Kensington company. For proper ventilation, allow a ...com, the internet homepage of heat source. Connect the Kensington Security System cable as notebook PCs and LCD projectors. The TV is equipped with the Kensington Security System. PREPARATION PREPARATION DESKTOP PEDESTAL INSTALLATION I ...
...After installing the TV, you can adjust the TV set manually to the left or right direction by following the clearance ...a Kensington Security System connector on all models. - NOTE: The Kensington Security System is an optional accessory. 16 G Do not mount near or above any type of the Kensington company. For proper ventilation, allow a ...com, the internet homepage of heat source. Connect the Kensington Security System cable as notebook PCs and LCD projectors. The TV is equipped with the Kensington Security System. PREPARATION PREPARATION DESKTOP PEDESTAL INSTALLATION I ...
Owners Manual
Page 20
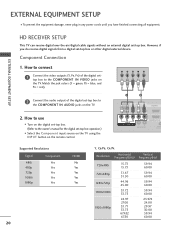
Component Connection 1. How to use I Turn on the digital set-top box. (Refer to the owner's manual for the digital set -top box. EXTERNAL EQUIPMENT SETUP HD RECEIVER SETUP This TV can receive digital over-the-air/digital cable signals ...L(MONO) R 1 VIDEO COMPONENT IN L AUDIO R L R SPEAKER OUT /DVI IN REMO CONTRO Supported Resolutions Signal Component 480i Yes 480p Yes 720p Yes 1080i Yes 1080p Yes HDMI No Yes Yes Yes Yes 20 Y, CB/PB, CR/PR Resolution Horizontal Vertical Frequency(KHz) Frequency(Hz) 720x480i 720x480p 1280x720p 1920x1080i 1920x1080p 15.73 15...
Component Connection 1. How to use I Turn on the digital set-top box. (Refer to the owner's manual for the digital set -top box. EXTERNAL EQUIPMENT SETUP HD RECEIVER SETUP This TV can receive digital over-the-air/digital cable signals ...L(MONO) R 1 VIDEO COMPONENT IN L AUDIO R L R SPEAKER OUT /DVI IN REMO CONTRO Supported Resolutions Signal Component 480i Yes 480p Yes 720p Yes 1080i Yes 1080p Yes HDMI No Yes Yes Yes Yes 20 Y, CB/PB, CR/PR Resolution Horizontal Vertical Frequency(KHz) Frequency(Hz) 720x480i 720x480p 1280x720p 1920x1080i 1920x1080p 15.73 15...
Owners Manual
Page 21
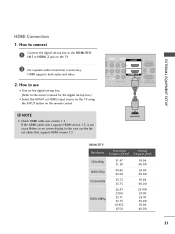
...top box to the owner's manual for the digital set -top box. (Refer to the HDMI/DVI I Select the HDMI1 or HDMI2 input source on the TV using the INPUT button on the TV. 2 No separate audio connection is necessary. If the HDMI cables don't support HDMI version 1.3, it can cause ... R 1 DEO ONENT IN L AUDIO R L R SPEAKER OUT RGB IN (PC) AUDIO IN O /DVI IN (RGB/DVI) REMOTE RS-232C IN CONTROL IN (CONTROL&SERVICE) 1 HDMI OUTPUT HDMI-DTV Resolution Horizontal Vertical Frequency(KHz) Frequency(Hz) 720x480p 1280x720p 1920x1080i 1920x1080p 31.47 31.50 44.96 45.00 33.72 33.75 26...
...top box to the owner's manual for the digital set -top box. (Refer to the HDMI/DVI I Select the HDMI1 or HDMI2 input source on the TV using the INPUT button on the TV. 2 No separate audio connection is necessary. If the HDMI cables don't support HDMI version 1.3, it can cause ... R 1 DEO ONENT IN L AUDIO R L R SPEAKER OUT RGB IN (PC) AUDIO IN O /DVI IN (RGB/DVI) REMOTE RS-232C IN CONTROL IN (CONTROL&SERVICE) 1 HDMI OUTPUT HDMI-DTV Resolution Horizontal Vertical Frequency(KHz) Frequency(Hz) 720x480p 1280x720p 1920x1080i 1920x1080p 31.47 31.50 44.96 45.00 33.72 33.75 26...
Owners Manual
Page 22
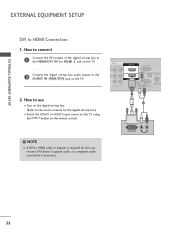
...top box audio output to the AUDIO IN (RGB/DVI) jack on the digital set-top box. (Refer to HDMI cable or adapter is necessary. NOTE G A DVI to the owner's manual for this connection. EXTERNAL EQUIPMENT SETUP EXTERNAL EQUIPMENT SETUP DVI to use I Turn on the TV. 2. How to... HDMI Connection 1. AV IN 1 O AUDIO 2 L(MONO) R 1 L AUDIO R L R SPEAKER OUT RGB IN (PC) AUDIO IN /DVI IN (RGB/DVI) OPTICAL ...
...top box audio output to the AUDIO IN (RGB/DVI) jack on the digital set-top box. (Refer to HDMI cable or adapter is necessary. NOTE G A DVI to the owner's manual for this connection. EXTERNAL EQUIPMENT SETUP EXTERNAL EQUIPMENT SETUP DVI to use I Turn on the TV. 2. How to... HDMI Connection 1. AV IN 1 O AUDIO 2 L(MONO) R 1 L AUDIO R L R SPEAKER OUT RGB IN (PC) AUDIO IN /DVI IN (RGB/DVI) OPTICAL ...

Owners Manual
Page 23
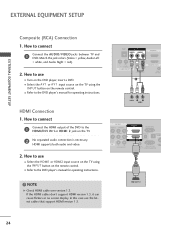
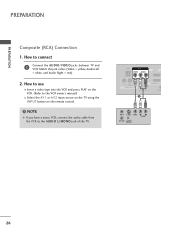
.... 2. How to the COMPONENT IN VIDEO jacks on the DVD player, insert a DVD. EXTERNAL EQUIPMENT SETUP DVD SETUP Component Connection 1. I Refer to the DVD player's manual for operating instructions. How to connect 1 Connect the video outputs (Y, PB, PR) of the DVD to the component input ports as shown below. I Select the...
.... 2. How to the COMPONENT IN VIDEO jacks on the DVD player, insert a DVD. EXTERNAL EQUIPMENT SETUP DVD SETUP Component Connection 1. I Refer to the DVD player's manual for operating instructions. How to connect 1 Connect the video outputs (Y, PB, PR) of the DVD to the component input ports as shown below. I Select the...
Owners Manual
Page 24
... jack colors (Video = yellow, Audio Left = white, and Audio Right = red). 2. How to use I Refer to use the latest cables that support HDMI version 1.3. How to the DVD player's manual for operating instructions. In this case use I Turn on the TV. 2 No separated audio connection is necessary. EXTERNAL EQUIPMENT SETUP EXTERNAL EQUIPMENT...
... jack colors (Video = yellow, Audio Left = white, and Audio Right = red). 2. How to use I Refer to use the latest cables that support HDMI version 1.3. How to the DVD player's manual for operating instructions. In this case use I Turn on the TV. 2 No separated audio connection is necessary. EXTERNAL EQUIPMENT SETUP EXTERNAL EQUIPMENT...
Owners Manual
Page 25
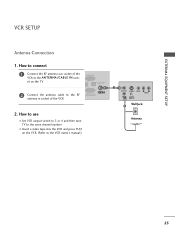
... the VCR and press PLAY on the TV. 2 Connect the antenna cable to the VCR owner's manual.) 1 ANT OUT S-VIDEO VIDEO L R AUDIO ANT IN OUTPUT SWITCH Wall Jack 2 Antenna 25 How to connect 1 Connect the RF antenna out socket of the VCR to the ANTENNA/CABLE IN socket on the VCR. (Refer... to the RF antenna in socket of the VCR. RGB IN (PC) DIO IN GB/DVI) OPTICAL DIGITAL AUDIO...
... the VCR and press PLAY on the TV. 2 Connect the antenna cable to the VCR owner's manual.) 1 ANT OUT S-VIDEO VIDEO L R AUDIO ANT IN OUTPUT SWITCH Wall Jack 2 Antenna 25 How to connect 1 Connect the RF antenna out socket of the VCR to the ANTENNA/CABLE IN socket on the VCR. (Refer... to the RF antenna in socket of the VCR. RGB IN (PC) DIO IN GB/DVI) OPTICAL DIGITAL AUDIO...
Owners Manual
Page 26
..., and Audio Right = red). 2. How to use I Insert a video tape into the VCR and press PLAY on the remote control. ! How to the VCR owner's manual.) I Select the A V 1 or A V 2 input source on the TV using the INPUT button on the VCR. (Refer to connect 1 Connect the AUDIO/VIDEO jacks between TV...
..., and Audio Right = red). 2. How to use I Insert a video tape into the VCR and press PLAY on the remote control. ! How to the VCR owner's manual.) I Select the A V 1 or A V 2 input source on the TV using the INPUT button on the VCR. (Refer to connect 1 Connect the AUDIO/VIDEO jacks between TV...
Owners Manual
Page 29
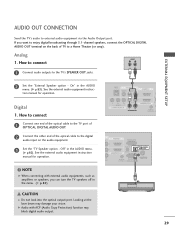
... of the optical cable to the TV's SPEAKER OUT jacks. 2 Set the "External Speaker option - Digital 1. tion manual for operation. ! Analog AUDIO 1. See the external audio equipment instruc- See the external audio equipment instruction manual for operation. Off " in the AUDIO menu. (G p.82). EXTERNAL EQUIPMENT SETUP AUDIO OUT CONNECTION Send the TV...
... of the optical cable to the TV's SPEAKER OUT jacks. 2 Set the "External Speaker option - Digital 1. tion manual for operation. ! Analog AUDIO 1. See the external audio equipment instruc- See the external audio equipment instruction manual for operation. Off " in the AUDIO menu. (G p.82). EXTERNAL EQUIPMENT SETUP AUDIO OUT CONNECTION Send the TV...

Owners Manual
Page 33
... Configure Automatically adjusts picture position and minimizes image instability. Select Screen (RGB-PC). After adjustment, if the image is still not correct, try using the manual settings or a different resolution or refresh rate on the PC.
... Configure Automatically adjusts picture position and minimizes image instability. Select Screen (RGB-PC). After adjustment, if the image is still not correct, try using the manual settings or a different resolution or refresh rate on the PC.

Owners Manual
Page 34
I S i z e: This function is not clear after auto adjustment and especially if characters are still trembling, adjust the picture phase manually. I Position: This function is to adjust picture to left/right and up/down as you to remove any vertical bars or stripes visible on the ...
I S i z e: This function is not clear after auto adjustment and especially if characters are still trembling, adjust the picture phase manually. I Position: This function is to adjust picture to left/right and up/down as you to remove any vertical bars or stripes visible on the ...
Owners Manual
Page 39
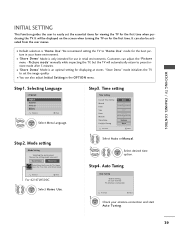
It will automatically return to set the essential items for viewing the TV for the first time. Picture mode" manually while inspecting the TV, but the TV will be displayed on the screen when turning the TV on for the first time when purchasing the ... Time Setting Month Date Year Hour Minute Time Zone Daylight Saving F Auto G 02 21 2009 10 AM 10 Eastern Auto Previous Next 1 Select A ut o or Manual. 2 ENTER Select desired time option. Customers can also be sure that the TV antenna is only intended for displaying at home. I Default selection is an...
It will automatically return to set the essential items for viewing the TV for the first time. Picture mode" manually while inspecting the TV, but the TV will be displayed on the screen when turning the TV on for the first time when purchasing the ... Time Setting Month Date Year Hour Minute Time Zone Daylight Saving F Auto G 02 21 2009 10 AM 10 Eastern Auto Previous Next 1 Select A ut o or Manual. 2 ENTER Select desired time option. Customers can also be sure that the TV antenna is only intended for displaying at home. I Default selection is an...
Owners Manual
Page 40
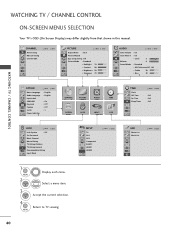
Select a menu item. 3 ENTER Accept the current selection. 4 MENU Return to TV viewing. 40 CHANNEL Auto Tuning Manual Tuning Channel Edit Move Enter PICTURE Move Enter Aspect Ratio : 16:9 Picture Wizard Energy Saving : Off Picture Mode : Standard • Backlight 70 • Contrast 90 • Brightness 50 • Sharpness 70 E AUDIO Move Enter Auto... TV / CHANNEL CONTROL WATCHING TV / CHANNEL CONTROL ON-SCREEN MENUS SELECTION Your TV's OSD (On Screen Display) may differ slightly from that shown in this manual.
Select a menu item. 3 ENTER Accept the current selection. 4 MENU Return to TV viewing. 40 CHANNEL Auto Tuning Manual Tuning Channel Edit Move Enter PICTURE Move Enter Aspect Ratio : 16:9 Picture Wizard Energy Saving : Off Picture Mode : Standard • Backlight 70 • Contrast 90 • Brightness 50 • Sharpness 70 E AUDIO Move Enter Auto... TV / CHANNEL CONTROL WATCHING TV / CHANNEL CONTROL ON-SCREEN MENUS SELECTION Your TV's OSD (On Screen Display) may differ slightly from that shown in this manual.
Owners Manual
Page 41
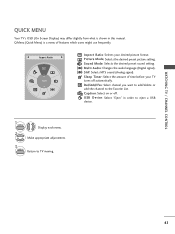
F Aspect Ratio G A 16:9 Aspect Ratio: Selects your TV turns off . A Caption: Select on or off automatically. USB Device: Select "Eject" in this manual. Sound Mode: Selects the desired preset sound setting. Sleep Timer: Select the amount of features which users might use frequently. Del/Add/Fav: Select channel ...
F Aspect Ratio G A 16:9 Aspect Ratio: Selects your TV turns off . A Caption: Select on or off automatically. USB Device: Select "Eject" in this manual. Sound Mode: Selects the desired preset sound setting. Sleep Timer: Select the amount of features which users might use frequently. Del/Add/Fav: Select channel ...


