
Owners Manual
Page 2
...wanitheinqutihlaeterparlodturciat'nsglee,ncilsosiunrteendtheadt tmoaaylebrte thoef suusffei-r to cient magnitude to constitute a risk of the FCC Rules. NOTE TO CABLE/TV INSTALLER: This reminder is no guarantee that interference will not occur in accordance with the limits for this equipment does cause...harmful interference in any way without written authorization from that the cable ground shall be determined by turning the equipment off and on a circuit different from LG Electronics Corporation. However, there is provided to call the CATV system installer's attention to operate...
...wanitheinqutihlaeterparlodturciat'nsglee,ncilsosiunrteendtheadt tmoaaylebrte thoef suusffei-r to cient magnitude to constitute a risk of the FCC Rules. NOTE TO CABLE/TV INSTALLER: This reminder is no guarantee that interference will not occur in accordance with the limits for this equipment does cause...harmful interference in any way without written authorization from that the cable ground shall be determined by turning the equipment off and on a circuit different from LG Electronics Corporation. However, there is provided to call the CATV system installer's attention to operate...

Owners Manual
Page 5
... liquid has been spilled or objects have the cord replaced with the appa- Avoid touching the LCD screen or holding your finger(s) against it for long periods of time. Doing so may produce...has been dropped. \ J S Note -x - Some minute dot defects may be certain. If the TV feels cold to avoid injury from physical or mechanical abuse, such as tiny red, green, or blue spots...over. (9 $3125A 13. that appliance and has no adverse effect on . When a cart is turned on the monitor's performance. - Any of the appliance, and have fallen into the apparatus, the apparatus...
... liquid has been spilled or objects have the cord replaced with the appa- Avoid touching the LCD screen or holding your finger(s) against it for long periods of time. Doing so may produce...has been dropped. \ J S Note -x - Some minute dot defects may be certain. If the TV feels cold to avoid injury from physical or mechanical abuse, such as tiny red, green, or blue spots...over. (9 $3125A 13. that appliance and has no adverse effect on . When a cart is turned on the monitor's performance. - Any of the appliance, and have fallen into the apparatus, the apparatus...
Owners Manual
Page 6
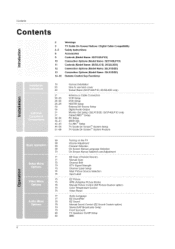
... 31 32-35 36-41 42-43 44-50 51-68 Various Installation How to use back cover Swivel Stand (32/37/42LP1 D, 26/32LX2D only) Antenna or Cable Connection VCR Setup DVD Setup HDSTB Setup External AV Source Setup Digital Audio Output Monitor Out Setup (32LXl D/2D..., 32/37/42LP1D CableCARD TM Setup PC Setup IEEE1394 G-LINK TM Setup TV Guide On Screen TM System Setup TV Guide On Screen TM System Feature only) 69 Turning on the TV 69 Volume Adjustment 69 Channel Selection iiii__!ii!iiii!i__i__i__iii__iiiii__!iiiii!iiii_6_9__ii_____!iiiii_O_niiiiS_c_r_e_ei!n!i!!iMiii!ei!niiuii_s__L!...
... 31 32-35 36-41 42-43 44-50 51-68 Various Installation How to use back cover Swivel Stand (32/37/42LP1 D, 26/32LX2D only) Antenna or Cable Connection VCR Setup DVD Setup HDSTB Setup External AV Source Setup Digital Audio Output Monitor Out Setup (32LXl D/2D..., 32/37/42LP1D CableCARD TM Setup PC Setup IEEE1394 G-LINK TM Setup TV Guide On Screen TM System Setup TV Guide On Screen TM System Feature only) 69 Turning on the TV 69 Volume Adjustment 69 Channel Selection iiii__!ii!iiii!i__i__i__iii__iiiii__!iiiii!iiii_6_9__ii_____!iiiii_O_niiiiS_c_r_e_ei!n!i!!iMiii!ei!niiuii_s__L!...

Owners Manual
Page 14
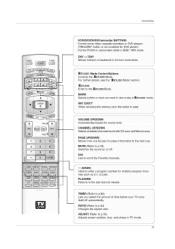
... displays on or Rotates the input mode between Antenna and Cable. Introduction Remote Co ntrol Key Fu nction s POWl Turns your TV or any menu. -- Enters or exits a pane I mode. \ J 14 input s0urces, screen returns to operate the DVHS, MicroMV Camcorder and DSTB. Brings UP ...d adjust the ---_ system settings to y0urpreference. / Clears all on-screen displays and returns to the screen. O, J MENU Brings up the main menu to TV viewing from any other programmed equipment on top of the screen. Not available in Component ! _2, RGB and HDM!/DV I Menu in regular sequence; In...
... displays on or Rotates the input mode between Antenna and Cable. Introduction Remote Co ntrol Key Fu nction s POWl Turns your TV or any menu. -- Enters or exits a pane I mode. \ J 14 input s0urces, screen returns to operate the DVHS, MicroMV Camcorder and DSTB. Brings UP ...d adjust the ---_ system settings to y0urpreference. / Clears all on-screen displays and returns to the screen. O, J MENU Brings up the main menu to TV viewing from any other programmed equipment on top of the screen. Not available in Component ! _2, RGB and HDM!/DV I Menu in regular sequence; In...
Owners Manual
Page 15
... rernoving the memory card, this button is not available for multiPle program nels such aS 2-!! 2-2,etc . Moves from one full set of time before your TV turns itself off . Lets you want to p.18) Sw tches the sound on or off automatically. Moves forward or backward in PC mode. _ J 15 Introduction f -x VCR...
... rernoving the memory card, this button is not available for multiPle program nels such aS 2-!! 2-2,etc . Moves from one full set of time before your TV turns itself off . Lets you want to p.18) Sw tches the sound on or off automatically. Moves forward or backward in PC mode. _ J 15 Introduction f -x VCR...

Owners Manual
Page 18
PAGE EZ Mute: A special mute mode to the picture below) Mute: Sound is muted. Mute Off: Sound is enab ed. Note: EZ Mute does not operate in turn. (Refer to activate the closed caption automatically. Introduction TV/ViDEO EZ Mute -When you repeatedly press the MUTE button, the sound _node is changed in Component/RGB/HDMI/DVI modes. 18
PAGE EZ Mute: A special mute mode to the picture below) Mute: Sound is muted. Mute Off: Sound is enab ed. Note: EZ Mute does not operate in turn. (Refer to activate the closed caption automatically. Introduction TV/ViDEO EZ Mute -When you repeatedly press the MUTE button, the sound _node is changed in Component/RGB/HDMI/DVI modes. 18

Owners Manual
Page 21
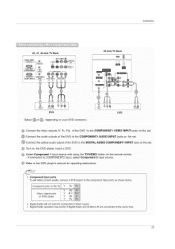
VHF Antenna _S UHFAntenna _ [ Turn clockwise to tighte_ Outdoor Antenna ,_ 7 J / J Bronze Wire Single-family Dwellings/Houses tCo_ qect to wall jack for outdoor antenna, Be careful not to be split for two TV's, install a "2-Way Signal Splitter" in the connections. • If the antenna is not installed properly, contact your dealer for assistance... socket) Wall AntennRaF SCoocakxeiatl Wire (75 ohm) ......... Ext e r na I Eq u ip m e nt Co n ne c t io ns NOTE: All cables shown are not included with the TV Installation -
VHF Antenna _S UHFAntenna _ [ Turn clockwise to tighte_ Outdoor Antenna ,_ 7 J / J Bronze Wire Single-family Dwellings/Houses tCo_ qect to wall jack for outdoor antenna, Be careful not to be split for two TV's, install a "2-Way Signal Splitter" in the connections. • If the antenna is not installed properly, contact your dealer for assistance... socket) Wall AntennRaF SCoocakxeiatl Wire (75 ohm) ......... Ext e r na I Eq u ip m e nt Co n ne c t io ns NOTE: All cables shown are not included with the TV Installation -

Owners Manual
Page 24
... jacks on the set . _S_ Installation 32, 37, 42 inch TV Back S-VIDEO 26 inch TV Back [] CCJ • mC [] DVD S.VlOEO IR_aUOlO I[ DVD... Connect the S-VIDEO output of the DVD to the S-VIDEO inout on the set Connect the audio outputs of the DV D to the HDMI jack on the set . select Video 2 input source Refer to the DVD player's manual for operating instructions. 26... inch TV Back i @ Connect the HDMI output of the DVD to IN2 (or VIDEO2). Select...
... jacks on the set . _S_ Installation 32, 37, 42 inch TV Back S-VIDEO 26 inch TV Back [] CCJ • mC [] DVD S.VlOEO IR_aUOlO I[ DVD... Connect the S-VIDEO output of the DVD to the S-VIDEO inout on the set Connect the audio outputs of the DV D to the HDMI jack on the set . select Video 2 input source Refer to the DVD player's manual for operating instructions. 26... inch TV Back i @ Connect the HDMI output of the DVD to IN2 (or VIDEO2). Select...
Owners Manual
Page 25
... time. 25 Select Component I input source with using the TV/VlDEO button on your DVD connector. COMPONENT1 -- @0@0@ ,uo,o,N Ut 26 inch TV Back J LJ [] DVD Select or , depending on the remote control. - Installation 32,37.42inch TV Back S-VIDE0 MONITOR -- Component ports on the set . ...DVD to the COMPONENT1 AUDIO INPUT jacks on the TV • Digital Audio will not work for operating instructions. • Component Input ports To get better picture quality, connect a DVD player to COMPONENT2 input, select Component 2 input source. Turn on the DVD player, insert a DVD.
... time. 25 Select Component I input source with using the TV/VlDEO button on your DVD connector. COMPONENT1 -- @0@0@ ,uo,o,N Ut 26 inch TV Back J LJ [] DVD Select or , depending on the remote control. - Installation 32,37.42inch TV Back S-VIDE0 MONITOR -- Component ports on the set . ...DVD to the COMPONENT1 AUDIO INPUT jacks on the TV • Digital Audio will not work for operating instructions. • Component Input ports To get better picture quality, connect a DVD player to COMPONENT2 input, select Component 2 input source. Turn on the DVD player, insert a DVD.

Owners Manual
Page 26
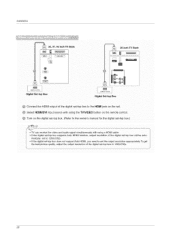
... Digital signals from a digital set-top box or other digital external device, refer to the figure as shown below. 32,37,42 inch TV Back AC IN Q 26 inch TV Back AD IN o Q /RI AUDIO ILl RGB-DTV OUPUT Digital Set-top Box _R_AUDIO _L RGB-DTV OUPUI Digital Set-top Box Connect... set -top box. Connect the audio outputs of the digital set-top box to the RGB INPUT (PC/DTV INPUT) jack on the set . This TV can receive Digital Over-the-air/Cable signals without an external digital set -top box._ Select RGB-DTV input source with using the...
... Digital signals from a digital set-top box or other digital external device, refer to the figure as shown below. 32,37,42 inch TV Back AC IN Q 26 inch TV Back AD IN o Q /RI AUDIO ILl RGB-DTV OUPUT Digital Set-top Box _R_AUDIO _L RGB-DTV OUPUI Digital Set-top Box Connect... set -top box. Connect the audio outputs of the digital set-top box to the RGB INPUT (PC/DTV INPUT) jack on the set . This TV can receive Digital Over-the-air/Cable signals without an external digital set -top box._ Select RGB-DTV input source with using the...

Owners Manual
Page 27
...set-top box to the owner's manual for the digital set-top box.) Select Component I input source with using the TV/VIDEO button on the remote control. - Turn on the set. If connected to the COMPONENT1 VIDEO INPUT jacks on the digital set-top box. [Refer to the ... the audio output of the digital set-top box to COMPONENT2 input, select Component 2 input source. Installation 32, 37, 42 inch TV Back o_uDJoe_,0 [] @ _ COOPONENT,__ _ AUDIO INPUT VIDEO INPUT 26 inch TV Back [] w [] •_p .... @@ tR_ AUDIO _L_ _@ PE Digital Set-top Box ........ _ _ po mAU_O,L Digital Set-top ...
...set-top box to the owner's manual for the digital set-top box.) Select Component I input source with using the TV/VIDEO button on the remote control. - Turn on the set. If connected to the COMPONENT1 VIDEO INPUT jacks on the digital set-top box. [Refer to the ... the audio output of the digital set-top box to COMPONENT2 input, select Component 2 input source. Installation 32, 37, 42 inch TV Back o_uDJoe_,0 [] @ _ COOPONENT,__ _ AUDIO INPUT VIDEO INPUT 26 inch TV Back [] w [] •_p .... @@ tR_ AUDIO _L_ _@ PE Digital Set-top Box ........ _ _ po mAU_O,L Digital Set-top ...
Owners Manual
Page 28
you need to the HDMI jack on the set. Installation 32, 37, 42 inch TV Back HDM/ @ @ 26 inch TV Back D _ , m_ D [] 7=6 HDMI DTVOUPUT Digital Set-top Box _DMI DTVOUPUl Digital Set-top Box Connect the HDMI output of the digital set-top box to ... function, output resolution of the digital set-top box to 1280x720p. • If the digital set -top box.) • TV can receive the video and audio signal simultaneously with using the TV/VIDEO button on the digital set-top box. (Refer to the owner's manual for the digital set -top box does...
you need to the HDMI jack on the set. Installation 32, 37, 42 inch TV Back HDM/ @ @ 26 inch TV Back D _ , m_ D [] 7=6 HDMI DTVOUPUT Digital Set-top Box _DMI DTVOUPUl Digital Set-top Box Connect the HDMI output of the digital set-top box to ... function, output resolution of the digital set-top box to 1280x720p. • If the digital set -top box.) • TV can receive the video and audio signal simultaneously with using the TV/VIDEO button on the digital set-top box. (Refer to the owner's manual for the digital set -top box does...

Owners Manual
Page 29
...box supports Auto DVI function, the output resolution of the digital set-top box to the DIGITAL AUDIO DVl INPUT jack on the set . Turn on the a gital set-top box. (Refer to the owner's manual for the digital set-top box.) Select HDMI/DVI input source with... the set the output resolution appropriately. Connect the audio output of the digital set -top box connector. Installation 32, 37, 42 inch TV Back HD_I IEEE WOEO mPUT ..... 26 inch TV Back m ml O OO ° [] m [] . @@ mAUDJO4L_ _G_TA_AUDIO OPTICAL D_-DWOUTPUT Digital Set-top Box @ Digital Set-top Box Select _z_or ,...
...box supports Auto DVI function, the output resolution of the digital set-top box to the DIGITAL AUDIO DVl INPUT jack on the set . Turn on the a gital set-top box. (Refer to the owner's manual for the digital set-top box.) Select HDMI/DVI input source with... the set the output resolution appropriately. Connect the audio output of the digital set -top box connector. Installation 32, 37, 42 inch TV Back HD_I IEEE WOEO mPUT ..... 26 inch TV Back m ml O OO ° [] m [] . @@ mAUDJO4L_ _G_TA_AUDIO OPTICAL D_-DWOUTPUT Digital Set-top Box @ Digital Set-top Box Select _z_or ,...
Owners Manual
Page 30
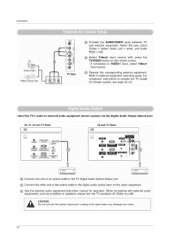
When connecting with external audio equipments, such as amulifiers or speakers, please turn the TV speakers off. (Refer to the digital audio optical input on the audio equipment. cI oo_ o OOEE31 Connect the other end of an optical cable to ... connection Operate the correspo.nding externa.l equipment " Refer to the TV Digital Audio Optical Output port. For instructions to external audio equipment (stereo system) via the Digital Audio Output Optical port. 32.37.42inch TV Back 26 inch TV Back [- Send the TV's audio to operate the -IV Guide On Screen system, see page 42_43...
When connecting with external audio equipments, such as amulifiers or speakers, please turn the TV speakers off. (Refer to the digital audio optical input on the audio equipment. cI oo_ o OOEE31 Connect the other end of an optical cable to ... connection Operate the correspo.nding externa.l equipment " Refer to the TV Digital Audio Optical Output port. For instructions to external audio equipment (stereo system) via the Digital Audio Output Optical port. 32.37.42inch TV Back 26 inch TV Back [- Send the TV's audio to operate the -IV Guide On Screen system, see page 42_43...

Owners Manual
Page 32
Turn on the remote control. 32 Select RGB-PC input source with using the TV/VlDEO button on the PC and the set. Installation - AC IN = H _m [] 1_el = _¢J AUDIO RGB-PC OUPUT PC AUDIO RGB-PC OUPUI Connect the RGB output of the PC to the RGB INPUT (PClDTV INPUT) jack on the set . Connect the PC audio output to the TV's settings. 32,37,42 inch TV Back AC IN ° 26 inch TV Back .....? This TV provides Plug and Play capability, meaning that the PC adjusts automatically to the PC AUDIO INPUT jack on the set .
Turn on the remote control. 32 Select RGB-PC input source with using the TV/VlDEO button on the PC and the set. Installation - AC IN = H _m [] 1_el = _¢J AUDIO RGB-PC OUPUT PC AUDIO RGB-PC OUPUI Connect the RGB output of the PC to the RGB INPUT (PClDTV INPUT) jack on the set . Connect the PC audio output to the TV's settings. 32,37,42 inch TV Back AC IN ° 26 inch TV Back .....? This TV provides Plug and Play capability, meaning that the PC adjusts automatically to the PC AUDIO INPUT jack on the set .

Owners Manual
Page 33
you need to set . Turn on the set . Connect the PC audio output to the PC AUDIO INPUT jack on the PC and the set . To get the best picture ... does not support Auto DVI. Select HDMI/DVI input source with using the TVNIDEO button on the set the output resolution appropriately. 32,37, 42inch TV Back Installation 26 inch TV Back [] m • Connect the DVI output of PC graphics card's output resolution to 1024x768.60Hz. 33
you need to set . Turn on the set . Connect the PC audio output to the PC AUDIO INPUT jack on the PC and the set . To get the best picture ... does not support Auto DVI. Select HDMI/DVI input source with using the TVNIDEO button on the set the output resolution appropriately. 32,37, 42inch TV Back Installation 26 inch TV Back [] m • Connect the DVI output of PC graphics card's output resolution to 1024x768.60Hz. 33

Owners Manual
Page 44
... 1. Press ENTER button to begin Setup. 44 by pressing the TV GUIDE button - The Welcome Screen highlights features of the TV Guide On Screen system. The TV Guide On Screen system uses Setup information to provide you have a VCR connected, turn it back On To make a selection, use the • .../ • button to download. Turn OFF your area--which Cable system's program...
... 1. Press ENTER button to begin Setup. 44 by pressing the TV GUIDE button - The Welcome Screen highlights features of the TV Guide On Screen system. The TV Guide On Screen system uses Setup information to provide you have a VCR connected, turn it back On To make a selection, use the • .../ • button to download. Turn OFF your area--which Cable system's program...

Owners Manual
Page 53
...a show currently airing • Set a show to Remind • Set a show to turn off your remote or on the front panel of the program listings was not provided to TV Guide On Screen 2.The transmission of your TV. - Please remember to Record • Lock and unlock the Video Window • Access ...Listings is always the first Service displayed in order to move the highlight within the next 24 hours. 4. Access Listings by pressing the TV Guide button on your TV when not in use in the Guide. - Use the •/T/_1/1_ Listings to: button to receive program listings. 53 With ...
...a show currently airing • Set a show to Remind • Set a show to turn off your remote or on the front panel of the program listings was not provided to TV Guide On Screen 2.The transmission of your TV. - Please remember to Record • Lock and unlock the Video Window • Access ...Listings is always the first Service displayed in order to move the highlight within the next 24 hours. 4. Access Listings by pressing the TV Guide button on your TV when not in use in the Guide. - Use the •/T/_1/1_ Listings to: button to receive program listings. 53 With ...

Owners Manual
Page 69
...receive fu!l iistings data. • When the "I'V is turned On, the TV Guide Qn screen system is out. 3. Operation Basic oDeration 1. In standby mode to turn TV on, press the ON/OFF, TV/VIDEO, CH • / • button on the TV or press the POWER, TV INPUT, TV/VIDEO, CH • / •, Number (0 -...• or NUMBER buttons to standby mode. 1. You can be away Onvacationl disconnect the power plug from the wall power Outlet. • After turning 0nthe TV, it was unp!ugged and then powered On. - Select the viewing source by pressing the MUTE or VOL • / • button. ...
...receive fu!l iistings data. • When the "I'V is turned On, the TV Guide Qn screen system is out. 3. Operation Basic oDeration 1. In standby mode to turn TV on, press the ON/OFF, TV/VIDEO, CH • / • button on the TV or press the POWER, TV INPUT, TV/VIDEO, CH • / •, Number (0 -...• or NUMBER buttons to standby mode. 1. You can be away Onvacationl disconnect the power plug from the wall power Outlet. • After turning 0nthe TV, it was unp!ugged and then powered On. - Select the viewing source by pressing the MUTE or VOL • / • button. ...

Owners Manual
Page 71
...is required to gain access to begin the channel search. When inserting the CableCARd _, CATV, CADTV is turned on the channel list. - cal channel number, which is different from normal channel number showed in TV Guide On Screen system Setup, cable channels (CATV or CADTV) will net be scanned by EZ Scan...the I_ button and then use • / • button to select Manual Scan. 3 Press the I_ button and then use • / • button to select TV, DTV, CATV, and CADTV. 4 Press the I_ button and then use • / • button to select EZ Scan. 3 Press the ENTER button to Manual ...
...is required to gain access to begin the channel search. When inserting the CableCARd _, CATV, CADTV is turned on the channel list. - cal channel number, which is different from normal channel number showed in TV Guide On Screen system Setup, cable channels (CATV or CADTV) will net be scanned by EZ Scan...the I_ button and then use • / • button to select Manual Scan. 3 Press the I_ button and then use • / • button to select TV, DTV, CATV, and CADTV. 4 Press the I_ button and then use • / • button to select EZ Scan. 3 Press the ENTER button to Manual ...


