Specification (English)
Page 2
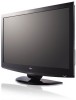
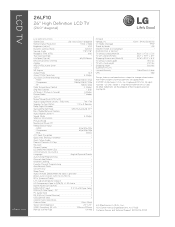
...8226; Favorite Channel Programming • Auto/Manual Clock • On/Off Timer • Sleep Timer • Auto Off/Auto Sleep (When no video is a registered trademark of their respective owners. 05/26/09 LG Electronics U.S.A., Inc. 1000 Sylvan Avenue Englewood ...• Audio Output Power (Watts - All rights reserved. HDMI 1080p/1080i/720p - Component 60p/30p/24p - HDMI 60p/30p/24p - LCD TV 26LF10 26" High Definition LCD TV (26.0" diagonal) LGusa.com LCD SPECIFICATION Screen Size 26" Class (26.0" diagonal) Native Display Resolution 1366 ...
...8226; Favorite Channel Programming • Auto/Manual Clock • On/Off Timer • Sleep Timer • Auto Off/Auto Sleep (When no video is a registered trademark of their respective owners. 05/26/09 LG Electronics U.S.A., Inc. 1000 Sylvan Avenue Englewood ...• Audio Output Power (Watts - All rights reserved. HDMI 1080p/1080i/720p - Component 60p/30p/24p - HDMI 60p/30p/24p - LCD TV 26LF10 26" High Definition LCD TV (26.0" diagonal) LGusa.com LCD SPECIFICATION Screen Size 26" Class (26.0" diagonal) Native Display Resolution 1366 ...

Owner's Manual (English)
Page 1
... User 1-888-865-3026 USA, Commercial User 1-888-542-2623 CANADA LG Customer Information Center P/NO : SAC30708022 (0907-REV08) www.lgusa.com / www.lg.ca / www.lgcommercial.com LCD TV OWNER'S MANUAL 19LG30 19LG31 22LG30 22LG31 22LG30DC 26LG30 26LG30DC 19LF10 19LF10C 22LF10 26LF10 Please read this is located on the back and one side of...
... User 1-888-865-3026 USA, Commercial User 1-888-542-2623 CANADA LG Customer Information Center P/NO : SAC30708022 (0907-REV08) www.lgusa.com / www.lg.ca / www.lgcommercial.com LCD TV OWNER'S MANUAL 19LG30 19LG31 22LG30 22LG31 22LG30DC 26LG30 26LG30DC 19LF10 19LF10C 22LF10 26LF10 Please read this is located on the back and one side of...
Owner's Manual (English)
Page 4
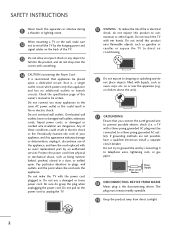
... or expose the TV to direct air conditioning. 16 Do not expose to rain, moisture or other liquids. SAFETY INSTRUCTIONS 11 Never touch this owner's manual to telephone wires, lightening rods, or gas pipes. Pay particular attention to the same AC power outlet as being twisted, kinked, pinched, closed in fire...
... or expose the TV to direct air conditioning. 16 Do not expose to rain, moisture or other liquids. SAFETY INSTRUCTIONS 11 Never touch this owner's manual to telephone wires, lightening rods, or gas pipes. Pay particular attention to the same AC power outlet as being twisted, kinked, pinched, closed in fire...
Owner's Manual (English)
Page 6
... Adjustment - Eye Care 57 Advanced Control - Picture Mode - Add / Delete Channel (Manual Tuning 46 - Black (Darkness) Level 56 Advanced Control - Real Cinema 58 Picture Reset 59 Power Indicator 60 SOUND & LANGUAGE CONTROL Auto Volume Leveler (Auto Volume ...
... Adjustment - Eye Care 57 Advanced Control - Picture Mode - Add / Delete Channel (Manual Tuning 46 - Black (Darkness) Level 56 Advanced Control - Real Cinema 58 Picture Reset 59 Power Indicator 60 SOUND & LANGUAGE CONTROL Auto Volume Leveler (Auto Volume ...

Owner's Manual (English)
Page 7
Auto Clock Setup 73 Manual Clock Setup 74 Auto On/Off Time Setting 75 Sleep Timer Setting 76 Auto Shut-off Setting 77 PARENTAL CONTROL / RATINGS Set Password & Lock System 78 Channel Blocking 81 Movie & TV Rating 82 Downloadable Rating 87 External Input Blocking 88 Key Lock 89 APPENDIX Troubleshooting 90 Maintenance 92 Product Specifications 93 External Control Through RS-232C 94 Open Source License 100 5 TIME SETTING Clock Setting -
Auto Clock Setup 73 Manual Clock Setup 74 Auto On/Off Time Setting 75 Sleep Timer Setting 76 Auto Shut-off Setting 77 PARENTAL CONTROL / RATINGS Set Password & Lock System 78 Channel Blocking 81 Movie & TV Rating 82 Downloadable Rating 87 External Input Blocking 88 Key Lock 89 APPENDIX Troubleshooting 90 Maintenance 92 Product Specifications 93 External Control Through RS-232C 94 Open Source License 100 5 TIME SETTING Clock Setting -

Owner's Manual (English)
Page 9
... removing Polishing Cloth stain. PICTURE TV SOUND POWER 1 4 2 SAP INPUT RATIO 7 5 3 - 8 6 0 9 VOL FAV FLASHBK Q.MENU CC MUTE MENU CH RETURN ENTER 1.5V 1.5V Owner's Manual CD Manual Remote Control, Batteries Power Cord Only 19/22LG3**, 19/22LF1** Cable Management Clip Only 26LG3**, 26LF1** Protection Cover x 4 x 4 Bolts for stand assembly Screw for all...
... removing Polishing Cloth stain. PICTURE TV SOUND POWER 1 4 2 SAP INPUT RATIO 7 5 3 - 8 6 0 9 VOL FAV FLASHBK Q.MENU CC MUTE MENU CH RETURN ENTER 1.5V 1.5V Owner's Manual CD Manual Remote Control, Batteries Power Cord Only 19/22LG3**, 19/22LF1** Cable Management Clip Only 26LG3**, 26LF1** Protection Cover x 4 x 4 Bolts for stand assembly Screw for all...
Owner's Manual (English)
Page 18
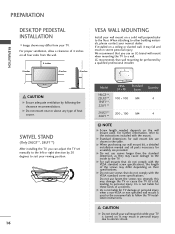
...inside to the TV. A B CAUTION G Ensure adequate ventilation by a qualified professional installer. G When purchasing our wall mount kit, a detailed installation manual and all four sides from your TV. G Do not use fasten the screws too strongly, this may result in the table. G For wall ... wall mount on a solid wall perpendicular to the floor. We recommend that do not comply with the VESA standard screw specifications. LG recommends that do not comply with the mount. For further information, refer to the instructions included with the VESA standard screw specifications,...
...inside to the TV. A B CAUTION G Ensure adequate ventilation by a qualified professional installer. G When purchasing our wall mount kit, a detailed installation manual and all four sides from your TV. G Do not use fasten the screws too strongly, this may result in the table. G For wall ... wall mount on a solid wall perpendicular to the floor. We recommend that do not comply with the VESA standard screw specifications. LG recommends that do not comply with the mount. For further information, refer to the instructions included with the VESA standard screw specifications,...
Owner's Manual (English)
Page 21
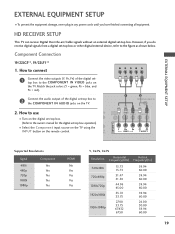
... remote control. operation) I Select the Component input source on the TV using the INPUT button on the digital set-top box. (Refer to the owner's manual for the digital set-top box. Component Connection 19/22LG3**, 19/22LF1** 1. Match the jack colors (Y = green, PB = blue, and PR = ...IN 2. IN AUDIO IN (RGB/DVI) AV IN S-VIDEO VIDEO AUDIO L(MONO) R COMPONENT IN L R IN VIDEO AUDIO NLY) Supported Resolutions Signal 480i 480p 720p 1080i 1080p Component Yes Yes Yes Yes Yes HDMI No Yes Yes Yes Yes Y, CB/PB, CR/PR Resolution Horizontal Vertical Frequency(KHz) Frequency(Hz...
... remote control. operation) I Select the Component input source on the TV using the INPUT button on the digital set-top box. (Refer to the owner's manual for the digital set-top box. Component Connection 19/22LG3**, 19/22LF1** 1. Match the jack colors (Y = green, PB = blue, and PR = ...IN 2. IN AUDIO IN (RGB/DVI) AV IN S-VIDEO VIDEO AUDIO L(MONO) R COMPONENT IN L R IN VIDEO AUDIO NLY) Supported Resolutions Signal 480i 480p 720p 1080i 1080p Component Yes Yes Yes Yes Yes HDMI No Yes Yes Yes Yes Y, CB/PB, CR/PR Resolution Horizontal Vertical Frequency(KHz) Frequency(Hz...

Owner's Manual (English)
Page 22
...AUDIO COMPONENT IN S- I Select the Component 1 input source on the TV using the INPUT button on the digital set-top box. (Refer to the owner's manual for the digital set -top box to connect Y PB PR L R 1 Connect the video outputs (Y, PB, PR) of the digital set -top box.... Supported Resolutions Y, CB/PB, CR/PR Signal 480i 480p 720p 1080i 1080p Component Yes Yes Yes Yes Yes HDMI No Yes Yes Yes Yes Resolution Horizontal Vertical Frequency(KHz) Frequency(Hz) 720x480i 720x480p 1280x720p 1920x1080i...
...AUDIO COMPONENT IN S- I Select the Component 1 input source on the TV using the INPUT button on the digital set-top box. (Refer to the owner's manual for the digital set -top box to connect Y PB PR L R 1 Connect the video outputs (Y, PB, PR) of the digital set -top box.... Supported Resolutions Y, CB/PB, CR/PR Signal 480i 480p 720p 1080i 1080p Component Yes Yes Yes Yes Yes HDMI No Yes Yes Yes Yes Resolution Horizontal Vertical Frequency(KHz) Frequency(Hz) 720x480i 720x480p 1280x720p 1920x1080i...
Owner's Manual (English)
Page 23
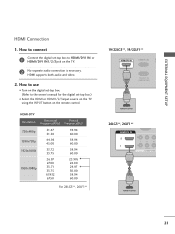
...** HDMI/DVI IN 2 1 2 Y 1 PB PR VIDEO COMPONE 1 HDMI-DTV OUTPUT 21 How to use I Turn on the digital set-top box. (Refer to the owner's manual for the digital set -top box to connect 1 Connect the digital set -top box.) I Select the HDMI or HDMI1/2/3input source on the TV using...
...** HDMI/DVI IN 2 1 2 Y 1 PB PR VIDEO COMPONE 1 HDMI-DTV OUTPUT 21 How to use I Turn on the digital set-top box. (Refer to the owner's manual for the digital set -top box to connect 1 Connect the digital set -top box.) I Select the HDMI or HDMI1/2/3input source on the TV using...
Owner's Manual (English)
Page 24
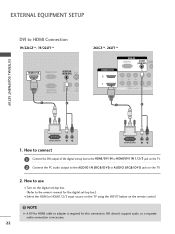
... TV. 2 Connect the PC audio output to the AUDIO IN (RGB/DVI) or AUDIO (RGB/DVI) jack on the remote control. ! How to the owner's manual for this connection. How to connect DVI-DTV OUTPUT L R 1 Connect the DVI output of the digital set -top box.) I Turn on the digital set-top...
... TV. 2 Connect the PC audio output to the AUDIO IN (RGB/DVI) or AUDIO (RGB/DVI) jack on the remote control. ! How to the owner's manual for this connection. How to connect DVI-DTV OUTPUT L R 1 Connect the DVI output of the digital set -top box.) I Turn on the digital set-top...

Owner's Manual (English)
Page 25
... 2 input source on the remote control. I Turn on the TV. Component Input ports To get better picture quality, connect a DVD player to the DVD player's manual for operating instructions. DVD SETUP Component Connection 19/22LG3**, 19/22LF1** Y PB PR L R 26LG3**, 26LF1** Y PB PR L R EXTERNAL EQUIPMENT SETUP 1 2 ANTENNA/CABLE IN AV IN...
... 2 input source on the remote control. I Turn on the TV. Component Input ports To get better picture quality, connect a DVD player to the DVD player's manual for operating instructions. DVD SETUP Component Connection 19/22LG3**, 19/22LF1** Y PB PR L R 26LG3**, 26LF1** Y PB PR L R EXTERNAL EQUIPMENT SETUP 1 2 ANTENNA/CABLE IN AV IN...
Owner's Manual (English)
Page 26
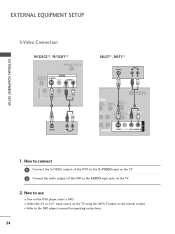
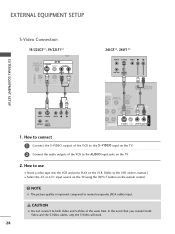
... 1 Connect the S-VIDEO output of the DVD to the S -VIDEO input on the TV. 2 Connect the audio outputs of the DVD to the DVD player's manual for operating instructions. 24 EXTERNAL EQUIPMENT SETUP EXTERNAL EQUIPMENT SETUP COMPONENT IN AV IN 1 S-Video Connection 19/22LG3**, 19/22LF1** ANTENNA/CABLE IN AUDIO IN...
... 1 Connect the S-VIDEO output of the DVD to the S -VIDEO input on the TV. 2 Connect the audio outputs of the DVD to the DVD player's manual for operating instructions. 24 EXTERNAL EQUIPMENT SETUP EXTERNAL EQUIPMENT SETUP COMPONENT IN AV IN 1 S-Video Connection 19/22LG3**, 19/22LF1** ANTENNA/CABLE IN AUDIO IN...

Owner's Manual (English)
Page 27
... RGB(PC) HDMI/DVI IN 2 1 2 Y 1 PB VIDEO COMPON 1 HDMI-DVD OUTPUT HDMI-DVD OUTPUT 1. HDMI supports both audio and video. 2. How to the DVD player's manual for operating instructions. 25 I Refer to use I Select the HDMI or HDMI1/2/3 input source on the TV using the INPUT button on the TV. 2 No...
... RGB(PC) HDMI/DVI IN 2 1 2 Y 1 PB VIDEO COMPON 1 HDMI-DVD OUTPUT HDMI-DVD OUTPUT 1. HDMI supports both audio and video. 2. How to the DVD player's manual for operating instructions. 25 I Refer to use I Select the HDMI or HDMI1/2/3 input source on the TV using the INPUT button on the TV. 2 No...

Owner's Manual (English)
Page 28
... IN socket on the VCR. (Refer to the same channel number. I Set VCR output switch to 3 or 4 and then tune TV to the VCR owner's manual.) 26
... IN socket on the VCR. (Refer to the same channel number. I Set VCR output switch to 3 or 4 and then tune TV to the VCR owner's manual.) 26

Owner's Manual (English)
Page 29
... = white, and Audio Right = red) 2. How to use I Insert a video tape into the VCR and press PLAY on the VCR. (Refer to the VCR owner's manual.) I If connected to AV IN2, select AV2 input source on the remote control. NOTE G If you have a mono VCR, connect the audio cable from the...
... = white, and Audio Right = red) 2. How to use I Insert a video tape into the VCR and press PLAY on the VCR. (Refer to the VCR owner's manual.) I If connected to AV IN2, select AV2 input source on the remote control. NOTE G If you have a mono VCR, connect the audio cable from the...
Owner's Manual (English)
Page 30
... 1 Connect the S-VIDEO output of the VCR to the S -VIDEO input on the TV. 2 Connect the audio outputs of the VCR to the VCR owner's manual.) I Insert a video tape into the VCR and press PLAY on the VCR. (Refer to the AUDIO input jacks on the remote control. ! In the event...
... 1 Connect the S-VIDEO output of the VCR to the S -VIDEO input on the TV. 2 Connect the audio outputs of the VCR to the VCR owner's manual.) I Insert a video tape into the VCR and press PLAY on the VCR. (Refer to the AUDIO input jacks on the remote control. ! In the event...
Owner's Manual (English)
Page 32
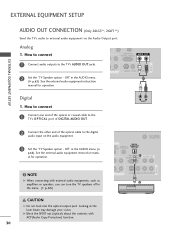
... OUT (CONTROL & SERVICE) AV IN 1 R AUDIO S-VIDEO VIDEO L(MONO) AUDIO R 2 See the external audio equipment instruction manual for operation. ! Looking at the laser beam may damage your vision. See the external audio equipment instruction manual for operation. Off" in the AUDIO menu. (G p.65). Analog 1. How to connect RS-232C IN (CONTROL & SERVICE...
... OUT (CONTROL & SERVICE) AV IN 1 R AUDIO S-VIDEO VIDEO L(MONO) AUDIO R 2 See the external audio equipment instruction manual for operation. ! Looking at the laser beam may damage your vision. See the external audio equipment instruction manual for operation. Off" in the AUDIO menu. (G p.65). Analog 1. How to connect RS-232C IN (CONTROL & SERVICE...

Owner's Manual (English)
Page 37
After adjustment, if the image is still not correct, try using the manual settings or a different resolution or refresh rate on the PC. To Set Yes No 1 MENU 2 ENTER 3 ENTER Select PICTURE. PICTURE Move Enter E • Contrast 50 &#...
After adjustment, if the image is still not correct, try using the manual settings or a different resolution or refresh rate on the PC. To Set Yes No 1 MENU 2 ENTER 3 ENTER Select PICTURE. PICTURE Move Enter E • Contrast 50 &#...
Owner's Manual (English)
Page 38
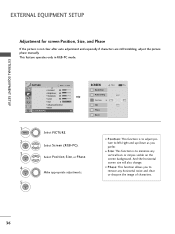
... (RGB-PC) SCREEN Resolution Auto config. I S i z e: This function is not clear after auto adjustment and especially if characters are still trembling, adjust the picture phase manually. Select Screen (RGB-PC). Position G Size Phase Reset Move MENU Prev. I Phase: This function allows you to left/right and up/down as you prefer...
... (RGB-PC) SCREEN Resolution Auto config. I S i z e: This function is not clear after auto adjustment and especially if characters are still trembling, adjust the picture phase manually. Select Screen (RGB-PC). Position G Size Phase Reset Move MENU Prev. I Phase: This function allows you to left/right and up/down as you prefer...


