
Owners Manual
Page 2
..., of the cable entry Increase the separation receiver. This reminder is connected. -Consult technician the dealer or an experienced radio/TV for help. The code provides guidelines proper grounding and, in a residential installation. If this product in any way authorization from...communications. However, there is no guarantee that to correct off and on a circuit different from LG Electronics. I iiii'iiiii[ Any changes or modifications not expressly approved by turning encouraged - shall be determined the equipment to try to which can radiate radio frequency energy and...
..., of the cable entry Increase the separation receiver. This reminder is connected. -Consult technician the dealer or an experienced radio/TV for help. The code provides guidelines proper grounding and, in a residential installation. If this product in any way authorization from...communications. However, there is no guarantee that to correct off and on a circuit different from LG Electronics. I iiii'iiiii[ Any changes or modifications not expressly approved by turning encouraged - shall be determined the equipment to try to which can radiate radio frequency energy and...
Owners Manual
Page 5
...Scan) ...35 4 Picture Improvement Technology ...48 Advanced - Digital Broadcasting System Captions ...60 Caption Option ...61 Remote Control Key Functions ...Turning On TV ...Channel Selection ...Volume Adjustment ...On-Screen Menus Selection ...Channel Search ...- User Mode ... - EZ Picture - User Mode ...46 ...ii!+_+ Accessories ...Front Panel Information ...Back Panel Information ...7 8 10 Back Cover for Wire Arrangement ...12 Attaching the TV to a Wall ...Stand Installation ...VESA Wall Mounting ...13 14 15 Manual Picture Adjustment ...- CONTENTS WARNING / CAUTION ...
...Scan) ...35 4 Picture Improvement Technology ...48 Advanced - Digital Broadcasting System Captions ...60 Caption Option ...61 Remote Control Key Functions ...Turning On TV ...Channel Selection ...Volume Adjustment ...On-Screen Menus Selection ...Channel Search ...- User Mode ... - EZ Picture - User Mode ...46 ...ii!+_+ Accessories ...Front Panel Information ...Back Panel Information ...7 8 10 Back Cover for Wire Arrangement ...12 Attaching the TV to a Wall ...Stand Installation ...VESA Wall Mounting ...13 14 15 Manual Picture Adjustment ...- CONTENTS WARNING / CAUTION ...
Owners Manual
Page 7
... cable and produces the highest quality digital images and sound. b. is turned on the screen. This is normal, there is a trademark of digital television, ...c. However, they have no adverse effect on the monitor's Avoid touching the LCD screen or holding your local authority. 6 Disposal of time. may produce a. of a... full digital image processor, six different picture quality factors. If the TV feels cold to the HDMI (high-definition multimedia interface), LG TV with one remote control. A subset of SRS Labs, Inc. High-resolution digital ...
... cable and produces the highest quality digital images and sound. b. is turned on the screen. This is normal, there is a trademark of digital television, ...c. However, they have no adverse effect on the monitor's Avoid touching the LCD screen or holding your local authority. 6 Disposal of time. may produce a. of a... full digital image processor, six different picture quality factors. If the TV feels cold to the HDMI (high-definition multimedia interface), LG TV with one remote control. A subset of SRS Labs, Inc. High-resolution digital ...

Owners Manual
Page 9
""_ NOTE: If your TV. And then wipe the product with your product, _D m _D Front Panel Controls (26 inches) © z (A,¥)Bu_ons (41,I_) Buttons Bu_on Bu_on Remote Control Sensor Power/Sta Illuminates nd by Indicator red in standby mode. PREPARATION FRONT PANELINFORMATION Here shown may be somewhat different from your product has a protection tape attached, remove the tape. use it). blinks green and is included with a cloth (If a polishing cloth is displayed. When the TV is turned then illuminates on, the indicator green before the picture 8
""_ NOTE: If your TV. And then wipe the product with your product, _D m _D Front Panel Controls (26 inches) © z (A,¥)Bu_ons (41,I_) Buttons Bu_on Bu_on Remote Control Sensor Power/Sta Illuminates nd by Indicator red in standby mode. PREPARATION FRONT PANELINFORMATION Here shown may be somewhat different from your product has a protection tape attached, remove the tape. use it). blinks green and is included with a cloth (If a polishing cloth is displayed. When the TV is turned then illuminates on, the indicator green before the picture 8

Owners Manual
Page 10
When the TV is turned on, the indicator then illuminates blinks green and green before the picture is displayed. 9 -0 _o m Front Panel Controls (32/42 inches) _o © 7 (A,V)Buttons (_I,I_) Buttons Button Button Button Button Remote Control Sensor Power/Sta nd by Indicator llluminates red in standby mode.
When the TV is turned on, the indicator then illuminates blinks green and green before the picture is displayed. 9 -0 _o m Front Panel Controls (32/42 inches) _o © 7 (A,V)Buttons (_I,I_) Buttons Button Button Button Button Remote Control Sensor Power/Sta nd by Indicator llluminates red in standby mode.
Owners Manual
Page 18
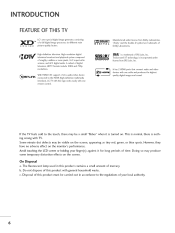
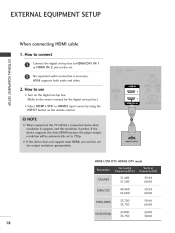
...on the digital set-top box. (Refer to the owner's manual for the 42 inches models. operation) Select Component I . all equipment. HD RECEIVERSETUP This TV can receive Digital do receive digital below. Over-the-air/Cable set-top signals without box or other an external external digital set . 2. How to... box. IN2 input, select Yes Yes Yes Yes Yes No Yes Yes Yes Yes 17 However, if you have finished connecting EQUIPMENT SETUP mainly use Turn on the set -top box. How to connect Connect Component cable _D z m XD c (Y, PB, PR) of the digital IN VIDEO set the video ...
...on the digital set-top box. (Refer to the owner's manual for the 42 inches models. operation) Select Component I . all equipment. HD RECEIVERSETUP This TV can receive Digital do receive digital below. Over-the-air/Cable set-top signals without box or other an external external digital set . 2. How to... box. IN2 input, select Yes Yes Yes Yes Yes No Yes Yes Yes Yes 17 However, if you have finished connecting EQUIPMENT SETUP mainly use Turn on the set -top box. How to connect Connect Component cable _D z m XD c (Y, PB, PR) of the digital IN VIDEO set the video ...
Owners Manual
Page 19
... 33.750 27.000 33.750 59.94 60.00 59.94 60.00 24.00 30.00 18 set-top box.) (Refer to use Turn on the digital set . z m No separated audio connection HDMI supports is necessary. _D c both audio and video. How to the owner's manual for the digital...
... 33.750 27.000 33.750 59.94 60.00 59.94 60.00 24.00 30.00 18 set-top box.) (Refer to use Turn on the digital set . z m No separated audio connection HDMI supports is necessary. _D c both audio and video. How to the owner's manual for the digital...
Owners Manual
Page 20
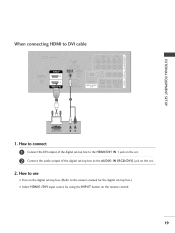
When connecting HDMI to the owner's manual for the digital button set-top box.) input source by using the INPUT on the remote control. 19 How to connect Connect the DVI output of the digital set-top box to the HDMI/DVI IN 1 jack on the set. How to use 01_ Turn on the set -top box. (Refer to DVi cable m x m z m c m z m c 1. Connect the audio output of the digital set-top box to the AUDIO IN (RGB/DVI) jack on the digital 01_ Select HDMI 1/DVI set . 2.
When connecting HDMI to the owner's manual for the digital button set-top box.) input source by using the INPUT on the remote control. 19 How to connect Connect the DVI output of the digital set-top box to the HDMI/DVI IN 1 jack on the set. How to use 01_ Turn on the set -top box. (Refer to DVi cable m x m z m c m z m c 1. Connect the audio output of the digital set-top box to the AUDIO IN (RGB/DVI) jack on the digital 01_ Select HDMI 1/DVI set . 2.
Owners Manual
Page 21
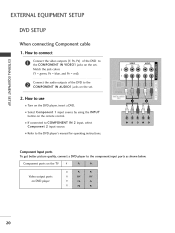
...jack colors IN VIDE01 _o z m (Y = green_ PB = blue_ and PR = red). EXTERNALEQUIPMENT SETUP DVD SETUP When connecting 1. How to use 01_ Turn on the DVD playen insert a DVD. 01_ Select Component 1 input source by using the INPUT button on DVD player 20 to the component input ports... as shown below. XD c Connect the audio outputs IN of the DVD jacks on the set . instructions. Component ports on the TV Video output ports on the remote control. 01_ If connected Component to the jacks on the set . COMPONENT m AUDIO1 z m 2. How to connect r'_ ...
...jack colors IN VIDE01 _o z m (Y = green_ PB = blue_ and PR = red). EXTERNALEQUIPMENT SETUP DVD SETUP When connecting 1. How to use 01_ Turn on the DVD playen insert a DVD. 01_ Select Component 1 input source by using the INPUT button on DVD player 20 to the component input ports... as shown below. XD c Connect the audio outputs IN of the DVD jacks on the set . instructions. Component ports on the TV Video output ports on the remote control. 01_ If connected Component to the jacks on the set . COMPONENT m AUDIO1 z m 2. How to connect r'_ ...
Owners Manual
Page 22
... using the INPUT remote control. 01_ If connected to the DVD player's manual for operating c "O When connecting 1. both audio and video. 2. How to use 01_ Turn on the XD c "O z r-r1 input source. im,f_ Refer to AV IN2, select AV2 button on the DVD player, insert a DVD. 01_ Select AV1 input...
... using the INPUT remote control. 01_ If connected to the DVD player's manual for operating c "O When connecting 1. both audio and video. 2. How to use 01_ Turn on the XD c "O z r-r1 input source. im,f_ Refer to AV IN2, select AV2 button on the DVD player, insert a DVD. 01_ Select AV1 input...
Owners Manual
Page 26
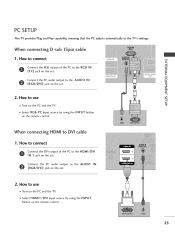
...I . Connect (RGB/DVI) the PC audio output to the AUDIO IN jack on the set . 2. PC SETUP This TV provides Plug and Play capability, meaning that the PC adjusts automatically to the AUDIO IN m z p.- How to connect D-sub... 15pin cable m x Connect the RGB output of the PC to use 01_ Turn on the PC and the TV. 01_ Select HDMII/DVI input source by using the INPUT button on the remote control. How... HDMI to DVI cable Connect the DVI output of the PC to use 01_ Turn on the PC and the TV. 01_ Select RGB-PC input source by using the INPUT on the remote control...
...I . Connect (RGB/DVI) the PC audio output to the AUDIO IN jack on the set . 2. PC SETUP This TV provides Plug and Play capability, meaning that the PC adjusts automatically to the AUDIO IN m z p.- How to connect D-sub... 15pin cable m x Connect the RGB output of the PC to use 01_ Turn on the PC and the TV. 01_ Select HDMII/DVI input source by using the INPUT button on the remote control. How... HDMI to DVI cable Connect the DVI output of the PC to use 01_ Turn on the PC and the TV. 01_ Select RGB-PC input source by using the INPUT on the remote control...
Owners Manual
Page 31
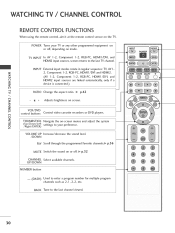
... depending on or off . _ p.32 CHANNEL Select available channels. UP/DOWN NUMBER button -- (DASH) Used to the last channel viewed. POWER Turns your preference. N © Z © VCR/DVD control buttons THUMBSTICK Up/Down/Left Right/ENTER) Control video cassette recorders or DVD players. BACK... 3O External input modes rotate in regular sequence: TV, AV1 2, Component 1-2, RGB-PC, HDMI1/DVI and HDMI2. (AV 1-2, Component 1-2, RGB-PC, HDMI1/DVI, and HDMI2 input sources are...
... depending on or off . _ p.32 CHANNEL Select available channels. UP/DOWN NUMBER button -- (DASH) Used to the last channel viewed. POWER Turns your preference. N © Z © VCR/DVD control buttons THUMBSTICK Up/Down/Left Right/ENTER) Control video cassette recorders or DVD players. BACK... 3O External input modes rotate in regular sequence: TV, AV1 2, Component 1-2, RGB-PC, HDMI1/DVI and HDMI2. (AV 1-2, Component 1-2, RGB-PC, HDMI1/DVI, and HDMI2 input sources are...

Owners Manual
Page 32
...Adjust the screen resolution, Not functional position, size and phase. _ p.27 N I MODE Select the remote's operating mode: TV, DVD, VCR. COMP1 Directly, select Component1 input. to TV viewing from any menu. When you toggle this button, the SimpLink menu SIMPLINK See a list of AV devices connected appears at... _ p.40 PICTURE Selects the factory preset picture depend on -screen displays and returns to TV. select RGB-PC input. SOUND Selects the factory preset sound for type of time before your TV turns off automatically. _ p.65 31 I > z z fT1 EXIT Clears all on the ...
...Adjust the screen resolution, Not functional position, size and phase. _ p.27 N I MODE Select the remote's operating mode: TV, DVD, VCR. COMP1 Directly, select Component1 input. to TV viewing from any menu. When you toggle this button, the SimpLink menu SIMPLINK See a list of AV devices connected appears at... _ p.40 PICTURE Selects the factory preset picture depend on -screen displays and returns to TV. select RGB-PC input. SOUND Selects the factory preset sound for type of time before your TV turns off automatically. _ p.65 31 I > z z fT1 EXIT Clears all on the ...
Owners Manual
Page 33
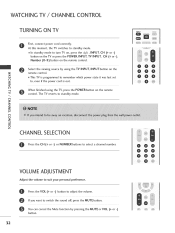
WATCHING TV / CHANNEL CONTROL TURNING ON TV First, connect power cord correctly. using the TV INPUT, INPUT button remote control. The TV reverts to standby N © Z © CHANNELSELECTION Press the CH (+ or -) or NUMBER buttons to adjust the volume. Press the VOL (+ or -) button to...ADJUSTMENT Adjust the volume to switch the sound off, press the MUTE button. by using the TV, press the POWER button on the 01_ This TV is programmed to remember which power state it was last set to turn TV on, press the _/I > z z fT1 on the remote mode. At this moment, the...
WATCHING TV / CHANNEL CONTROL TURNING ON TV First, connect power cord correctly. using the TV INPUT, INPUT button remote control. The TV reverts to standby N © Z © CHANNELSELECTION Press the CH (+ or -) or NUMBER buttons to adjust the volume. Press the VOL (+ or -) button to...ADJUSTMENT Adjust the volume to switch the sound off, press the MUTE button. by using the TV, press the POWER button on the 01_ This TV is programmed to remember which power state it was last set to turn TV on, press the _/I > z z fT1 on the remote mode. At this moment, the...
Owners Manual
Page 35
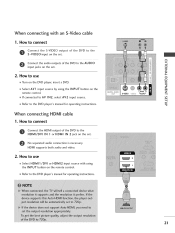
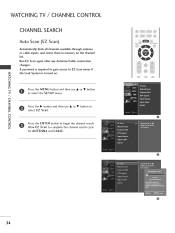
... use • menu. or • button to EZ Scan menu if on the channel connection Run EZ Scan again after any Antenna/Cable changes. WATCHING TV / CHANNEL CONTROL CHANNELSEARCH Auto Scan (EZ Scan) Automatically or cable inputs, list. finds all channels available through and stores them in memory antenna on . A password...
... use • menu. or • button to EZ Scan menu if on the channel connection Run EZ Scan again after any Antenna/Cable changes. WATCHING TV / CHANNEL CONTROL CHANNELSEARCH Auto Scan (EZ Scan) Automatically or cable inputs, list. finds all channels available through and stores them in memory antenna on . A password...
Owners Manual
Page 36
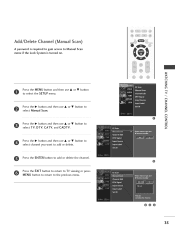
... then use • or • button to select the SETUP menu. Press the • button and then use • or • button < N I > z z fT1 to select TV, DTV, CATV, and CADTV. Press the ENTER button to add or delete the channel. @ Press the EXIT button to return to... TV viewing or press MENU button to return to Manual on. Add/Delete A password Channel (Manual Scan) to gain access to the previous menu. @@@ 35 Scan ...
... then use • or • button to select the SETUP menu. Press the • button and then use • or • button < N I > z z fT1 to select TV, DTV, CATV, and CADTV. Press the ENTER button to add or delete the channel. @ Press the EXIT button to return to... TV viewing or press MENU button to return to Manual on. Add/Delete A password Channel (Manual Scan) to gain access to the previous menu. @@@ 35 Scan ...

Owners Manual
Page 42
z C_ -q pause, fast reverse, fast forward, Power _Switch off all connected devices are turned off. to switch audio-out. all devices: When you to select one of AV devices connected Control connected AV devices by pressing the , A Y _1 ...I1_,ENTER buttons and buttons for play, stop, chapter skip. SimpLink Functions Direct Play: After connecting additional settings. to TV and play it. ,_ , , , AV devices to TV, you can directly control the devices and play media without _Select Disc ,_ AV device: playback: ,_ Enables you power offTV, audio-out: Offers...
z C_ -q pause, fast reverse, fast forward, Power _Switch off all connected devices are turned off. to switch audio-out. all devices: When you to select one of AV devices connected Control connected AV devices by pressing the , A Y _1 ...I1_,ENTER buttons and buttons for play, stop, chapter skip. SimpLink Functions Direct Play: After connecting additional settings. to TV and play it. ,_ , , , AV devices to TV, you can directly control the devices and play media without _Select Disc ,_ AV device: playback: ,_ Enables you power offTV, audio-out: Offers...

Owners Manual
Page 56
the TV Speakers option On or Off. TV SPEAKERSON/OFF SETUP Turn the TV speakers Feature turns off if using external audio equipment. z c l'rl Press EXIT MENU button to return to TV viewing or press N 0 Z .-I 0 button to return to select the AUDIO menu. Press the MENU button and then use • or • button to select On or Off. or • button @ Press the • button and then use • or • button to 0 c z select TV Speaker. @ Press the • button and then use • to the previous menu. @0 55
the TV Speakers option On or Off. TV SPEAKERSON/OFF SETUP Turn the TV speakers Feature turns off if using external audio equipment. z c l'rl Press EXIT MENU button to return to TV viewing or press N 0 Z .-I 0 button to return to select the AUDIO menu. Press the MENU button and then use • or • button to select On or Off. or • button @ Press the • button and then use • or • button to 0 c z select TV Speaker. @ Press the • button and then use • to the previous menu. @0 55

Owners Manual
Page 57
...accompanies Stereo the stereo program signal as well as the an additional one and when you press the SAP button, Stereo, 0 c z or SAP appear in turn. in Analog channel. Each time you select or SAP on the digital them with the SAP button. z c l'rl Press EXIT button to save and return... to the mono stereo/SAP broadcasting. sound in remote Select Mono areas during Stereo if you want to listen to TV viewing. SOUND &LANGUAGE CONTROL STEREO/SAP BROADCASTS SETUP This TV can be received Use the SAP button to select your desired MTS mode in analog signal. Mono Mono;
...accompanies Stereo the stereo program signal as well as the an additional one and when you press the SAP button, Stereo, 0 c z or SAP appear in turn. in Analog channel. Each time you select or SAP on the digital them with the SAP button. z c l'rl Press EXIT button to save and return... to the mono stereo/SAP broadcasting. sound in remote Select Mono areas during Stereo if you want to listen to TV viewing. SOUND &LANGUAGE CONTROL STEREO/SAP BROADCASTS SETUP This TV can be received Use the SAP button to select your desired MTS mode in analog signal. Mono Mono;

Owners Manual
Page 60
... program provided 0 c Z z Ch c Ch l'rl N 0 Z .-I _o 0 Press EXIT to save and return to TV viewing. 0i_ You can also use the OPTION menu to select Caption/Text. 59 usually the audio portion for the hearing impaired. ...Caption Use the CC button repeatedly to memorize the caption/text the power off. would be disabled. mode which This TV is usually the program's usually at Select a caption any position Text displays Analog caption on a program. information,...CAPTION The term for on the screen and is programmed was last set when you turn When you select the CO1 -
... program provided 0 c Z z Ch c Ch l'rl N 0 Z .-I _o 0 Press EXIT to save and return to TV viewing. 0i_ You can also use the OPTION menu to select Caption/Text. 59 usually the audio portion for the hearing impaired. ...Caption Use the CC button repeatedly to memorize the caption/text the power off. would be disabled. mode which This TV is usually the program's usually at Select a caption any position Text displays Analog caption on a program. information,...CAPTION The term for on the screen and is programmed was last set when you turn When you select the CO1 -


