
Owners Manual - English
Page 2
... the Monitor set 9 - Mounting on a table 13 - DVI-D connection 17 - Using the cable holder 15 - HDMI connection 18 Connecting to AV Devices 17 - Menu Settings 23 -Picture 24 -Color 25 -Display 25 -Audio 26 -Others 27 READER Setting 28 FUNC. D-SUB connection 16 - Detaching the Stand Base 12 - Peripheral device connection...
... the Monitor set 9 - Mounting on a table 13 - DVI-D connection 17 - Using the cable holder 15 - HDMI connection 18 Connecting to AV Devices 17 - Menu Settings 23 -Picture 24 -Color 25 -Display 25 -Audio 26 -Others 27 READER Setting 28 FUNC. D-SUB connection 16 - Detaching the Stand Base 12 - Peripheral device connection...
Owners Manual - English
Page 23
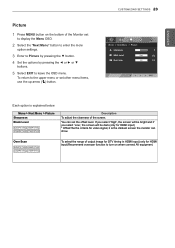
... HDMI input)Recommend overscan function to the upper menu or set the offset level. Menu > Next Menu > Picture Sharpness Black Level 22MP47HQ 24MP47HQ 23MP47HQ 27MP47HQ Description To adjust the clearness of the Monitor set to display the Menu OSD. 2 Select the "Next Menu" button to enter the ... to turn on the bottom of the screen. ENEGNLGISH Picture 1 Press MENU button on when connect AV equipment. Over Scan 22MP47HQ 24MP47HQ 23MP47HQ 27MP47HQ To select the range of output image for DTV timing in HDMI input.(only for video signal, it is explained below. CUSTOMIZING SETTINGS...
... HDMI input)Recommend overscan function to the upper menu or set the offset level. Menu > Next Menu > Picture Sharpness Black Level 22MP47HQ 24MP47HQ 23MP47HQ 27MP47HQ Description To adjust the clearness of the Monitor set to display the Menu OSD. 2 Select the "Next Menu" button to enter the ... to turn on the bottom of the screen. ENEGNLGISH Picture 1 Press MENU button on when connect AV equipment. Over Scan 22MP47HQ 24MP47HQ 23MP47HQ 27MP47HQ To select the range of output image for DTV timing in HDMI input.(only for video signal, it is explained below. CUSTOMIZING SETTINGS...


