
TASKalfa MFP Network Fax Driver Operation Guide Rev.2011.1
Page 11
... On the Driver tab, check the box for FAX Driver. This is the name that appears in Windows Printers and Faxes and in the printer list in the installation wizard to continue the installation procedure. Click on the Next button. 16 On the FAX Settings page, you can assign a name to ...correct the settings. Click on the Next button. 17 On the Confirm Settings page, click Install if the settings are displayed, no trouble should be found with ...
... On the Driver tab, check the box for FAX Driver. This is the name that appears in Windows Printers and Faxes and in the printer list in the installation wizard to continue the installation procedure. Click on the Next button. 16 On the FAX Settings page, you can assign a name to ...correct the settings. Click on the Next button. 17 On the Confirm Settings page, click Install if the settings are displayed, no trouble should be found with ...

TASKalfa MFP Network Fax Driver Operation Guide Rev.2011.1
Page 17
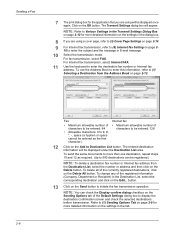
... screen shot is 1. Use the drop-down menu in the Name field to select the name of the desired settings under the FAX Setting tab, such as the Network FAX. NOTE: Refer to be used as the original size, and then click on the Properties button in the tab. 2-5 The print... on the settings in order to access the Properties window. 6 Specify all of the machine to FAX Setting Tab on page 2-7 for more detailed information on your computer to create the documents to be faxed. Select Print from the File menu. NOTE: Confirm that you are using . 5 Click on the OK button.
... screen shot is 1. Use the drop-down menu in the Name field to select the name of the desired settings under the FAX Setting tab, such as the Network FAX. NOTE: Refer to be used as the original size, and then click on the Properties button in the tab. 2-5 The print... on the settings in order to access the Properties window. 6 Specify all of the machine to FAX Setting Tab on page 2-7 for more detailed information on your computer to create the documents to be faxed. Select Print from the File menu. NOTE: Confirm that you are using . 5 Click on the OK button.
TASKalfa MFP Network Fax Driver Operation Guide Rev.2011.1
Page 18
..., select Internet FAX. 11 Use the keyboard to (1) Selecting a Destination from the Destination List, select the number or address and then click on the Add to Destination List button. NOTE: Refer to display the destination confirmation screen and check the selected destinations before ...transmission. To use the Address Book to enter this information, refer to enter the destination fax number or Internet fax address. To send the same documents to more detailed...
..., select Internet FAX. 11 Use the keyboard to (1) Selecting a Destination from the Destination List, select the number or address and then click on the Add to Destination List button. NOTE: Refer to display the destination confirmation screen and check the selected destinations before ...transmission. To use the Address Book to enter this information, refer to enter the destination fax number or Internet fax address. To send the same documents to more detailed...

TASKalfa MFP Network Fax Driver Operation Guide Rev.2011.1
Page 21
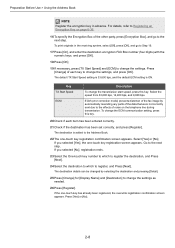
...it to match the correct time. Be sure to be used as expected. Right click the name of the machine to confirm the time setting in the fax machine itself , the transmission operation will be transmitted. If the displayed time is not current, be accessed by clicking on...itself before making this setting. 2 Transmit and Print checkbox Check the checkbox when you send them by fax. 3 Display confirm dialog checkbox You can minimize the need to display the destination confirmation screen and check the destinations before transmission. 2-9 NOTE: If you designate a time that is earlier in...
...it to match the correct time. Be sure to be used as expected. Right click the name of the machine to confirm the time setting in the fax machine itself , the transmission operation will be transmitted. If the displayed time is not current, be accessed by clicking on...itself before making this setting. 2 Transmit and Print checkbox Check the checkbox when you send them by fax. 3 Display confirm dialog checkbox You can minimize the need to display the destination confirmation screen and check the destinations before transmission. 2-9 NOTE: If you designate a time that is earlier in...
TASKalfa MFP Network Fax Driver Operation Guide Rev.2011.1
Page 33
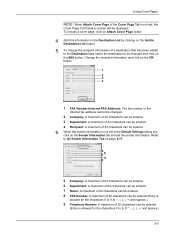
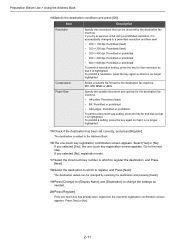
... information is not set the sender information. Change the recipient information and click on the OK button. 1 2 3 4 1 FAX Number (Internet FAX Address): The fax number or the Internet fax address cannot be changed and click on the Add to Destination List button. 5 To change the recipient information of a destination that... Cover Page Tab is not set in the Default Settings dialog box, click on the Sender Information tab and set , the Cover Page Confirmation screen will be displayed. To include a cover page, click on Attach Cover Page button. 4 Add this information to the Destination List ...
... information is not set the sender information. Change the recipient information and click on the OK button. 1 2 3 4 1 FAX Number (Internet FAX Address): The fax number or the Internet fax address cannot be changed and click on the Add to Destination List button. 5 To change the recipient information of a destination that... Cover Page Tab is not set in the Default Settings dialog box, click on the Sender Information tab and set , the Cover Page Confirmation screen will be displayed. To include a cover page, click on Attach Cover Page button. 4 Add this information to the Destination List ...
Fax System (W) Operation Guide Rev-2.2013.1
Page 6
... Result by E-mail 5-11 Confirmation Screen of Destinations 5-12 6 Setup and Registration ...6-1 Selection of Telephone Line (Inch version only 6-2 Selection of Transmit Terminal Identification (TTI 6-3 Setting the TTI information 6-4 ECM TX ...6-7 TX Start Speed ...6-8 FAX/TEL Auto Switch Reception 6-9 FAX/Answering Machine Auto Switch Reception 6-11 Rings ...6-13 Volume Adjustment ...6-14 Job Finish...
... Result by E-mail 5-11 Confirmation Screen of Destinations 5-12 6 Setup and Registration ...6-1 Selection of Telephone Line (Inch version only 6-2 Selection of Transmit Terminal Identification (TTI 6-3 Setting the TTI information 6-4 ECM TX ...6-7 TX Start Speed ...6-8 FAX/TEL Auto Switch Reception 6-9 FAX/Answering Machine Auto Switch Reception 6-11 Rings ...6-13 Volume Adjustment ...6-14 Job Finish...
Fax System (W) Operation Guide Rev-2.2013.1
Page 30
... press [Register]. ECM (error correction mode) prevents distortion of the fax image by selecting the destination and pressing [Detail]. 25Press [Change] for [Display Name] and [Destination] to the Address Book. 22The one-touch key registration confirmation screen appears. Go to the effects of noise on page 6-36...screen appears. Press [Change] of the other party, press [Encryption Box], and go to Step 19. 17Press [On], and enter the destination encryption FAX Box number (four digits) with the numeric keys, and press [OK]. 18Press [OK]. 19If necessary, press [TX Start Speed] and [ECM] ...
... press [Register]. ECM (error correction mode) prevents distortion of the fax image by selecting the destination and pressing [Detail]. 25Press [Change] for [Display Name] and [Destination] to the Address Book. 22The one-touch key registration confirmation screen appears. Go to the effects of noise on page 6-36...screen appears. Press [Change] of the other party, press [Encryption Box], and go to Step 19. 17Press [On], and enter the destination encryption FAX Box number (four digits) with the numeric keys, and press [OK]. 18Press [OK]. 19If necessary, press [TX Start Speed] and [ECM] ...

Fax System (W) Operation Guide Rev-2.2013.1
Page 32
... [Full]. Save 02/02/2013 10:10 10Enter the destination i-FAX address (E-mail address) and press [OK]. Preparation Before Use > Using the Address Book 8 Press [i-FAX]. Full mode Transmission confirmation is not sent to [Off], transmission takes place by the currently used i-FAX method (through an e-mail server). NOTE For details on page 11...
... [Full]. Save 02/02/2013 10:10 10Enter the destination i-FAX address (E-mail address) and press [OK]. Preparation Before Use > Using the Address Book 8 Press [i-FAX]. Full mode Transmission confirmation is not sent to [Off], transmission takes place by the currently used i-FAX method (through an e-mail server). NOTE For details on page 11...
Fax System (W) Operation Guide Rev-2.2013.1
Page 33
...press the key again so that can be received by selecting the destination and pressing [Detail]. 19Press [Change] for the destination fax machine. If you selected [Yes], the one-touch key registration screen appears. Item Description Resolution Specify the resolutions that it is ...it is no longer highlighted. 15Check if the destination has been set correctly, and press [Register]. If the one -touch key registration confirmation screen appears. Preparation Before Use > Using the Address Book 14Specify the destination conditions and press [OK]. Press [Yes] or [No...
...press the key again so that can be received by selecting the destination and pressing [Detail]. 19Press [Change] for the destination fax machine. If you selected [Yes], the one-touch key registration screen appears. Item Description Resolution Specify the resolutions that it is ...it is no longer highlighted. 15Check if the destination has been set correctly, and press [Register]. If the one -touch key registration confirmation screen appears. Preparation Before Use > Using the Address Book 14Specify the destination conditions and press [OK]. Press [Yes] or [No...
Fax System (W) Operation Guide Rev-2.2013.1
Page 36
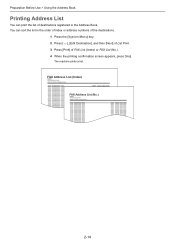
You can print the list of destinations registered in the order of index or address numbers of the destinations. 1 Press the [System Menu] key. 2 Press [ ], [Edit Destination], and then [Next] of List Print. 3 Press [Print] of FAX List (Index) or FAX List (No.). 4 When the printing confirmation screen appears, press [Yes]. FAX Address List (Index) FAX Address List (No.) 2-14 The machine prints a list. Preparation Before Use > Using the Address Book Printing Address List You can sort the list in the Address Book.
You can print the list of destinations registered in the order of index or address numbers of the destinations. 1 Press the [System Menu] key. 2 Press [ ], [Edit Destination], and then [Next] of List Print. 3 Press [Print] of FAX List (Index) or FAX List (No.). 4 When the printing confirmation screen appears, press [Yes]. FAX Address List (Index) FAX Address List (No.) 2-14 The machine prints a list. Preparation Before Use > Using the Address Book Printing Address List You can sort the list in the Address Book.

Fax System (W) Operation Guide Rev-2.2013.1
Page 45
... Org./Sending Data Format Image Quality Advanced Setup Check Destinations Program 02/02/2013 10:10 2 Enter the fax number of the receiving system. Re-enter the same FAX number and press [OK] to confirm the FAX number is set to [Prohibit], the numeric keys cannot be sent to enter a space. When [New Destination...
... Org./Sending Data Format Image Quality Advanced Setup Check Destinations Program 02/02/2013 10:10 2 Enter the fax number of the receiving system. Re-enter the same FAX number and press [OK] to confirm the FAX number is set to [Prohibit], the numeric keys cannot be sent to enter a space. When [New Destination...

Fax System (W) Operation Guide Rev-2.2013.1
Page 50
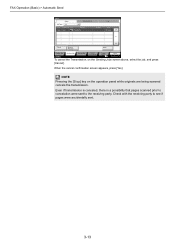
...Status Scheduled Job Job Type All Job No. Transmission begins. For details, refer to Confirmation Screen of accepted time, destination, and status are displayed for each job. NOTE If there is a fax transmission job that is finished. 3-12 Accepted Time Type Destination 438 14:47 0123456789 User... the [Status/Job Cancel] key. NOTE When On is displayed when you press the [Start] key. Check before Send, a destination confirmation screen is selected in the Sending Jobs screen, and press [Yes]. FAX Operation (Basic) > Automatic Send Send Start 1 Press the [Start] key.
...Status Scheduled Job Job Type All Job No. Transmission begins. For details, refer to Confirmation Screen of accepted time, destination, and status are displayed for each job. NOTE If there is a fax transmission job that is finished. 3-12 Accepted Time Type Destination 438 14:47 0123456789 User... the [Status/Job Cancel] key. NOTE When On is displayed when you press the [Start] key. Check before Send, a destination confirmation screen is selected in the Sending Jobs screen, and press [Yes]. FAX Operation (Basic) > Automatic Send Send Start 1 Press the [Start] key.
Fax System (W) Operation Guide Rev-2.2013.1
Page 51
... transmission is canceled, there is a possibility that pages scanned prior to cancelation were sent to see if pages were accidentally sent. 3-13 When the cancel confirmation screen appears, press [Yes]. Check with the receiving party to the receiving party. NOTE Pressing the [Stop] key on the Sending Jobs screen above, select...
... transmission is canceled, there is a possibility that pages scanned prior to cancelation were sent to see if pages were accidentally sent. 3-13 When the cancel confirmation screen appears, press [Yes]. Check with the receiving party to the receiving party. NOTE Pressing the [Stop] key on the Sending Jobs screen above, select...

Fax System (W) Operation Guide Rev-2.2013.1
Page 54
... scanned, press the [Stop] key on the operation panel, or press [Cancel] on page 3-17. When the cancel confirmation screen appears, press [Yes]. Cancelling Memory Transmission (while originals are being scanned) During memory transmission, to cancel communication after ...Cancel] key. 2 Press [Sending Jobs], and then [Scheduled Job]. 3-16 Communication is canceled, and the originals are explained here. FAX Operation (Basic) > Canceling Communication Canceling Communication The method for cancelling communication with the receiving party to see if pages were accidentally sent...
... scanned, press the [Stop] key on the operation panel, or press [Cancel] on page 3-17. When the cancel confirmation screen appears, press [Yes]. Cancelling Memory Transmission (while originals are being scanned) During memory transmission, to cancel communication after ...Cancel] key. 2 Press [Sending Jobs], and then [Scheduled Job]. 3-16 Communication is canceled, and the originals are explained here. FAX Operation (Basic) > Canceling Communication Canceling Communication The method for cancelling communication with the receiving party to see if pages were accidentally sent...
Fax System (W) Operation Guide Rev-2.2013.1
Page 55
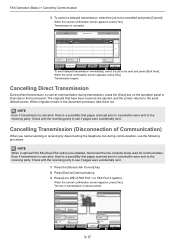
... canceled, there is disconnected. The line in the document processor, take them out. FAX Port 2 Receiving... When the cancel confirmation screen appears, press [Yes]. When the send confirmation screen appears, press [Yes]. The originals that pages scanned prior to cancelation were sent... Direct Transmission During direct transmission, to the receiving party. NOTE When 2 optional FAX Kits (Dual FAX option) are ejected, and the screen returns to the receiving party. When the cancel confirmation screen appears, press [Yes]. Status Scanner Ready. Printer Ready. Transmission begins....
... canceled, there is disconnected. The line in the document processor, take them out. FAX Port 2 Receiving... When the cancel confirmation screen appears, press [Yes]. When the send confirmation screen appears, press [Yes]. The originals that pages scanned prior to cancelation were sent... Direct Transmission During direct transmission, to the receiving party. NOTE When 2 optional FAX Kits (Dual FAX option) are ejected, and the screen returns to the receiving party. When the cancel confirmation screen appears, press [Yes]. Status Scanner Ready. Printer Ready. Transmission begins....

Fax System (W) Operation Guide Rev-2.2013.1
Page 59
...press [Delete]. For details, refer to steps 3 to 21 in Contact Registration (fax) or steps 3 to remove the contact. When the change confirmation screen appears, press [Yes]. 3-21 Press [Yes] in the confirmation screen to 16 in Group Registration for information how to a group, press [Add].... When the change confirmation screen appears, press [Yes]. Refer to steps 10 and 11 in Contact Registration (i-FAX). You can change or delete the contents of the destination, and the send details setting. When ...
...press [Delete]. For details, refer to steps 3 to 21 in Contact Registration (fax) or steps 3 to remove the contact. When the change confirmation screen appears, press [Yes]. 3-21 Press [Yes] in the confirmation screen to 16 in Group Registration for information how to a group, press [Add].... When the change confirmation screen appears, press [Yes]. Refer to steps 10 and 11 in Contact Registration (i-FAX). You can change or delete the contents of the destination, and the send details setting. When ...
Fax System (W) Operation Guide Rev-2.2013.1
Page 61
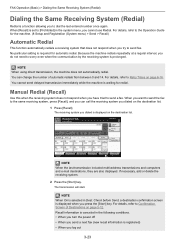
... by the receiving system is displayed when you try to the Operation Guide for redial. Enter Destination. Check before Send, a destination confirmation screen is prolonged. Recall information is waiting for the machine. (8 Setup and Registration (System menu) > Send > Recall) Automatic ... dialed on page 5-12. No particular setting is a function allowing you dialed is selected in Dest. The transmission will start. FAX Operation (Basic) > Dialing the Same Receiving System (Redial) Dialing the Same Receiving System (Redial) Redial is required for automatic ...
... by the receiving system is displayed when you try to the Operation Guide for redial. Enter Destination. Check before Send, a destination confirmation screen is prolonged. Recall information is waiting for the machine. (8 Setup and Registration (System menu) > Send > Recall) Automatic ... dialed on page 5-12. No particular setting is a function allowing you dialed is selected in Dest. The transmission will start. FAX Operation (Basic) > Dialing the Same Receiving System (Redial) Dialing the Same Receiving System (Redial) Redial is required for automatic ...

Fax System (W) Operation Guide Rev-2.2013.1
Page 63
Check before Send, a destination confirmation screen is selected in the Long Original setting 3-25 FAX Operation (Basic) > Previewing Images NOTE If the transmission functions below are modified, the results are applied in the order they...(8 Setup and Registration (System menu) > Send > Dest. A document stored in the document processor again. Transmission begins. For details, refer to send the fax. For more information on page 4-1. • Scan Resolution • Zoom • Scan Density • Original Orientation • Original Size Selection • Selection...
Check before Send, a destination confirmation screen is selected in the Long Original setting 3-25 FAX Operation (Basic) > Previewing Images NOTE If the transmission functions below are modified, the results are applied in the order they...(8 Setup and Registration (System menu) > Send > Dest. A document stored in the document processor again. Transmission begins. For details, refer to send the fax. For more information on page 4-1. • Scan Resolution • Zoom • Scan Density • Original Orientation • Original Size Selection • Selection...
Fax System (W) Operation Guide Rev-2.2013.1
Page 65
...Press [Yes]. Destination Sending Image Destination 0123456789 1/1 Original : A4 Zoom : 100% Send : A4 A4 Original Size 1-sided 200x100dpi Normal FAX TX Resolution Off Normal 0 Density Text+Photo Preview Destination Status 2-sided/Book Original Quick Setup Org./Sending Data Format Continuous Scan Image Quality ...System Menu] key. Zoom Add Zoom to set replacement location. The Zoom Quality function will be Key 3 newly registered. A confirmation screen appears. FAX - FAX Operation (Basic) > Quick Setup Screen Changing Registration The following procedure is one example for...
...Press [Yes]. Destination Sending Image Destination 0123456789 1/1 Original : A4 Zoom : 100% Send : A4 A4 Original Size 1-sided 200x100dpi Normal FAX TX Resolution Off Normal 0 Density Text+Photo Preview Destination Status 2-sided/Book Original Quick Setup Org./Sending Data Format Continuous Scan Image Quality ...System Menu] key. Zoom Add Zoom to set replacement location. The Zoom Quality function will be Key 3 newly registered. A confirmation screen appears. FAX - FAX Operation (Basic) > Quick Setup Screen Changing Registration The following procedure is one example for...
Fax System (W) Operation Guide Rev-2.2013.1
Page 66
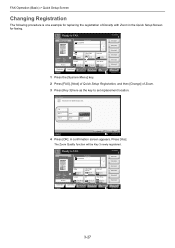
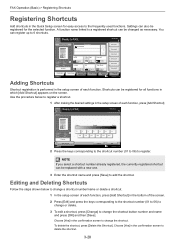
... Sending Image Destination 0123456789 1/1 Original : A4 Zoom : 100% Send : A4 A4 Original Size 1-sided 200x100dpi Normal FAX TX Resolution Off Normal 0 Density Text+Photo Preview Destination Status 2-sided/Book Original Quick Setup Org./Sending Data Format Continuous... to delete the shortcut. 3-28 Choose [Yes] in the Quick Setup screen for the selected function. FAX Operation (Basic) > Registering Shortcuts Registering Shortcuts Add shortcuts in the confirmation screen to change a shortcut number/name or delete a shortcut. 1 In the setup screen of each function, press [Add ...
... Sending Image Destination 0123456789 1/1 Original : A4 Zoom : 100% Send : A4 A4 Original Size 1-sided 200x100dpi Normal FAX TX Resolution Off Normal 0 Density Text+Photo Preview Destination Status 2-sided/Book Original Quick Setup Org./Sending Data Format Continuous... to delete the shortcut. 3-28 Choose [Yes] in the Quick Setup screen for the selected function. FAX Operation (Basic) > Registering Shortcuts Registering Shortcuts Add shortcuts in the confirmation screen to change a shortcut number/name or delete a shortcut. 1 In the setup screen of each function, press [Add ...


