
TASKalfa MFP Network Fax Driver Operation Guide Rev.2011.1
Page 11
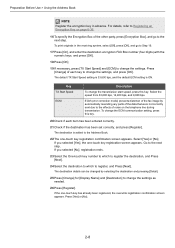
... the settings. Click on the Next button. 16 On the FAX Settings page, you can assign a name to the machine. NOTE: If Windows Security and User Account Control are correct. Click on the Next button. 17 On the Confirm Settings page, click Install if the settings are displayed, no ...trouble should be found with operation after installing the driver and software we have provided. Installing the Corresponding Software 15 On the Driver tab, check the box for FAX Driver.
... the settings. Click on the Next button. 16 On the FAX Settings page, you can assign a name to the machine. NOTE: If Windows Security and User Account Control are correct. Click on the Next button. 17 On the Confirm Settings page, click Install if the settings are displayed, no ...trouble should be found with operation after installing the driver and software we have provided. Installing the Corresponding Software 15 On the Driver tab, check the box for FAX Driver.

TASKalfa MFP Network Fax Driver Operation Guide Rev.2011.1
Page 17
NOTE: Confirm that the number of copies is just an example and the actual dialog box...down menu in order to access the Properties window. 6 Specify all of the machine to be faxed. The following screen shot is 1. NOTE: Refer to FAX Setting Tab on page 2-7 for the application that you are using . 5 Click on the Properties... button in the Name field to select the name of the desired settings under the FAX Setting tab, such as the Network FAX. Select Print from the File menu. Sending a Fax Basic Transmission 1 2 3 4 Use an application on your computer may differ depending ...
NOTE: Confirm that the number of copies is just an example and the actual dialog box...down menu in order to access the Properties window. 6 Specify all of the machine to be faxed. The following screen shot is 1. NOTE: Refer to FAX Setting Tab on page 2-7 for the application that you are using . 5 Click on the Properties... button in the Name field to select the name of the desired settings under the FAX Setting tab, such as the Network FAX. Select Print from the File menu. Sending a Fax Basic Transmission 1 2 3 4 Use an application on your computer may differ depending ...
TASKalfa MFP Network Fax Driver Operation Guide Rev.2011.1
Page 18
... checkbox on the Sending Options tab of the Default Settings dialog box to display the destination confirmation screen and check the selected destinations before transmission. For fax transmission, select FAX. NOTE: You can be displayed under the Destination List area. Refer to (1) Sending Options Tab on page ... for the application that you are using a cover page, refer to (3) Cover Page Settings on page 2-14. 9 For Internet fax transmission, refer to (6) Internet fax Setting on page 2- 16 to enter the subject and the message in the tab. 2-6 button. 13 Click on the Add to...
... checkbox on the Sending Options tab of the Default Settings dialog box to display the destination confirmation screen and check the selected destinations before transmission. For fax transmission, select FAX. NOTE: You can be displayed under the Destination List area. Refer to (1) Sending Options Tab on page ... for the application that you are using a cover page, refer to (3) Cover Page Settings on page 2-14. 9 For Internet fax transmission, refer to (6) Internet fax Setting on page 2- 16 to enter the subject and the message in the tab. 2-6 button. 13 Click on the Add to...

TASKalfa MFP Network Fax Driver Operation Guide Rev.2011.1
Page 21
...you use the timer may not be accomplished as expected. The desired time setting can be entered directly with the keyboard or by fax. 3 Display confirm dialog checkbox You can minimize the need to match the correct time. The Default Settings dialog box can be accessed by the following...the machine to be sure to adjust it to change the settings each time. Be sure to display the destination confirmation screen and check the destinations before making this fax machine does not match the current time, communications that your documents will be transmitted. Enter the time on the ...
...you use the timer may not be accomplished as expected. The desired time setting can be entered directly with the keyboard or by fax. 3 Display confirm dialog checkbox You can minimize the need to match the correct time. The Default Settings dialog box can be accessed by the following...the machine to be sure to adjust it to change the settings each time. Be sure to display the destination confirmation screen and check the destinations before making this fax machine does not match the current time, communications that your documents will be transmitted. Enter the time on the ...
TASKalfa MFP Network Fax Driver Operation Guide Rev.2011.1
Page 33
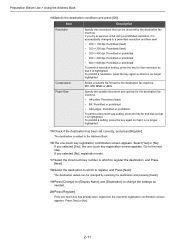
... characters can be entered. 6 Department: A maximum of 64 characters can be entered. 7 Name: A maximum of 32 characters can be entered. 8 FAX Number: A maximum of 20 characters can be entered (Entry is allowed for the characters 0 to 9 and spaces.) 3-3 Change the recipient information and click... on the OK button. 1 2 3 4 1 FAX Number (Internet FAX Address): The fax number or the Internet fax address cannot be changed and click on the Sender Information tab and set , the Cover Page Confirmation screen will be entered. 6 When the sender information is not set in...
... characters can be entered. 6 Department: A maximum of 64 characters can be entered. 7 Name: A maximum of 32 characters can be entered. 8 FAX Number: A maximum of 20 characters can be entered (Entry is allowed for the characters 0 to 9 and spaces.) 3-3 Change the recipient information and click... on the OK button. 1 2 3 4 1 FAX Number (Internet FAX Address): The fax number or the Internet fax address cannot be changed and click on the Sender Information tab and set , the Cover Page Confirmation screen will be entered. 6 When the sender information is not set in...
Fax System (W) Operation Guide Rev-2.2013.1
Page 6
... Result by E-mail 5-11 Confirmation Screen of Destinations 5-12 6 Setup and Registration ...6-1 Selection of Telephone Line (Inch version only 6-2 Selection of Transmit Terminal Identification (TTI 6-3 Setting the TTI information 6-4 ECM TX ...6-7 TX Start Speed ...6-8 FAX/TEL Auto Switch Reception 6-9 FAX/Answering Machine Auto Switch Reception 6-11 Rings ...6-13 Volume Adjustment ...6-14 Job Finish...
... Result by E-mail 5-11 Confirmation Screen of Destinations 5-12 6 Setup and Registration ...6-1 Selection of Telephone Line (Inch version only 6-2 Selection of Transmit Terminal Identification (TTI 6-3 Setting the TTI information 6-4 ECM TX ...6-7 TX Start Speed ...6-8 FAX/TEL Auto Switch Reception 6-9 FAX/Answering Machine Auto Switch Reception 6-11 Rings ...6-13 Volume Adjustment ...6-14 Job Finish...
Fax System (W) Operation Guide Rev-2.2013.1
Page 30
... default ECM setting is added to the next step. To change the settings. If the one-touch key has already been registered, the overwrite registration confirmation screen appears. Press [Yes] or [No]. 2-8 To print originals in advance. Select the speed from 33,600 bps, 14,400 bps, and ...to change the ECM communication setting, press this key. Go to the effects of noise on page 6-36. 16To specify the Encryption Box of the fax image by selecting the destination and pressing [Detail]. 25Press [Change] for [Display Name] and [Destination] to change the settings as needed. 26Press [...
... default ECM setting is added to the next step. To change the settings. If the one-touch key has already been registered, the overwrite registration confirmation screen appears. Press [Yes] or [No]. 2-8 To print originals in advance. Select the speed from 33,600 bps, 14,400 bps, and ...to change the ECM communication setting, press this key. Go to the effects of noise on page 6-36. 16To specify the Encryption Box of the fax image by selecting the destination and pressing [Detail]. 25Press [Change] for [Display Name] and [Destination] to change the settings as needed. 26Press [...

Fax System (W) Operation Guide Rev-2.2013.1
Page 32
... this setting is set to the destination machine. If the other machine supports Direct SMTP, enter the IP address of i-FAX Address. Full mode Transmission confirmation is not sent to [On], transmission takes place by direct SMTP (not through an e-mail server). 13Press [Change] of Mode and select [Simple] or [Full]. ...
... this setting is set to the destination machine. If the other machine supports Direct SMTP, enter the IP address of i-FAX Address. Full mode Transmission confirmation is not sent to [On], transmission takes place by direct SMTP (not through an e-mail server). 13Press [Change] of Mode and select [Simple] or [Full]. ...
Fax System (W) Operation Guide Rev-2.2013.1
Page 33
... selected [Yes], the one -touch key has already been registered, the overwrite registration confirmation screen appears. MH, MR, MMR or JBIG Paper Size Specify the suitable document size options for the destination fax machine. • A4/Letter: Permitted (fixed) • B4: Permitted or prohibited...destination to which to the next step. If you try to send an i-FAX using a prohibited resolution, it is added to the Address Book. 16The one-touch key registration confirmation screen appears. Item Description Resolution Specify the resolutions that it is automatically changed ...
... selected [Yes], the one -touch key has already been registered, the overwrite registration confirmation screen appears. MH, MR, MMR or JBIG Paper Size Specify the suitable document size options for the destination fax machine. • A4/Letter: Permitted (fixed) • B4: Permitted or prohibited...destination to which to the next step. If you try to send an i-FAX using a prohibited resolution, it is added to the Address Book. 16The one-touch key registration confirmation screen appears. Item Description Resolution Specify the resolutions that it is automatically changed ...
Fax System (W) Operation Guide Rev-2.2013.1
Page 36
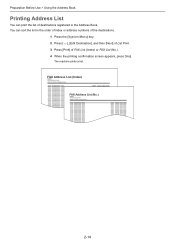
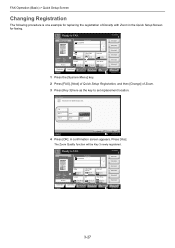
The machine prints a list. Preparation Before Use > Using the Address Book Printing Address List You can sort the list in the order of index or address numbers of the destinations. 1 Press the [System Menu] key. 2 Press [ ], [Edit Destination], and then [Next] of List Print. 3 Press [Print] of destinations registered in the Address Book. FAX Address List (Index) FAX Address List (No.) 2-14 You can print the list of FAX List (Index) or FAX List (No.). 4 When the printing confirmation screen appears, press [Yes].
The machine prints a list. Preparation Before Use > Using the Address Book Printing Address List You can sort the list in the order of index or address numbers of the destinations. 1 Press the [System Menu] key. 2 Press [ ], [Edit Destination], and then [Next] of List Print. 3 Press [Print] of destinations registered in the Address Book. FAX Address List (Index) FAX Address List (No.) 2-14 You can print the list of FAX List (Index) or FAX List (No.). 4 When the printing confirmation screen appears, press [Yes].

Fax System (W) Operation Guide Rev-2.2013.1
Page 45
.... [Pause] Pressing this method to insert a pause before reentering the fax number. Entry On Hook Direct Chain Detail Delete Recall 0001 0002 0003 0004 0005 No. Entry] and repeat the above procedure. Press [Space] to confirm the FAX number is On, press [OK] and you dial a specific number.... 3-7 Re-enter the same FAX number and press [OK] to move the cursor. AAA BBB CCC DDD EEE 0006 0007...
.... [Pause] Pressing this method to insert a pause before reentering the fax number. Entry On Hook Direct Chain Detail Delete Recall 0001 0002 0003 0004 0005 No. Entry] and repeat the above procedure. Press [Space] to confirm the FAX number is On, press [OK] and you dial a specific number.... 3-7 Re-enter the same FAX number and press [OK] to move the cursor. AAA BBB CCC DDD EEE 0006 0007...

Fax System (W) Operation Guide Rev-2.2013.1
Page 50
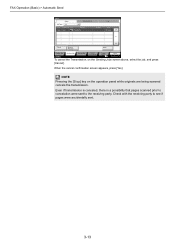
... priority override that is in progress is selected in the Sending Jobs screen, and press [Yes]. For details, refer to Confirmation Screen of the priority override fax job will start after the job in progress, transmission of Destinations on page 5-12. Accepted Time Type Destination 438 14:47... Job Job Type All Job No. Checking the Send Status 1 Press the [Status/Job Cancel] key. Check before Send, a destination confirmation screen is waiting, select the job and press [Priority Override] in Dest. FAX Operation (Basic) > Automatic Send Send Start 1 Press the [Start] key.
... priority override that is in progress is selected in the Sending Jobs screen, and press [Yes]. For details, refer to Confirmation Screen of the priority override fax job will start after the job in progress, transmission of Destinations on page 5-12. Accepted Time Type Destination 438 14:47... Job Job Type All Job No. Checking the Send Status 1 Press the [Status/Job Cancel] key. Check before Send, a destination confirmation screen is waiting, select the job and press [Priority Override] in Dest. FAX Operation (Basic) > Automatic Send Send Start 1 Press the [Start] key.
Fax System (W) Operation Guide Rev-2.2013.1
Page 51
When the cancel confirmation screen appears, press [Yes]. FAX Operation (Basic) > Automatic Send Status Status Scheduled Job Job Type All Job No. NOTE Pressing the [Stop] key on the Sending Jobs screen above, select ...
When the cancel confirmation screen appears, press [Yes]. FAX Operation (Basic) > Automatic Send Status Status Scheduled Job Job Type All Job No. NOTE Pressing the [Stop] key on the Sending Jobs screen above, select ...

Fax System (W) Operation Guide Rev-2.2013.1
Page 54
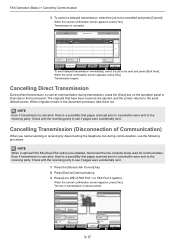
FAX Operation (Basic) > Canceling Communication Canceling Communication The method for the specified time, use the following the completed scanning of originals is canceled, and the originals ... in the document processor, take them out from the original output table. NOTE You can cancel transmission by disconnecting the telephone line. When the cancel confirmation screen appears, press [Yes]. Even if transmission is canceled, there is canceled. Status Status Scheduled Job Job Type All Job No. Scanning of originals, use...
FAX Operation (Basic) > Canceling Communication Canceling Communication The method for the specified time, use the following the completed scanning of originals is canceled, and the originals ... in the document processor, take them out from the original output table. NOTE You can cancel transmission by disconnecting the telephone line. When the cancel confirmation screen appears, press [Yes]. Even if transmission is canceled, there is canceled. Status Status Scheduled Job Job Type All Job No. Scanning of originals, use...
Fax System (W) Operation Guide Rev-2.2013.1
Page 55
...Transmission (Disconnection of FAX Port 1 or FAX Port 2 (option). When the cancel confirmation screen appears, press [Yes]. Status Scanner Ready. When the cancel confirmation screen appears, press [Yes]. When originals remain in transmission is canceled. NOTE When 2 optional FAX Kits (Dual FAX option) are ... canceled, there is a possibility that have been scanned are installed, disconnect the line currently being used for communication. FAX Port 2 Receiving... Status Status Scheduled Job Log Job No. The originals that pages scanned prior to cancelation were sent...
...Transmission (Disconnection of FAX Port 1 or FAX Port 2 (option). When the cancel confirmation screen appears, press [Yes]. Status Scanner Ready. When the cancel confirmation screen appears, press [Yes]. When originals remain in transmission is canceled. NOTE When 2 optional FAX Kits (Dual FAX option) are ... canceled, there is a possibility that have been scanned are installed, disconnect the line currently being used for communication. FAX Port 2 Receiving... Status Status Scheduled Job Log Job No. The originals that pages scanned prior to cancelation were sent...

Fax System (W) Operation Guide Rev-2.2013.1
Page 59
...]. 6 Press [Register]. Press [Yes] in the confirmation screen to 16 in Group Registration for information how to delete. 4 Press [Delete]. When editing the destination of a contact registration Change Address Number, Name, the fax number of Address Book. 3 Select the destination or ...group to add contacts. When editing a group 1 Change Address Number and Name. When the change confirmation screen appears, press [Yes]. 3-21 FAX Operation (Basic) > Selecting a Destination from a group, select the contact to be removed and press [Delete]. When editing ...
...]. 6 Press [Register]. Press [Yes] in the confirmation screen to 16 in Group Registration for information how to delete. 4 Press [Delete]. When editing the destination of a contact registration Change Address Number, Name, the fax number of Address Book. 3 Select the destination or ...group to add contacts. When editing a group 1 Change Address Number and Name. When the change confirmation screen appears, press [Yes]. 3-21 FAX Operation (Basic) > Selecting a Destination from a group, select the contact to be removed and press [Delete]. When editing ...
Fax System (W) Operation Guide Rev-2.2013.1
Page 61
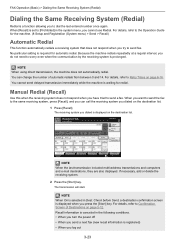
...system that does not respond when you have tried to send a fax. The receiving system you dialed is displayed on page 6-16. NOTE When On is displayed when you cannot use Redial. Check before Send, a destination confirmation screen is selected in the system menu, you press the [... Use this when the receiving system does not respond when you try to Confirmation Screen of automatic redials from between 0 and 14. ABCD Pause Space [email protected] 001/001 Backspace Destination Address Book FAX No. FAX Operation (Basic) > Dialing the Same Receiving System (Redial) Dialing the ...
...system that does not respond when you have tried to send a fax. The receiving system you dialed is displayed on page 6-16. NOTE When On is displayed when you cannot use Redial. Check before Send, a destination confirmation screen is selected in the system menu, you press the [... Use this when the receiving system does not respond when you try to Confirmation Screen of automatic redials from between 0 and 14. ABCD Pause Space [email protected] 001/001 Backspace Destination Address Book FAX No. FAX Operation (Basic) > Dialing the Same Receiving System (Redial) Dialing the ...

Fax System (W) Operation Guide Rev-2.2013.1
Page 63
...To see the preview again, make the transmission function changes and select the destination. 1 Press the [Start] key to Automatic Send on page 3-4 or FAX Operation (Advanced) on page 4-44. A document stored in a polling box for the machine. (8 Setup and Registration (System menu) > Send >... for polling transmission can be pressed to move through the preview images in the document processor again. Check before Send, a destination confirmation screen is cancelled. You cannot change the transmission functions while the preview image is displayed. • To change any of Image ...
...To see the preview again, make the transmission function changes and select the destination. 1 Press the [Start] key to Automatic Send on page 3-4 or FAX Operation (Advanced) on page 4-44. A document stored in a polling box for the machine. (8 Setup and Registration (System menu) > Send >... for polling transmission can be pressed to move through the preview images in the document processor again. Check before Send, a destination confirmation screen is cancelled. You cannot change the transmission functions while the preview image is displayed. • To change any of Image ...
Fax System (W) Operation Guide Rev-2.2013.1
Page 65
FAX - A confirmation screen appears. Destination Sending Image Destination 0123456789 1/1 Original : A4 Zoom : 100% Send : A4 A4 Original Size 1-sided 200x100dpi Normal FAX TX Resolution Off Normal 0 Zoom Text+Photo Preview Destination Status 2-sided/Book Original Quick... 3-27 Destination Sending Image Destination 0123456789 1/1 Original : A4 Zoom : 100% Send : A4 A4 Original Size 1-sided 200x100dpi Normal FAX TX Resolution Off Normal 0 Density Text+Photo Preview Destination Status 2-sided/Book Original Quick Setup Org./Sending Data Format Continuous Scan Image ...
FAX - A confirmation screen appears. Destination Sending Image Destination 0123456789 1/1 Original : A4 Zoom : 100% Send : A4 A4 Original Size 1-sided 200x100dpi Normal FAX TX Resolution Off Normal 0 Zoom Text+Photo Preview Destination Status 2-sided/Book Original Quick... 3-27 Destination Sending Image Destination 0123456789 1/1 Original : A4 Zoom : 100% Send : A4 A4 Original Size 1-sided 200x100dpi Normal FAX TX Resolution Off Normal 0 Density Text+Photo Preview Destination Status 2-sided/Book Original Quick Setup Org./Sending Data Format Continuous Scan Image ...
Fax System (W) Operation Guide Rev-2.2013.1
Page 66
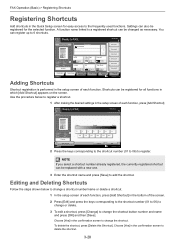
...shortcut, press [Delete this Shortcut]. Choose [Yes] in the confirmation screen to 6 shortcuts. Destination Sending Image Destination 0123456789 1/1 Original : A4 Zoom : 100% Send : A4 A4 Original Size 1-sided 200x100dpi Normal FAX TX Resolution Off Normal 0 Density Text+Photo Preview Destination Status...in the setup screen of each function. FAX Operation (Basic) > Registering Shortcuts Registering Shortcuts Add shortcuts in the Quick Setup screen for easy access to change the shortcut. Choose [Yes] in the confirmation screen to the frequently used functions. ...
...shortcut, press [Delete this Shortcut]. Choose [Yes] in the confirmation screen to 6 shortcuts. Destination Sending Image Destination 0123456789 1/1 Original : A4 Zoom : 100% Send : A4 A4 Original Size 1-sided 200x100dpi Normal FAX TX Resolution Off Normal 0 Density Text+Photo Preview Destination Status...in the setup screen of each function. FAX Operation (Basic) > Registering Shortcuts Registering Shortcuts Add shortcuts in the Quick Setup screen for easy access to change the shortcut. Choose [Yes] in the confirmation screen to the frequently used functions. ...


