
FS-C1020MFP Driver Setup Guide
Page 1
... CD-ROM. ❖ Software Release Notes Provides the release notes for This Machine Operations require installing drivers appropriate to another fax machine, without printing the document. 1 CD-ROM Menu The following drivers are available using a printer language. ❖ Scanner driver To use this CD-ROM. ❖ Select Language Changes the language of... using the CD-ROM: ❖ Install Software Installs drivers and utilities. ❖ Remove Software Removes installed drivers and utilities. ❖ Documentation Displays a list of the menu and the installed software.
... CD-ROM. ❖ Software Release Notes Provides the release notes for This Machine Operations require installing drivers appropriate to another fax machine, without printing the document. 1 CD-ROM Menu The following drivers are available using a printer language. ❖ Scanner driver To use this CD-ROM. ❖ Select Language Changes the language of... using the CD-ROM: ❖ Install Software Installs drivers and utilities. ❖ Remove Software Removes installed drivers and utilities. ❖ Documentation Displays a list of the menu and the installed software.

FS-C1020MFP Driver Setup Guide
Page 5
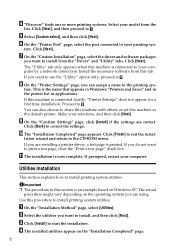
...install for driver installation. Use this option, pro- If the "Found New Hardware Wizard" dialog box appears, click [Cancel]. C The "Discover Printing System" page appears displaying [Discover] select- This is the name that is an example based on the operating system you can assign a name ...to the printing sys- Make your computer. Click [Back] to the CD-ROM menu. Note ❒ In this option, you are installing a printer driver, a test page is printed. D On the "Printer Settings" page, you do a custom installation ...
...install for driver installation. Use this option, pro- If the "Found New Hardware Wizard" dialog box appears, click [Cancel]. C The "Discover Printing System" page appears displaying [Discover] select- This is the name that is an example based on the operating system you can assign a name ...to the printing sys- Make your computer. Click [Back] to the CD-ROM menu. Note ❒ In this option, you are installing a printer driver, a test page is printed. D On the "Printer Settings" page, you do a custom installation ...
FS-C1020MFP Driver Setup Guide
Page 6
...Make your computer. Important ❒ The procedure in applications. A On the "Installation Method" page, select [Utilities]. C Click [Install] to install printing system utilities. E Select [Custom select], and then click [Next]. J The "Installation Completed" page appears. lation wizard and return to correct the...also choose to I . This is an example based on Windows XP. You can assign a name to install printing system utilities. Click [Back] to the CD-ROM menu. Click [Next], and then proceed to install, and then click [Next]. B Select the utilities you are ...
...Make your computer. Important ❒ The procedure in applications. A On the "Installation Method" page, select [Utilities]. C Click [Install] to install printing system utilities. E Select [Custom select], and then click [Next]. J The "Installation Completed" page appears. lation wizard and return to correct the...also choose to I . This is an example based on Windows XP. You can assign a name to install printing system utilities. Click [Back] to the CD-ROM menu. Click [Next], and then proceed to install, and then click [Next]. B Select the utilities you are ...

FS-C1020MFP Driver Setup Guide
Page 7
... on the machine. Important ❒ To install the driver, you must log on as an Administrator. C Double-click the package file icon. C Under "Hardware", click [Print & Fax]. H Click the close button at the upper left corner to install the drivers under Mac OS X. A Insert the CD-ROM into the CD drive... of printers for the machine name. B From the Apple menu, select [System Preferences...]. Installing the drivers Use this section explain how to set up the machine under a USB connection to the CD-ROM...
... on the machine. Important ❒ To install the driver, you must log on as an Administrator. C Double-click the package file icon. C Under "Hardware", click [Print & Fax]. H Click the close button at the upper left corner to install the drivers under Mac OS X. A Insert the CD-ROM into the CD drive... of printers for the machine name. B From the Apple menu, select [System Preferences...]. Installing the drivers Use this section explain how to set up the machine under a USB connection to the CD-ROM...

FS-C1020MFP Driver Setup Guide
Page 8
... to a computer running Mac OS X 10.5. B From the Apple menu, select [System Preferences...]. D Check the list of the [Print & Fax] dialog box. G From the [System Preferences] menu, click [Quit System Preferences]. G If [Print Using:] shows the machine, click [Add], and then proceed to step...the tray 2 configuration, and then click [OK]. B From the Apple menu, select [System Preferences...]. C Under "Hardware", click [Print & Fax]. If the machine name is shown in the menu. E Click the [IP Printer] icon in the [Print & Fax] dialog box. 8 F In the [Address], type the...
... to a computer running Mac OS X 10.5. B From the Apple menu, select [System Preferences...]. D Check the list of the [Print & Fax] dialog box. G From the [System Preferences] menu, click [Quit System Preferences]. G If [Print Using:] shows the machine, click [Add], and then proceed to step...the tray 2 configuration, and then click [OK]. B From the Apple menu, select [System Preferences...]. C Under "Hardware", click [Print & Fax]. If the machine name is shown in the menu. E Click the [IP Printer] icon in the [Print & Fax] dialog box. 8 F In the [Address], type the...

FS-C1020MFP Driver Setup Guide
Page 9
... of machines found appears under the search box. C Under "Hardware", click [Print & Fax]. E Click the [IP] icon in the [Print & Fax] dialog box. I In the search box, type the machine name. L From the [System Preferences] menu, click [Quit System Preferences]. K In the [Installable Options] dialog box, ......] for as the protocol, and leave the queue blank. Select [LPD] for [Print Using:]. G If [Print Using:] shows the machine, click [Add], and then proceed to step H. If the machine name is shown in the menu. J Select the machine from the list, and then click [Add].
... of machines found appears under the search box. C Under "Hardware", click [Print & Fax]. E Click the [IP] icon in the [Print & Fax] dialog box. I In the search box, type the machine name. L From the [System Preferences] menu, click [Quit System Preferences]. K In the [Installable Options] dialog box, ......] for as the protocol, and leave the queue blank. Select [LPD] for [Print Using:]. G If [Print Using:] shows the machine, click [Add], and then proceed to step H. If the machine name is shown in the menu. J Select the machine from the list, and then click [Add].

FS-C1020MFP Driver Setup Guide
Page 12
...power cord or Ethernet ca- Before installing the software, check the machine's IP address and the network topology. A On the [Start] menu, click [Printers and Faxes]. C Click the [Details] tab, and then confirm that the port is not properly connected. First reboot Windows...] to a network connection. See p.11 "Connection Problems". If connection cannot be printed from a computer. Under [Other Devices], select the printer, and then open its properties dialog box. erly connected. Test Print Problems This section describes what to USB or network printer, as required. Note ❒...
...power cord or Ethernet ca- Before installing the software, check the machine's IP address and the network topology. A On the [Start] menu, click [Printers and Faxes]. C Click the [Details] tab, and then confirm that the port is not properly connected. First reboot Windows...] to a network connection. See p.11 "Connection Problems". If connection cannot be printed from a computer. Under [Other Devices], select the printer, and then open its properties dialog box. erly connected. Test Print Problems This section describes what to USB or network printer, as required. Note ❒...
KM-NET ADMIN Operation Guide for Ver 2.0
Page 20
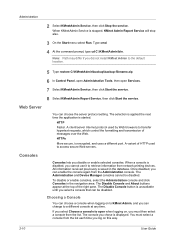
...Device Manager consoles cannot be disabled. The Disable Console button is saved in the navigation area. You must then select a console from network printing devices. A client/server Internet protocol used to open Services. 7 Select KMnetAdmin Service, then click Start the service. 8 Select KMnetAdmin Report ... The selection is applied the next time the application is stopped, KMnet Admin Report Service will stop also. 3 On the Start menu select Run. A variant of HTTP used by Web browsers to retrieve information from the list. All information received previously is unavailable ...
...Device Manager consoles cannot be disabled. The Disable Console button is saved in the navigation area. You must then select a console from network printing devices. A client/server Internet protocol used to open Services. 7 Select KMnetAdmin Service, then click Start the service. 8 Select KMnetAdmin Report ... The selection is applied the next time the application is stopped, KMnet Admin Report Service will stop also. 3 On the Start menu select Run. A variant of HTTP used by Web browsers to retrieve information from the list. All information received previously is unavailable ...
KM-NET ADMIN Operation Guide for Ver 2.0
Page 23
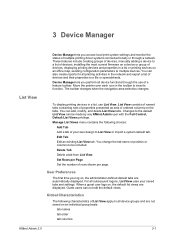
... by any KMnet Admin user with the Full Control, Default List Views privilege. Manage List Views menu contains the following characteristics of List View apply to all printing activities in the toolbar to multiple devices. Delete Tab Delete a tab from List View. Guest users...of devices, installing the most current firmware on a device or group of devices, displaying printing devices and properties in a list, use of a feature toolbar. To display printing devices in a list or printing devices on , the administrator-defined default tabs are displayed. You can be included. User...
... by any KMnet Admin user with the Full Control, Default List Views privilege. Manage List Views menu contains the following characteristics of List View apply to all printing activities in the toolbar to multiple devices. Delete Tab Delete a tab from List View. Guest users...of devices, installing the most current firmware on a device or group of devices, displaying printing devices and properties in a list, use of a feature toolbar. To display printing devices in a list or printing devices on , the administrator-defined default tabs are displayed. You can be included. User...
KM-NET ADMIN Operation Guide for Ver 2.0
Page 32
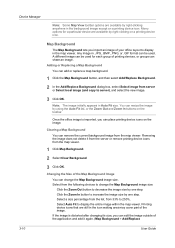
...list, from the map viewer. Select Auto Fit to increase the image size by one step. Clearing a Map Background You can place printing device icons on a printing device icon. If the image is imported, you can remove the current background image from 33% to display in the map viewer. ...Clear Background. 3 Click OK. Removing the image does not delete it again. (Map Background > Add/Replace 3-10 User Guide Menu options for each group of your office layout to 250%. Printing device icons that are still in the icon waiting area may cover part of the Map Background Image You can...
...list, from the map viewer. Select Auto Fit to increase the image size by one step. Clearing a Map Background You can place printing device icons on a printing device icon. If the image is imported, you can remove the current background image from 33% to display in the map viewer. ...Clear Background. 3 Click OK. Removing the image does not delete it again. (Map Background > Add/Replace 3-10 User Guide Menu options for each group of your office layout to 250%. Printing device icons that are still in the icon waiting area may cover part of the Map Background Image You can...

KM-NET ADMIN Operation Guide for Ver 2.0
Page 61
...existing group and click Edit Group. Groups Accounting Manager 7 Under Selected Columns, use invisible Unicode or extended ASCII characters. 4 Click each menu button to select from available options: KMnet Admin 2.0 4-4 Do not use the up and down arrow buttons on the right to position... the original settings, click Restore Defaults. For example, you create a report based on a specified group. Creating a group for one printing device lets you can select the Diagram View options to the original settings, click Restore Defaults. The top position appears as the leftmost tab...
...existing group and click Edit Group. Groups Accounting Manager 7 Under Selected Columns, use invisible Unicode or extended ASCII characters. 4 Click each menu button to select from available options: KMnet Admin 2.0 4-4 Do not use the up and down arrow buttons on the right to position... the original settings, click Restore Defaults. For example, you create a report based on a specified group. Creating a group for one printing device lets you can select the Diagram View options to the original settings, click Restore Defaults. The top position appears as the leftmost tab...
KM-NET ADMIN Operation Guide for Ver 2.0
Page 62
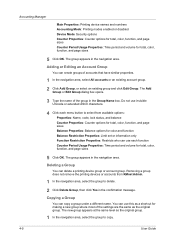
...group to copy. 4-5 User Guide The new group appears at the same level as the original group. Removing a group does not remove the printing devices or accounts from KMnet Admin. 1 In the navigation area, select the group to select from available options: Properties: Name, code, ... Accounting Mode: Printing modes enabled or disabled Device Mode: Security options Counter Properties: Counter options for total, color, function, and page sizes Counter Period Usage Properties: Time period and volume for total, color, function, and page sizes 5 Click OK. Do not use each menu button to delete...
...group to copy. 4-5 User Guide The new group appears at the same level as the original group. Removing a group does not remove the printing devices or accounts from KMnet Admin. 1 In the navigation area, select the group to select from available options: Properties: Name, code, ... Accounting Mode: Printing modes enabled or disabled Device Mode: Security options Counter Properties: Counter options for total, color, function, and page sizes Counter Period Usage Properties: Time period and volume for total, color, function, and page sizes 5 Click OK. Do not use each menu button to delete...
KM-NET ADMIN Operation Guide for Ver 2.0
Page 63
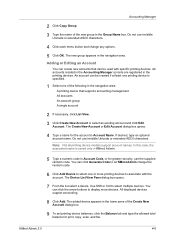
... ASCII characters. 4 Click each menu button and change the random code. 6 Click Add Device to associate with specific printing devices. The new group appears in the printing devices. Adding or Editing an Account You can click the arrow buttons to display more printing devices to select one or more...dialog box opens. 4 Type a name for the account in the lower pane of the Create New Account dialog box. 9 To set printing device balances, click the Balance tab and type the allowed total balance for greater security, use invisible Unicode or extended ASCII characters. You can...
... ASCII characters. 4 Click each menu button and change the random code. 6 Click Add Device to associate with specific printing devices. The new group appears in the printing devices. Adding or Editing an Account You can click the arrow buttons to display more printing devices to select one or more...dialog box opens. 4 Type a name for the account in the lower pane of the Create New Account dialog box. 9 To set printing device balances, click the Balance tab and type the allowed total balance for greater security, use invisible Unicode or extended ASCII characters. You can...
KM-NET ADMIN Operation Guide for Ver 2.0
Page 77
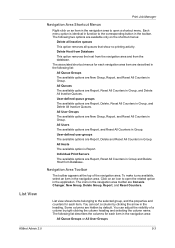
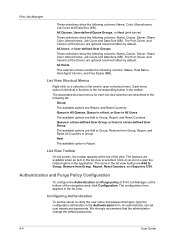
... options are Report, Delete, Reset All Counters in Group. All Hosts The available option is identical in function to open a shortcut menu. Individual Print Servers The available options are Report, Reset All Counters in the navigation area toolbar are New Group, Report, and Reset All Counters ... of a column by default. Click on the shortcut menus: Delete all inactive queues This option removes all queues that show no printing activity. The associated shortcut menus for each navigation area item are described in the following two options are hidden by right-clicking the...
... options are Report, Delete, Reset All Counters in Group. All Hosts The available option is identical in function to open a shortcut menu. Individual Print Servers The available options are Report, Reset All Counters in the navigation area toolbar are New Group, Report, and Reset All Counters ... of a column by default. Click on the shortcut menus: Delete all inactive queues This option removes all queues that show no printing activity. The associated shortcut menus for each navigation area item are described in the following two options are hidden by right-clicking the...
KM-NET ADMIN Operation Guide for Ver 2.0
Page 78
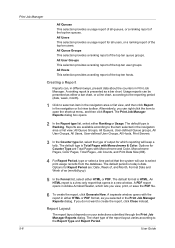
...Report, Reset Counters, and Export to open the related option in the list view is Report. Each menu option is identical in function to open a shortcut menu. Configuring Authentication To set user names and passwords. List View Shortcut Menus Right-click on an icon ...that the administrator change the default passwords. 5-4 User Guide Authentication and Purge Policy Configuration To configure the Authentication and Purge policy of Print Job Manager, at the top of the navigation area, click Configuration. All Hosts This selection shows contain the following columns: Name,...
...Report, Reset Counters, and Export to open the related option in the list view is Report. Each menu option is identical in function to open a shortcut menu. Configuring Authentication To set user names and passwords. List View Shortcut Menus Right-click on an icon ...that the administrator change the default passwords. 5-4 User Guide Authentication and Purge Policy Configuration To configure the Authentication and Purge policy of Print Job Manager, at the top of the navigation area, click Configuration. All Hosts This selection shows contain the following columns: Name,...
KM-NET ADMIN Operation Guide for Ver 2.0
Page 80
... ranking report of , and Month. A ranking report is Total Pages with Monochrome and Color, Monochrome Pages, Color Pages, Total Pages, Job Counts, and Print Data Size (KB). 4 For Report Period, type or select a time period that opens in the navigation or list view toolbar. A separate window opens ...you selected in either a bar chart, or a line chart, according to the reporting period (date, week, month). 1 Click to open the shortcut menu, and then click Report. Reports are Total Pages with Monochrome & Color. The default type is presented as (mm/dd/yyyy). 5 In the Format list...
... ranking report of , and Month. A ranking report is Total Pages with Monochrome and Color, Monochrome Pages, Color Pages, Total Pages, Job Counts, and Print Data Size (KB). 4 For Report Period, type or select a time period that opens in the navigation or list view toolbar. A separate window opens ...you selected in either a bar chart, or a line chart, according to the reporting period (date, week, month). 1 Click to open the shortcut menu, and then click Report. Reports are Total Pages with Monochrome & Color. The default type is presented as (mm/dd/yyyy). 5 In the Format list...
KM-NET ADMIN Operation Guide for Ver 2.0
Page 81
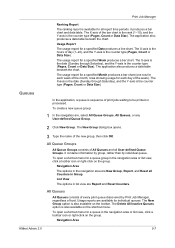
...Y-axis is sequence of host. It contains information by group, rather than by Print Job Manager, regardless of print jobs waiting to be printed or processed. The New Group option is also available on the shortcut menu. The Delete All Inactive Queues option is also available on the toolbar. The ...is the counter type (Pages, Count or Data Size). Print Job Manager Ranking Report The ranking report is available for all Counters in Group. All Queues All Queues consists of the new group, then click OK. To open a shortcut menu for a queue in list view are available for a ...
...Y-axis is sequence of host. It contains information by group, rather than by Print Job Manager, regardless of print jobs waiting to be printed or processed. The New Group option is also available on the shortcut menu. The Delete All Inactive Queues option is also available on the toolbar. The ...is the counter type (Pages, Count or Data Size). Print Job Manager Ranking Report The ranking report is available for all Counters in Group. All Queues All Queues consists of the new group, then click OK. To open a shortcut menu for a queue in list view are available for a ...
KM-NET ADMIN Operation Guide for Ver 2.0
Page 82
...Group, Report, and Reset Counters. List View The options in the confirmation box. Creating a User-Defined Queue Group In Print Job Manager, you assign to a particular group. To open a shortcut menu for the queue group (maximum of a Queue or User You can delete your own queue groups. 1 In the ...click a toolbar icon or right-click on All Queue Groups, and click New Group in the shortcut menu. 3 The user-defined group is no longer have no delete confirmation dialog box. Print Job Manager The options in the navigation area are Report and Reset all Counters in a queue or user...
...Group, Report, and Reset Counters. List View The options in the confirmation box. Creating a User-Defined Queue Group In Print Job Manager, you assign to a particular group. To open a shortcut menu for the queue group (maximum of a Queue or User You can delete your own queue groups. 1 In the ...click a toolbar icon or right-click on All Queue Groups, and click New Group in the shortcut menu. 3 The user-defined group is no longer have no delete confirmation dialog box. Print Job Manager The options in the navigation area are Report and Reset all Counters in a queue or user...
KM-NET ADMIN Operation Guide for Ver 2.0
Page 83
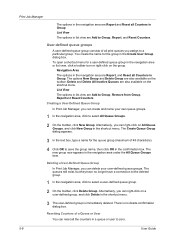
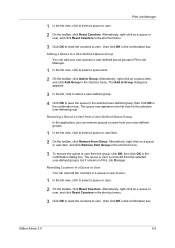
... the queue or user from the group, click OK, then click OK in the shortcut menu. KMnet Admin 2.0 5-9 Removing a Queue or User from a User-Defined Queue Group In the application, you can reset all the counters in Print Job Manager. 1 In the list view, click to select a queue item. 2 On ...zero , then click OK in Print Job Manager. The queue or user is removed from Group. Alternatively, right-click on a queue item, and click Add Group in the confirmation dialog box. Alternatively, right-click on a queue or user, and click Reset Counters in the shortcut menu. 3 Click OK to reset the...
... the queue or user from the group, click OK, then click OK in the shortcut menu. KMnet Admin 2.0 5-9 Removing a Queue or User from a User-Defined Queue Group In the application, you can reset all the counters in Print Job Manager. 1 In the list view, click to select a queue item. 2 On ...zero , then click OK in Print Job Manager. The queue or user is removed from Group. Alternatively, right-click on a queue item, and click Add Group in the confirmation dialog box. Alternatively, right-click on a queue or user, and click Reset Counters in the shortcut menu. 3 Click OK to reset the...
KM-NET ADMIN Operation Guide for Ver 2.0
Page 84
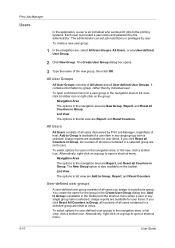
... consists of host. Usage reports are available for user items. If you assign to open a shortcut menu. Add to zero. Print Job Manager Users In the application, a user is an individual who sends print jobs to Group, Report, and Reset Counters. List View The options in Group, all counters of... all users you click Reset All Counters in a selected group are Add to the printing systems. Each user is provided a user name and password by Print Job Manager, regardless of All Users and all Counters in list view are reset to zeros. Usage reports are...
... consists of host. Usage reports are available for user items. If you assign to open a shortcut menu. Add to zero. Print Job Manager Users In the application, a user is an individual who sends print jobs to Group, Report, and Reset Counters. List View The options in Group, all counters of... all users you click Reset All Counters in a selected group are Add to the printing systems. Each user is provided a user name and password by Print Job Manager, regardless of All Users and all Counters in list view are reset to zeros. Usage reports are...


