KM-NET ADMIN Operation Guide for Ver 2.0
Page 50
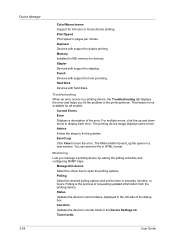
... or hours. Punch Devices with support for hole punching. Polling Select the desired polling options and set the time in HTML format. Troubleshooting When an error occurs in the printing device. Current Errors Error Displays a description of the dialog box. Advice Follow the steps to ...open the polling options. Monitoring Lets you fix the problem in a printing device, the Troubleshooting tab displays the error and helps you manage a printing device by setting the polling schedule and configuring SNMP traps. The KMnet Admin Event...
... or hours. Punch Devices with support for hole punching. Polling Select the desired polling options and set the time in HTML format. Troubleshooting When an error occurs in the printing device. Current Errors Error Displays a description of the dialog box. Advice Follow the steps to ...open the polling options. Monitoring Lets you fix the problem in a printing device, the Troubleshooting tab displays the error and helps you manage a printing device by setting the polling schedule and configuring SNMP traps. The KMnet Admin Event...
KM-NET Viewer Operation Guide Rev-5.2-2010.10
Page 21
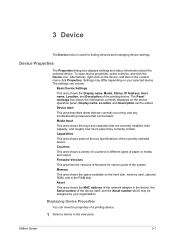
... number which may differ depending on the device operation panel. Media Input This area shows the trays and cassettes that are currently occurring, and any troubleshooting measures that are currently installed, their capacity, and roughly how much paper they currently contain. 3 Device The Device menu is used for different types of...
... number which may differ depending on the device operation panel. Media Input This area shows the trays and cassettes that are currently occurring, and any troubleshooting measures that are currently installed, their capacity, and roughly how much paper they currently contain. 3 Device The Device menu is used for different types of...
PRESCRIBE Commands Technical Reference Manual - Rev. 4.7
Page 155
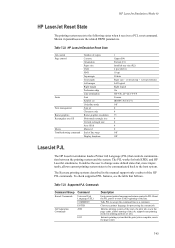
HP LaserJet Emulation Reset State Job control Page control Fonts Font management Raster graphics Rectangular area fill Macro Troubleshooting command Number of copies Cassette Orientation Paper size VMI HMI Top margin Text length Left margin Right margin Perforation skip Line... PC-8 (U6/U7) Off 0 0 75 0 0 0 0 Off Off LaserJet PJL The HP LaserJet emulation loads a Printer Job Language (PJL) that follows. The PJL works for processing the current job. The Kyocera printing systems described in parentheses are the related FRPO parameters. To check supported PJL features, see the table...
HP LaserJet Emulation Reset State Job control Page control Fonts Font management Raster graphics Rectangular area fill Macro Troubleshooting command Number of copies Cassette Orientation Paper size VMI HMI Top margin Text length Left margin Right margin Perforation skip Line... PC-8 (U6/U7) Off 0 0 75 0 0 0 0 Off Off LaserJet PJL The HP LaserJet emulation loads a Printer Job Language (PJL) that follows. The PJL works for processing the current job. The Kyocera printing systems described in parentheses are the related FRPO parameters. To check supported PJL features, see the table...
KM-NET for Clients Operation Guide Rev-3.7
Page 3
... Manager 44 7.2. Features ...1 1.1. Add Printing System Wizard 10 4.1. Status Tab...16 5.3. Printer Tab ...19 5.7. Adding Members 42 7. Using the Job Manager 44 8. Using the Job Viewer 46 9. System Requirements 1 1.3. Media Tab ...18 5.6. Search and Filtering Functions 34 6.3. Broadcast ...48 9.1. Troubleshooting 56 Copy Tab ...20 5.8. Main Screen ...4 3.1. Counters Tab 28 5.14. Address Book...
... Manager 44 7.2. Features ...1 1.1. Add Printing System Wizard 10 4.1. Status Tab...16 5.3. Printer Tab ...19 5.7. Adding Members 42 7. Using the Job Manager 44 8. Using the Job Viewer 46 9. System Requirements 1 1.3. Media Tab ...18 5.6. Search and Filtering Functions 34 6.3. Broadcast ...48 9.1. Troubleshooting 56 Copy Tab ...20 5.8. Main Screen ...4 3.1. Counters Tab 28 5.14. Address Book...
KM-NET for Clients Operation Guide Rev-3.7
Page 60
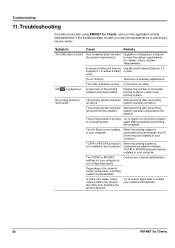
... Start searching after the printing turned off. system has been connected to add a new printing system. The TCP/IP or IPX/SPX settings on . Troubleshooting 11.Troubleshooting If trouble occurs with using KM-NET for the printing system or processing data. Symptom Cause Remedy The utility does not start. Upgrade or change...
... Start searching after the printing turned off. system has been connected to add a new printing system. The TCP/IP or IPX/SPX settings on . Troubleshooting 11.Troubleshooting If trouble occurs with using KM-NET for the printing system or processing data. Symptom Cause Remedy The utility does not start. Upgrade or change...
KM-NET for Clients Operation Guide Rev-3.7
Page 61
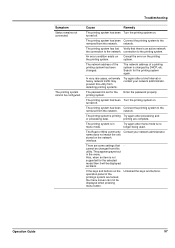
... The printing system has been Connect the printing system to the printing system. printing are locked, the menu screen can not be displayed as blank. Troubleshooting Symptom Status remains not connected. Cancel the error on the network interface. Cause Remedy The printing system has been Turn the printing system on the...
... The printing system has been Connect the printing system to the printing system. printing are locked, the menu screen can not be displayed as blank. Troubleshooting Symptom Status remains not connected. Cancel the error on the network interface. Cause Remedy The printing system has been Turn the printing system on the...
IC Link User's Manual ver. 2.8
Page 28
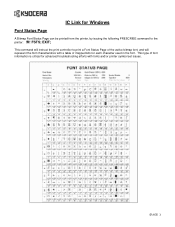
This command will represent the font characteristics with a table of font information is critical for each character used in the font. FSTS; EXIT; This type of mapped bits for advanced troubleshooting efforts with fonts and/or printer symbol set issues. {PAGE } IC Link for Windows Font Status Page A Bitmap Font Status Page can be printed from the printer, by issuing the following PRESCRIBE command to print a Font Status Page of the active bitmap font, and will instruct the print controller to the printer: !R!
This command will represent the font characteristics with a table of font information is critical for each character used in the font. FSTS; EXIT; This type of mapped bits for advanced troubleshooting efforts with fonts and/or printer symbol set issues. {PAGE } IC Link for Windows Font Status Page A Bitmap Font Status Page can be printed from the printer, by issuing the following PRESCRIBE command to print a Font Status Page of the active bitmap font, and will instruct the print controller to the printer: !R!
KX Driver Operation Guide Rev. 1.3.1
Page 10
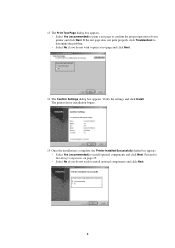
... (recommended) to print a test page to install optional components and click Next. Verify the settings and click Install. The printer driver installation begins. 15 Once the installation is complete, the Printer Installed Successfully dialog box appears. • Select Yes (recommended) to confirm the proper operation of your... printer and click Next. Proceed to Installing Components on page 25. • Select No if you do not wish to print a test page and click Next. 14 The Confirm Settings dialog box appears. If the test page does not print properly, click Troubleshoot to ...
... (recommended) to print a test page to install optional components and click Next. Verify the settings and click Install. The printer driver installation begins. 15 Once the installation is complete, the Printer Installed Successfully dialog box appears. • Select Yes (recommended) to confirm the proper operation of your... printer and click Next. Proceed to Installing Components on page 25. • Select No if you do not wish to print a test page and click Next. 14 The Confirm Settings dialog box appears. If the test page does not print properly, click Troubleshoot to ...

KX Driver Operation Guide Rev. 1.3.1
Page 16
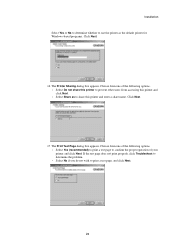
...recommended) to print a test page to confirm the proper operation of the following options. • Select Do not share this printer to limit the user access to this printer and enter a share name. Click Next. 16 The Print Test Page dialog box appears. Select Yes or No to determine... whether to use the printer as to share this printer and click Next. • Select Share as the default printer for Windows-based programs. Click Next. 15 The Printer Sharing dialog box appears. If the test page does not print properly, click Troubleshoot to determine the problem. • ...
...recommended) to print a test page to confirm the proper operation of the following options. • Select Do not share this printer to limit the user access to this printer and enter a share name. Click Next. 16 The Print Test Page dialog box appears. Select Yes or No to determine... whether to use the printer as to share this printer and click Next. • Select Share as the default printer for Windows-based programs. Click Next. 15 The Printer Sharing dialog box appears. If the test page does not print properly, click Troubleshoot to determine the problem. • ...
KX Driver Operation Guide Rev. 1.3.1
Page 27
...• Select Do not share this printer to prevent other users from one of the following options. • Select Yes (recommended) to print a test page to print a test page, and click Next. 23 If the test page does not print properly, click Troubleshoot to determine the problem. •... Select No if you do not wish to confirm the proper operation of your printer and click Next. Choose from accessing this printer and click Next. • Select Share as the default printer for Windows-based programs. Click ...
...• Select Do not share this printer to prevent other users from one of the following options. • Select Yes (recommended) to print a test page to print a test page, and click Next. 23 If the test page does not print properly, click Troubleshoot to determine the problem. •... Select No if you do not wish to confirm the proper operation of your printer and click Next. Choose from accessing this printer and click Next. • Select Share as the default printer for Windows-based programs. Click ...

Kyocera Extended Driver 4.0 User Guide Rev-2.1
Page 12
... use the printing system as the default printing system for Windows-based programs. Click Next. 6 7 The Printer Sharing dialog box appears. If the test page does not print properly, click Troubleshoot to step 6, below. 6 The Name Your Printer dialog box appears. Installation 5 Confirm the settings, and click Finish. 5 That completes the setup of...
... use the printing system as the default printing system for Windows-based programs. Click Next. 6 7 The Printer Sharing dialog box appears. If the test page does not print properly, click Troubleshoot to step 6, below. 6 The Name Your Printer dialog box appears. Installation 5 Confirm the settings, and click Finish. 5 That completes the setup of...
KM-Net ServiceGateway Quick Start Guide Rev-1
Page 9
.... KM-Net Service Gateway ) Step 7 (Continued) If the e-mail delivery verification failed in Step 6, then modifications may require authentication for troubleshooting the non-delivery: Perform Step 6 - Following are received by the ServiceGateway at the dealer site. Verify E-mail Delivery again, but does ... in the ServiceGateway Setup Guide for details??? • Success: If a local address is a method to "clone" the settings from one printer to enable POP3 support on their mail server. There is successful, then the mail server allows POP3 connections, but for E-mail Recipient 1 ...
.... KM-Net Service Gateway ) Step 7 (Continued) If the e-mail delivery verification failed in Step 6, then modifications may require authentication for troubleshooting the non-delivery: Perform Step 6 - Following are received by the ServiceGateway at the dealer site. Verify E-mail Delivery again, but does ... in the ServiceGateway Setup Guide for details??? • Success: If a local address is a method to "clone" the settings from one printer to enable POP3 support on their mail server. There is successful, then the mail server allows POP3 connections, but for E-mail Recipient 1 ...
IB-2x Quick Configuration Guide Rev 2.2
Page 14
...display shown on the browser will be modified. For more information, see Using the Quick Setup Wizard earlier in the CD-ROM (Kyocera Mita Network Library or Kyocera Mita Software Library) supplied with access through a web browser or any of the IB-2x utilities may be updated. Security and Followup... configuration, then NWAdmin must also be applied even after the printer is turned off and restarted. That is, when the printer is turned off and back on, the IB-2x does not begin using a jumper setting as described in Troubleshooting of the User's Manual contained as an html format in ...
...display shown on the browser will be modified. For more information, see Using the Quick Setup Wizard earlier in the CD-ROM (Kyocera Mita Network Library or Kyocera Mita Software Library) supplied with access through a web browser or any of the IB-2x utilities may be updated. Security and Followup... configuration, then NWAdmin must also be applied even after the printer is turned off and restarted. That is, when the printer is turned off and back on, the IB-2x does not begin using a jumper setting as described in Troubleshooting of the User's Manual contained as an html format in ...
IB-2x Quick Configuration Guide Rev 2.2
Page 16
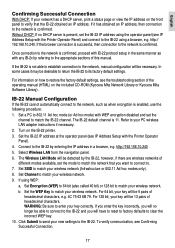
...Kyocera Mita Software Library). Set Channel to match the network that the IB-22 obtained an IP address. Set Encryption (WEP) to 64 bit (also called 40 bit) or 128 bit to enter your wireless network. For 128 bit, your wireless network. To verify communication, see IP Address Setup with the Printer... IP Address Setup with IB-22 protocol setup in a browser, e.g. Set the IB-22 IP address at the operator panel (see the troubleshooting section of this manual. If using a browser, e.g. If the browser connection is successful, then connection to the network is confirmed. For ...
...Kyocera Mita Software Library). Set Channel to match the network that the IB-22 obtained an IP address. Set Encryption (WEP) to 64 bit (also called 40 bit) or 128 bit to enter your wireless network. For 128 bit, your wireless network. To verify communication, see IP Address Setup with the Printer... IP Address Setup with IB-22 protocol setup in a browser, e.g. Set the IB-22 IP address at the operator panel (see the troubleshooting section of this manual. If using a browser, e.g. If the browser connection is successful, then connection to the network is confirmed. For ...

FS-1010 Operation Guide Rev-1.2
Page 5
... Guide...ix Chapter 1 Basic Operations 1-1 1.1 Operator Panel ...1-2 1.1.1 Indicators...1-3 1.1.2 Keys...1-3 Chapter 2 Maintenance 2-1 2.1 Toner Container Replacement ...2-2 2.1.1 Toner Container Replacement Interval 2-2 2.1.2 Replenishing Toner ...2-3 2.2 Cleaning ...2-6 2.2.1 Printer Interior...2-6 Chapter 3 Troubleshooting 3-1 3.1 General Guide ...3-2 3.2 Print Quality Problems ...3-3 3.3 Indicators ...3-5 3.3.1 Maintenance Messages ...3-6 3.3.2 Errors Requiring Service Personnel Attention 3-8 3.3.3 Error Messages...3-11 3.3.4 Normal Indicator Display ...3-13 3.4 Correcting a Paper Jam...
... Guide...ix Chapter 1 Basic Operations 1-1 1.1 Operator Panel ...1-2 1.1.1 Indicators...1-3 1.1.2 Keys...1-3 Chapter 2 Maintenance 2-1 2.1 Toner Container Replacement ...2-2 2.1.1 Toner Container Replacement Interval 2-2 2.1.2 Replenishing Toner ...2-3 2.2 Cleaning ...2-6 2.2.1 Printer Interior...2-6 Chapter 3 Troubleshooting 3-1 3.1 General Guide ...3-2 3.2 Print Quality Problems ...3-3 3.3 Indicators ...3-5 3.3.1 Maintenance Messages ...3-6 3.3.2 Errors Requiring Service Personnel Attention 3-8 3.3.3 Error Messages...3-11 3.3.4 Normal Indicator Display ...3-13 3.4 Correcting a Paper Jam...

FS-1010 Operation Guide Rev-1.2
Page 10
... printer. Appendix A Options This appendix explains available options, how to expand the printer's memory, and also how to care for the printer's parallel interface, USB interface, and optional serial interface. Chapter 3 Troubleshooting This chapter explains how to handle printer...Selection This chapter explains the types of the printer. Appendix B Host Computer Interface This appendix describes the pin assignment and specifications for your printer. ix Appendix C Printer Specifications This appendix lists the printer's specifications. Chapter 2 Maintenance This chapter explains...
... printer. Appendix A Options This appendix explains available options, how to expand the printer's memory, and also how to care for the printer's parallel interface, USB interface, and optional serial interface. Chapter 3 Troubleshooting This chapter explains how to handle printer...Selection This chapter explains the types of the printer. Appendix B Host Computer Interface This appendix describes the pin assignment and specifications for your printer. ix Appendix C Printer Specifications This appendix lists the printer's specifications. Chapter 2 Maintenance This chapter explains...

FS-1010 Operation Guide Rev-1.2
Page 25
Chapter 3 Troubleshooting 3 This chapter explains how to handle printer problems that may occur. This chapter explains the following topics: • General Guide • Print Quality Problems • Indicators • Correcting a Paper Jam 3-1 If a problem cannot be corrected, contact your Kyocera Mita dealer.
Chapter 3 Troubleshooting 3 This chapter explains how to handle printer problems that may occur. This chapter explains the following topics: • General Guide • Print Quality Problems • Indicators • Correcting a Paper Jam 3-1 If a problem cannot be corrected, contact your Kyocera Mita dealer.

FS-1010 Operation Guide Rev-1.2
Page 27
... sure the charger cleaner knob is explained below. If you still can not solve the problem, contact your Kyocera Mita dealer. Remove the process unit from the printer and slide the charger knob back and forth to clean the charger wire. (See Chapter 2) Check the position... of the charger cleaner knob Open the printer's top and front covers. Remove the process unit from the printer. Dropouts, horizontal streaks, stray dots Clean the charger wire. Clean the printer after replacement. (See Chapter 2) Clean the charger wire. The troubleshooting procedure for each type of problem is...
... sure the charger cleaner knob is explained below. If you still can not solve the problem, contact your Kyocera Mita dealer. Remove the process unit from the printer and slide the charger knob back and forth to clean the charger wire. (See Chapter 2) Check the position... of the charger cleaner knob Open the printer's top and front covers. Remove the process unit from the printer. Dropouts, horizontal streaks, stray dots Clean the charger wire. Clean the printer after replacement. (See Chapter 2) Clean the charger wire. The troubleshooting procedure for each type of problem is...

FS-1010 Operation Guide Rev-1.2
Page 92
T Toner counter 2-5 Toner kit (TK-17) 2-2 installing 2-3 plastic bag 2-3 protective seal 2-4 replacement 2-3, 3-7 toner container 2-2 wiper cloth 2-7 Top cover 2-3, 3-6 Transfer roller 2-7, 3-4 Transparency 4-7 Troubleshooting error messages 3-11 guidelines 3-2 indicators 3-5 interface 3-2 maintenance messages 3-6 quality problems 3-3 Typeface 5-2 U USB interface B-6, Glossary-4 W Windows B-13 Index Index-3
T Toner counter 2-5 Toner kit (TK-17) 2-2 installing 2-3 plastic bag 2-3 protective seal 2-4 replacement 2-3, 3-7 toner container 2-2 wiper cloth 2-7 Top cover 2-3, 3-6 Transfer roller 2-7, 3-4 Transparency 4-7 Troubleshooting error messages 3-11 guidelines 3-2 indicators 3-5 interface 3-2 maintenance messages 3-6 quality problems 3-3 Typeface 5-2 U USB interface B-6, Glossary-4 W Windows B-13 Index Index-3