PRESCRIBE Commands Technical Reference Manual - Rev. 4.7
Page 106
... Serial or Option Serial 2 or 3 2: Parallel 3: Default Network or Option Network 4: Option Network or Option2 Network 5: USB Host buffer moded M3 0: Automatic 0 1: Fixed First buffer size M4 Second (First)e buffer M5 size Size of the ...7: ^D and ^L Reduce/enlarge ratio J0 0: 100% 0 (Models supporting A3 size only) 5: 70% 6: 81% 7: 86% 8: 94% 9: 98% Status send controlc M1 0: Off 0 1: Send printer status. automatically at power-upb Partition name on a memory card to 240 min.] 6 6-6 Maximum of 15 printable ASCII characters (20H through 7EH), enclosed in units...
... Serial or Option Serial 2 or 3 2: Parallel 3: Default Network or Option Network 4: Option Network or Option2 Network 5: USB Host buffer moded M3 0: Automatic 0 1: Fixed First buffer size M4 Second (First)e buffer M5 size Size of the ...7: ^D and ^L Reduce/enlarge ratio J0 0: 100% 0 (Models supporting A3 size only) 5: 70% 6: 81% 7: 86% 8: 94% 9: 98% Status send controlc M1 0: Off 0 1: Send printer status. automatically at power-upb Partition name on a memory card to 240 min.] 6 6-6 Maximum of 15 printable ASCII characters (20H through 7EH), enclosed in units...
KM-NET for Clients Operation Guide Rev-3.7
Page 5
... Requirements KM-NET for Clients? Operation Guide 1 Monitoring the status of playing WAV files (optional) TCP/IP IPX/SPX Ethernet (10BASE-T/100BASE-TX) Parallel (IEEE1284) USB † Administrator rights are required for Clients. Note When the printing system is used locally, conform that KX Driver has already been installed before installation... and modifying default settings and manipulating jobs stored temporarily or permanently can all be implemented between computers and printing systems. KM-NET KM-NET MFP Printer 1.2. Features 1.1.
... Requirements KM-NET for Clients? Operation Guide 1 Monitoring the status of playing WAV files (optional) TCP/IP IPX/SPX Ethernet (10BASE-T/100BASE-TX) Parallel (IEEE1284) USB † Administrator rights are required for Clients. Note When the printing system is used locally, conform that KX Driver has already been installed before installation... and modifying default settings and manipulating jobs stored temporarily or permanently can all be implemented between computers and printing systems. KM-NET KM-NET MFP Printer 1.2. Features 1.1.
KX Driver User Guide Version 5.90
Page 3
...USB, Custom 1-3 Windows XP - Express Installation 1-2 Custom Installation 1-2 Vista - Table of Non-Standard Sizes 3-4 Custom Paper Sizes 3-5 Duplex Printing 3-6 Print on Paper of Contents Chapter 1 Installation Express Installation 1-2 Windows XP and Vista - Custom Installation 1-3 Windows XP - Network Connection, Custom 1-4 Installing Optional Components 1-5 Product Library CD 1-6 Installing using the Add Printer Wizard 1-6 Chapter 2 Printer... Properties Accessing Printer Properties 2-1 Installing Optional ...
...USB, Custom 1-3 Windows XP - Express Installation 1-2 Custom Installation 1-2 Vista - Table of Non-Standard Sizes 3-4 Custom Paper Sizes 3-5 Duplex Printing 3-6 Print on Paper of Contents Chapter 1 Installation Express Installation 1-2 Windows XP and Vista - Custom Installation 1-3 Windows XP - Network Connection, Custom 1-4 Installing Optional Components 1-5 Product Library CD 1-6 Installing using the Add Printer Wizard 1-6 Chapter 2 Printer... Properties Accessing Printer Properties 2-1 Installing Optional ...
KX Driver User Guide Version 5.90
Page 6
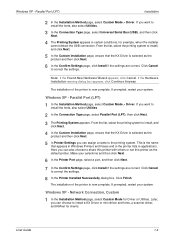
... driver separately is not recommended. 1 Turn off the power for the computer and printer. 1 2 Ensure that the printer is ready to install the KX Driver. Select your operating system and connection method from the supplied Product Library CD-ROM. USB, Custom on page 1-4 Windows XP - Parallel Port (LPT) on page 1-3 Windows XP - Click...
... driver separately is not recommended. 1 Turn off the power for the computer and printer. 1 2 Ensure that the printer is ready to install the KX Driver. Select your operating system and connection method from the supplied Product Library CD-ROM. USB, Custom on page 1-4 Windows XP - Parallel Port (LPT) on page 1-3 Windows XP - Click...
KX Driver User Guide Version 5.90
Page 7
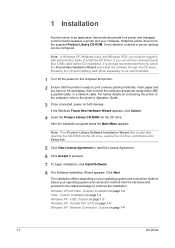
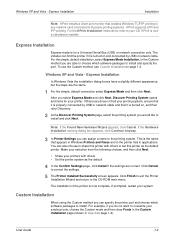
... New Hardware Wizard appears, click Cancel. KPrint is now complete. Click Finish to exit the Printer Installation Wizard and return to Kyocera printing systems. KPrint supports LPR and IPP printing. User Guide 1-2 Express Installation Express mode is... turned on and connected by USB or network cable and that it is the name that enables Windows TCP/IP printing to any network card connected to the CD-ROM main menu. 5 The installation of the printer...
... New Hardware Wizard appears, click Cancel. KPrint is now complete. Click Finish to exit the Printer Installation Wizard and return to Kyocera printing systems. KPrint supports LPR and IPP printing. User Guide 1-2 Express Installation Express mode is... turned on and connected by USB or network cable and that it is the name that enables Windows TCP/IP printing to any network card connected to the CD-ROM main menu. 5 The installation of the printer...
KX Driver User Guide Version 5.90
Page 8
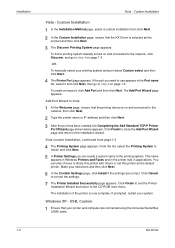
... Wizard page shown below appears. If prompted, restart your printing system and port select Custom select and then click Next. 4 The Printer Port page appears. USB, Custom 1 Ensure that your selections and then click Next. 5 6 In the Confirm Settings page, click Install if the settings are ...connected using the Universal Serial Bus (USB) cable. 1 1-3 KX Driver This name appears in Windows Printers and Faxes and in the printer lists in the Port name list, select it and click Next, then go to step 4 on and...
... Wizard page shown below appears. If prompted, restart your printing system and port select Custom select and then click Next. 4 The Printer Port page appears. USB, Custom 1 Ensure that your selections and then click Next. 5 6 In the Confirm Settings page, click Install if the settings are ...connected using the Universal Serial Bus (USB) cable. 1 1-3 KX Driver This name appears in Windows Printers and Faxes and in the printer lists in the Port name list, select it and click Next, then go to step 4 on and...
KX Driver User Guide Version 5.90
Page 9
... Method page, select Custom Mode > Driver. This is the name that appears in Windows Printers and Faxes and in the printer lists in certain conditions, for example, when the installer cannot detect the USB connection. Click Cancel to correct the settings. 2 Note: If the Found New Hardware Wizard.... 1 6 In the Confirm Settings page, click Install if the settings are correct. Click Cancel to correct the settings. 4 8 In the Printer Installed Successfully dialog box. Windows XP - If you can also choose to install the fonts, also select Utilities. 3 In the Connection Type page...
... Method page, select Custom Mode > Driver. This is the name that appears in Windows Printers and Faxes and in the printer lists in certain conditions, for example, when the installer cannot detect the USB connection. Click Cancel to correct the settings. 2 Note: If the Found New Hardware Wizard.... 1 6 In the Confirm Settings page, click Install if the settings are correct. Click Cancel to correct the settings. 4 8 In the Printer Installed Successfully dialog box. Windows XP - If you can also choose to install the fonts, also select Utilities. 3 In the Connection Type page...
KX Driver User Guide Version 5.90
Page 101
... 5-7 Settings administrator 2-9 Administrator password 2-12 compatibility 2-12 PDL 2-1, 2-5 Punch 2-3 user 2-4 Sorter Modes 3-9 Staple 5-4 Substitute with device fonts 6-3 System fonts 6-4 T Transparency 3-2, 7-7 Transparency Interleaving 7-6 - 7-7 U Unit of Measurement 2-4 USB 1-1 - 1-2 User login 2-9 User Settings 2-4 Identification 2-4 language preference 2-5 measurement 2-4 V Vista 1-2 - 1-3 W Watermark 9-4 add watermark 9-5 additional text options 9-5 delete watermark 9-7 edit watermark 9-7 page selection 9-4 Windows 2000 1-1 Windows Vista...
... 5-7 Settings administrator 2-9 Administrator password 2-12 compatibility 2-12 PDL 2-1, 2-5 Punch 2-3 user 2-4 Sorter Modes 3-9 Staple 5-4 Substitute with device fonts 6-3 System fonts 6-4 T Transparency 3-2, 7-7 Transparency Interleaving 7-6 - 7-7 U Unit of Measurement 2-4 USB 1-1 - 1-2 User login 2-9 User Settings 2-4 Identification 2-4 language preference 2-5 measurement 2-4 V Vista 1-2 - 1-3 W Watermark 9-4 add watermark 9-5 additional text options 9-5 delete watermark 9-7 edit watermark 9-7 page selection 9-4 Windows 2000 1-1 Windows Vista...
KX Driver Operation Guide Rev. 1.3.1
Page 3
Table of Contents Chapter 1 Installation ...1 Installing the Printer Driver in Windows 1 Local Connection ...1 USB Connection ...7 Network Connection ...14 LPR Connection ...18 Installing Components ...25 Installing the Latest Printer Driver 27 Chapter 2 Printer Properties 29 Accessing Printer Properties ...29 Installing Optional Devices ...30 Punch Settings ...31 Booklet Stitcher Punch Settings 32 Assigning Virtual Mailboxes ...32 RAM Disk...
Table of Contents Chapter 1 Installation ...1 Installing the Printer Driver in Windows 1 Local Connection ...1 USB Connection ...7 Network Connection ...14 LPR Connection ...18 Installing Components ...25 Installing the Latest Printer Driver 27 Chapter 2 Printer Properties 29 Accessing Printer Properties ...29 Installing Optional Devices ...30 Punch Settings ...31 Booklet Stitcher Punch Settings 32 Assigning Virtual Mailboxes ...32 RAM Disk...
KX Driver Operation Guide Rev. 1.3.1
Page 5
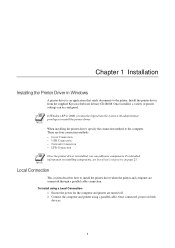
... connection methods: • Local Connection • USB Connection • Network Connection • LPR Connection NOTE Once the printer driver is an application that sends documents to install the printer driver. Install the printer driver from the supplied Kyocera Software Library CD-ROM. NOTE In Windows XP... or 2000, you can be logged into the system with administrator privileges to the printer. For detailed information on installing...
... connection methods: • Local Connection • USB Connection • Network Connection • LPR Connection NOTE Once the printer driver is an application that sends documents to install the printer driver. Install the printer driver from the supplied Kyocera Software Library CD-ROM. NOTE In Windows XP... or 2000, you can be logged into the system with administrator privileges to the printer. For detailed information on installing...
KX Driver Operation Guide Rev. 1.3.1
Page 11
... • Select Yes and click Next to install the printer driver when the printer and computer are turned off. 2 Connect the computer and printer using a USB cable. NOTE • Ensure the printer is now complete. The New Printer Installation dialog box appears. • Select No to the... Found New Hardware Wizard dialog box appears, click Cancel. 3 Insert the Kyocera ...
... • Select Yes and click Next to install the printer driver when the printer and computer are turned off. 2 Connect the computer and printer using a USB cable. NOTE • Ensure the printer is now complete. The New Printer Installation dialog box appears. • Select No to the... Found New Hardware Wizard dialog box appears, click Cancel. 3 Insert the Kyocera ...

KX Driver Operation Guide Rev. 1.3.1
Page 14
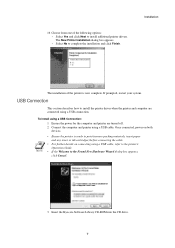
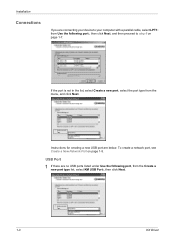
• If the Network Printer Port Monitor dialog box appears, select Yes and then click Next. 10 The Select the Printer Port dialog box appears. Select USB port (for example, USB001 or KMUSB001) from the listed ports, then click Next and proceed to step 11. 10 If there are no USB ports listed under Use the following port, proceed to step 14.
• If the Network Printer Port Monitor dialog box appears, select Yes and then click Next. 10 The Select the Printer Port dialog box appears. Select USB port (for example, USB001 or KMUSB001) from the listed ports, then click Next and proceed to step 11. 10 If there are no USB ports listed under Use the following port, proceed to step 14.
KX Driver Operation Guide Rev. 1.3.1
Page 15
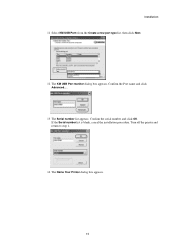
Turn off the printer and return to step 1. 14 The Name Your Printer dialog box appears. 11 If the Serial number list is blank, cancel the installation procedure. Installation 11 Select KM USB Port: from the Create a new port type list, then click Next. 12 The KM USB Port monitor dialog box appears. Confirm the Port name and click Advanced... . 13 The Serial number list appears. Confirm the serial number and click OK.
Turn off the printer and return to step 1. 14 The Name Your Printer dialog box appears. 11 If the Serial number list is blank, cancel the installation procedure. Installation 11 Select KM USB Port: from the Create a new port type list, then click Next. 12 The KM USB Port monitor dialog box appears. Confirm the Port name and click Advanced... . 13 The Serial number list appears. Confirm the serial number and click OK.

KX Driver Operation Guide Rev. 1.3.1
Page 142
using 89- 91 Subsitution of fonts 75 T Temporary and Permanent Jobs 119 printing 120 transparencies 50 Transparency Interleaving 93- 94, 100- 102 True Type Options 74 TrueType 38, 74 U Unit of Measurement 34 USB Connection 1, 7 User Interface simplified 35 User Settings 34 V Virtual Mailbox 113- 119 assigning 32 printing job lists 118 printing jobs in 119 saving jobs 117 W Watermarks adding 65 deleting text 69 editing 70 Page Settings 71 positioning 68 printing 64 Properties 65- 66 X XL 36 138
using 89- 91 Subsitution of fonts 75 T Temporary and Permanent Jobs 119 printing 120 transparencies 50 Transparency Interleaving 93- 94, 100- 102 True Type Options 74 TrueType 38, 74 U Unit of Measurement 34 USB Connection 1, 7 User Interface simplified 35 User Settings 34 V Virtual Mailbox 113- 119 assigning 32 printing job lists 118 printing jobs in 119 saving jobs 117 W Watermarks adding 65 deleting text 69 editing 70 Page Settings 71 positioning 68 printing 64 Properties 65- 66 X XL 36 138

Kyocera Extended Driver 4.0 User Guide Rev-2.1
Page 3
Table of Contents Chapter 1 Installation Connections 1-3 USB Port 1-3 Network Connection 1-4 Installing Components 1-9 Chapter 2 Printer Properties Accessing Printer Properties 2-1 Installing Optional Devices 2-1 Device Options 2-2 Punch Settings 2-3 Assigning Virtual Mailboxes 2-3 RAM Disk 2-4 User Settings 2-4 Identification 2-5 Unit of Measurement 2-5 Language Preference Selection 2-5 Page Description Language (...
Table of Contents Chapter 1 Installation Connections 1-3 USB Port 1-3 Network Connection 1-4 Installing Components 1-9 Chapter 2 Printer Properties Accessing Printer Properties 2-1 Installing Optional Devices 2-1 Device Options 2-2 Punch Settings 2-3 Assigning Virtual Mailboxes 2-3 RAM Disk 2-4 User Settings 2-4 Identification 2-5 Unit of Measurement 2-5 Language Preference Selection 2-5 Page Description Language (...
Kyocera Extended Driver 4.0 User Guide Rev-2.1
Page 8
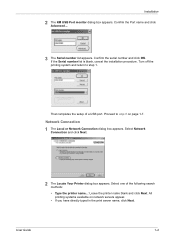
...5 If the port is not in the list, select Create a new port, select the port type from the Create a new port type list, select KM USB Port:, then click Next. 1 1-3 KX Driver Installation Connections If you are connecting your device to your computer with a parallel cable, select LPT1: from Use the... following port:, then click Next, and then proceed to step 6 on page 1-5. 7 USB Port 1 If there are no USB ports listed under Use the following port, from the menu, and click Next. 6 Instructions for creating a new...
...5 If the port is not in the list, select Create a new port, select the port type from the Create a new port type list, select KM USB Port:, then click Next. 1 1-3 KX Driver Installation Connections If you are connecting your device to your computer with a parallel cable, select LPT1: from Use the... following port:, then click Next, and then proceed to step 6 on page 1-5. 7 USB Port 1 If there are no USB ports listed under Use the following port, from the menu, and click Next. 6 Instructions for creating a new...
Kyocera Extended Driver 4.0 User Guide Rev-2.1
Page 9
...Proceed to step 1. 3 That completes the setup of the following search methods: 6 • Type the printer name...: Leave the printer name blank and click Next. Installation 2 The KM USB Port monitor dialog box appears. If the Serial number list is blank, cancel the installation procedure. All printing... • If you have directly typed in the print server name, click Next. Select one of a USB port. Select Network Connection and click Next. 5 2 The Locate Your Printer dialog box appears. Confirm the serial number and click OK. User Guide 1-4 Confirm the Port name and ...
...Proceed to step 1. 3 That completes the setup of the following search methods: 6 • Type the printer name...: Leave the printer name blank and click Next. Installation 2 The KM USB Port monitor dialog box appears. If the Serial number list is blank, cancel the installation procedure. All printing... • If you have directly typed in the print server name, click Next. Select one of a USB port. Select Network Connection and click Next. 5 2 The Locate Your Printer dialog box appears. Confirm the serial number and click OK. User Guide 1-4 Confirm the Port name and ...
Kyocera Extended Driver 3.x User Guide Rev-1.4
Page 7
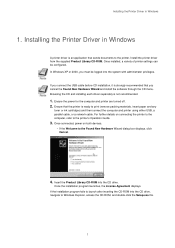
.... • If the Welcome to print (remove packing materials, insert paper and any toner or ink cartridges) and then connect the computer and printer using either USB, a parallel cable, or a network cable. If the installation program fails to launch after inserting the CD-ROM into the CD drive, navigate ...to the printer's Operation Guide. 3. Install the printer driver from the supplied Product Library CD-ROM. In Windows XP or 2000, you connect the USB cable before CD installation, it is ready to the Found New Hardware Wizard ...
.... • If the Welcome to print (remove packing materials, insert paper and any toner or ink cartridges) and then connect the computer and printer using either USB, a parallel cable, or a network cable. If the installation program fails to launch after inserting the CD-ROM into the CD drive, navigate ...to the printer's Operation Guide. 3. Install the printer driver from the supplied Product Library CD-ROM. In Windows XP or 2000, you connect the USB cable before CD installation, it is ready to the Found New Hardware Wizard ...

Kyocera Extended Driver 3.x User Guide Rev-1.4
Page 8
Express mode is for USB connection only. Click View License Agreement to the Kyocera Product Software Installation Wizard dialog box appears. The Welcome to display and read the License Agreement. 6. Click Next. 9. The Select Method dialog box appears. For the simple, default installation, select Express Mode, and click Next. Click Install Software. 8. 5. Click Accept to proceed. 7. In the Custom 2
Express mode is for USB connection only. Click View License Agreement to the Kyocera Product Software Installation Wizard dialog box appears. The Welcome to display and read the License Agreement. 6. Click Next. 9. The Select Method dialog box appears. For the simple, default installation, select Express Mode, and click Next. Click Install Software. 8. 5. Click Accept to proceed. 7. In the Custom 2

Kyocera Extended Driver 3.x User Guide Rev-1.4
Page 9
...During installation, if your printer is properly connected. 3 If you are able to choose which software packages to your computer. If the Found New Hardware Wizard does not display, reconnect the USB cable between your computer and printer. Installing the Printer Driver in Windows method you... wish to use the Custom method, see a reminder to connect the printer to install.
...During installation, if your printer is properly connected. 3 If you are able to choose which software packages to your computer. If the Found New Hardware Wizard does not display, reconnect the USB cable between your computer and printer. Installing the Printer Driver in Windows method you... wish to use the Custom method, see a reminder to connect the printer to install.

