bizhub C203/C253/C353/C451/C550/C650 Advanced Function Operations User Manual
Page 21
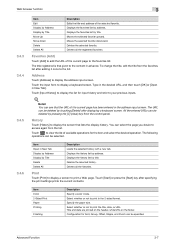
... again from the control panel. Title and date are printed on the header, while URL on the footer. Advanced Function 3-7 Configuration for Sort, Group, Offset, Staple, and Punch can select the page you desire to your previous inputs. ! Type in the desired URL, and then touch [OK] or [Open in the...
... again from the control panel. Title and date are printed on the header, while URL on the footer. Advanced Function 3-7 Configuration for Sort, Group, Offset, Staple, and Punch can select the page you desire to your previous inputs. ! Type in the desired URL, and then touch [OK] or [Open in the...
bizhub C203/C253/C353/C451/C550/C650 Advanced Function Operations User Manual
Page 25
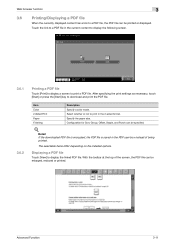
... Paper Finishing Description Specify a color mode. Select whether or not to display the linked PDF file. Specify the paper size. Configuration for Sort, Group, Offset, Staple, and Punch can be specified. ! Displaying a PDF file Touch [View] to print in the 2-sided format. Web browser function 3 3.6 Printing/Displaying a PDF file When the...
... Paper Finishing Description Specify a color mode. Select whether or not to display the linked PDF file. Specify the paper size. Configuration for Sort, Group, Offset, Staple, and Punch can be specified. ! Displaying a PDF file Touch [View] to print in the 2-sided format. Web browser function 3 3.6 Printing/Displaying a PDF file When the...
bizhub C203/C253/C353/C451/C550/C650 Advanced Function Operations User Manual
Page 45
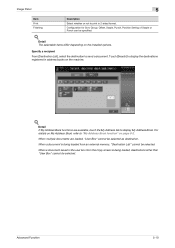
... other than "User Box" cannot be selected as destination. Detail The selectable items differ depending on the machine. ! Configuration for Sort, Group, Offset, Staple, Punch, Position Setting of Staple or Punch can be selected. When multiple documents are available, touch the My Address tab to print in the user box from an...
... other than "User Box" cannot be selected as destination. Detail The selectable items differ depending on the machine. ! Configuration for Sort, Group, Offset, Staple, Punch, Position Setting of Staple or Punch can be selected. When multiple documents are available, touch the My Address tab to print in the user box from an...

bizhub C451 FK-502 Fax Operations User Guide
Page 187
...6 6.7 Copying the original at the same time as sending the Fax (Send & Print) Send & Print It is set . 2 Note In order to use the staple function, the optional finisher must be used . Sending the fax after specifying Send & Print 1 Press [Fax/Scan] key to copy at the same time as... Fax transmission. C451 6-27 For details on loading originals, refer to "Restrict", the Send & Print function cannot be set to "Loading the original" on page 2-7. 3 Touch [...
...6 6.7 Copying the original at the same time as sending the Fax (Send & Print) Send & Print It is set . 2 Note In order to use the staple function, the optional finisher must be used . Sending the fax after specifying Send & Print 1 Press [Fax/Scan] key to copy at the same time as... Fax transmission. C451 6-27 For details on loading originals, refer to "Restrict", the Send & Print function cannot be set to "Loading the original" on page 2-7. 3 Touch [...

bizhub C451 FK-502 Fax Operations User Guide
Page 188
... or broadcast transmission)" on page 6-5. 9 Specify the destination. - For details on specifying destination, refer to "Communication Settings" on page 2-31. C451 6-28 When [C] (clear) key is pressed, the number of copies. - For details on Scan Settings, refer to "Original Settings" on page... 6-2. - Useful transmission functions 6 5 Select the desired end settings and touch [OK]. - Touch [Corner] or [2 Position] to specify the staple margins and touch [None] to specify Simplex/Duplex printing. - Returns to Scan Settings screen. 7 Touch [OK]. Returns to Fax/Scan screen. ...
... or broadcast transmission)" on page 6-5. 9 Specify the destination. - For details on specifying destination, refer to "Communication Settings" on page 2-31. C451 6-28 When [C] (clear) key is pressed, the number of copies. - For details on Scan Settings, refer to "Original Settings" on page... 6-2. - Useful transmission functions 6 5 Select the desired end settings and touch [OK]. - Touch [Corner] or [2 Position] to specify the staple margins and touch [None] to specify Simplex/Duplex printing. - Returns to Scan Settings screen. 7 Touch [OK]. Returns to Fax/Scan screen. ...

bizhub C451 Print Operations User Manual
Page 25
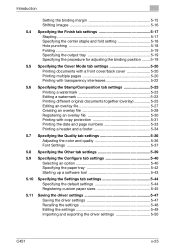
Introduction Print Type (duplex printing/booklet printing 4-16 Image Shift 4-17 Stapling and hole punching 4-18 Center Staple and Fold/Fold 4-19 Paper Arrangement 4-20 Cover Mode and Transparency Interleave 4-20 Per Page Setting 4-21 Watermark 4-21 Overlay 4-22 Copy Protect 4-22 Date/... settings 5-12 5.3 Specifying the Layout tab settings 5-13 Printing multiple pages on one page (N in 1, Poster Mode) ......... 5-13 Chapters 5-14 Specifying duplex/booklet printing 5-14 C451 x-24
Introduction Print Type (duplex printing/booklet printing 4-16 Image Shift 4-17 Stapling and hole punching 4-18 Center Staple and Fold/Fold 4-19 Paper Arrangement 4-20 Cover Mode and Transparency Interleave 4-20 Per Page Setting 4-21 Watermark 4-21 Overlay 4-22 Copy Protect 4-22 Date/... settings 5-12 5.3 Specifying the Layout tab settings 5-13 Printing multiple pages on one page (N in 1, Poster Mode) ......... 5-13 Chapters 5-14 Specifying duplex/booklet printing 5-14 C451 x-24
bizhub C451 Print Operations User Manual
Page 26
Introduction Setting the binding margin 5-15 Shifting images 5-16 5.4 Specifying the Finish tab settings 5-17 Stapling 5-17 Specifying the center staple and fold setting 5-18 Hole punching 5-18 Folding 5-19 Specifying the output tray 5-19 Specifying the procedure for adjusting the binding position ........ 5-19 5.5 Specifying the ... Saving the driver settings 5-47 Saving the driver settings 5-47 Recalling the settings 5-48 Editing the settings 5-49 Importing and exporting the driver settings 5-50 C451 x-25
Introduction Setting the binding margin 5-15 Shifting images 5-16 5.4 Specifying the Finish tab settings 5-17 Stapling 5-17 Specifying the center staple and fold setting 5-18 Hole punching 5-18 Folding 5-19 Specifying the output tray 5-19 Specifying the procedure for adjusting the binding position ........ 5-19 5.5 Specifying the ... Saving the driver settings 5-47 Saving the driver settings 5-47 Recalling the settings 5-48 Editing the settings 5-49 Importing and exporting the driver settings 5-50 C451 x-25

bizhub C451 Print Operations User Manual
Page 27
...(N in 1 6-14 Chapters 6-15 Specifying duplex/booklet printing 6-15 Setting the binding margin 6-16 Shifting images 6-17 6.4 Specifying the Finish tab settings 6-18 Stapling 6-18 Specifying the center staple and fold setting 6-19 Hole punching 6-19 Folding 6-20 Specifying the output tray 6-20 Specifying the procedure for adjusting the binding position ........ 6-20... with transparency interleaves 6-23 6.6 Specifying the Stamp/Composition tab settings 6-24 Printing a watermark 6-24 Editing a watermark 6-24 Printing different original documents together (overlay 6-26 C451 x-26
...(N in 1 6-14 Chapters 6-15 Specifying duplex/booklet printing 6-15 Setting the binding margin 6-16 Shifting images 6-17 6.4 Specifying the Finish tab settings 6-18 Stapling 6-18 Specifying the center staple and fold setting 6-19 Hole punching 6-19 Folding 6-20 Specifying the output tray 6-20 Specifying the procedure for adjusting the binding position ........ 6-20... with transparency interleaves 6-23 6.6 Specifying the Stamp/Composition tab settings 6-24 Printing a watermark 6-24 Editing a watermark 6-24 Printing different original documents together (overlay 6-26 C451 x-26

bizhub C451 Print Operations User Manual
Page 31
... Direction Adjustment 10-10 Line Width Adjustment 10-11 Paper Tray 10-13 Paper Size 10-15 2-Sided Print 10-16 Binding Position 10-17 Staple 10-18 Punch 10-19 Banner Paper Tray 10-20 Font Settings 10-21 Symbol Set 10-23 Font Size 10-24 Line/Page 10... 10-38 To specify the secure document delete time 10-39 To specify the ID & Print Delete Time 10-41 ID & Print Settings 10-42 C451 x-30
... Direction Adjustment 10-10 Line Width Adjustment 10-11 Paper Tray 10-13 Paper Size 10-15 2-Sided Print 10-16 Binding Position 10-17 Staple 10-18 Punch 10-19 Banner Paper Tray 10-20 Font Settings 10-21 Symbol Set 10-23 Font Size 10-24 Line/Page 10... 10-38 To specify the secure document delete time 10-39 To specify the ID & Print Delete Time 10-41 ID & Print Settings 10-42 C451 x-30

bizhub C451 Print Operations User Manual
Page 123
Staple Specifies stapling. oo Center Staple Specifies to be printed o o on multiple pages with N in 1 printing only) o o o o o o o o o o o o o o o o o o o o o o o o C451 4-6 Paper Arrange- Specifies the method for each set. oo Back Cover Attaches a back cover page. oo Per Page Set- Various printing methods 4 Function Overview Printer ...
Staple Specifies stapling. oo Center Staple Specifies to be printed o o on multiple pages with N in 1 printing only) o o o o o o o o o o o o o o o o o o o o o o o o C451 4-6 Paper Arrange- Specifies the method for each set. oo Back Cover Attaches a back cover page. oo Per Page Set- Various printing methods 4 Function Overview Printer ...

bizhub C451 Print Operations User Manual
Page 135
... settings" on page 5-17 Konica Minolta PostScript "Specifying the Finish tab settings" on page 6-18 PostScript PPD "Layout/Finish" on page 8-16 "Printer specific options (Finishing Options 1 to 4)" on the optional finisher. The hole punch function is available only when the punch kit is installed. Various printing methods 4 Stapling and hole punching Documents...
... settings" on page 5-17 Konica Minolta PostScript "Specifying the Finish tab settings" on page 6-18 PostScript PPD "Layout/Finish" on page 8-16 "Printer specific options (Finishing Options 1 to 4)" on the optional finisher. The hole punch function is available only when the punch kit is installed. Various printing methods 4 Stapling and hole punching Documents...

bizhub C451 Print Operations User Manual
Page 136
...Konica Minolta PCL "Specifying the Finish tab settings" on page 5-17 Konica Minolta PostScript "Specifying the Finish tab settings" on page 6-18 PostScript PPD "Layout/Finish" on page 8-16 "Printer specific options (Finishing Options 1 to staple in the center. Half-fold Tri-fold Center staple and fold 2 Reminder The center staple... available only when optional finisher FS-608 or finisher FS-519 with saddle stitcher is installed. Various printing methods 4 Center Staple and Fold/Fold You can specify whether to fold a printed document in half, or to fold a printed document in ...
...Konica Minolta PCL "Specifying the Finish tab settings" on page 5-17 Konica Minolta PostScript "Specifying the Finish tab settings" on page 6-18 PostScript PPD "Layout/Finish" on page 8-16 "Printer specific options (Finishing Options 1 to staple in the center. Half-fold Tri-fold Center staple and fold 2 Reminder The center staple... available only when optional finisher FS-608 or finisher FS-519 with saddle stitcher is installed. Various printing methods 4 Center Staple and Fold/Fold You can specify whether to fold a printed document in half, or to fold a printed document in ...

bizhub C451 Print Operations User Manual
Page 148
... a back cover from the post inserter. (This function cannot be printed on multiple pages. Item Staple Center Staple and Fold Punch Fold Output Tray Paper Arrangement Function Specifies stapling. Specifies the method for the back cover. Setting up the PCL driver (Windows) 5 Layout tab... data. Prints by clicking the [Combination Details] button. Specifies hole punching. Specifies the tray where to specify the image shift values. C451 5-3 Attaches a back cover page. Attaches a front cover from Post Inserter Per Page Setting Function Attaches a front cover page. Selects...
... a back cover from the post inserter. (This function cannot be printed on multiple pages. Item Staple Center Staple and Fold Punch Fold Output Tray Paper Arrangement Function Specifies stapling. Specifies the method for the back cover. Setting up the PCL driver (Windows) 5 Layout tab... data. Prints by clicking the [Combination Details] button. Specifies hole punching. Specifies the tray where to specify the image shift values. C451 5-3 Attaches a back cover page. Attaches a front cover from Post Inserter Per Page Setting Function Attaches a front cover page. Selects...

bizhub C451 Print Operations User Manual
Page 162
Setting up the PCL driver (Windows) 5 5.4 Specifying the Finish tab settings Stapling Multiple-page documents can be stapled. 2 Reminder The staple function is available only when the optional finisher is installed. 1 Click the Finish tab. 2 Select the "Staple" check box. 3 From the drop-down list, specify the number of staples and the sta- C451 5-17 pling position. 2 Note Specify the staple position noting the binding position specified in "Binding Position".
Setting up the PCL driver (Windows) 5 5.4 Specifying the Finish tab settings Stapling Multiple-page documents can be stapled. 2 Reminder The staple function is available only when the optional finisher is installed. 1 Click the Finish tab. 2 Select the "Staple" check box. 3 From the drop-down list, specify the number of staples and the sta- C451 5-17 pling position. 2 Note Specify the staple position noting the binding position specified in "Binding Position".

bizhub C451 Print Operations User Manual
Page 163
C451 5-18 The number of punched holes. 2 Note The hole-punch position changes according to center staple and fold a printed document. The center staple function and the thick paper function cannot be selected may vary depending on the punch kit that can be specified when the staple, punch, or fold ... FS-608 or finishe FS-519 with saddle stitcher is installed. 1 Click the Finish tab. 2 Select the "Center Staple and Fold" check box. 2 Note The center staple and fold function cannot be punched into the printed document. 2 Reminder The hole punch function is available only when the ...
C451 5-18 The number of punched holes. 2 Note The hole-punch position changes according to center staple and fold a printed document. The center staple function and the thick paper function cannot be selected may vary depending on the punch kit that can be specified when the staple, punch, or fold ... FS-608 or finishe FS-519 with saddle stitcher is installed. 1 Click the Finish tab. 2 Select the "Center Staple and Fold" check box. 2 Note The center staple and fold function cannot be punched into the printed document. 2 Reminder The hole punch function is available only when the ...

bizhub C451 Print Operations User Manual
Page 164
... all pages can be processed to increase the print efficiency, select "Prioritize Productivity". If the desired binding position and width cannot be specified when the staple, punch, or saddle stitch function is specified. If "Prioritize Productivity" is selected, the printing process is performed efficiently because the binding position is adjusted while... The fold function cannot be achieved, select "Prioritize Arranging Papers". 1 Click the Finish tab. 2 From the "Paper Arrangement" drop-down list, specify the output tray. C451 5-19
... all pages can be processed to increase the print efficiency, select "Prioritize Productivity". If the desired binding position and width cannot be specified when the staple, punch, or saddle stitch function is specified. If "Prioritize Productivity" is selected, the printing process is performed efficiently because the binding position is adjusted while... The fold function cannot be achieved, select "Prioritize Arranging Papers". 1 Click the Finish tab. 2 From the "Paper Arrangement" drop-down list, specify the output tray. C451 5-19

bizhub C451 Print Operations User Manual
Page 166
... page numbers with the smallest page number. Print Type: Specifies Print Insert, Insert Blank Sheet, Print (1-Sided), and Print (2-Sided). - Staple: Specifies the number of staples and the stapling position. 7 Click the [OK] button. 2 Note To change existing print settings, select the desired row and change the page number starting..., select the desired row, and then click the [Delete] button. Setting up the PCL driver (Windows) 5 4 Click the [Edit List] button. C451 5-21 The Per Page Settings - A new row for specifying the print settings appears. 5 Click the [Add] button.
... page numbers with the smallest page number. Print Type: Specifies Print Insert, Insert Blank Sheet, Print (1-Sided), and Print (2-Sided). - Staple: Specifies the number of staples and the stapling position. 7 Click the [OK] button. 2 Note To change existing print settings, select the desired row and change the page number starting..., select the desired row, and then click the [Delete] button. Setting up the PCL driver (Windows) 5 4 Click the [Edit List] button. C451 5-21 The Per Page Settings - A new row for specifying the print settings appears. 5 Click the [Add] button.

bizhub C451 Print Operations User Manual
Page 198
...Binding Margin Image Shift Finish tab Function Prints multiple pages on the front side. Item Staple Center Staple and Fold Punch Fold Output Tray Paper Arrangement Function Specifies stapling. Specifies to specify the image shift values. Specifies the method for each set. Click... the [Image Shift Settings] button to saddle stitch a printed document. Specifies the binding position. Specifies the tray where to specify the margin values. C451 6-3 Setting...
...Binding Margin Image Shift Finish tab Function Prints multiple pages on the front side. Item Staple Center Staple and Fold Punch Fold Output Tray Paper Arrangement Function Specifies stapling. Specifies to specify the image shift values. Specifies the method for each set. Click... the [Image Shift Settings] button to saddle stitch a printed document. Specifies the binding position. Specifies the tray where to specify the margin values. C451 6-3 Setting...

bizhub C451 Print Operations User Manual
Page 213
pling position. 2 Note Specify the staple position noting the binding position specified in "Binding Position". C451 6-18 Setting up the PostScript driver (Windows) 6 6.4 Specifying the Finish tab settings Stapling Multiple-page documents can be stapled. 2 Reminder The staple function is available only when the optional finisher is installed. 1 Click the Finish tab. 2 Select the "Staple" check box. 3 From the drop-down list, specify the number of staples and the sta-
pling position. 2 Note Specify the staple position noting the binding position specified in "Binding Position". C451 6-18 Setting up the PostScript driver (Windows) 6 6.4 Specifying the Finish tab settings Stapling Multiple-page documents can be stapled. 2 Reminder The staple function is available only when the optional finisher is installed. 1 Click the Finish tab. 2 Select the "Staple" check box. 3 From the drop-down list, specify the number of staples and the sta-

bizhub C451 Print Operations User Manual
Page 214
...available only when the punch kit is installed on the punch kit that is installed. The center staple function and the thick paper function cannot be specified when finisher FS-608 is installed. C451 6-19 Hole punching Holes can be selected may vary depending on the optional finisher. 1 Click... the Finish tab. 2 Select the "Punch" check box. 3 From the drop-down list, specify the number of punched holes. 2 Note The hole-punch position changes according to center staple and fold ...
...available only when the punch kit is installed on the punch kit that is installed. The center staple function and the thick paper function cannot be specified when finisher FS-608 is installed. C451 6-19 Hole punching Holes can be selected may vary depending on the optional finisher. 1 Click... the Finish tab. 2 Select the "Punch" check box. 3 From the drop-down list, specify the number of punched holes. 2 Note The hole-punch position changes according to center staple and fold ...


