KIP 7900 User Guide
Page 8
... 1. 7 Specifications for Printing Media 1. 7. 1 Available Print Size 1. 7. 2 Media not to be used 1. 7. 3 Maintaining Media 1. 7. 4 Environmental Condition - Correction Chapter 2 Basic Operations 2. 1 Turning on KIP 7900 2. 2 Turning off KIP 7900 2. 3 Replacing Roll Media 2. 4 Replacing Toner Cartridge 2. 5 Placing Cut Sheet Media 2. 6 Canceling Sleep Mode 2. 7 Dehumidifying Roll Media 2. 8 Stacking Prints on High Capacity Print Tray (option) Chapter 3 Error Corrections 3. 1 Paper...
... 1. 7 Specifications for Printing Media 1. 7. 1 Available Print Size 1. 7. 2 Media not to be used 1. 7. 3 Maintaining Media 1. 7. 4 Environmental Condition - Correction Chapter 2 Basic Operations 2. 1 Turning on KIP 7900 2. 2 Turning off KIP 7900 2. 3 Replacing Roll Media 2. 4 Replacing Toner Cartridge 2. 5 Placing Cut Sheet Media 2. 6 Canceling Sleep Mode 2. 7 Dehumidifying Roll Media 2. 8 Stacking Prints on High Capacity Print Tray (option) Chapter 3 Error Corrections 3. 1 Paper...
KIP 7900 User Guide
Page 15
Storage of consumables (Media) Wrap the media surely to shut out the humidity. (Toner cartridge) Keep the toner cartridge away from the direct sunlight, and store it in the condition of 0 to 35 C ( 32 - 95 F) and 10 to change without notice. 1-6 Chapter 1 Before Use NOTE The above specifications are subject to 85% RH.
Storage of consumables (Media) Wrap the media surely to shut out the humidity. (Toner cartridge) Keep the toner cartridge away from the direct sunlight, and store it in the condition of 0 to 35 C ( 32 - 95 F) and 10 to change without notice. 1-6 Chapter 1 Before Use NOTE The above specifications are subject to 85% RH.

KIP 7900 User Guide
Page 24
Chapter 2 Basic Operations 2. 1 Turning on KIP 7900 2. 2 Turning off KIP 7900 2. 3 Replacing Roll Media 2. 4 Replacing Toner Cartridge 2. 5 Placing Cut Sheet Media 2. 6 Canceling Sleep Mode 2. 7 Dehumidifying Roll Media 2. 8 Stacking Prints on High Capacity Print Tray (option) 2-1 page 2- 2 2- 4 2- 5 2-13 2-17 2-18 2-19 2-21 Chapter 2 Basic Operations
Chapter 2 Basic Operations 2. 1 Turning on KIP 7900 2. 2 Turning off KIP 7900 2. 3 Replacing Roll Media 2. 4 Replacing Toner Cartridge 2. 5 Placing Cut Sheet Media 2. 6 Canceling Sleep Mode 2. 7 Dehumidifying Roll Media 2. 8 Stacking Prints on High Capacity Print Tray (option) 2-1 page 2- 2 2- 4 2- 5 2-13 2-17 2-18 2-19 2-21 Chapter 2 Basic Operations
KIP 7900 User Guide
Page 36
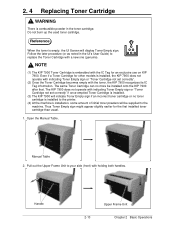
... Upper Frame Unit to the machine. The KIP 7900 does not operate with indicating Toner Empty sign or "Toner Cartridge not set correctly". (2) Once the Toner Cartridge becomes empty with indicating Toner Empty sign or "Toner Cartridge not set correctly" if once emptied Toner Cartridge is installed. (3) The KIP 7900 will indicate Toner Empty sign if an incorrect toner cartridge or no more be supplied to your...
... Upper Frame Unit to the machine. The KIP 7900 does not operate with indicating Toner Empty sign or "Toner Cartridge not set correctly". (2) Once the Toner Cartridge becomes empty with indicating Toner Empty sign or "Toner Cartridge not set correctly" if once emptied Toner Cartridge is installed. (3) The KIP 7900 will indicate Toner Empty sign if an incorrect toner cartridge or no more be supplied to your...
KIP 7900 User Guide
Page 37
... it stops. 3. This will soak into fiber.) 2-14 Chapter 2 Basic Operations Pressing down the green lever, rotate Toner Cartridge body (not the Cap of Cartridge) to unlock the toner cartridge. Keep pressing the green lever. Lift up Toner Cartridge and remove it clicks to the arrow direction until it , wash the clothing with the cold water. (Do...
... it stops. 3. This will soak into fiber.) 2-14 Chapter 2 Basic Operations Pressing down the green lever, rotate Toner Cartridge body (not the Cap of Cartridge) to unlock the toner cartridge. Keep pressing the green lever. Lift up Toner Cartridge and remove it clicks to the arrow direction until it , wash the clothing with the cold water. (Do...
KIP 7900 User Guide
Page 38
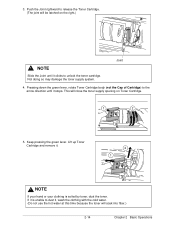
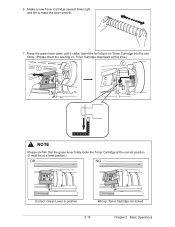
6. Press the green lever down until it clicks. Insert the far left to make the toner smooth. 7. Shake a new Toner Cartridge several times right and left pin on Toner Cartridge into the slot firmly. (Please direct the opening on Toner Cartridge downward at this time.) 2 1 NOTE Please confirm that the green lever firmly locks the Toner Cartridge at the correct position. (It must be at a level position.) OK NG Correct: Green Lever in position Wrong: Toner Cartridge not locked 2-15 Chapter 2 Basic Operations
6. Press the green lever down until it clicks. Insert the far left to make the toner smooth. 7. Shake a new Toner Cartridge several times right and left pin on Toner Cartridge into the slot firmly. (Please direct the opening on Toner Cartridge downward at this time.) 2 1 NOTE Please confirm that the green lever firmly locks the Toner Cartridge at the correct position. (It must be at a level position.) OK NG Correct: Green Lever in position Wrong: Toner Cartridge not locked 2-15 Chapter 2 Basic Operations
KIP 7900 User Guide
Page 39
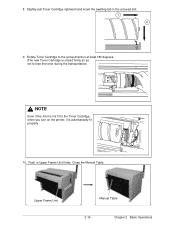
Slightly pull Toner Cartridge rightward and insert the swelling tab in Upper Frame Unit firmly. Push in the arrowed slot. 1 2 9. Close the Manual Table. Rotate Toner Cartridge to the arrow direction at least 180 degrees. (The new Toner Cartridge is closed firmly so as not to lose the toner during the transportation) NOTE Even if the Joint is not fit to the Toner Cartridge, when you turn on the printer, it is automatically fit properly. 10. 8. Upper Frame Unit Manual Table 2-16 Chapter 2 Basic Operations
Slightly pull Toner Cartridge rightward and insert the swelling tab in Upper Frame Unit firmly. Push in the arrowed slot. 1 2 9. Close the Manual Table. Rotate Toner Cartridge to the arrow direction at least 180 degrees. (The new Toner Cartridge is closed firmly so as not to lose the toner during the transportation) NOTE Even if the Joint is not fit to the Toner Cartridge, when you turn on the printer, it is automatically fit properly. 10. 8. Upper Frame Unit Manual Table 2-16 Chapter 2 Basic Operations
KIP 7900 User Guide
Page 65
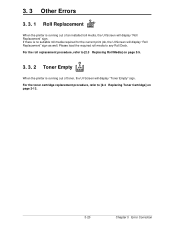
... the required roll media to [2.4 Replacing Toner Cartridge] on page 2-5. 3. 3. 2 Toner Empty When the printer is no suitable roll media required for the current print job, the UI Screen will display "Roll Replacement" sign as well. If there is running out of toner, the UI Screen will display "Toner Empty" sign. For the roll replacement...
... the required roll media to [2.4 Replacing Toner Cartridge] on page 2-5. 3. 3. 2 Toner Empty When the printer is no suitable roll media required for the current print job, the UI Screen will display "Roll Replacement" sign as well. If there is running out of toner, the UI Screen will display "Toner Empty" sign. For the roll replacement...


