
Watkiss PowerSquare R2L User Manual
Page 4
... 78 Change the Fuses - Declaration of Conformity 105 Appendix 107 Image Creep 107 ii Watkiss PowerSquare™224 User Manual Book Stacker 79 Manually park the Shuttle 80 6. Error Conditions, Problems and Solutions 41 Printer Error 41 PowerSquare Error 41 General Problems 42...Stitch-wire Jam 73 Clear a Stitch Head Jam 75 Calibrate the Touch Screen 78 Change the Fuses - Specifications 101 8. Maintenance 83 Service Interval 83 Operator Maintenance 83 Clean the PowerSquare 84 Clean the Former Roller 85 Clean the Polyurethane Strips in the Form Clamp 86 Clean...
... 78 Change the Fuses - Declaration of Conformity 105 Appendix 107 Image Creep 107 ii Watkiss PowerSquare™224 User Manual Book Stacker 79 Manually park the Shuttle 80 6. Error Conditions, Problems and Solutions 41 Printer Error 41 PowerSquare Error 41 General Problems 42...Stitch-wire Jam 73 Clear a Stitch Head Jam 75 Calibrate the Touch Screen 78 Change the Fuses - Specifications 101 8. Maintenance 83 Service Interval 83 Operator Maintenance 83 Clean the PowerSquare 84 Clean the Former Roller 85 Clean the Polyurethane Strips in the Form Clamp 86 Clean...
Watkiss PowerSquare R2L User Manual
Page 6
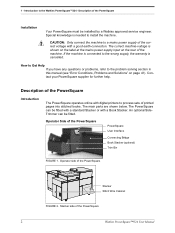
Introduction to the problem solving section in this manual (see "Error Conditions, Problems and Solutions" on the rear of the correct voltage with a Book Stacker....be fitted with a standard Stacker or with a good earth-connection. Operator side of the PowerSquare 2 Watkiss PowerSquare™224 User Manual How to Get Help If you have any questions or problems, refer to the Watkiss PowerSquare™224 - CAUTION: Only connect the... is cancelled. 1 - Operator Side of the PowerSquare Installation Your PowerSquare must be installed by a Watkiss approved service engineer.
Introduction to the problem solving section in this manual (see "Error Conditions, Problems and Solutions" on the rear of the correct voltage with a Book Stacker....be fitted with a standard Stacker or with a good earth-connection. Operator side of the PowerSquare 2 Watkiss PowerSquare™224 User Manual How to Get Help If you have any questions or problems, refer to the Watkiss PowerSquare™224 - CAUTION: Only connect the... is cancelled. 1 - Operator Side of the PowerSquare Installation Your PowerSquare must be installed by a Watkiss approved service engineer.
Watkiss PowerSquare R2L User Manual
Page 27
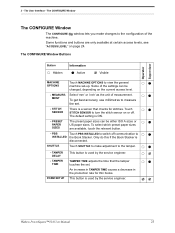
...functions and buttons are available, touch the relevant button. - PBS Touch PBS INSTALLED to switch off . This button is used by the service engineer. PRESET PAPER SIZES The preset paper sizes can be either ISO A sizes or US paper sizes. TAMPER TIME FORM SETUP This button...rate for stitches. The User Interface - The default setting is a sensor that the tamper touches the set. Watkiss PowerSquare™224 User Manual 23 window lets you make adjustment to view the general machine set . - To select which preset paper sizes are only available at ...
...functions and buttons are available, touch the relevant button. - PBS Touch PBS INSTALLED to switch off . This button is used by the service engineer. PRESET PAPER SIZES The preset paper sizes can be either ISO A sizes or US paper sizes. TAMPER TIME FORM SETUP This button...rate for stitches. The User Interface - The default setting is a sensor that the tamper touches the set. Watkiss PowerSquare™224 User Manual 23 window lets you make adjustment to view the general machine set . - To select which preset paper sizes are only available at ...
Watkiss PowerSquare R2L User Manual
Page 28
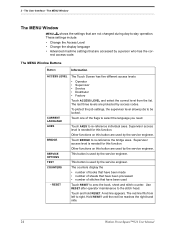
...settings that have been used by access codes. RESET The Touch Screen has five different access levels • Operator • Supervisor • Service • Distributor • Factory Touch ACCESS LEVEL and select the correct level from left to -day operation. Supervisor access level is needed...until the red line reaches the right-hand side. 24 Watkiss PowerSquare™224 User Manual 3 - The last three levels are accessed by the service engineer. This button is used by the service engineer. rect access-code. Touch AXES to the stitch head. Other functions on this...
...settings that have been used by access codes. RESET The Touch Screen has five different access levels • Operator • Supervisor • Service • Distributor • Factory Touch ACCESS LEVEL and select the correct level from left to -day operation. Supervisor access level is needed...until the red line reaches the right-hand side. 24 Watkiss PowerSquare™224 User Manual 3 - The last three levels are accessed by the service engineer. This button is used by the service engineer. rect access-code. Touch AXES to the stitch head. Other functions on this...
Watkiss PowerSquare R2L User Manual
Page 45
... the PowerSquare, then: Check the Touch START to start the machine. The partial book is displayed, take the corresponding action. Watkiss PowerSquare™224 User Manual 41 Follow the instructions on page 55. See "Message List" on the printer. Check the PowerSquare screen. The type of PowerSquare error is displayed on...
... the PowerSquare, then: Check the Touch START to start the machine. The partial book is displayed, take the corresponding action. Watkiss PowerSquare™224 User Manual 41 Follow the instructions on page 55. See "Message List" on the printer. Check the PowerSquare screen. The type of PowerSquare error is displayed on...
Watkiss PowerSquare R2L User Manual
Page 46
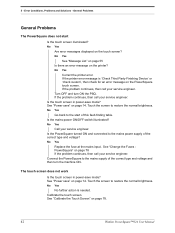
...Power save " on the PowerSquare touch screen. No Yes Go back to the mains power supply of this fault-finding table. No Yes Call your service engineer. No Yes No further action is 'Check Third Party Finishing Device' or 'check custom', then check for an error message on page 14... on the touch screen? See "Change the Fuses PowerSquare" on page 78. 42 Watkiss PowerSquare™224 User Manual Calibrate the touch screen. If the problem continues, then call your service engineer. Is the touch screen in power-save mode? See "Calibrate the Touch Screen" on page 78 If ...
...Power save " on the PowerSquare touch screen. No Yes Go back to the mains power supply of this fault-finding table. No Yes Call your service engineer. No Yes No further action is 'Check Third Party Finishing Device' or 'check custom', then check for an error message on page 14... on the touch screen? See "Change the Fuses PowerSquare" on page 78. 42 Watkiss PowerSquare™224 User Manual Calibrate the touch screen. If the problem continues, then call your service engineer. Is the touch screen in power-save mode? See "Calibrate the Touch Screen" on page 78 If ...
Watkiss PowerSquare R2L User Manual
Page 48
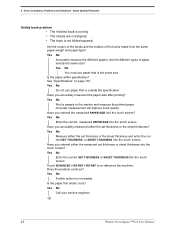
...? Yes No Enter the correct SET THICKNESS or SHEET THICKNESS into the touch screen? Is the paper thin and/or curly? Yes No Call your service engineer A 44 Watkiss PowerSquare™224 User Manual
...? Yes No Enter the correct SET THICKNESS or SHEET THICKNESS into the touch screen? Is the paper thin and/or curly? Yes No Call your service engineer A 44 Watkiss PowerSquare™224 User Manual

Watkiss PowerSquare R2L User Manual
Page 49
On thin books, this may reduce the production speed. Error Conditions, Problems and Solutions - Book Quality Problems A Increase the TAMPER TIME to give the paper more time to settle. Touch CONFIGURE > SHUTTLE. Supervisor access level is not needed (see page 24). Increase the TAMPER TIME in increments of 200. Yes No Further action is needed . Call your service engineer Watkiss PowerSquare™224 User Manual 45 Does the problem continue? 5 -
On thin books, this may reduce the production speed. Error Conditions, Problems and Solutions - Book Quality Problems A Increase the TAMPER TIME to give the paper more time to settle. Touch CONFIGURE > SHUTTLE. Supervisor access level is not needed (see page 24). Increase the TAMPER TIME in increments of 200. Yes No Further action is needed . Call your service engineer Watkiss PowerSquare™224 User Manual 45 Does the problem continue? 5 -
Watkiss PowerSquare R2L User Manual
Page 51
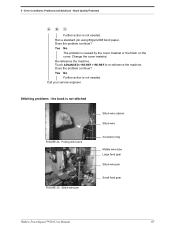
... jam Stitch-wire cabinet Stitch-wire Accessory bag Middle wire-tube Large feed gear Stitch-wire jam Small feed gear Watkiss PowerSquare™224 User Manual 47 Does the problem continue? Does the problem continue? Change the cover material. Pulling stitch-wire FIGURE 25. Book Quality Problems A B C Further action is not... No The problem is not stitched FIGURE 24. Re-reference the machine. Touch ADVANCED > RE-REF > RE-REF to re-reference the machine. 5 - Call your service engineer. Error Conditions, Problems and Solutions - Stitching problems -
... jam Stitch-wire cabinet Stitch-wire Accessory bag Middle wire-tube Large feed gear Stitch-wire jam Small feed gear Watkiss PowerSquare™224 User Manual 47 Does the problem continue? Does the problem continue? Change the cover material. Pulling stitch-wire FIGURE 25. Book Quality Problems A B C Further action is not... No The problem is not stitched FIGURE 24. Re-reference the machine. Touch ADVANCED > RE-REF > RE-REF to re-reference the machine. 5 - Call your service engineer. Error Conditions, Problems and Solutions - Stitching problems -
Watkiss PowerSquare R2L User Manual
Page 52
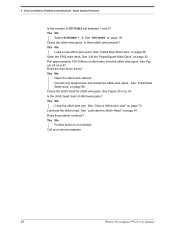
... Problems Is the number of STITCHES set between 1 and 6? Lubricate the stitch head. Discard any tangled wire and reload the stitch-wire spool. Call your service engineer 48 Watkiss PowerSquare™224 User Manual 5 - Check the stitch-wire spool. Yes No Further action is not needed.
... Problems Is the number of STITCHES set between 1 and 6? Lubricate the stitch head. Discard any tangled wire and reload the stitch-wire spool. Call your service engineer 48 Watkiss PowerSquare™224 User Manual 5 - Check the stitch-wire spool. Yes No Further action is not needed.

Watkiss PowerSquare R2L User Manual
Page 53
... paper-type? Have you accurately measured the paper-size after printing? Watkiss PowerSquare™224 User Manual 49 Is the paper within specification? See "Specifications" on the spine. Yes No Do not ...Print a sample to re-reference the machine. Yes No Call your service engineer Further action is not needed . Yes No Enter the correct, measured PAPER SIZE into the touch... screen? Call your service engineer The stitches should be aligned centrally on page 101. Book Quality Problems Stitching problems ...
... paper-type? Have you accurately measured the paper-size after printing? Watkiss PowerSquare™224 User Manual 49 Is the paper within specification? See "Specifications" on the spine. Yes No Do not ...Print a sample to re-reference the machine. Yes No Call your service engineer Further action is not needed . Yes No Enter the correct, measured PAPER SIZE into the touch... screen? Call your service engineer The stitches should be aligned centrally on page 101. Book Quality Problems Stitching problems ...
Watkiss PowerSquare R2L User Manual
Page 54
... > RE-REF > RE-REF to AUTO. Does the problem continue? No Yes Set TRIM to re-reference the machine. Is AUTO turned off ? Call your service engineer. 50 Watkiss PowerSquare™224 User Manual Book Quality Problems Trimming problem - Yes No Further action is not needed .
... > RE-REF > RE-REF to AUTO. Does the problem continue? No Yes Set TRIM to re-reference the machine. Is AUTO turned off ? Call your service engineer. 50 Watkiss PowerSquare™224 User Manual Book Quality Problems Trimming problem - Yes No Further action is not needed .
Watkiss PowerSquare R2L User Manual
Page 55
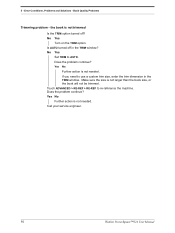
...the book size, or the book will not be trimmed. See "Clear paper from the trim stop guard and check for paper trimmings. Call your service engineer Trimming problem - Yes No Turn on page 100. Make sure the size is not trimmed square Open the trim stop . the book is ...not trimmed to re-reference the machine. Yes No Further action is needed . Call your service engineer Watkiss PowerSquare™224 User Manual 51 Re-reference the machine. Does the problem continue? Yes No Clear paper from the trim stop clear of paper trimmings? Book...
...the book size, or the book will not be trimmed. See "Clear paper from the trim stop guard and check for paper trimmings. Call your service engineer Trimming problem - Yes No Turn on page 100. Make sure the size is not trimmed square Open the trim stop . the book is ...not trimmed to re-reference the machine. Yes No Further action is needed . Call your service engineer Watkiss PowerSquare™224 User Manual 51 Re-reference the machine. Does the problem continue? Yes No Clear paper from the trim stop clear of paper trimmings? Book...
Watkiss PowerSquare R2L User Manual
Page 56
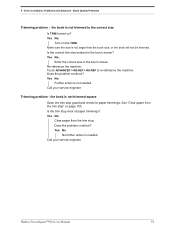
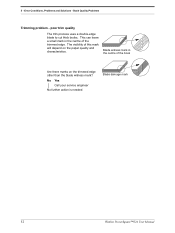
No Yes Call your service engineer No further action is needed Blade damage mark 52 Watkiss PowerSquare™224 User Manual Blade witness mark in the centre of this mark will depend on the trimmed edge other than the blade witness mark? Book Quality Problems Trimming problem - poor trim quality The trim process uses a double-edge blade to cut thick books. 5 - Error Conditions, Problems and Solutions - The visibility of the trimmed edge. This can leave a small mark in the centre of the book Are there marks on the paper quality and characteristics.
No Yes Call your service engineer No further action is needed Blade damage mark 52 Watkiss PowerSquare™224 User Manual Blade witness mark in the centre of this mark will depend on the trimmed edge other than the blade witness mark? Book Quality Problems Trimming problem - poor trim quality The trim process uses a double-edge blade to cut thick books. 5 - Error Conditions, Problems and Solutions - The visibility of the trimmed edge. This can leave a small mark in the centre of the book Are there marks on the paper quality and characteristics.
Watkiss PowerSquare R2L User Manual
Page 57
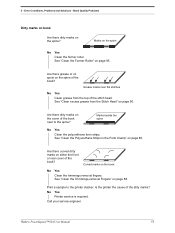
... cover of the book? Grease marks near to the printer stacker. Are there dirty marks on the spine of the stitch head. Call your service engineer. See "Clean excess grease from the top of the book? See "Clean the Trimmings-removal Fingers" on page 90. Watkiss PowerSquare™...;224 User Manual 53 5 - See "Clean the Polyurethane Strips in the Form Clamp" on the book No Yes Clean the trimmings removal fingers. Curved marks on ...
... cover of the book? Grease marks near to the printer stacker. Are there dirty marks on the spine of the stitch head. Call your service engineer. See "Clean excess grease from the top of the book? See "Clean the Trimmings-removal Fingers" on page 90. Watkiss PowerSquare™...;224 User Manual 53 5 - See "Clean the Polyurethane Strips in the Form Clamp" on the book No Yes Clean the trimmings removal fingers. Curved marks on ...
Watkiss PowerSquare R2L User Manual
Page 58
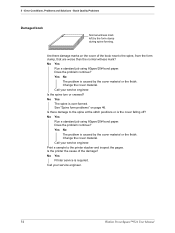
... "Spine form problems" on the cover of the damage? Does the problem continue? No Yes Printer service is over-formed. Is the spine torn or creased? Call your service engineer. 54 Watkiss PowerSquare™224 User Manual Book Quality Problems Damaged book Normal witness mark left by the cover material or the finish...
... "Spine form problems" on the cover of the damage? Does the problem continue? No Yes Printer service is over-formed. Is the spine torn or creased? Call your service engineer. 54 Watkiss PowerSquare™224 User Manual Book Quality Problems Damaged book Normal witness mark left by the cover material or the finish...

Watkiss PowerSquare R2L User Manual
Page 59
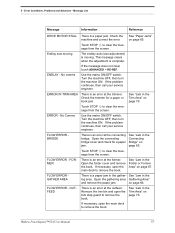
.... See "Jam in the message list. Press the reset button on the cover is complete. If the problem continues, then call your service engineer. Watkiss PowerSquare™224 User Manual 55 Follow the action needed for each message. Message AXES MOVING BOOK CYCLE TIME TOO LONG Information Reference Some of the list...
.... See "Jam in the message list. Press the reset button on the cover is complete. If the problem continues, then call your service engineer. Watkiss PowerSquare™224 User Manual 55 Follow the action needed for each message. Message AXES MOVING BOOK CYCLE TIME TOO LONG Information Reference Some of the list...

Watkiss PowerSquare R2L User Manual
Page 60
... print job. The paper dimension changes when the paper is complete. Use the mains ON/OFF switch. If the problem continues, then call your service engineer. 5 - Error Conditions, Problems and Solutions - Check the trim bin. See "Jam in the Connecting Bridge" on page 34. 56... Watkiss PowerSquare™224 User Manual Message List Message Information Reference BRIDGE MOTOR STALL BRIDGE - No comms Check for a paper jam in the bridge is closed. The centre axis ...
... print job. The paper dimension changes when the paper is complete. Use the mains ON/OFF switch. If the problem continues, then call your service engineer. 5 - Error Conditions, Problems and Solutions - Check the trim bin. See "Jam in the Connecting Bridge" on page 34. 56... Watkiss PowerSquare™224 User Manual Message List Message Information Reference BRIDGE MOTOR STALL BRIDGE - No comms Check for a paper jam in the bridge is closed. The centre axis ...
Watkiss PowerSquare R2L User Manual
Page 61
... If the message does not clear, touch ADVANCED > RE-REF. See "Jam in the Connecting Bridge" on page 70. Watkiss PowerSquare™224 User Manual 57 No comms Use the mains ON/OFF switch. ERROR - Touch STOP to remove the book. FLOW ERROR - If necessary, open the main deck... is an error at the connecting bridge. ERROR IN TRIM AREA There is an error at the outfeed. If the problem continues, then call your service engineer. See "Jam in the gather- FLOW ERROR - Open the gathering area Gathering Area" and remove the paper jam. Check the trimmer for...
... If the message does not clear, touch ADVANCED > RE-REF. See "Jam in the Connecting Bridge" on page 70. Watkiss PowerSquare™224 User Manual 57 No comms Use the mains ON/OFF switch. ERROR - Touch STOP to remove the book. FLOW ERROR - If necessary, open the main deck... is an error at the connecting bridge. ERROR IN TRIM AREA There is an error at the outfeed. If the problem continues, then call your service engineer. See "Jam in the gather- FLOW ERROR - Open the gathering area Gathering Area" and remove the paper jam. Check the trimmer for...

Plockmatic SD-350/SD-500 Software Update Procedure
Page 5
... Booklet Maker User Interface upgrade, please note the detailed steps below ) 7. XXXXXX-x.xx (User Interface) 1. Perform an NVM Reset (GP 20 NVM Reset in the Service Manual, and page 16 of that comes up (see details in screenshots below : Double-click the file and follow the instructions given in the USB port...
... Booklet Maker User Interface upgrade, please note the detailed steps below ) 7. XXXXXX-x.xx (User Interface) 1. Perform an NVM Reset (GP 20 NVM Reset in the Service Manual, and page 16 of that comes up (see details in screenshots below : Double-click the file and follow the instructions given in the USB port...


