User Manual
Page 3
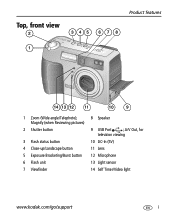
A/V Out, for television viewing 3 Flash status button 10 DC-In (5V) 4 Close-up/Landscape button 11 Lens 5 Exposure Bracketing/Burst button 12 Microphone 6 Flash unit 13 Light sensor 7 Viewfinder 14 Self Timer/Video light www.kodak.com/go/support i Top, front view 2 345 6 7 8 Product features 1 14 13 12 11 10 9 1 Zoom (Wide angle/Telephoto); 8 Speaker Magnify (when Reviewing pictures) 2 Shutter button 9 USB Port ;
A/V Out, for television viewing 3 Flash status button 10 DC-In (5V) 4 Close-up/Landscape button 11 Lens 5 Exposure Bracketing/Burst button 12 Microphone 6 Flash unit 13 Light sensor 7 Viewfinder 14 Self Timer/Video light www.kodak.com/go/support i Top, front view 2 345 6 7 8 Product features 1 14 13 12 11 10 9 1 Zoom (Wide angle/Telephoto); 8 Speaker Magnify (when Reviewing pictures) 2 Shutter button 9 USB Port ;
User Manual
Page 4
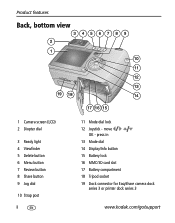
Product features Back, bottom view 3456789 2 1 10 11 12 13 19 18 14 17 16 15 1 Camera screen (LCD) 2 Diopter dial 3 Ready light 4 Viewfinder 5 Delete button 6 Menu button 7 Review button 8 Share button 9 Jog dial 10 Strap post ii 11 Mode dial lock 12 Joystick - move OK - press in 13 Mode dial 14 Display/Info button 15 Battery lock 16 MMC/SD card slot 17 Battery compartment 18 Tripod socket 19 Dock connector for EasyShare camera dock series 3 or printer dock series 3 www.kodak.com/go/support
Product features Back, bottom view 3456789 2 1 10 11 12 13 19 18 14 17 16 15 1 Camera screen (LCD) 2 Diopter dial 3 Ready light 4 Viewfinder 5 Delete button 6 Menu button 7 Review button 8 Share button 9 Jog dial 10 Strap post ii 11 Mode dial lock 12 Joystick - move OK - press in 13 Mode dial 14 Display/Info button 15 Battery lock 16 MMC/SD card slot 17 Battery compartment 18 Tripod socket 19 Dock connector for EasyShare camera dock series 3 or printer dock series 3 www.kodak.com/go/support
User Manual
Page 5
...4 Storing pictures on an optional SD or MMC card 5 Using optional lenses 5 2 Taking pictures and videos 6 Taking a picture 6 Taking a video 8 Reviewing the picture or video just taken 8 Using optical zoom 9 Using digital zoom 9 Camera modes 10 Using P, A, S, M, and C modes 13 Using the jog dial to change P, A, S, M, or C mode settings 14 Using the flash...15 Shooting close-up and landscape pictures 18 Using exposure bracketing 19 Using burst 20 Changing picture-taking settings 21 Using setup to customize your camera 27 Pre-tagging for album names 29 www.kodak.com/go/support iii
...4 Storing pictures on an optional SD or MMC card 5 Using optional lenses 5 2 Taking pictures and videos 6 Taking a picture 6 Taking a video 8 Reviewing the picture or video just taken 8 Using optical zoom 9 Using digital zoom 9 Camera modes 10 Using P, A, S, M, and C modes 13 Using the jog dial to change P, A, S, M, or C mode settings 14 Using the flash...15 Shooting close-up and landscape pictures 18 Using exposure bracketing 19 Using burst 20 Changing picture-taking settings 21 Using setup to customize your camera 27 Pre-tagging for album names 29 www.kodak.com/go/support iii
User Manual
Page 6
... Viewing single pictures and videos 31 Viewing multiple pictures and videos 32 Playing a video 32 Deleting pictures and videos 33 Magnifying pictures 33 Changing optional review settings 34 Protecting pictures and videos from deletion 34 Tagging pictures/videos for albums 35 Running a slide show 36 Displaying pictures and videos on a television... emailing 42 Tagging pictures as favorites 43 6 Transferring and printing pictures 46 Transferring pictures/videos with the USB cable 46 Printing pictures 47 iv www.kodak.com/go/support
... Viewing single pictures and videos 31 Viewing multiple pictures and videos 32 Playing a video 32 Deleting pictures and videos 33 Magnifying pictures 33 Changing optional review settings 34 Protecting pictures and videos from deletion 34 Tagging pictures/videos for albums 35 Running a slide show 36 Displaying pictures and videos on a television... emailing 42 Tagging pictures as favorites 43 6 Transferring and printing pictures 46 Transferring pictures/videos with the USB cable 46 Printing pictures 47 iv www.kodak.com/go/support

User Manual
Page 15
You can : Delete ■ Review: If you take a picture or video, the camera screen displays a Quickview for email or as a favorite, or to begin recording. NOTE: If you select Delete, all pictures in Review. (See page 33.) www.kodak.com/go/support 8 To stop recording, press and release .../video for approximately 5 seconds. Taking pictures and videos Taking a video 1 Turn the Mode dial to Video . 2 Use the viewfinder or camera screen to play the video. While the picture or video is displayed, you take no action, the picture/video is displayed during ) video recording...
You can : Delete ■ Review: If you take a picture or video, the camera screen displays a Quickview for email or as a favorite, or to begin recording. NOTE: If you select Delete, all pictures in Review. (See page 33.) www.kodak.com/go/support 8 To stop recording, press and release .../video for approximately 5 seconds. Taking pictures and videos Taking a video 1 Turn the Mode dial to Video . 2 Use the viewfinder or camera screen to play the video. While the picture or video is displayed, you take no action, the picture/video is displayed during ) video recording...
User Manual
Page 26
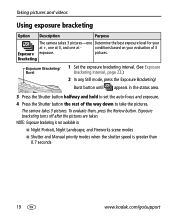
... button the rest of 3 Exposure exposure. The camera takes 3 pictures. NOTE: Exposure bracketing is greater than 0.7 seconds 19 www.kodak.com/go/support Taking pictures and videos Using exposure bracketing Option Description Purpose The camera takes 3 pictures-one Determine the best exposure level... for your evaluation of the way down to take the pictures. To evaluate them, press the Review button....
... button the rest of 3 Exposure exposure. The camera takes 3 pictures. NOTE: Exposure bracketing is greater than 0.7 seconds 19 www.kodak.com/go/support Taking pictures and videos Using exposure bracketing Option Description Purpose The camera takes 3 pictures-one Determine the best exposure level... for your evaluation of the way down to take the pictures. To evaluate them, press the Review button....
User Manual
Page 38
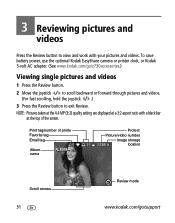
... tag Email tag Album name Protect Picture/video number Image storage location Scroll arrows 31 Review mode www.kodak.com/go /z730accessories.) Viewing single pictures and videos 1 Press the Review button. 2 Move the joystick to scroll backward or forward through pictures and videos....the Review button to view and work with a black bar at a 3:2 aspect ratio with your pictures and videos. 3 Reviewing pictures and videos Press the Review button to exit Review. Print tag/number of the screen. To save battery power, use the optional Kodak EasyShare camera or printer dock, or Kodak 5-...
... tag Email tag Album name Protect Picture/video number Image storage location Scroll arrows 31 Review mode www.kodak.com/go /z730accessories.) Viewing single pictures and videos 1 Press the Review button. 2 Move the joystick to scroll backward or forward through pictures and videos....the Review button to view and work with a black bar at a 3:2 aspect ratio with your pictures and videos. 3 Reviewing pictures and videos Press the Review button to exit Review. Print tag/number of the screen. To save battery power, use the optional Kodak EasyShare camera or printer dock, or Kodak 5-...
User Manual
Page 39
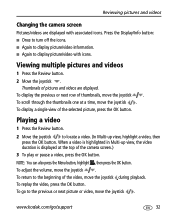
... is highlighted in Multi-up view, highlight a video, then press the OK button. To go /support 32 www.kodak.com/go to the beginning of the video, move the joystick . Thumbnails of the camera screen.) 3 To play or pause a video, press the OK button. To adjust the volume, move the joystick To... video, move the joystick . NOTE: You can also press the Menu button, highlight , then press the OK button. Viewing multiple pictures and videos 1 Press the Review button. 2 Move the joystick . during playback.
... is highlighted in Multi-up view, highlight a video, then press the OK button. To go /support 32 www.kodak.com/go to the beginning of the video, move the joystick . Thumbnails of the camera screen.) 3 To play or pause a video, press the OK button. To adjust the volume, move the joystick To... video, move the joystick . NOTE: You can also press the Menu button, highlight , then press the OK button. Viewing multiple pictures and videos 1 Press the Review button. 2 Move the joystick . during playback.
User Manual
Page 40
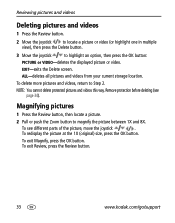
... OK button. To see page 34). To delete more pictures and videos, return to magnify the picture between 1X and 8X. Magnifying pictures 1 Press the Review button, then locate a picture. 2 Pull or push the Zoom button to Step 2. Remove protection before deleting (see different parts of the picture, move the joystick... OK button: PICTURE or VIDEO-deletes the displayed picture or video. EXIT-exits the Delete screen. To exit Magnify, press the OK button. To exit Review, press the Review button. 33 www.kodak.com/go/support
... OK button. To see page 34). To delete more pictures and videos, return to magnify the picture between 1X and 8X. Magnifying pictures 1 Press the Review button, then locate a picture. 2 Pull or push the Zoom button to Step 2. Remove protection before deleting (see different parts of the picture, move the joystick... OK button: PICTURE or VIDEO-deletes the displayed picture or video. EXIT-exits the Delete screen. To exit Magnify, press the OK button. To exit Review, press the Review button. 33 www.kodak.com/go/support
User Manual
Page 41
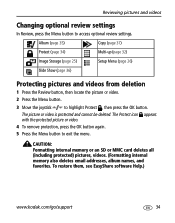
... MMC card deletes all (including protected) pictures, videos. (Formatting internal memory also deletes email addresses, album names, and favorites. To restore them, see EasyShare software Help.) www.kodak.com/go/support 34 Album (page 35) Copy (page 37) Protect (page 34) Multi-up (page 32) Image Storage (page 25) Setup Menu... button again. 5 Press the Menu button to highlight Protect , then press the OK button. The picture or video is protected and cannot be deleted. Reviewing pictures and videos Changing optional review settings In Review, press the Menu button to access optional...
... MMC card deletes all (including protected) pictures, videos. (Formatting internal memory also deletes email addresses, album names, and favorites. To restore them, see EasyShare software Help.) www.kodak.com/go/support 34 Album (page 35) Copy (page 37) Protect (page 34) Multi-up (page 32) Image Storage (page 25) Setup Menu... button again. 5 Press the Menu button to highlight Protect , then press the OK button. The picture or video is protected and cannot be deleted. Reviewing pictures and videos Changing optional review settings In Review, press the Menu button to access optional...
User Manual
Page 42
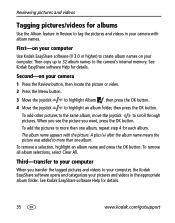
...Kodak EasyShare software Help for albums Use the Album feature in Review to tag the pictures and videos in the appropriate album folder. To remove a selection, highlight an album name and press the OK button. Reviewing pictures and videos Tagging pictures/videos for details. Second-on your camera 1 Press the Review... the OK button. The album name appears with album names. First-on your computer Use Kodak EasyShare software (V 3.0 or higher) to your pictures and videos in your camera with the picture. Third-transfer to create album names on your computer. A plus (+) ...
...Kodak EasyShare software Help for albums Use the Album feature in Review to tag the pictures and videos in the appropriate album folder. To remove a selection, highlight an album name and press the OK button. Reviewing pictures and videos Tagging pictures/videos for details. Second-on your camera 1 Press the Review... the OK button. The album name appears with album names. First-on your computer Use Kodak EasyShare software (V 3.0 or higher) to your pictures and videos in your camera with the picture. Third-transfer to create album names on your computer. A plus (+) ...
User Manual
Page 43
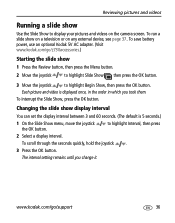
... press the OK button. Each picture and video is 5 seconds.) 1 On the Slide Show menu, move the joystick the OK button. www.kodak.com/go /z730accessories.) Starting the slide show display interval You can set the display interval between 3 and 60 seconds. (The default is displayed...slide show Use the Slide Show to display your pictures and videos on any external device, see page 37. Reviewing pictures and videos Running a slide show on a television or on the camera screen. To scroll through the seconds quickly, hold the joystick . 3 Press the OK button. Changing the ...
... press the OK button. Each picture and video is 5 seconds.) 1 On the Slide Show menu, move the joystick the OK button. www.kodak.com/go /z730accessories.) Starting the slide show display interval You can set the display interval between 3 and 60 seconds. (The default is displayed...slide show Use the Slide Show to display your pictures and videos on any external device, see page 37. Reviewing pictures and videos Running a slide show on a television or on the camera screen. To scroll through the seconds quickly, hold the joystick . 3 Press the OK button. Changing the ...
User Manual
Page 44
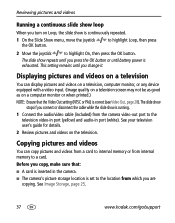
... Storage, page 25. 37 www.kodak.com/go/support Before you copy, make sure that the Video Out setting (NTSC or PAL) is correct (see Video Out, page 28). This setting remains until battery power is inserted in port (white). Reviewing pictures and videos Running a continuous slide... while the slide show is running. 1 Connect the audio/video cable (included) from the camera video-out port to the television video-in port (yellow) and audio-in the camera. ■ The camera's picture storage location is continuously repeated. 1 On the Slide Show menu, move the joystick ...
... Storage, page 25. 37 www.kodak.com/go/support Before you copy, make sure that the Video Out setting (NTSC or PAL) is correct (see Video Out, page 28). This setting remains until battery power is inserted in port (white). Reviewing pictures and videos Running a continuous slide... while the slide show is running. 1 Connect the audio/video cable (included) from the camera video-out port to the television video-in port (yellow) and audio-in the camera. ■ The camera's picture storage location is continuously repeated. 1 On the Slide Show menu, move the joystick ...
User Manual
Page 45
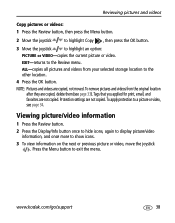
www.kodak.com/go/support 38 NOTE: Pictures and videos are not copied. Protection settings are... page 34. To remove pictures and videos from your selected storage location to exit the menu. Reviewing pictures and videos Copy pictures or videos: 1 Press the Review button, then press the Menu button. 2 Move the joystick to highlight Copy , then press ...the joystick to a picture or video, see page 33). Viewing picture/video information 1 Press the Review button. 2 Press the Display/Info button once to hide icons, again to display picture/video information, and once more to the...
www.kodak.com/go/support 38 NOTE: Pictures and videos are not copied. Protection settings are... page 34. To remove pictures and videos from your selected storage location to exit the menu. Reviewing pictures and videos Copy pictures or videos: 1 Press the Review button, then press the Menu button. 2 Move the joystick to highlight Copy , then press ...the joystick to a picture or video, see page 33). Viewing picture/video information 1 Press the Review button. 2 Press the Display/Info button once to hide icons, again to display picture/video information, and once more to the...
User Manual
Page 47
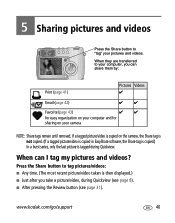
.... www.kodak.com/go/support 40 When can share them by: Print (page 41) Pictures Videos ✔ Email (page 42) ✔ ✔ Favorite (page 43) ✔ ✔ for sharing on the camera, the Share tag is not copied. (If a tagged picture/video is copied in EasyShare software,... the Share tag is copied.) In a burst series, only the last picture is tagged during Quickview (see page 8). ■ After pressing the Review button (see page 31). 5 ...
.... www.kodak.com/go/support 40 When can share them by: Print (page 41) Pictures Videos ✔ Email (page 42) ✔ ✔ Favorite (page 43) ✔ ✔ for sharing on the camera, the Share tag is not copied. (If a tagged picture/video is copied in EasyShare software,... the Share tag is copied.) In a burst series, only the last picture is tagged during Quickview (see page 8). ■ After pressing the Review button (see page 31). 5 ...
User Manual
Page 57
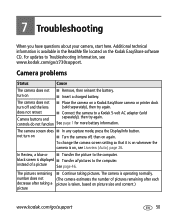
...; Insert a charged battery. black screen is taken, based on again. Camera problems Status Cause The camera does not ■ Remove, then reinsert the battery. 7 Troubleshooting When you have questions about your camera, start here. Additional technical information is on the Kodak EasyShare software CD. In Review, a blue or ■ Transfer the picture to Troubleshooting information, see...
...; Insert a charged battery. black screen is taken, based on again. Camera problems Status Cause The camera does not ■ Remove, then reinsert the battery. 7 Troubleshooting When you have questions about your camera, start here. Additional technical information is on the Kodak EasyShare software CD. In Review, a blue or ■ Transfer the picture to Troubleshooting information, see...
User Manual
Page 67
... battery life. Reviewing your battery. when they return to local and national regulations. Battery safety and handling ■ Do not allow batteries to your computer, and charges your camera, makes 4 x 6 in the camera. ■ Battery performance is not covered under warranty. Do not discard cold batteries that deplete battery power: - Kodak EasyShare printer dock series...
... battery life. Reviewing your battery. when they return to local and national regulations. Battery safety and handling ■ Do not allow batteries to your computer, and charges your camera, makes 4 x 6 in the camera. ■ Battery performance is not covered under warranty. Do not discard cold batteries that deplete battery power: - Kodak EasyShare printer dock series...
User Manual
Page 74
Index A A/V out, 37 about picture, video, 38 about this camera, 29 accessories battery, 60 buying, 54 lenses, 5 printer dock, 47 SD/MMC card, 5 advanced digital zoom, 27 AF control, 24 album, 25 albums, tagging pictures for, 29, 35 ...camera dock connector on camera, ii camera screen reviewing pictures, 31 reviewing videos, 31 Canadian compliance, 66 caring for your camera, 59 charging battery via charger, 1 lights, battery charger, 1 children, 12 clock, setting, 2 close-up, 12 scenes, 18 close-up pictures, 18 color mode, 25 compression, 22 computer connecting camera, 46 transfer to, 46 www.kodak...
Index A A/V out, 37 about picture, video, 38 about this camera, 29 accessories battery, 60 buying, 54 lenses, 5 printer dock, 47 SD/MMC card, 5 advanced digital zoom, 27 AF control, 24 album, 25 albums, tagging pictures for, 29, 35 ...camera dock connector on camera, ii camera screen reviewing pictures, 31 reviewing videos, 31 Canadian compliance, 66 caring for your camera, 59 charging battery via charger, 1 lights, battery charger, 1 children, 12 clock, setting, 2 close-up, 12 scenes, 18 close-up pictures, 18 color mode, 25 compression, 22 computer connecting camera, 46 transfer to, 46 www.kodak...
User Manual
Page 77
... 11 power auto off, save, 62 camera, 3 switch, ii print warning, 27 printer dock, 47 printing from a card, 48 optimizing printer, 54 www.kodak.com/go/support Index order online, 48 PictBridge, 47 pictures, 47 tagged pictures, 48 with EasyShare printer dock, 47 program, 10 protecting pictures...flash, 15 regulatory information, 65 removing favorites, 44 repair, 54 reset to default, PASM, C, 25 review button, 31 reviewing pictures as you take them, 8 camera screen, 31 deleting, 33 magnifying, 33 slide show, 36 reviewing videos camera screen, 31 deleting, 33 slide show, 36 running slide show, 36 70
... 11 power auto off, save, 62 camera, 3 switch, ii print warning, 27 printer dock, 47 printing from a card, 48 optimizing printer, 54 www.kodak.com/go/support Index order online, 48 PictBridge, 47 pictures, 47 tagged pictures, 48 with EasyShare printer dock, 47 program, 10 protecting pictures...flash, 15 regulatory information, 65 removing favorites, 44 repair, 54 reset to default, PASM, C, 25 review button, 31 reviewing pictures as you take them, 8 camera screen, 31 deleting, 33 magnifying, 33 slide show, 36 reviewing videos camera screen, 31 deleting, 33 slide show, 36 running slide show, 36 70
User Manual
Page 79
..., 53 turning camera on and off, 3 U upgrading software, firmware, 62 URLs, Kodak web sites, 54 USB (universal serial bus) connection location, i transferring pictures, 46 www.kodak.com/go/support Index V VCCI compliance, 66 video length, 26 out, 28 size, 26 video date display, 29 videos copying, 37 deleting, 33 emailing tagged, 42 reviewing, 31...
..., 53 turning camera on and off, 3 U upgrading software, firmware, 62 URLs, Kodak web sites, 54 USB (universal serial bus) connection location, i transferring pictures, 46 www.kodak.com/go/support Index V VCCI compliance, 66 video length, 26 out, 28 size, 26 video date display, 29 videos copying, 37 deleting, 33 emailing tagged, 42 reviewing, 31...


