User Manual
Page 3
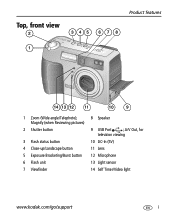
Top, front view 2 345 6 7 8 Product features 1 14 13 12 11 10 9 1 Zoom (Wide angle/Telephoto); 8 Speaker Magnify (when Reviewing pictures) 2 Shutter button 9 USB Port ; A/V Out, for television viewing 3 Flash status button 10 DC-In (5V) 4 Close-up/Landscape button 11 Lens 5 Exposure Bracketing/Burst button 12 Microphone 6 Flash unit 13 Light sensor 7 Viewfinder 14 Self Timer/Video light www.kodak.com/go/support i
Top, front view 2 345 6 7 8 Product features 1 14 13 12 11 10 9 1 Zoom (Wide angle/Telephoto); 8 Speaker Magnify (when Reviewing pictures) 2 Shutter button 9 USB Port ; A/V Out, for television viewing 3 Flash status button 10 DC-In (5V) 4 Close-up/Landscape button 11 Lens 5 Exposure Bracketing/Burst button 12 Microphone 6 Flash unit 13 Light sensor 7 Viewfinder 14 Self Timer/Video light www.kodak.com/go/support i
User Manual
Page 4
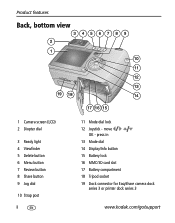
press in 13 Mode dial 14 Display/Info button 15 Battery lock 16 MMC/SD card slot 17 Battery compartment 18 Tripod socket 19 Dock connector for EasyShare camera dock series 3 or printer dock series 3 www.kodak.com/go/support move OK - Product features Back, bottom view 3456789 2 1 10 11 12 13 19 18 14 17 16 15 1 Camera screen (LCD) 2 Diopter dial 3 Ready light 4 Viewfinder 5 Delete button 6 Menu button 7 Review button 8 Share button 9 Jog dial 10 Strap post ii 11 Mode dial lock 12 Joystick -
press in 13 Mode dial 14 Display/Info button 15 Battery lock 16 MMC/SD card slot 17 Battery compartment 18 Tripod socket 19 Dock connector for EasyShare camera dock series 3 or printer dock series 3 www.kodak.com/go/support move OK - Product features Back, bottom view 3456789 2 1 10 11 12 13 19 18 14 17 16 15 1 Camera screen (LCD) 2 Diopter dial 3 Ready light 4 Viewfinder 5 Delete button 6 Menu button 7 Review button 8 Share button 9 Jog dial 10 Strap post ii 11 Mode dial lock 12 Joystick -
User Manual
Page 5
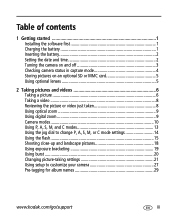
...4 Storing pictures on an optional SD or MMC card 5 Using optional lenses 5 2 Taking pictures and videos 6 Taking a picture 6 Taking a video 8 Reviewing the picture or video just taken 8 Using optical zoom 9 Using digital zoom 9 Camera modes 10 Using P, A, S, M, and C modes 13 Using the jog dial to change P, A, S, M, or C mode settings 14 Using the flash...15 Shooting close-up and landscape pictures 18 Using exposure bracketing 19 Using burst 20 Changing picture-taking settings 21 Using setup to customize your camera 27 Pre-tagging for album names 29 www.kodak.com/go/support iii
...4 Storing pictures on an optional SD or MMC card 5 Using optional lenses 5 2 Taking pictures and videos 6 Taking a picture 6 Taking a video 8 Reviewing the picture or video just taken 8 Using optical zoom 9 Using digital zoom 9 Camera modes 10 Using P, A, S, M, and C modes 13 Using the jog dial to change P, A, S, M, or C mode settings 14 Using the flash...15 Shooting close-up and landscape pictures 18 Using exposure bracketing 19 Using burst 20 Changing picture-taking settings 21 Using setup to customize your camera 27 Pre-tagging for album names 29 www.kodak.com/go/support iii
User Manual
Page 6
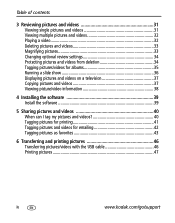
... Viewing single pictures and videos 31 Viewing multiple pictures and videos 32 Playing a video 32 Deleting pictures and videos 33 Magnifying pictures 33 Changing optional review settings 34 Protecting pictures and videos from deletion 34 Tagging pictures/videos for albums 35 Running a slide show 36 Displaying pictures and videos on a television... emailing 42 Tagging pictures as favorites 43 6 Transferring and printing pictures 46 Transferring pictures/videos with the USB cable 46 Printing pictures 47 iv www.kodak.com/go/support
... Viewing single pictures and videos 31 Viewing multiple pictures and videos 32 Playing a video 32 Deleting pictures and videos 33 Magnifying pictures 33 Changing optional review settings 34 Protecting pictures and videos from deletion 34 Tagging pictures/videos for albums 35 Running a slide show 36 Displaying pictures and videos on a television... emailing 42 Tagging pictures as favorites 43 6 Transferring and printing pictures 46 Transferring pictures/videos with the USB cable 46 Printing pictures 47 iv www.kodak.com/go/support

User Manual
Page 15
... ■ Delete: Press the Delete button while the picture/video and are deleted. You can : Delete ■ Review: If you select Delete, all pictures in Review. (See page 33.) www.kodak.com/go/support 8 Share OK NOTE: Only the final picture of a burst series (see page 20) is displayed... the Shutter button again. Taking pictures and videos Taking a video 1 Turn the Mode dial to Video . 2 Use the viewfinder or camera screen to play the video. If you take a picture or video, the camera screen displays a Quickview for email or as a favorite, or to begin recording.
... ■ Delete: Press the Delete button while the picture/video and are deleted. You can : Delete ■ Review: If you select Delete, all pictures in Review. (See page 33.) www.kodak.com/go/support 8 Share OK NOTE: Only the final picture of a burst series (see page 20) is displayed... the Shutter button again. Taking pictures and videos Taking a video 1 Turn the Mode dial to Video . 2 Use the viewfinder or camera screen to play the video. If you take a picture or video, the camera screen displays a Quickview for email or as a favorite, or to begin recording.
User Manual
Page 26
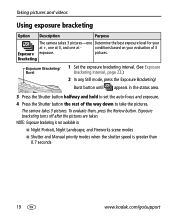
The camera takes 3 pictures. To evaluate them, press the Review button. Exposure bracketing turns off after the pictures are taken. NOTE: Exposure bracketing is not available in the status area. 3 Press the Shutter button halfway ... scene modes ■ Shutter and Manual priority modes when the shutter speed is greater than 0.7 seconds 19 www.kodak.com/go/support pictures. Taking pictures and videos Using exposure bracketing Option Description Purpose The camera takes 3 pictures-one at - conditions based on your at +, one at 0, and one Determine the best exposure...
The camera takes 3 pictures. To evaluate them, press the Review button. Exposure bracketing turns off after the pictures are taken. NOTE: Exposure bracketing is not available in the status area. 3 Press the Shutter button halfway ... scene modes ■ Shutter and Manual priority modes when the shutter speed is greater than 0.7 seconds 19 www.kodak.com/go/support pictures. Taking pictures and videos Using exposure bracketing Option Description Purpose The camera takes 3 pictures-one at - conditions based on your at +, one at 0, and one Determine the best exposure...
User Manual
Page 38
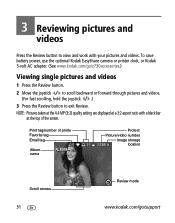
To save battery power, use the optional Kodak EasyShare camera or printer dock, or Kodak 5-volt AC adapter. (See www.kodak.com/go /support NOTE: Pictures taken at the 4.4 MP (3:2) quality setting are displayed at a 3:2 aspect ratio with your pictures and videos. ... of prints Favorite tag Email tag Album name Protect Picture/video number Image storage location Scroll arrows 31 Review mode www.kodak.com/go /z730accessories.) Viewing single pictures and videos 1 Press the Review button. 2 Move the joystick to scroll backward or forward through pictures and videos. (For fast scrolling...
To save battery power, use the optional Kodak EasyShare camera or printer dock, or Kodak 5-volt AC adapter. (See www.kodak.com/go /support NOTE: Pictures taken at the 4.4 MP (3:2) quality setting are displayed at a 3:2 aspect ratio with your pictures and videos. ... of prints Favorite tag Email tag Album name Protect Picture/video number Image storage location Scroll arrows 31 Review mode www.kodak.com/go /z730accessories.) Viewing single pictures and videos 1 Press the Review button. 2 Move the joystick to scroll backward or forward through pictures and videos. (For fast scrolling...
User Manual
Page 39
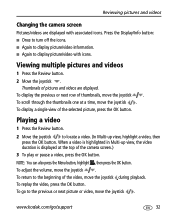
...highlighted in Multi-up view, highlight a video, then press the OK button. To adjust the volume, move the joystick . Thumbnails of the camera screen.) 3 To play or pause a video, press the OK button. To scroll through the thumbnails one at the top of pictures and videos... . To display a single view of the video, move the joystick . during playback. www.kodak.com/go to the beginning of the selected picture, press the OK button. Playing a video 1 Press the Review button. 2 Move the joystick to display picture/video with associated icons. NOTE: You can also...
...highlighted in Multi-up view, highlight a video, then press the OK button. To adjust the volume, move the joystick . Thumbnails of the camera screen.) 3 To play or pause a video, press the OK button. To scroll through the thumbnails one at the top of pictures and videos... . To display a single view of the video, move the joystick . during playback. www.kodak.com/go to the beginning of the selected picture, press the OK button. Playing a video 1 Press the Review button. 2 Move the joystick to display picture/video with associated icons. NOTE: You can also...
User Manual
Page 40
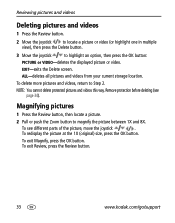
... the picture at the 1X (original) size, press the OK button. To exit Magnify, press the OK button. To exit Review, press the Review button. 33 www.kodak.com/go/support ALL-deletes all pictures and videos from your current storage location. Remove protection before deleting (see different parts of ...return to highlight an option, then press the OK button: PICTURE or VIDEO-deletes the displayed picture or video. Magnifying pictures 1 Press the Review button, then locate a picture. 2 Pull or push the Zoom button to magnify the picture between 1X and 8X. EXIT-exits the Delete screen.
... the picture at the 1X (original) size, press the OK button. To exit Magnify, press the OK button. To exit Review, press the Review button. 33 www.kodak.com/go/support ALL-deletes all pictures and videos from your current storage location. Remove protection before deleting (see different parts of ...return to highlight an option, then press the OK button: PICTURE or VIDEO-deletes the displayed picture or video. Magnifying pictures 1 Press the Review button, then locate a picture. 2 Pull or push the Zoom button to magnify the picture between 1X and 8X. EXIT-exits the Delete screen.
User Manual
Page 41
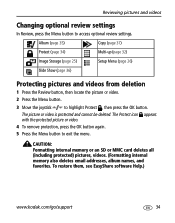
To restore them, see EasyShare software Help.) www.kodak.com/go/support 34 The picture or video is protected and cannot be deleted. CAUTION: Formatting internal memory or an SD or MMC card deletes ... 34) Multi-up (page 32) Image Storage (page 25) Setup Menu (page 26) Slide Show (page 36) Protecting pictures and videos from deletion 1 Press the Review button, then locate the picture or video. 2 Press the Menu button. 3 Move the joystick to exit the menu...
To restore them, see EasyShare software Help.) www.kodak.com/go/support 34 The picture or video is protected and cannot be deleted. CAUTION: Formatting internal memory or an SD or MMC card deletes ... 34) Multi-up (page 32) Image Storage (page 25) Setup Menu (page 26) Slide Show (page 36) Protecting pictures and videos from deletion 1 Press the Review button, then locate the picture or video. 2 Press the Menu button. 3 Move the joystick to exit the menu...
User Manual
Page 42
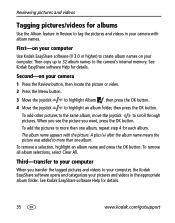
First-on your computer Use Kodak EasyShare software (V 3.0 or higher) to create album names on your camera 1 Press the Review button, then locate the picture or video. 2 Press the Menu button. 3 Move the joystick to highlight Album , then press the OK button. 4 Move ...album, move the joystick to the camera's internal memory. The album name appears with album names. To remove a selection, highlight an album name and press the OK button. A plus (+) after the album name means the picture was added to your computer, the Kodak EasyShare software opens and categorizes your pictures and...
First-on your computer Use Kodak EasyShare software (V 3.0 or higher) to create album names on your camera 1 Press the Review button, then locate the picture or video. 2 Press the Menu button. 3 Move the joystick to highlight Album , then press the OK button. 4 Move ...album, move the joystick to the camera's internal memory. The album name appears with album names. To remove a selection, highlight an album name and press the OK button. A plus (+) after the album name means the picture was added to your computer, the Kodak EasyShare software opens and categorizes your pictures and...
User Manual
Page 43
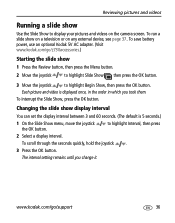
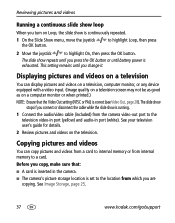
...interval setting remains until you took them. To run a slide show on a television or on the camera screen. To save battery power, use an optional Kodak 5V AC adapter. (Visit www.kodak.com/go /support 36 Changing the slide show display interval You can set the display interval between 3 ...37. Each picture and video is 5 seconds.) 1 On the Slide Show menu, move the joystick the OK button. www.kodak.com/go /z730accessories.) Starting the slide show 1 Press the Review button, then press the Menu button. 2 Move the joystick to highlight Slide Show , then press the OK button. 3 ...
...interval setting remains until you took them. To run a slide show on a television or on the camera screen. To save battery power, use an optional Kodak 5V AC adapter. (Visit www.kodak.com/go /support 36 Changing the slide show display interval You can set the display interval between 3 ...37. Each picture and video is 5 seconds.) 1 On the Slide Show menu, move the joystick the OK button. www.kodak.com/go /z730accessories.) Starting the slide show 1 Press the Review button, then press the Menu button. 2 Move the joystick to highlight Slide Show , then press the OK button. 3 ...
User Manual
Page 44
...out port to the television video-in port (yellow) and audio-in the camera. ■ The camera's picture storage location is set to the location from internal memory to a card. See Image Storage, page 25. 37 www.kodak.com/go/support Displaying pictures and videos on a television You can copy ... may not be as good as on Loop, the slide show is continuously repeated. 1 On the Slide Show menu, move the joystick the OK button. Reviewing pictures and videos Running a continuous slide show loop When you turn on a computer monitor or when printed.) NOTE: Ensure that : ■ A card...
...out port to the television video-in port (yellow) and audio-in the camera. ■ The camera's picture storage location is set to the location from internal memory to a card. See Image Storage, page 25. 37 www.kodak.com/go/support Displaying pictures and videos on a television You can copy ... may not be as good as on Loop, the slide show is continuously repeated. 1 On the Slide Show menu, move the joystick the OK button. Reviewing pictures and videos Running a continuous slide show loop When you turn on a computer monitor or when printed.) NOTE: Ensure that : ■ A card...
User Manual
Page 45
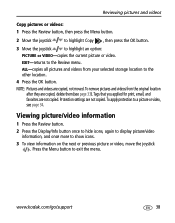
... video, move the joystick . Protection settings are copied, delete them (see page 34. NOTE: Pictures and videos are not copied. www.kodak.com/go/support 38 ALL-copies all pictures and videos from the original location after they are not copied. Viewing picture/video information 1 Press... the Review button. 2 Press the Display/Info button once to hide icons, again to display picture/video information, and once more to the other ...
... video, move the joystick . Protection settings are copied, delete them (see page 34. NOTE: Pictures and videos are not copied. www.kodak.com/go/support 38 ALL-copies all pictures and videos from the original location after they are not copied. Viewing picture/video information 1 Press... the Review button. 2 Press the Display/Info button once to hide icons, again to display picture/video information, and once more to the other ...
User Manual
Page 47
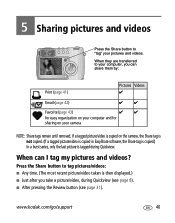
When they are transferred to "tag" your pictures and videos. If a tagged picture/video is copied on your camera NOTE: Share tags remain until removed. www.kodak.com/go/support 40 5 Sharing pictures and videos Press the Share button to your computer, you take a picture/video, during ...10004; Favorite (page 43) ✔ ✔ for easy organization on your computer and for sharing on the camera, the Share tag is not copied. (If a tagged picture/video is copied in EasyShare software, the Share tag is copied.) In a burst series, only the last picture is tagged during Quickview (...
When they are transferred to "tag" your pictures and videos. If a tagged picture/video is copied on your camera NOTE: Share tags remain until removed. www.kodak.com/go/support 40 5 Sharing pictures and videos Press the Share button to your computer, you take a picture/video, during ...10004; Favorite (page 43) ✔ ✔ for easy organization on your computer and for sharing on the camera, the Share tag is not copied. (If a tagged picture/video is copied in EasyShare software, the Share tag is copied.) In a burst series, only the last picture is tagged during Quickview (...
User Manual
Page 57
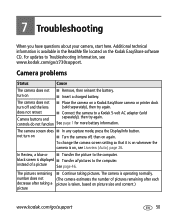
.... The camera screen does ■ In any capture mode, press the Display/Info button. The pictures remaining number does not decrease after each picture is on again. 7 Troubleshooting When you have questions about your camera, start here. The camera does not ■ Place the camera on a Kodak EasyShare camera or printer dock turn on the Kodak EasyShare software CD...
.... The camera screen does ■ In any capture mode, press the Display/Info button. The pictures remaining number does not decrease after each picture is on again. 7 Troubleshooting When you have questions about your camera, start here. The camera does not ■ Place the camera on a Kodak EasyShare camera or printer dock turn on the Kodak EasyShare software CD...
User Manual
Page 67
... the camera screen as a viewfinder ■ Dirt on batteries, see www.kodak.com/global/en/service/batteries/batteryUsage.jhtml www.kodak.com/go /z730accessories for: Kodak EasyShare camera dock series 3-powers your camera, transfers...camera. Visit www.kodak.com/go /support 60 Appendix We recommend using your camera in cold weather, carry spare batteries and keep them warm. Not all manufacturers' 3.7V rechargeable Li-Ion batteries are compatible with a clean, dry cloth before inserting a battery in . (10 x 15 cm) prints, transfers pictures, and charges your battery. Reviewing your camera...
... the camera screen as a viewfinder ■ Dirt on batteries, see www.kodak.com/global/en/service/batteries/batteryUsage.jhtml www.kodak.com/go /z730accessories for: Kodak EasyShare camera dock series 3-powers your camera, transfers...camera. Visit www.kodak.com/go /support 60 Appendix We recommend using your camera in cold weather, carry spare batteries and keep them warm. Not all manufacturers' 3.7V rechargeable Li-Ion batteries are compatible with a clean, dry cloth before inserting a battery in . (10 x 15 cm) prints, transfers pictures, and charges your battery. Reviewing your camera...
User Manual
Page 74
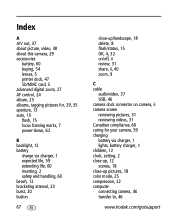
Index A A/V out, 37 about picture, video, 38 about this camera, 29 accessories battery, 60 buying, 54 lenses, 5 printer dock, 47 SD/MMC card, 5 advanced digital zoom, 27 AF control, 24 album, 25 albums, tagging pictures for, 29, 35 ...camera dock connector on camera, ii camera screen reviewing pictures, 31 reviewing videos, 31 Canadian compliance, 66 caring for your camera, 59 charging battery via charger, 1 lights, battery charger, 1 children, 12 clock, setting, 2 close-up, 12 scenes, 18 close-up pictures, 18 color mode, 25 compression, 22 computer connecting camera, 46 transfer to, 46 www.kodak...
Index A A/V out, 37 about picture, video, 38 about this camera, 29 accessories battery, 60 buying, 54 lenses, 5 printer dock, 47 SD/MMC card, 5 advanced digital zoom, 27 AF control, 24 album, 25 albums, tagging pictures for, 29, 35 ...camera dock connector on camera, ii camera screen reviewing pictures, 31 reviewing videos, 31 Canadian compliance, 66 caring for your camera, 59 charging battery via charger, 1 lights, battery charger, 1 children, 12 clock, setting, 2 close-up, 12 scenes, 18 close-up pictures, 18 color mode, 25 compression, 22 computer connecting camera, 46 transfer to, 46 www.kodak...
User Manual
Page 77
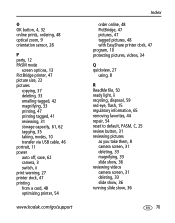
... 11 power auto off, save, 62 camera, 3 switch, ii print warning, 27 printer dock, 47 printing from a card, 48 optimizing printer, 54 www.kodak.com/go/support Index order online, 48 PictBridge, 47 pictures, 47 tagged pictures, 48 with EasyShare printer dock, 47 program, 10 protecting pictures...flash, 15 regulatory information, 65 removing favorites, 44 repair, 54 reset to default, PASM, C, 25 review button, 31 reviewing pictures as you take them, 8 camera screen, 31 deleting, 33 magnifying, 33 slide show, 36 reviewing videos camera screen, 31 deleting, 33 slide show, 36 running slide show, 36 70
... 11 power auto off, save, 62 camera, 3 switch, ii print warning, 27 printer dock, 47 printing from a card, 48 optimizing printer, 54 www.kodak.com/go/support Index order online, 48 PictBridge, 47 pictures, 47 tagged pictures, 48 with EasyShare printer dock, 47 program, 10 protecting pictures...flash, 15 regulatory information, 65 removing favorites, 44 repair, 54 reset to default, PASM, C, 25 review button, 31 reviewing pictures as you take them, 8 camera screen, 31 deleting, 33 magnifying, 33 slide show, 36 reviewing videos camera screen, 31 deleting, 33 slide show, 36 running slide show, 36 70
User Manual
Page 79
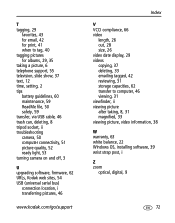
... USB cable, 46 trash can, deleting, 8 tripod socket, ii troubleshooting camera, 50 computer connectivity, 51 picture quality, 52 ready light, 53 turning camera on and off, 3 U upgrading software, firmware, 62 URLs, Kodak web sites, 54 USB (universal serial bus) connection location, i transferring ...42 reviewing, 31 storage capacities, 62 transfer to computer, 46 viewing, 31 viewfinder, ii viewing picture after taking, 8, 31 magnified, 33 viewing picture, video information, 38 W warranty, 63 white balance, 22 Windows OS, installing software, 39 wrist strap post, i Z zoom optical, digital, ...
... USB cable, 46 trash can, deleting, 8 tripod socket, ii troubleshooting camera, 50 computer connectivity, 51 picture quality, 52 ready light, 53 turning camera on and off, 3 U upgrading software, firmware, 62 URLs, Kodak web sites, 54 USB (universal serial bus) connection location, i transferring ...42 reviewing, 31 storage capacities, 62 transfer to computer, 46 viewing, 31 viewfinder, ii viewing picture after taking, 8, 31 magnified, 33 viewing picture, video information, 38 W warranty, 63 white balance, 22 Windows OS, installing software, 39 wrist strap post, i Z zoom optical, digital, ...


