
User Manual
Page 1
Kodak EasyShare Z730 zoom digital camera User's guide www.kodak.com For interactive tutorials, www.kodak.com/go/howto For help with your camera, www.kodak.com/go/z730support
Kodak EasyShare Z730 zoom digital camera User's guide www.kodak.com For interactive tutorials, www.kodak.com/go/howto For help with your camera, www.kodak.com/go/z730support
User Manual
Page 4
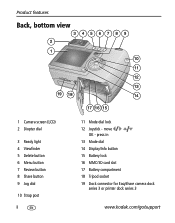
Product features Back, bottom view 3456789 2 1 10 11 12 13 19 18 14 17 16 15 1 Camera screen (LCD) 2 Diopter dial 3 Ready light 4 Viewfinder 5 Delete button 6 Menu button 7 Review button 8 Share button 9 Jog dial 10 Strap post ii 11 Mode dial lock 12 Joystick - press in 13 Mode dial 14 Display/Info button 15 Battery lock 16 MMC/SD card slot 17 Battery compartment 18 Tripod socket 19 Dock connector for EasyShare camera dock series 3 or printer dock series 3 www.kodak.com/go/support move OK -
Product features Back, bottom view 3456789 2 1 10 11 12 13 19 18 14 17 16 15 1 Camera screen (LCD) 2 Diopter dial 3 Ready light 4 Viewfinder 5 Delete button 6 Menu button 7 Review button 8 Share button 9 Jog dial 10 Strap post ii 11 Mode dial lock 12 Joystick - press in 13 Mode dial 14 Display/Info button 15 Battery lock 16 MMC/SD card slot 17 Battery compartment 18 Tripod socket 19 Dock connector for EasyShare camera dock series 3 or printer dock series 3 www.kodak.com/go/support move OK -
User Manual
Page 5
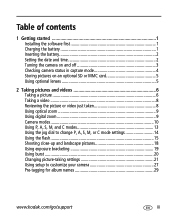
... or MMC card 5 Using optional lenses 5 2 Taking pictures and videos 6 Taking a picture 6 Taking a video 8 Reviewing the picture or video just taken 8 Using optical zoom 9 Using digital zoom 9 Camera modes 10 Using P, A, S, M, and C modes 13 Using the jog dial to change P, A, S, M, or C mode settings 14 Using the flash 15 Shooting close-up and... landscape pictures 18 Using exposure bracketing 19 Using burst 20 Changing picture-taking settings 21 Using setup to customize your camera 27 Pre-tagging for album names 29 www.kodak.com/go/support iii
... or MMC card 5 Using optional lenses 5 2 Taking pictures and videos 6 Taking a picture 6 Taking a video 8 Reviewing the picture or video just taken 8 Using optical zoom 9 Using digital zoom 9 Camera modes 10 Using P, A, S, M, and C modes 13 Using the jog dial to change P, A, S, M, or C mode settings 14 Using the flash 15 Shooting close-up and... landscape pictures 18 Using exposure bracketing 19 Using burst 20 Changing picture-taking settings 21 Using setup to customize your camera 27 Pre-tagging for album names 29 www.kodak.com/go/support iii
User Manual
Page 7
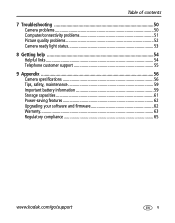
Table of contents 7 Troubleshooting 50 Camera problems 50 Computer/connectivity problems 51 Picture quality problems 52 Camera ready light status 53 8 Getting help 54 Helpful links 54 Telephone customer support 55 9 Appendix 56 Camera specifications 56 Tips, safety, maintenance 59 Important battery information 59 Storage capacities 61 Power-saving features 62 Upgrading your software and firmware 62 Warranty...63 Regulatory compliance 65 www.kodak.com/go/support v
Table of contents 7 Troubleshooting 50 Camera problems 50 Computer/connectivity problems 51 Picture quality problems 52 Camera ready light status 53 8 Getting help 54 Helpful links 54 Telephone customer support 55 9 Appendix 56 Camera specifications 56 Tips, safety, maintenance 59 Important battery information 59 Storage capacities 61 Power-saving features 62 Upgrading your software and firmware 62 Warranty...63 Regulatory compliance 65 www.kodak.com/go/support v
User Manual
Page 8
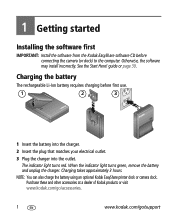
.... The indicator light turns red. NOTE: You can also charge the battery using an optional Kodak EasyShare printer dock or camera dock. Purchase these and other accessories at a dealer of Kodak products or visit www.kodak.com/go/accessories. 1 www.kodak.com/go/support Charging the battery The rechargeable Li-Ion battery requires charging before connecting...
.... The indicator light turns red. NOTE: You can also charge the battery using an optional Kodak EasyShare printer dock or camera dock. Purchase these and other accessories at a dealer of Kodak products or visit www.kodak.com/go/accessories. 1 www.kodak.com/go/support Charging the battery The rechargeable Li-Ion battery requires charging before connecting...
User Manual
Page 9
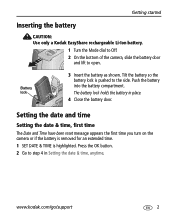
... date and time Setting the date & time, first time The Date and Time have been reset message appears the first time you turn on the camera or if the battery is removed for an extended time. 1 SET DATE & TIME is pushed to open. The battery lock holds the battery in... so the battery lock is highlighted. Push the battery into the battery compartment. www.kodak.com/go/support 2 Getting started Inserting the battery CAUTION: Use only a Kodak EasyShare rechargeable Li-Ion battery. 1 Turn the Mode dial to Off. 2 On the bottom of the camera, slide the battery door and lift to the side.
... date and time Setting the date & time, first time The Date and Time have been reset message appears the first time you turn on the camera or if the battery is removed for an extended time. 1 SET DATE & TIME is pushed to open. The battery lock holds the battery in... so the battery lock is highlighted. Push the battery into the battery compartment. www.kodak.com/go/support 2 Getting started Inserting the battery CAUTION: Use only a Kodak EasyShare rechargeable Li-Ion battery. 1 Turn the Mode dial to Off. 2 On the bottom of the camera, slide the battery door and lift to the side.

User Manual
Page 10
... OK button. 6 Press the Menu button to adjust the date and time. Turning the camera on the camera. The camera screen turns on your computer operating system, Kodak EasyShare software may update the camera clock when you connect the camera. Power ring 3 www.kodak.com/go/support The Power ring glows green. NOTE: Depending on . The Ready light...
... OK button. 6 Press the Menu button to adjust the date and time. Turning the camera on the camera. The camera screen turns on your computer operating system, Kodak EasyShare software may update the camera clock when you connect the camera. Power ring 3 www.kodak.com/go/support The Power ring glows green. NOTE: Depending on . The Ready light...
User Manual
Page 11
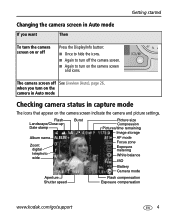
...-up Date stamp Album name Zoom: digital telephoto wide Burst Picture size Compression Pictures/time remaining Image storage AF mode Focus zone Exposure metering White balance ISO Battery Camera mode Aperture Shutter speed Flash compensation Exposure compensation www.kodak.com/go/support 4 when you want... Then Getting started To turn the camera screen on or off Press the Display/Info button: ■...
...-up Date stamp Album name Zoom: digital telephoto wide Burst Picture size Compression Pictures/time remaining Image storage AF mode Focus zone Exposure metering White balance ISO Battery Camera mode Aperture Shutter speed Flash compensation Exposure compensation www.kodak.com/go/support 4 when you want... Then Getting started To turn the camera screen on or off Press the Display/Info button: ■...
User Manual
Page 12
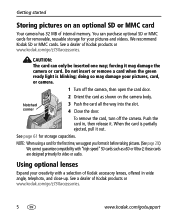
...NOTE: When using a card for your creativity with "high-speed" SD cards such as shown on an optional SD or MMC card Your camera has 32 MB of Kodak accessory lenses, offered in , then release it before taking pictures. (See page 29.) We cannot guarantee compatibility with a selection of internal ... remove a card when the green ready light is partially ejected, pull it may damage your pictures, card, or camera. 1 Turn off the camera. You can only be inserted one way; We recommend Kodak SD or MMC cards. forcing it out. Notched corner 3 Push the card all the way into the slot....
...NOTE: When using a card for your creativity with "high-speed" SD cards such as shown on an optional SD or MMC card Your camera has 32 MB of Kodak accessory lenses, offered in , then release it before taking pictures. (See page 29.) We cannot guarantee compatibility with a selection of internal ... remove a card when the green ready light is partially ejected, pull it may damage your pictures, card, or camera. 1 Turn off the camera. You can only be inserted one way; We recommend Kodak SD or MMC cards. forcing it out. Notched corner 3 Push the card all the way into the slot....
User Manual
Page 13
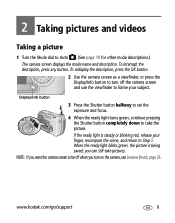
... and use the viewfinder to frame your finger, recompose the scene, and return to Step 3. NOTE: If you want the camera screen to take pictures. www.kodak.com/go/support 6 Display/Info button 3 Press the Shutter button halfway to set the exposure and focus. 4 When the ready light turns green, continue pressing... the ready light blinks green, the picture is steady or blinking red, release your subject. To redisplay the description, press the OK button. 2 Use the camera screen as a viewfinder, or press the Display/Info button to Auto . (See page 10 for other mode descriptions.) The...
... and use the viewfinder to frame your finger, recompose the scene, and return to Step 3. NOTE: If you want the camera screen to take pictures. www.kodak.com/go/support 6 Display/Info button 3 Press the Shutter button halfway to set the exposure and focus. 4 When the ready light turns green, continue pressing... the ready light blinks green, the picture is steady or blinking red, release your subject. To redisplay the description, press the OK button. 2 Use the camera screen as a viewfinder, or press the Display/Info button to Auto . (See page 10 for other mode descriptions.) The...
User Manual
Page 14
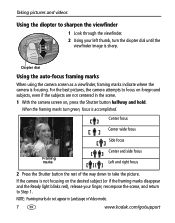
...focus framing marks When using the camera screen as a viewfinder, framing marks indicate where the camera is accomplished. For the best pictures, the camera attempts to focus on foreground subjects, even if the subjects are not centered in Landscape or Video mode. 7 www.kodak.com/go/support When the framing... way down to take the picture. NOTE: Framing marks do not appear in the scene. 1 With the camera screen on, press the Shutter button halfway and hold. If the camera is sharp. Taking pictures and videos Using the diopter to sharpen the viewfinder 1 Look through the viewfinder. 2...
...focus framing marks When using the camera screen as a viewfinder, framing marks indicate where the camera is accomplished. For the best pictures, the camera attempts to focus on foreground subjects, even if the subjects are not centered in Landscape or Video mode. 7 www.kodak.com/go/support When the framing... way down to take the picture. NOTE: Framing marks do not appear in the scene. 1 With the camera screen on, press the Shutter button halfway and hold. If the camera is sharp. Taking pictures and videos Using the diopter to sharpen the viewfinder 1 Look through the viewfinder. 2...

User Manual
Page 15
...To stop recording, press and release the Shutter button again. Reviewing the picture or video just taken After you take a picture or video, the camera screen displays a Quickview for approximately 5 seconds. If you prefer, press the Shutter button completely down and release. Taking pictures and videos Taking a...and hold it for more than 2 seconds to begin recording. NOTE: If you select Delete, all pictures in Review. (See page 33.) www.kodak.com/go/support 8 Press to adjust the volume. ■ Share: Press the Share button to tag a picture/video for print. (See page ...
...To stop recording, press and release the Shutter button again. Reviewing the picture or video just taken After you take a picture or video, the camera screen displays a Quickview for approximately 5 seconds. If you prefer, press the Shutter button completely down and release. Taking pictures and videos Taking a...and hold it for more than 2 seconds to begin recording. NOTE: If you select Delete, all pictures in Review. (See page 33.) www.kodak.com/go/support 8 Press to adjust the volume. ■ Share: Press the Share button to tag a picture/video for print. (See page ...
User Manual
Page 16
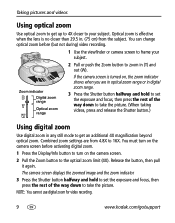
... take the picture. Release the button, then pull it again. NOTE: You cannot use digital zoom for video recording. 9 www.kodak.com/go/support You can change optical zoom before activating digital zoom. 1 Press the Display/Info button to turn on the camera screen before (but not during) video recording. 1 Use the viewfinder or...
... take the picture. Release the button, then pull it again. NOTE: You cannot use digital zoom for video recording. 9 www.kodak.com/go/support You can change optical zoom before activating digital zoom. 1 Press the Display/Info button to turn on the camera screen before (but not during) video recording. 1 Use the viewfinder or...
User Manual
Page 17
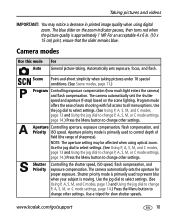
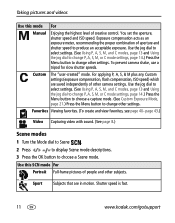
...pictures under 16 special conditions. (See Scene modes, page 11.) Program Controlling exposure compensation (how much light enters the camera) and flash compensation. Automatically sets exposure, focus, and flash. Use the jog dial to select settings. (See Using ...page 14.) Press the Menu button to all menu options. www.kodak.com/go/support 10 For an acceptable 4 x 6 in printed image quality when using optical zoom. The camera automatically sets the aperture for slow shutter speeds. The blue slider ...pictures and videos IMPORTANT: You may be affected when using digital zoom.
...pictures under 16 special conditions. (See Scene modes, page 11.) Program Controlling exposure compensation (how much light enters the camera) and flash compensation. Automatically sets exposure, focus, and flash. Use the jog dial to select settings. (See Using ...page 14.) Press the Menu button to all menu options. www.kodak.com/go/support 10 For an acceptable 4 x 6 in printed image quality when using optical zoom. The camera automatically sets the aperture for slow shutter speeds. The blue slider ...pictures and videos IMPORTANT: You may be affected when using digital zoom.
User Manual
Page 18
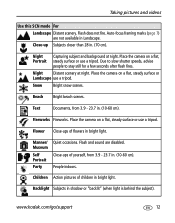
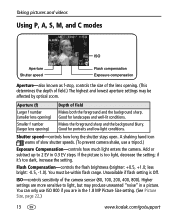
Exposure compensation acts as an exposure meter, recommending the proper combination of aperture and shutter speed to choose a Scene mode. To prevent camera shake, use a tripod for slow shutter speeds. For applying P, A, S, & M plus any Custom settings (exposure compensation, flash compensation, ISO ...21.) Press the Menu button to change other settings. Sport Subjects that are saved independently of other camera settings. Custom The "user-created" mode. Shutter speed is fast. 11 www.kodak.com/go/support page 43.) Video Capturing video with sound. (See page 8.) Scene modes 1 ...
Exposure compensation acts as an exposure meter, recommending the proper combination of aperture and shutter speed to choose a Scene mode. To prevent camera shake, use a tripod for slow shutter speeds. For applying P, A, S, & M plus any Custom settings (exposure compensation, flash compensation, ISO ...21.) Press the Menu button to change other settings. Sport Subjects that are saved independently of other camera settings. Custom The "user-created" mode. Shutter speed is fast. 11 www.kodak.com/go/support page 43.) Video Capturing video with sound. (See page 8.) Scene modes 1 ...
User Manual
Page 19
...-ups of yourself, from 3.9 - 23.7 in. (10-60 cm). www.kodak.com/go/support 12 Taking pictures and videos Use this SCN mode For Landscape Distant scenery. Flash does not fire. Place the camera on a flat, steady surface or use a tripod. Due to slow shutter speeds...Fireworks. Manner/ Museum Self Portrait Party Quiet occasions. Flash and sound are not available in bright light. Night Distant scenery at night. Place the camera on a flat, steady surface or use a tripod. People indoors. Flower Close-ups of children in Landscape. Backlight Subjects in . (70 ...
...-ups of yourself, from 3.9 - 23.7 in. (10-60 cm). www.kodak.com/go/support 12 Taking pictures and videos Use this SCN mode For Landscape Distant scenery. Flash does not fire. Place the camera on a flat, steady surface or use a tripod. Due to slow shutter speeds...Fireworks. Manner/ Museum Self Portrait Party Quiet occasions. Flash and sound are not available in bright light. Night Distant scenery at night. Place the camera on a flat, steady surface or use a tripod. People indoors. Flower Close-ups of children in Landscape. Backlight Subjects in . (70 ...
User Manual
Page 20
...If the picture is Off. You must be affected by optical zoom. You can only use a tripod.) Exposure Compensation-controls how much light enters the camera. Aperture (f) Depth of field.) The highest and lowest aperture settings may produce unwanted "noise" in 0.3 EV steps. Add or subtract up to ...light, but may be within flash range. Higher settings are in the 1.8 MP Picture Size setting. (See Picture Size, page 22.) 13 www.kodak.com/go/support Good for landscapes and well-lit conditions. if it's too dark, increase the setting. Smaller f number (larger lens opening ) Good...
...If the picture is Off. You must be affected by optical zoom. You can only use a tripod.) Exposure Compensation-controls how much light enters the camera. Aperture (f) Depth of field.) The highest and lowest aperture settings may produce unwanted "noise" in 0.3 EV steps. Add or subtract up to ...light, but may be within flash range. Higher settings are in the 1.8 MP Picture Size setting. (See Picture Size, page 22.) 13 www.kodak.com/go/support Good for landscapes and well-lit conditions. if it's too dark, increase the setting. Smaller f number (larger lens opening ) Good...
User Manual
Page 21
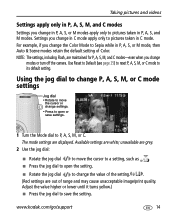
...dial: ■ Rotate the jog dial to move the cursor or change in P, A, S, or M modes apply only to change modes or turn off the camera. Press to open the setting. ■ Rotate the jog dial to pictures taken in P, A, S, and M modes. Available settings are displayed. unavailable are ...out of Color. www.kodak.com/go/support 14 Use Reset to Default (see page 25) to reset P, A, S, M, or C mode to P, A, S, M, or C. The mode settings are ...
...dial: ■ Rotate the jog dial to move the cursor or change in P, A, S, or M modes apply only to change modes or turn off the camera. Press to open the setting. ■ Rotate the jog dial to pictures taken in P, A, S, and M modes. Available settings are displayed. unavailable are ...out of Color. www.kodak.com/go/support 14 Use Reset to Default (see page 25) to reset P, A, S, M, or C mode to P, A, S, M, or C. The mode settings are ...
User Manual
Page 22
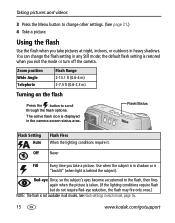
... setting in shadow or is "backlit" (when light is behind the subject). Use when the subject is displayed in each mode, page 16. 15 www.kodak.com/go/support The active flash icon is in any Still mode; Using the flash Use the flash when you exit the mode or turn.../Status Flash Setting Auto Off Flash Fires When the lighting conditions require it. See Flash settings in the camera screen status area. the default flash setting is not available in heavy shadows. Never Fill Every time you take pictures at night, indoors, or outdoors ...
... setting in shadow or is "backlit" (when light is behind the subject). Use when the subject is displayed in each mode, page 16. 15 www.kodak.com/go/support The active flash icon is in any Still mode; Using the flash Use the flash when you exit the mode or turn.../Status Flash Setting Auto Off Flash Fires When the lighting conditions require it. See Flash settings in the camera screen status area. the default flash setting is not available in heavy shadows. Never Fill Every time you take pictures at night, indoors, or outdoors ...
User Manual
Page 25
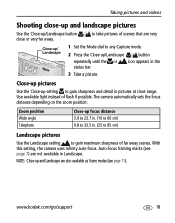
Use available light instead of far away scenes. With this setting, the camera uses infinity auto-focus. www.kodak.com/go/support 18 to take pictures of scenes that are not available in Landscape. NOTE: Close-up /Landscape button close range. Auto-focus framing ...(see page 7) are very Close-up/ Landscape 1 Set the Mode dial to gain sharpness and detail in pictures at close or very far away. The camera automatically sets the focus distance depending on the zoom position: Zoom position Wide angle Telephoto Close-up /Landscape button repeatedly until the or status bar...
Use available light instead of far away scenes. With this setting, the camera uses infinity auto-focus. www.kodak.com/go/support 18 to take pictures of scenes that are not available in Landscape. NOTE: Close-up /Landscape button close range. Auto-focus framing ...(see page 7) are very Close-up/ Landscape 1 Set the Mode dial to gain sharpness and detail in pictures at close or very far away. The camera automatically sets the focus distance depending on the zoom position: Zoom position Wide angle Telephoto Close-up /Landscape button repeatedly until the or status bar...


