
User Manual
Page 12
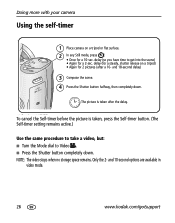
and 18-second delay) 3 Compose the scene. 4 Press the Shutter button halfway, then completely down . To cancel the Self-timer before the picture is taken after a 10- delay (... take a video, but: ■ Turn the Mode dial to get into the scene) • Again for a 2-sec. Only the 2- Doing more with your camera Using the self-timer 1 Place camera on a tripod) • Again for 2 pictures (after the delay. and 10-second options are available in video mode. 12 www.kodak.com/go/easysharecenter delay...
and 18-second delay) 3 Compose the scene. 4 Press the Shutter button halfway, then completely down . To cancel the Self-timer before the picture is taken after a 10- delay (... take a video, but: ■ Turn the Mode dial to get into the scene) • Again for a 2-sec. Only the 2- Doing more with your camera Using the self-timer 1 Place camera on a tripod) • Again for 2 pictures (after the delay. and 10-second options are available in video mode. 12 www.kodak.com/go/easysharecenter delay...

User Manual
Page 11
When the AF/AE indicator turns green, press the Shutter button completely down. AF/AE indicator: Green-successful Red-failed Failed focus Failed exposure NOTE: After you press the Delete button. www.kodak.com/go/support 5 2 Taking pictures/videos Taking a picture 1 2 Press the EVF/LCD button to turn on: • LCD or EVF LCD • EVF (electronic viewfinder) 3 Press the Shutter button halfway to focus and set exposure. The picture is saved unless you take a picture, the EVF/LCD displays a quickview for approximately 5 seconds.
When the AF/AE indicator turns green, press the Shutter button completely down. AF/AE indicator: Green-successful Red-failed Failed focus Failed exposure NOTE: After you press the Delete button. www.kodak.com/go/support 5 2 Taking pictures/videos Taking a picture 1 2 Press the EVF/LCD button to turn on: • LCD or EVF LCD • EVF (electronic viewfinder) 3 Press the Shutter button halfway to focus and set exposure. The picture is saved unless you take a picture, the EVF/LCD displays a quickview for approximately 5 seconds.

User Manual
Page 13
NOTE: After you press the Delete button. The video is saved unless you take a video, the EVF/LCD displays a quickview for approximately 5 seconds. To stop recording, press and release the Shutter button again. To play/pause the video during the quickview, press the OK button. www.kodak.com/go/support 7 Taking a video Taking pictures/videos 1 EVF 2 Press the EVF/LCD button to turn on: • LCD or LCD • EVF (electronic viewfinder) 3 Press the Shutter button completely down and release.
NOTE: After you press the Delete button. The video is saved unless you take a video, the EVF/LCD displays a quickview for approximately 5 seconds. To stop recording, press and release the Shutter button again. To play/pause the video during the quickview, press the OK button. www.kodak.com/go/support 7 Taking a video Taking pictures/videos 1 EVF 2 Press the EVF/LCD button to turn on: • LCD or LCD • EVF (electronic viewfinder) 3 Press the Shutter button completely down and release.

User Manual
Page 24
...is displayed on the screen. Working with a check mark. 4 To remove a selection, highlight an album name and press the OK button. Second-on your album selection is selected. 6 Press the Menu button to highlight an album name, then press the OK button. To remove all album...list the next time you turn on the LCD, your computer. See EasyShare software Help for details. 18 www.kodak.com/go/support Third-transfer to your computer When you transfer the tagged pictures or videos to your computer, Kodak EasyShare software opens and categorizes your camera 1 In any mode, press...
...is displayed on the screen. Working with a check mark. 4 To remove a selection, highlight an album name and press the OK button. Second-on your album selection is selected. 6 Press the Menu button to highlight an album name, then press the OK button. To remove all album...list the next time you turn on the LCD, your computer. See EasyShare software Help for details. 18 www.kodak.com/go/support Third-transfer to your computer When you transfer the tagged pictures or videos to your computer, Kodak EasyShare software opens and categorizes your camera 1 In any mode, press...
User Manual
Page 32
...The picture is taken, press the Self-timer button. (The Self-timer setting remains active.) Use the same procedure to take a video, but: ■ Turn the Mode dial to get into the scene) • Again for a 2-sec. NOTE: The video stops when no storage space remains. To cancel the ...Self-timer before the picture is taken after a 10- Only the 2- and 10-second options are available in video mode. 26 www.kodak.com/go/support Doing more with your camera Using the self-timer 1 Place camera on a tripod) • Again for 2 pictures (after the delay. delay (so you have...
...The picture is taken, press the Self-timer button. (The Self-timer setting remains active.) Use the same procedure to take a video, but: ■ Turn the Mode dial to get into the scene) • Again for a 2-sec. NOTE: The video stops when no storage space remains. To cancel the ...Self-timer before the picture is taken after a 10- Only the 2- and 10-second options are available in video mode. 26 www.kodak.com/go/support Doing more with your camera Using the self-timer 1 Place camera on a tripod) • Again for 2 pictures (after the delay. delay (so you have...

User Manual
Page 34
...Turn the Mode dial to Scene . 2 Press to choose a Scene mode. Center-Zone Focus, Center-Weight Metering Fireworks Flash does not fire. Minimizes Multi-Pattern Exposure Metering, Multi-Zone red eye. Place the camera on a flat, steady Center-Weight Metering, Daylight White surface or use a tripod. 28 www.kodak... is Focus, Fill-Flash, ISO 64 behind the subject). Place the f/5.6, 2 second exposure, Infinity Focus, camera on a flat, steady surface or use a tripod. NOTE: If the Scene mode description turns off, press the OK button. 3 Press the OK button to display Scene mode...
...Turn the Mode dial to Scene . 2 Press to choose a Scene mode. Center-Zone Focus, Center-Weight Metering Fireworks Flash does not fire. Minimizes Multi-Pattern Exposure Metering, Multi-Zone red eye. Place the camera on a flat, steady Center-Weight Metering, Daylight White surface or use a tripod. 28 www.kodak... is Focus, Fill-Flash, ISO 64 behind the subject). Place the f/5.6, 2 second exposure, Infinity Focus, camera on a flat, steady surface or use a tripod. NOTE: If the Scene mode description turns off, press the OK button. 3 Press the OK button to display Scene mode...


