User Manual
Page 1
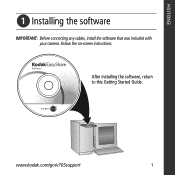
After installing the software, return to this Getting Started Guide. www.kodak.com/go/v705support 1 Follow the on-screen instructions. ENGLISH ᕡ Installing the software IMPORTANT: Before connecting any cables, install the software that was included with your camera.
After installing the software, return to this Getting Started Guide. www.kodak.com/go/v705support 1 Follow the on-screen instructions. ENGLISH ᕡ Installing the software IMPORTANT: Before connecting any cables, install the software that was included with your camera.
User Manual
Page 3
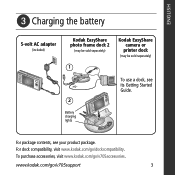
www.kodak.com/go /v705accessories. To purchase accessories, visit www.kodak.com/go /v705support 3 ENGLISH ᕣ Charging the battery 5-volt AC adapter (included) Kodak EasyShare photo frame dock 2 (may be sold separately) 1 Kodak EasyShare camera or printer dock (may be sold separately) To use a dock, see its Getting Started Guide. 2 Battery charging lights For package contents, see your product package. For dock compatibility, visit www.kodak.com/go/dockcompatibility.
www.kodak.com/go /v705accessories. To purchase accessories, visit www.kodak.com/go /v705support 3 ENGLISH ᕣ Charging the battery 5-volt AC adapter (included) Kodak EasyShare photo frame dock 2 (may be sold separately) 1 Kodak EasyShare camera or printer dock (may be sold separately) To use a dock, see its Getting Started Guide. 2 Battery charging lights For package contents, see your product package. For dock compatibility, visit www.kodak.com/go/dockcompatibility.
User Manual
Page 4
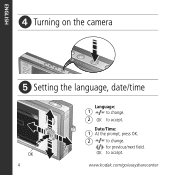
www.kodak.com/go/easysharecenter for previous/next field. Date/Time: 1 At the prompt, press OK. 2 to change . 2 OK to accept. OK to accept. ENGLISH ᕤ Turning on the camera ᕥ Setting the language, date/time OK 4 Language: 1 to change .
www.kodak.com/go/easysharecenter for previous/next field. Date/Time: 1 At the prompt, press OK. 2 to change . 2 OK to accept. OK to accept. ENGLISH ᕤ Turning on the camera ᕥ Setting the language, date/time OK 4 Language: 1 to change .
User Manual
Page 5
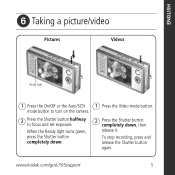
To stop recording, press and release the Shutter button again. When the Ready light turns green, press the Shutter button completely down. 1 Press the Video mode button. 2 Press the Shutter button completely down, then release it. ENGLISH ᕦ Taking a picture/video Pictures Videos Ready light 1 Press the On/Off or the Auto/SCN mode button to turn on the camera. 2 Press the Shutter button halfway to focus and set exposure. www.kodak.com/go/v705support 5
To stop recording, press and release the Shutter button again. When the Ready light turns green, press the Shutter button completely down. 1 Press the Video mode button. 2 Press the Shutter button completely down, then release it. ENGLISH ᕦ Taking a picture/video Pictures Videos Ready light 1 Press the On/Off or the Auto/SCN mode button to turn on the camera. 2 Press the Shutter button halfway to focus and set exposure. www.kodak.com/go/v705support 5
User Manual
Page 7
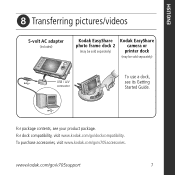
To purchase accessories, visit www.kodak.com/go /v705support 7 www.kodak.com/go /v705accessories. For package contents, see its Getting Started Guide. For dock compatibility, visit www.kodak.com/go/dockcompatibility. ENGLISH ᕨ Transferring pictures/videos 5-volt AC adapter (included) Kodak EasyShare photo frame dock 2 (may be sold separately) Kodak EasyShare camera or printer dock (may be sold separately) USB / A/V connector To use a dock, see your product package.
To purchase accessories, visit www.kodak.com/go /v705support 7 www.kodak.com/go /v705accessories. For package contents, see its Getting Started Guide. For dock compatibility, visit www.kodak.com/go/dockcompatibility. ENGLISH ᕨ Transferring pictures/videos 5-volt AC adapter (included) Kodak EasyShare photo frame dock 2 (may be sold separately) Kodak EasyShare camera or printer dock (may be sold separately) USB / A/V connector To use a dock, see your product package.
User Manual
Page 8
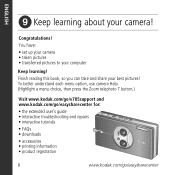
...! You have: • set up your camera • taken pictures • transferred pictures to your camera! To better understand each menu option, use camera Help. (Highlight a menu choice, then press the Zoom telephoto T button.) Visit www.kodak.com/go/v705support and www.kodak.com/go/easysharecenter for: • the extended user's guide • interactive troubleshooting and repairs • interactive tutorials • FAQs • downloads • accessories • printing information • product registration...
...! You have: • set up your camera • taken pictures • transferred pictures to your camera! To better understand each menu option, use camera Help. (Highlight a menu choice, then press the Zoom telephoto T button.) Visit www.kodak.com/go/v705support and www.kodak.com/go/easysharecenter for: • the extended user's guide • interactive troubleshooting and repairs • interactive tutorials • FAQs • downloads • accessories • printing information • product registration...
User Manual
Page 10
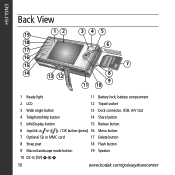
battery compartment 2 LCD 12 Tripod socket 3 Wide angle button 13 Dock connector, USB, A/V Out 4 Telephoto/Help button 14 Share button 5 Info/Display button 15 Review button 6 Joystick / OK button (press) 16 Menu button 7 Optional SD or MMC card 17 Delete button 8 Strap post 18 Flash button 9 Macro/Landscape mode button 19 Speaker 10 DC-In (5V) 10 www.kodak.com/go/easysharecenter ENGLISH Back View 12 345 19 18 6 17 16 15 7 14 13 12 8 9 11 10 1 Ready light 11 Battery lock;
battery compartment 2 LCD 12 Tripod socket 3 Wide angle button 13 Dock connector, USB, A/V Out 4 Telephoto/Help button 14 Share button 5 Info/Display button 15 Review button 6 Joystick / OK button (press) 16 Menu button 7 Optional SD or MMC card 17 Delete button 8 Strap post 18 Flash button 9 Macro/Landscape mode button 19 Speaker 10 DC-In (5V) 10 www.kodak.com/go/easysharecenter ENGLISH Back View 12 345 19 18 6 17 16 15 7 14 13 12 8 9 11 10 1 Ready light 11 Battery lock;
User Manual
Page 11
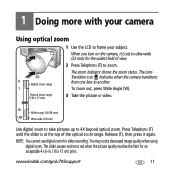
... image quality when using digital zoom. The zoom indicator shows the zoom status. Release (T), then press it is at the top of view. 2 Press Telephoto (T) to another. To zoom out, press Wide Angle (W). 3 Take the picture or video. The slider pauses and turns red when the picture quality reaches the limit for video recording. When you turn on the camera, it again. 1 Doing more with your subject. The Lens Transition icon indicates...
... image quality when using digital zoom. The zoom indicator shows the zoom status. Release (T), then press it is at the top of view. 2 Press Telephoto (T) to another. To zoom out, press Wide Angle (W). 3 Take the picture or video. The slider pauses and turns red when the picture quality reaches the limit for video recording. When you turn on the camera, it again. 1 Doing more with your subject. The Lens Transition icon indicates...
User Manual
Page 12
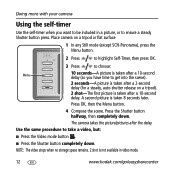
...-Panorama), press the Menu button. 2 Press to highlight Self-Timer, then press OK. 3 Press to choose: Menu 10 seconds-A picture is taken after a 10-second delay (so you have time to ensure a steady Shutter button press. Use the same procedure to take a video, but: ■ Press the Video mode button . ■ Press the Shutter button completely down . Place camera on a tripod). 2 shot-The first picture is not available in video mode. 12 www.kodak...
...-Panorama), press the Menu button. 2 Press to highlight Self-Timer, then press OK. 3 Press to choose: Menu 10 seconds-A picture is taken after a 10-second delay (so you have time to ensure a steady Shutter button press. Use the same procedure to take a video, but: ■ Press the Video mode button . ■ Press the Shutter button completely down . Place camera on a tripod). 2 shot-The first picture is not available in video mode. 12 www.kodak...
User Manual
Page 13
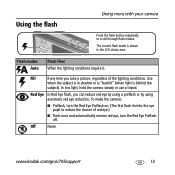
... time you can reduce red-eye by using a preflash or by using automatic red eye reduction. Off Never www.kodak.com/go/v705support 13 Red Eye In Red Eye flash, you take a picture, regardless of red eye.) ■ Flash once and automatically remove red eye, turn the Red Eye Preflash on. (The first flash shrinks the eye pupil to scroll through flash modes. Using the flash Doing more with your camera Press the flash button repeatedly to reduce the chance of the lighting conditions. Flash modes Auto Flash...
... time you can reduce red-eye by using a preflash or by using automatic red eye reduction. Off Never www.kodak.com/go/v705support 13 Red Eye In Red Eye flash, you take a picture, regardless of red eye.) ■ Flash once and automatically remove red eye, turn the Red Eye Preflash on. (The first flash shrinks the eye pupil to scroll through flash modes. Using the flash Doing more with your camera Press the flash button repeatedly to reduce the chance of the lighting conditions. Flash modes Auto Flash...

User Manual
Page 14
... a button to choose a mode. The camera automatically sets the focus distance depending on the zoom position. Macro: Close range. Doing more with sound. (See page 5.) Favorites: Viewing favorite pictures. The camera uses infinity auto-focus. NOTE: Landscape and Macro are not available in the LCD status area. Scene: Point-and-shoot simplicity when taking pictures under special conditions. (See page 15.) Video: Capturing video with your camera Using different modes Use this mode For Auto: General picture taking-offers...
... a button to choose a mode. The camera automatically sets the focus distance depending on the zoom position. Macro: Close range. Doing more with sound. (See page 5.) Favorites: Viewing favorite pictures. The camera uses infinity auto-focus. NOTE: Landscape and Macro are not available in the LCD status area. Scene: Point-and-shoot simplicity when taking pictures under special conditions. (See page 15.) Video: Capturing video with your camera Using different modes Use this mode For Auto: General picture taking-offers...
User Manual
Page 15
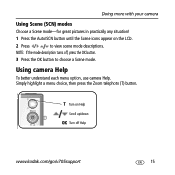
Doing more with your camera Using Scene (SCN) modes Choose a Scene mode-for great pictures in practically any situation! 1 Press the Auto/SCN button until the Scene icons appear on Help Scroll up/down OK Turn off , press the OK button. 3 Press the OK button to view scene mode descriptions. NOTE: If the mode description turns off Help www.kodak.com/go/v705support 15 Using camera Help To better understand each menu option, use camera Help. Simply highlight a menu choice, then press the Zoom telephoto (T) button. T Turn on the LCD. 2 Press to choose a Scene mode.
Doing more with your camera Using Scene (SCN) modes Choose a Scene mode-for great pictures in practically any situation! 1 Press the Auto/SCN button until the Scene icons appear on Help Scroll up/down OK Turn off , press the OK button. 3 Press the OK button to view scene mode descriptions. NOTE: If the mode description turns off Help www.kodak.com/go/v705support 15 Using camera Help To better understand each menu option, use camera Help. Simply highlight a menu choice, then press the Zoom telephoto (T) button. T Turn on the LCD. 2 Press to choose a Scene mode.
User Manual
Page 16
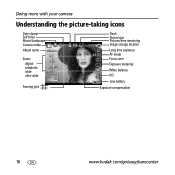
Doing more with your camera Understanding the picture-taking icons Date stamp Self timer Macro/Landscape Camera mode Album name Zoom: digital telephoto wide ultra-wide Framing grid Flash Picture size Pictures/time remaining Image storage location Long time exposure AF mode Focus zone Exposure metering White Balance ISO Low battery Exposure compensation 16 www.kodak.com/go/easysharecenter
Doing more with your camera Understanding the picture-taking icons Date stamp Self timer Macro/Landscape Camera mode Album name Zoom: digital telephoto wide ultra-wide Framing grid Flash Picture size Pictures/time remaining Image storage location Long time exposure AF mode Focus zone Exposure metering White Balance ISO Low battery Exposure compensation 16 www.kodak.com/go/easysharecenter

User Manual
Page 18
... during playback to play a video. Working with pictures/videos Playing a video ■ Press to play at 2X speed; This feature is only available immediately after you may be able to use Undo Delete to retrieve it. press again for 4X. ■ Press to adjust the volume. Using the undo delete feature If you accidentally delete a picture, you delete a picture. 18 www.kodak.com/go/easysharecenter Deleting pictures/videos 1 Press the Review button. 2 Press for previous/next picture/video...
... during playback to play a video. Working with pictures/videos Playing a video ■ Press to play at 2X speed; This feature is only available immediately after you may be able to use Undo Delete to retrieve it. press again for 4X. ■ Press to adjust the volume. Using the undo delete feature If you accidentally delete a picture, you delete a picture. 18 www.kodak.com/go/easysharecenter Deleting pictures/videos 1 Press the Review button. 2 Press for previous/next picture/video...
User Manual
Page 19
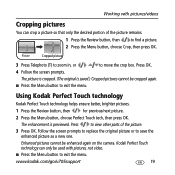
... the Menu button to view other parts of the picture remains. 1 Press the Review button, then to move the crop box. Enhanced pictures cannot be enhanced again on the camera. www.kodak.com/go/v705support 19 Kodak Perfect Touch technology can crop a picture so that only the desired portion of the picture. 3 Press OK. Working with pictures/videos Cropping pictures You can only be used with pictures, not video. ■...
... the Menu button to view other parts of the picture remains. 1 Press the Review button, then to move the crop box. Enhanced pictures cannot be enhanced again on the camera. www.kodak.com/go/v705support 19 Kodak Perfect Touch technology can crop a picture so that only the desired portion of the picture. 3 Press OK. Working with pictures/videos Cropping pictures You can only be used with pictures, not video. ■...
User Manual
Page 21
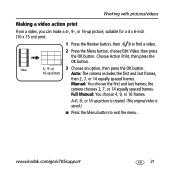
...) print. 1 Press the Review button, then to exit the menu. www.kodak.com/go/v705support 21 Working with pictures/videos Making a video action print From a video, you can make a 4-, 9-, or 16-up picture is created. (The original video is saved.) ■ Press the Menu button to find a video. 2 Press the Menu button, choose Edit Video, then press the OK button. the camera chooses 2, 7, or 14 equally spaced frames. Choose Action Print, then press the OK button. Video...
...) print. 1 Press the Review button, then to exit the menu. www.kodak.com/go/v705support 21 Working with pictures/videos Making a video action print From a video, you can make a 4-, 9-, or 16-up picture is created. (The original video is saved.) ■ Press the Menu button to find a video. 2 Press the Menu button, choose Edit Video, then press the OK button. the camera chooses 2, 7, or 14 equally spaced frames. Choose Action Print, then press the OK button. Video...
User Manual
Page 23
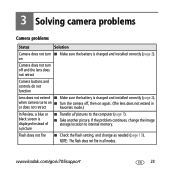
If the problem continues, change as needed (page 13). NOTE: The flash does not fire in or does not retract Favorites mode.) In Review, a blue or black screen is displayed instead of a picture ■ Transfer all modes. when camera turns on ■ Turn the camera off and the lens does not retract Camera buttons and controls do not function Lens does not extend ■ Make sure the battery is charged and installed correctly (page 2). www.kodak.com/go/v705support...
If the problem continues, change as needed (page 13). NOTE: The flash does not fire in or does not retract Favorites mode.) In Review, a blue or black screen is displayed instead of a picture ■ Transfer all modes. when camera turns on ■ Turn the camera off and the lens does not retract Camera buttons and controls do not function Lens does not extend ■ Make sure the battery is charged and installed correctly (page 2). www.kodak.com/go/v705support...

User Manual
Page 24
... fire, electric shock, or injury. ■ Use only a USB-certified computer. For more information on batteries, see www.kodak.com/go/batterytypes 24 www.kodak.com/go/easysharecenter Refer servicing to local and national regulations. ■ Do not charge non-rechargeable batteries. Kodak AC adapters and battery chargers are no user-serviceable parts inside the product, contact Kodak customer support. ■ In the unlikely event that is...
... fire, electric shock, or injury. ■ Use only a USB-certified computer. For more information on batteries, see www.kodak.com/go/batterytypes 24 www.kodak.com/go/easysharecenter Refer servicing to local and national regulations. ■ Do not charge non-rechargeable batteries. Kodak AC adapters and battery chargers are no user-serviceable parts inside the product, contact Kodak customer support. ■ In the unlikely event that is...
User Manual
Page 25
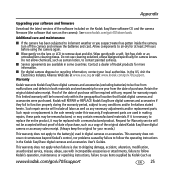
... or attachments, failure to follow the operating instructions in making repairs, these parts may be honored only within the geographical location that runs on the lens or LCD to the battery(s) used in the Kodak EasyShare digital cameras and accessories User's Guides. Contact a dealer of Kodak products for camera lenses. This limited warranty will REPAIR or REPLACE Kodak EasyShare digital cameras and accessories if they fail to function properly during the warranty period, subject...
... or attachments, failure to follow the operating instructions in making repairs, these parts may be honored only within the geographical location that runs on the lens or LCD to the battery(s) used in the Kodak EasyShare digital cameras and accessories User's Guides. Contact a dealer of Kodak products for camera lenses. This limited warranty will REPAIR or REPLACE Kodak EasyShare digital cameras and accessories if they fail to function properly during the warranty period, subject...
User Manual
Page 26
...date. Outside the United States and Canada In countries other act. This equipment generates, uses, and can radiate radio frequency energy and, if not installed or used in writing by a Kodak company, no other rights which vary from the purchase, use of this product, regardless of this product. Appendix adapters and cables), or claims made after the duration of replacement...of the cause. Unless specific Kodak warranty is ineffective under the law, the duration of the FCC Rules. FCC compliance and advisory Kodak EasyShare V705 dual lens digital camera This equipment has been ...
...date. Outside the United States and Canada In countries other act. This equipment generates, uses, and can radiate radio frequency energy and, if not installed or used in writing by a Kodak company, no other rights which vary from the purchase, use of this product, regardless of this product. Appendix adapters and cables), or claims made after the duration of replacement...of the cause. Unless specific Kodak warranty is ineffective under the law, the duration of the FCC Rules. FCC compliance and advisory Kodak EasyShare V705 dual lens digital camera This equipment has been ...


