
User's Manual
Page 2
..., and (2) this camera does cause interference to radio or television reception, which can radiate radio frequency energy and, if not used in residential use. Operation is no guarantee that may cause interference to the following : - These limits provide reasonable protection against interference in accordance with the limits for a Class B digital device, pursuant to Part 15 of...
..., and (2) this camera does cause interference to radio or television reception, which can radiate radio frequency energy and, if not used in residential use. Operation is no guarantee that may cause interference to the following : - These limits provide reasonable protection against interference in accordance with the limits for a Class B digital device, pursuant to Part 15 of...

User's Manual
Page 3
... your sales receipt as proof of the date of purchase. 1 to 5:00 p.m. (Eastern time) Monday through Friday at http://www.kodak.com (for US) or http://www.kodak.ca (for the Toronto area, call : Kodak (US only) from 8:00 a.m. for Canada) or call 416-766-8233, ext. 36100. ENGLISH KODAK ADVANTIX T50 Auto/T60 Auto-Focus Camera NEED HELP WITH YOUR CAMERA OR MORE INFORMATION ABOUT THE ADVANCED PHOTO SYSTEM? Kodak...
... your sales receipt as proof of the date of purchase. 1 to 5:00 p.m. (Eastern time) Monday through Friday at http://www.kodak.com (for US) or http://www.kodak.ca (for the Toronto area, call : Kodak (US only) from 8:00 a.m. for Canada) or call 416-766-8233, ext. 36100. ENGLISH KODAK ADVANTIX T50 Auto/T60 Auto-Focus Camera NEED HELP WITH YOUR CAMERA OR MORE INFORMATION ABOUT THE ADVANCED PHOTO SYSTEM? Kodak...
User's Manual
Page 4
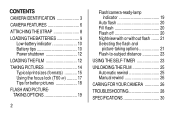
...-battery indicator 10 Battery tips 10 Power shutdown 12 LOADING THE FILM 12 TAKING PICTURES 14 Typical print sizes (formats 15 Using the focus lock (T60 AF) ......... 17 Tips for better pictures 18 FLASH AND PICTURETAKINGOPTIONS 19 2 Flash/camera-ready-lamp indicator 19 Auto flash 20 Fill flash 20 Flash off 20 Nightview with or without flash ....... 21 Selecting the flash and picture-taking options 21 Flash-to-subject distance 23 USING THE SELF-TIMER...
...-battery indicator 10 Battery tips 10 Power shutdown 12 LOADING THE FILM 12 TAKING PICTURES 14 Typical print sizes (formats 15 Using the focus lock (T60 AF) ......... 17 Tips for better pictures 18 FLASH AND PICTURETAKINGOPTIONS 19 2 Flash/camera-ready-lamp indicator 19 Auto flash 20 Fill flash 20 Flash off 20 Nightview with or without flash ....... 21 Selecting the flash and picture-taking options 21 Flash-to-subject distance 23 USING THE SELF-TIMER...
User's Manual
Page 8
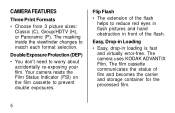
... the processed film. 6 Double Exposure Protection (DEP) • You don't need to prevent double exposures. Flip Flash • The extension of the flash helps to match each format selection. CAMERA FEATURES Three Print Formats • Choose from 3 picture sizes: Classic (C), Group/HDTV (H), or Panoramic (P). The masking inside the viewfinder changes to reduce red eyes in flash pictures and hand obstruction in loading is fast and virtually error-free.
... the processed film. 6 Double Exposure Protection (DEP) • You don't need to prevent double exposures. Flip Flash • The extension of the flash helps to match each format selection. CAMERA FEATURES Three Print Formats • Choose from 3 picture sizes: Classic (C), Group/HDTV (H), or Panoramic (P). The masking inside the viewfinder changes to reduce red eyes in flash pictures and hand obstruction in loading is fast and virtually error-free.
User's Manual
Page 11
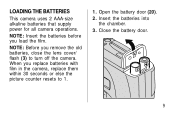
When you replace batteries with film in the camera, replace them within 30 seconds or else the picture counter resets to turn off the camera. Open the battery door (20). 2. Close the battery door. 9 NOTE: Before you load the film. Insert the batteries into the chamber. 3. NOTE: Insert the batteries before you remove the old batteries, close the lens cover/ flash (3) to 1. 1. LOADING THE BATTERIES This camera uses 2 AAA-size alkaline batteries that supply power for all camera operations.
When you replace batteries with film in the camera, replace them within 30 seconds or else the picture counter resets to turn off the camera. Open the battery door (20). 2. Close the battery door. 9 NOTE: Before you load the film. Insert the batteries into the chamber. 3. NOTE: Insert the batteries before you remove the old batteries, close the lens cover/ flash (3) to 1. 1. LOADING THE BATTERIES This camera uses 2 AAA-size alkaline batteries that supply power for all camera operations.

User's Manual
Page 12
... original packaging prior to use. • Remove the batteries when you store the camera for an extended time. • Do not use rechargeable batteries. • Replace both batteries at the same time with the same brand and alkaline type. When you replace batteries with film in the camera, replace them within 30 seconds or else the picture counter resets to 1. 10 Battery tips • Dispose of batteries according to turn off the camera...
... original packaging prior to use. • Remove the batteries when you store the camera for an extended time. • Do not use rechargeable batteries. • Replace both batteries at the same time with the same brand and alkaline type. When you replace batteries with film in the camera, replace them within 30 seconds or else the picture counter resets to 1. 10 Battery tips • Dispose of batteries according to turn off the camera...

User's Manual
Page 14
LOADING THE FILM You can load film with the camera on or off the camera when it is not in use to further extend the battery life. To wake up the camera, take a picture or close and reopen the lens cover. Turn off . NOTE: Insert the batteries before you load the film. 1. Push the film-door lever (10) to sleep after 4 minutes of nonuse. Power shutdown To conserve battery power, the camera automatically goes to open the film door (19). 12
LOADING THE FILM You can load film with the camera on or off the camera when it is not in use to further extend the battery life. To wake up the camera, take a picture or close and reopen the lens cover. Turn off . NOTE: Insert the batteries before you load the film. 1. Push the film-door lever (10) to sleep after 4 minutes of nonuse. Power shutdown To conserve battery power, the camera automatically goes to open the film door (19). 12

User's Manual
Page 16
Open the lens cover/flash (3) to raise the flash and to turn on the same film cassette. TAKING PICTURES You can take Classic (C), Group/ HDTV (H)*, and Panoramic (P) pictures on the camera. * High Definition Television (HDTV) prints are based on the format used. 1. Your photofinishing costs are the same aspect ratio as the TV for CD interface capabilities. 14
Open the lens cover/flash (3) to raise the flash and to turn on the same film cassette. TAKING PICTURES You can take Classic (C), Group/ HDTV (H)*, and Panoramic (P) pictures on the camera. * High Definition Television (HDTV) prints are based on the format used. 1. Your photofinishing costs are the same aspect ratio as the TV for CD interface capabilities. 14

User's Manual
Page 19
... the shutter button, move the camera until your subject is where you want it within the viewfinder eyepiece. 4. Completely press the shutter button to lock the focus position. 3. Place the center of the viewfinder eyepiece (14) on the subject that appears in the picture. 2. Partway press and hold the shutter button (1) to take the picture. 17 Using the focus lock (model T60 AF) The T60 AF (Auto Focus) camera focuses on...
... the shutter button, move the camera until your subject is where you want it within the viewfinder eyepiece. 4. Completely press the shutter button to lock the focus position. 3. Place the center of the viewfinder eyepiece (14) on the subject that appears in the picture. 2. Partway press and hold the shutter button (1) to take the picture. 17 Using the focus lock (model T60 AF) The T60 AF (Auto Focus) camera focuses on...

User's Manual
Page 20
... it with the T50 AUTO. • Take pictures at the lights to reduce red eyes in your pictures. • Turn on all the room lights and have your subject look at the subject's level. Move close to your body when you press the shutter button to avoid blurry pictures. • Keep your pictures simple. Tips for better pictures • Hold your camera steady by...
... it with the T50 AUTO. • Take pictures at the lights to reduce red eyes in your pictures. • Turn on all the room lights and have your subject look at the subject's level. Move close to your body when you press the shutter button to avoid blurry pictures. • Keep your pictures simple. Tips for better pictures • Hold your camera steady by...

User's Manual
Page 22
... subject, dark shadows (especially on dark overcast days, you need it. Your camera features an automatic flash that fires when you do not want to use the flash-off feature. Auto flash AUTO In dim light, such as indoors or outdoors in heavy shade, or on faces) may occur. Use a tripod or place the camera on another firm support, and use high-speed film because the shutter speed in...
... subject, dark shadows (especially on dark overcast days, you need it. Your camera features an automatic flash that fires when you do not want to use the flash-off feature. Auto flash AUTO In dim light, such as indoors or outdoors in heavy shade, or on faces) may occur. Use a tripod or place the camera on another firm support, and use high-speed film because the shutter speed in...

User's Manual
Page 23
... flash and picture-taking options 1. Repeatedly press the MODE button (16) until the modeselector arrow (25) points to turn on another firm support, and use high-speed film because the shutter speed at night is generally slow. Open the lens cover/flash (3) to raise the flash and to the auto-flash symbol (21), fill-flash symbol (22), flash-off symbol (23), nightview symbol (24) with flash: The camera balances the flash and existing light exposure...
... flash and picture-taking options 1. Repeatedly press the MODE button (16) until the modeselector arrow (25) points to turn on another firm support, and use high-speed film because the shutter speed at night is generally slow. Open the lens cover/flash (3) to raise the flash and to the auto-flash symbol (21), fill-flash symbol (22), flash-off symbol (23), nightview symbol (24) with flash: The camera balances the flash and existing light exposure...
User's Manual
Page 24
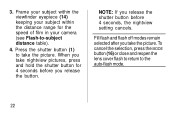
... and reopen the lens cover flash to return to -subject distance table). 4. Press the shutter button (1) to take nightview pictures, press and hold the shutter button for the speed of film in your camera (see Flash-to the auto-flash mode. 22 Fill flash and flash off modes remain selected after you release the button. 3. NOTE: If you release the shutter button before you take the picture. Frame your subject within the viewfinder eyepiece (14...
... and reopen the lens cover flash to return to -subject distance table). 4. Press the shutter button (1) to take nightview pictures, press and hold the shutter button for the speed of film in your camera (see Flash-to the auto-flash mode. 22 Fill flash and flash off modes remain selected after you release the button. 3. NOTE: If you release the shutter button before you take the picture. Frame your subject within the viewfinder eyepiece (14...

User's Manual
Page 25
...turn on a firm surface. 2. Open the lens cover/flash (3) to raise the flash and to the camera tripod socket (18) or place the camera on the camera. 23 Flash-to-subject distance ISO film speed T60 AF T50 AUTO... 50 2.6 to 7 ft 3.3 to 7 ft (0.8 to 2.1 m) (1.0 to 2.1 m) 100 2.6 to 10 ft 3.3 to 10 ft (0.8 to 3.1 m) (1.0 to 3.1 m) 200 2.6 to 13 ft 3.3 to 13 ft (0.8 to 4.0 m) (1.0 to 4.0 m) 400 2.6 to 18 ft 3.3 to 18 ft (0.8 to 5.5 m) (1.0 to 5.5 m) 800 2.6 to 28 ft 3.3 to 28 ft (0.8 to 8.5 m) (1.0 to 8.5 m) USING THE SELF-TIMER Use this feature to include yourself in pictures...
...turn on a firm surface. 2. Open the lens cover/flash (3) to raise the flash and to the camera tripod socket (18) or place the camera on the camera. 23 Flash-to-subject distance ISO film speed T60 AF T50 AUTO... 50 2.6 to 7 ft 3.3 to 7 ft (0.8 to 2.1 m) (1.0 to 2.1 m) 100 2.6 to 10 ft 3.3 to 10 ft (0.8 to 3.1 m) (1.0 to 3.1 m) 200 2.6 to 13 ft 3.3 to 13 ft (0.8 to 4.0 m) (1.0 to 4.0 m) 400 2.6 to 18 ft 3.3 to 18 ft (0.8 to 5.5 m) (1.0 to 5.5 m) 800 2.6 to 28 ft 3.3 to 28 ft (0.8 to 8.5 m) (1.0 to 8.5 m) USING THE SELF-TIMER Use this feature to include yourself in pictures...

User's Manual
Page 26
Press the shutter button (1) to start the timer. 6. Quickly position yourself in the composed picture. • Before the shutter releases, the self-timer bulb (2) glows and then blinks during the ten seconds of countdown. • To cancel the self-timer selection before the shutter releases, close the flash. • The self-timer turns off after the shutter releases. 24 MODE 4. Frame your subject within the viewfinder eyepiece (14) and allow room for yourself. 5. Press the self-timer button (13). 3.
Press the shutter button (1) to start the timer. 6. Quickly position yourself in the composed picture. • Before the shutter releases, the self-timer bulb (2) glows and then blinks during the ten seconds of countdown. • To cancel the self-timer selection before the shutter releases, close the flash. • The self-timer turns off after the shutter releases. 24 MODE 4. Frame your subject within the viewfinder eyepiece (14) and allow room for yourself. 5. Press the self-timer button (13). 3.
User's Manual
Page 27
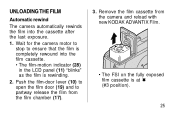
... camera motor to stop to partway release the film from the camera and reload with new KODAK ADVANTIX Film. • The FSI on the fully exposed film cassette is at ✖ (#3 position). 25 Push the film-door lever (10) to open the film door (19) and to ensure that the film is completely rewound into the cassette after the last exposure. 1. UNLOADING THE FILM Automatic rewind The camera automatically rewinds the film...
... camera motor to stop to partway release the film from the camera and reload with new KODAK ADVANTIX Film. • The FSI on the fully exposed film cassette is at ✖ (#3 position). 25 Push the film-door lever (10) to open the film door (19) and to ensure that the film is completely rewound into the cassette after the last exposure. 1. UNLOADING THE FILM Automatic rewind The camera automatically rewinds the film...

User's Manual
Page 29
... lead may be regulated due to disassemble or repair the camera or flash unit by yourself. WARNING: To prevent possible damage and electrical shock, do not attempt to environmental considerations. In the US, you store the camera for cleaning camera lenses. Do not use chemically treated tissues intended for cleaning eyeglasses. • Remove the batteries when you can also visit...
... lead may be regulated due to disassemble or repair the camera or flash unit by yourself. WARNING: To prevent possible damage and electrical shock, do not attempt to environmental considerations. In the US, you store the camera for cleaning camera lenses. Do not use chemically treated tissues intended for cleaning eyeglasses. • Remove the batteries when you can also visit...

User's Manual
Page 30
TROUBLESHOOTING What happened Probable cause Camera will not operate There are no more pictures remaining Batteries weak, dead, missing, or improperly inserted Film does not advance or rewind Batteries weak, dead, missing, or improperly inserted Picture counter Took more than resets to 1 after 30 seconds to replace replacing batteries the batteries with film in camera Solution Rewind film and remove from camera Replace or reload the batteries Replace or reload the batteries Replace batteries within 30 seconds 28
TROUBLESHOOTING What happened Probable cause Camera will not operate There are no more pictures remaining Batteries weak, dead, missing, or improperly inserted Film does not advance or rewind Batteries weak, dead, missing, or improperly inserted Picture counter Took more than resets to 1 after 30 seconds to replace replacing batteries the batteries with film in camera Solution Rewind film and remove from camera Replace or reload the batteries Replace or reload the batteries Replace batteries within 30 seconds 28

User's Manual
Page 31
What happened LCD panel is blank Probable cause Batteries weak, dead, missing, or improperly inserted Camera in sleep mode Lens cover/flash closed Flash/camera-ready Flash not fully charged lamp indicator "blinks" red Film cassette does Loaded exposed (✖), not fit entirely into the camera Solution Replace or reload the batteries Press shutter button or close into partially exposed (◗), film chamber; film or processed film (s) door does not close and reopen lens cover/flash Open lens cover/flash Wait for lamp to turn off Load only new film (q) 29
What happened LCD panel is blank Probable cause Batteries weak, dead, missing, or improperly inserted Camera in sleep mode Lens cover/flash closed Flash/camera-ready Flash not fully charged lamp indicator "blinks" red Film cassette does Loaded exposed (✖), not fit entirely into the camera Solution Replace or reload the batteries Press shutter button or close into partially exposed (◗), film chamber; film or processed film (s) door does not close and reopen lens cover/flash Open lens cover/flash Wait for lamp to turn off Load only new film (q) 29
User's Manual
Page 32
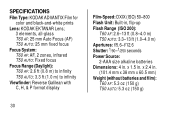
SPECIFICATIONS Film Type: KODAK ADVANTIX Film for color and black-and-white prints Lens: KODAK EKTANAR Lens; 3 elements, all-glass T60 AF: 25 mm Auto Focus (AF) T50 AUTO: 25 mm fixed focus Focus System: T60 AF: AF, 2 zones, infrared T50 AUTO: Fixed focus Focus Range (Daylight): T60 AF: 2.6 ft (0.8 m) to infinity T50 AUTO: 3.3 ft (1.0 m) to infinity Viewfinder: Reverse Galilean with C, H, & P format display 30 Film-Speed: DXIX (ISO) 50-800 Flash Unit: Built-in, flip-up Flash Range (ISO 200): T60 AF...
SPECIFICATIONS Film Type: KODAK ADVANTIX Film for color and black-and-white prints Lens: KODAK EKTANAR Lens; 3 elements, all-glass T60 AF: 25 mm Auto Focus (AF) T50 AUTO: 25 mm fixed focus Focus System: T60 AF: AF, 2 zones, infrared T50 AUTO: Fixed focus Focus Range (Daylight): T60 AF: 2.6 ft (0.8 m) to infinity T50 AUTO: 3.3 ft (1.0 m) to infinity Viewfinder: Reverse Galilean with C, H, & P format display 30 Film-Speed: DXIX (ISO) 50-800 Flash Unit: Built-in, flip-up Flash Range (ISO 200): T60 AF...


