

User Manual
Page 5
... 1 Charging the battery 2 Turning on the camera 3 Setting the language, date/time 3 Storing pictures on an SD/SDHC card 4 2 Taking pictures/videos 5 Taking a picture 5 Taking a video 6 Using optical zoom 7 Using the flash 8 Using different picture-taking modes 9 Using camera Help 11 Taking panoramic pictures ... Using Kodak Perfect Touch technology 18 Cropping pictures 19 Editing videos 19 Running a slide show 21 Viewing pictures/videos in different ways 23 Selecting multiple pictures/videos 25 Copying pictures/videos 25 Understanding the review icons 26 www.kodak.com/...
... 1 Charging the battery 2 Turning on the camera 3 Setting the language, date/time 3 Storing pictures on an SD/SDHC card 4 2 Taking pictures/videos 5 Taking a picture 5 Taking a video 6 Using optical zoom 7 Using the flash 8 Using different picture-taking modes 9 Using camera Help 11 Taking panoramic pictures ... Using Kodak Perfect Touch technology 18 Cropping pictures 19 Editing videos 19 Running a slide show 21 Viewing pictures/videos in different ways 23 Selecting multiple pictures/videos 25 Copying pictures/videos 25 Understanding the review icons 26 www.kodak.com/...
User Manual
Page 8
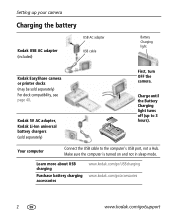
..., see page 40. Charge until the Battery Charging light turns off (up your camera Charging the battery USB AC adapter Kodak USB AC adapter (included) USB cable Battery Charging light Kodak EasyShare camera or printer docks (may be sold separately) Charg3e.6 / 7.2Power Li-IBoAnTUTNEIRVYERCSHAALRGER First, turn OFF the camera. Learn more about USB charging Purchase battery charging accessories...
..., see page 40. Charge until the Battery Charging light turns off (up your camera Charging the battery USB AC adapter Kodak USB AC adapter (included) USB cable Battery Charging light Kodak EasyShare camera or printer docks (may be sold separately) Charg3e.6 / 7.2Power Li-IBoAnTUTNEIRVYERCSHAALRGER First, turn OFF the camera. Learn more about USB charging Purchase battery charging accessories...

User Manual
Page 9
www.kodak.com/go/support 3 Turning on the camera Setting up your camera Setting the language, date/time NOTE: To change the date/time and language in the future, use the Menu button (page 28).
www.kodak.com/go/support 3 Turning on the camera Setting up your camera Setting the language, date/time NOTE: To change the date/time and language in the future, use the Menu button (page 28).

User Manual
Page 10
We recommend Kodak SD or SDHC cards. 1 Turn off the camera. 2 Insert or remove the optional card. 3 Turn on an SD/SDHC card Your camera has internal memory. forcing it , the card, pictures, or camera may cause damage. See page 56 for storage capacities. 4 www.kodak.com/go /m1063accessories). Setting up your camera Storing pictures on the camera. If you...
We recommend Kodak SD or SDHC cards. 1 Turn off the camera. 2 Insert or remove the optional card. 3 Turn on an SD/SDHC card Your camera has internal memory. forcing it , the card, pictures, or camera may cause damage. See page 56 for storage capacities. 4 www.kodak.com/go /m1063accessories). Setting up your camera Storing pictures on the camera. If you...

User Manual
Page 11
... button Press to focus and set exposure. to adjust the volume during playback To review pictures/videos anytime, see page 14. www.kodak.com/go/support 5 Reviewing the picture just taken After you take a picture or video, the LCD displays a quickview for approximately... 10 seconds. (To exit the quickview sooner, press the Shutter button halfway.) The picture is saved unless you press the Delete button. When the framing marks turn green, press the Shutter button completely down.
... button Press to focus and set exposure. to adjust the volume during playback To review pictures/videos anytime, see page 14. www.kodak.com/go/support 5 Reviewing the picture just taken After you take a picture or video, the LCD displays a quickview for approximately... 10 seconds. (To exit the quickview sooner, press the Shutter button halfway.) The picture is saved unless you press the Delete button. When the framing marks turn green, press the Shutter button completely down.

User Manual
Page 12
Taking pictures/videos Using the framing marks Framing marks indicate the camera focus area. Taking a video 1 3 On/Off button 2 Press the Shutter button completely down to focus on the desired subject (or if the framing marks disappear), ... are detected in all modes. To stop recording, press and release the Shutter button again. 6 www.kodak.com/go/support The camera attempts to take the picture. When the framing marks turn green, focus is accomplished. 2 If the camera is not focusing on foreground subjects, even if the subjects are fixed at Center Wide.
Taking pictures/videos Using the framing marks Framing marks indicate the camera focus area. Taking a video 1 3 On/Off button 2 Press the Shutter button completely down to focus on the desired subject (or if the framing marks disappear), ... are detected in all modes. To stop recording, press and release the Shutter button again. 6 www.kodak.com/go/support The camera attempts to take the picture. When the framing marks turn green, focus is accomplished. 2 If the camera is not focusing on foreground subjects, even if the subjects are fixed at Center Wide.
User Manual
Page 13
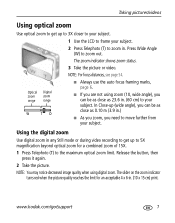
... the zoom indicator turns red when the picture quality reaches the limit for a combined zoom of 15X. 1 Press Telephoto (T) to zoom out. www.kodak.com/go/support 7 Optical zoom range Digital zoom range W TD I As you zoom, you are not using digital zoom. I If you need to zoom in . (10 x 15 cm) print. NOTE: For focus distances, see page 54. Using the digital zoom Use digital zoom in...
... the zoom indicator turns red when the picture quality reaches the limit for a combined zoom of 15X. 1 Press Telephoto (T) to zoom out. www.kodak.com/go/support 7 Optical zoom range Digital zoom range W TD I As you zoom, you are not using digital zoom. I If you need to zoom in . (10 x 15 cm) print. NOTE: For focus distances, see page 54. Using the digital zoom Use digital zoom in...

User Manual
Page 14
...Red-eye Pre-flash is turned on: eye I The flash fires once and the I The flash fires once so the eyes camera automatically become accustomed to the flash, then corrects red-eye in the LCD screen. Press the button repeatedly to -subject distance Zoom position Wide angle Telephoto ...Flash distance 0.6-3.0 m (2-9.8 ft) @ ISO 160 0.6-1.7 m (2-5.6 ft) @ ISO 160 Flash modes Flash fires Auto When the lighting conditions require it. Flash-to scroll through flash modes (see page 31. 8 www.kodak.com/go/support
...Red-eye Pre-flash is turned on: eye I The flash fires once and the I The flash fires once so the eyes camera automatically become accustomed to the flash, then corrects red-eye in the LCD screen. Press the button repeatedly to -subject distance Zoom position Wide angle Telephoto ...Flash distance 0.6-3.0 m (2-9.8 ft) @ ISO 160 0.6-1.7 m (2-5.6 ft) @ ISO 160 Flash modes Flash fires Auto When the lighting conditions require it. Flash-to scroll through flash modes (see page 31. 8 www.kodak.com/go/support

User Manual
Page 16
...left into one image. Place the camera on a flat, steady surface or use a tripod. Snow Bright snow scenes. Place the camera on a flat, steady Landscape surface or use a tripod. If the mode description turns off before you finish reading it, ...sound are disabled. Taking pictures/videos Scene modes Choose a Scene mode-for great pictures in practically any situation! 1 Turn the Mode dial to Scene . 2 Press to left to choose a Scene mode. Left-Right Panorama Stitching up ... colorful light displays. Assures proper focus and minimizes red eye. 10 www.kodak.com/go/support
...left into one image. Place the camera on a flat, steady surface or use a tripod. Snow Bright snow scenes. Place the camera on a flat, steady Landscape surface or use a tripod. If the mode description turns off before you finish reading it, ...sound are disabled. Taking pictures/videos Scene modes Choose a Scene mode-for great pictures in practically any situation! 1 Turn the Mode dial to Scene . 2 Press to left to choose a Scene mode. Left-Right Panorama Stitching up ... colorful light displays. Assures proper focus and minimizes red eye. 10 www.kodak.com/go/support

User Manual
Page 17
Backlight Subjects that are in low light. Select an option you want to learn more about, then press the Zoom telephoto (T) button. Using camera Help To better understand each menu option, use camera Help. Candle light Capturing subjects in shadow or "backlit" (when light is behind the subject). Sunset Capturing the deep hues seen at sunset. T Turn on Help Scroll up/down OK Turn off Help www.kodak.com/go/support 11 Taking pictures/videos Use this For SCN mode Children Action pictures of children in bright light.
Backlight Subjects that are in low light. Select an option you want to learn more about, then press the Zoom telephoto (T) button. Using camera Help To better understand each menu option, use camera Help. Candle light Capturing subjects in shadow or "backlit" (when light is behind the subject). Sunset Capturing the deep hues seen at sunset. T Turn on Help Scroll up/down OK Turn off Help www.kodak.com/go/support 11 Taking pictures/videos Use this For SCN mode Children Action pictures of children in bright light.

User Manual
Page 18
....) 1 Turn the Mode dial to SCN. 2 Press on the 4-way button to highlight Panorama Left-Right or Panorama Right-Left (depending on the direction you are not saved, even if panorama capture is cancelled before stitching occurs. (Picture size is set with the first picture. Get 1 panoramic picture. 12 www.kodak.com...
....) 1 Turn the Mode dial to SCN. 2 Press on the 4-way button to highlight Panorama Left-Right or Panorama Right-Left (depending on the direction you are not saved, even if panorama capture is cancelled before stitching occurs. (Picture size is set with the first picture. Get 1 panoramic picture. 12 www.kodak.com...

User Manual
Page 21
during playback to adjust the 7 Press during playback to play . Viewing picture/video information 1 Press the Review button. 2 Repeatedly press to play at 2X, 4X. 2 Press the Review button. 3 Press to find previous/next video. www.kodak.com/go/support 15 Playback speed 4X 2X 1X 2X 4X Reverse Forward 4 Press to turn on/off status icons and picture/video info. Working with pictures/videos Playing a video 1 Press during playback to reverse at 2X, 4X. Press OK to pause/unpause. 5 Press during pause to view previous/next video frame. 6 Press volume.
during playback to adjust the 7 Press during playback to play . Viewing picture/video information 1 Press the Review button. 2 Repeatedly press to play at 2X, 4X. 2 Press the Review button. 3 Press to find previous/next video. www.kodak.com/go/support 15 Playback speed 4X 2X 1X 2X 4X Reverse Forward 4 Press to turn on/off status icons and picture/video info. Working with pictures/videos Playing a video 1 Press during playback to reverse at 2X, 4X. Press OK to pause/unpause. 5 Press during pause to view previous/next video frame. 6 Press volume.
User Manual
Page 28
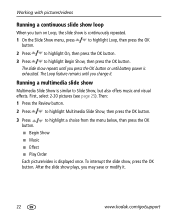
... show plays, you may save or modify it . The slide show repeats until you press the OK button or until you change it . 22 www.kodak.com/go/support Working with pictures/videos Running a continuous slide show loop When you...
... show plays, you may save or modify it . The slide show repeats until you press the OK button or until you change it . 22 www.kodak.com/go/support Working with pictures/videos Running a continuous slide show loop When you...

User Manual
Page 30
.... 24 www.kodak.com/go/support The slide show stops if you connect/disconnect a cable while the slide show is correct (see page 14 or page 21. NOTE: Ensure that the Video Out setting (NTSC or PAL) is running. (Image quality on a computer monitor or when printed.) 1 Turn off the camera before connecting...
.... 24 www.kodak.com/go/support The slide show stops if you connect/disconnect a cable while the slide show is correct (see page 14 or page 21. NOTE: Ensure that the Video Out setting (NTSC or PAL) is running. (Image quality on a computer monitor or when printed.) 1 Turn off the camera before connecting...

User Manual
Page 34
...Capture for the most common picture-taking settings I Setup for other picture-taking settings I Capture plus options, see page 18. 28 www.kodak.com/go/support 4 Doing more with your camera Using the menu button to change settings You can change them; NOTE: For Review and Review plus for other... camera settings 3 Press to highlight a setting, then press the OK button. 4 Choose an option, then press the OK button. others, until you change modes or turn off ...
...Capture for the most common picture-taking settings I Setup for other picture-taking settings I Capture plus options, see page 18. 28 www.kodak.com/go/support 4 Doing more with your camera Using the menu button to change settings You can change them; NOTE: For Review and Review plus for other... camera settings 3 Press to highlight a setting, then press the OK button. 4 Choose an option, then press the OK button. others, until you change modes or turn off ...

User Manual
Page 37
...camera is taken. Unavailable in brightly lit scenes; Off-red eye flash does not fire. Choose a lower ISO setting in Video mode. White Balance Available only in Video mode. 320 x 240 www.kodak....com/go/support 31 On-red eye flash fires before the picture is set to light. Off Maintain Settings Exit Choose which settings are Flash saved, even after the camera... Sharpness Control picture sharpness. Doing more with your camera Press Menu, , , and OK to access settings Options ISO Speed Control the camera's sensitivity to Portrait or SCN mode. High Normal...
...camera is taken. Unavailable in brightly lit scenes; Off-red eye flash does not fire. Choose a lower ISO setting in Video mode. White Balance Available only in Video mode. 320 x 240 www.kodak....com/go/support 31 On-red eye flash fires before the picture is set to light. Off Maintain Settings Exit Choose which settings are Flash saved, even after the camera... Sharpness Control picture sharpness. Doing more with your camera Press Menu, , , and OK to access settings Options ISO Speed Control the camera's sensitivity to Portrait or SCN mode. High Normal...

User Manual
Page 39
... time until camera turns off. 5 minutes 3 minutes 1 minute Video Out Choose the regional setting that lets you connect the camera to Options Camera Sounds Choose sound effects. Doing more with your camera Press Menu, , access settings , and OK to a television or other external device. Reset Camera Reset settings to all modes except SCN-Custom. www.kodak.com...
... time until camera turns off. 5 minutes 3 minutes 1 minute Video Out Choose the regional setting that lets you connect the camera to Options Camera Sounds Choose sound effects. Doing more with your camera Press Menu, , access settings , and OK to a television or other external device. Reset Camera Reset settings to all modes except SCN-Custom. www.kodak.com...

User Manual
Page 41
the LCD gets brighter or dimmer. www.kodak.com/go/support 35 Using the framing grid to make pictures darker or lighter. The camera stops taking pictures when you release the Shutter button, when the pictures are taken, or when there is helpful if, for example, you ..., do so in rapid succession. 1 In most Still modes, press the button repeatedly until appears on /off the framing grid, repeatedly press . To turn on the LCD. 2 Press the Shutter button halfway to focus and set exposure. Using exposure compensation to adjust picture brightness Before you take a picture, ...
the LCD gets brighter or dimmer. www.kodak.com/go/support 35 Using the framing grid to make pictures darker or lighter. The camera stops taking pictures when you release the Shutter button, when the pictures are taken, or when there is helpful if, for example, you ..., do so in rapid succession. 1 In most Still modes, press the button repeatedly until appears on /off the framing grid, repeatedly press . To turn on the LCD. 2 Press the Shutter button halfway to focus and set exposure. Using exposure compensation to adjust picture brightness Before you take a picture, ...
User Manual
Page 42
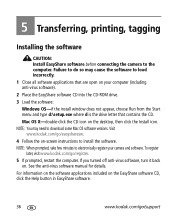
If you turned off anti-virus software, turn it back on the EasyShare software CD, click the Help button in EasyShare software. 36 www.kodak.com/go/support For information on the software applications included on . 5 Transferring, printing, tagging Installing the software CAUTION: Install EasyShare software before connecting the camera to download some Mac OS software versions. NOTE...
If you turned off anti-virus software, turn it back on the EasyShare software CD, click the Help button in EasyShare software. 36 www.kodak.com/go/support For information on the software applications included on . 5 Transferring, printing, tagging Installing the software CAUTION: Install EasyShare software before connecting the camera to download some Mac OS software versions. NOTE...

User Manual
Page 43
... pictures with the USB cable 1 Turn off the camera. 2 Connect the USB cable (U-8). 3 Turn on your pictures and videos. Also available for an online tutorial on connecting. www.kodak.com/go /m1063accessories. I Kodak EasyShare camera dock, Kodak EasyShare printer dock (see page 38) I Kodak multi-card reader, Kodak SD multimedia card reader-writer Purchase these Kodak products to transfer your computer and...
... pictures with the USB cable 1 Turn off the camera. 2 Connect the USB cable (U-8). 3 Turn on your pictures and videos. Also available for an online tutorial on connecting. www.kodak.com/go /m1063accessories. I Kodak EasyShare camera dock, Kodak EasyShare printer dock (see page 38) I Kodak multi-card reader, Kodak SD multimedia card reader-writer Purchase these Kodak products to transfer your computer and...


