
User Manual
Page 1
KODAK EASYSHARE M1063/MD1063/MX1063 Digital Camera Extended User Guide www.kodak.com For interactive tutorials: www.kodak.com/go/howto For help with your camera: www.kodak.com/go/m1063support
KODAK EASYSHARE M1063/MD1063/MX1063 Digital Camera Extended User Guide www.kodak.com For interactive tutorials: www.kodak.com/go/howto For help with your camera: www.kodak.com/go/m1063support

User Manual
Page 5
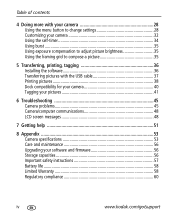
... on an SD/SDHC card 4 2 Taking pictures/videos 5 Taking a picture 5 Taking a video 6 Using optical zoom 7 Using the flash 8 Using different picture-taking modes 9 Using camera Help 11 Taking panoramic pictures 12 Understanding the picture-taking icons 13 3 Working with pictures/videos 14 Reviewing pictures/...videos 14 Using sound tags 16 Deleting pictures/videos 17 Using the menu button in Review 18 Using Kodak Perfect Touch ...
... on an SD/SDHC card 4 2 Taking pictures/videos 5 Taking a picture 5 Taking a video 6 Using optical zoom 7 Using the flash 8 Using different picture-taking modes 9 Using camera Help 11 Taking panoramic pictures 12 Understanding the picture-taking icons 13 3 Working with pictures/videos 14 Reviewing pictures/...videos 14 Using sound tags 16 Deleting pictures/videos 17 Using the menu button in Review 18 Using Kodak Perfect Touch ...
User Manual
Page 6
... 38 Dock compatibility for your camera 40 Tagging your pictures 41 6 Troubleshooting 45 Camera problems 45 Camera/computer communications 48 LCD screen messages 48 7 Getting help 51 8 Appendix 53 Camera specifications 53 Care and maintenance ...56 Upgrading your software and firmware 56 Storage capacities 56 Important safety instructions 57 Battery life 58 Limited Warranty 58 Regulatory compliance 60 iv www.kodak...
... 38 Dock compatibility for your camera 40 Tagging your pictures 41 6 Troubleshooting 45 Camera problems 45 Camera/computer communications 48 LCD screen messages 48 7 Getting help 51 8 Appendix 53 Camera specifications 53 Care and maintenance ...56 Upgrading your software and firmware 56 Storage capacities 56 Important safety instructions 57 Battery life 58 Limited Warranty 58 Regulatory compliance 60 iv www.kodak...
User Manual
Page 8
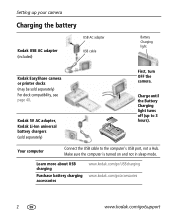
.... Charge until the Battery Charging light turns off (up your camera Charging the battery USB AC adapter Kodak USB AC adapter (included) USB cable Battery Charging light Kodak EasyShare camera or printer docks (may be sold separately) Charg3e.6 / 7.2Power Li-IBoAnTUTNEIRVYERCSHAALRGER First, turn OFF the camera. Your computer Connect the USB cable to 3 hours). Learn more...
.... Charge until the Battery Charging light turns off (up your camera Charging the battery USB AC adapter Kodak USB AC adapter (included) USB cable Battery Charging light Kodak EasyShare camera or printer docks (may be sold separately) Charg3e.6 / 7.2Power Li-IBoAnTUTNEIRVYERCSHAALRGER First, turn OFF the camera. Your computer Connect the USB cable to 3 hours). Learn more...

User Manual
Page 9
Turning on the camera Setting up your camera Setting the language, date/time NOTE: To change the date/time and language in the future, use the Menu button (page 28). www.kodak.com/go/support 3
Turning on the camera Setting up your camera Setting the language, date/time NOTE: To change the date/time and language in the future, use the Menu button (page 28). www.kodak.com/go/support 3

User Manual
Page 10
... damage. See page 56 for storage capacities. 4 www.kodak.com/go /m1063accessories). Setting up your camera Storing pictures on the camera. If you insert or remove a card while the camera is accessing it may be inserted one way; We recommend Kodak SD or SDHC cards. 1 Turn off the camera. 2 Insert or remove the optional card. 3 Turn...
... damage. See page 56 for storage capacities. 4 www.kodak.com/go /m1063accessories). Setting up your camera Storing pictures on the camera. If you insert or remove a card while the camera is accessing it may be inserted one way; We recommend Kodak SD or SDHC cards. 1 Turn off the camera. 2 Insert or remove the optional card. 3 Turn...

User Manual
Page 12
...Zone, the framing marks are detected in all modes. Multiple framing marks may appear when faces are fixed at Center Wide. The camera attempts to focus on the desired subject (or if the framing marks disappear), release the Shutter button and recompose the scene. ...the Shutter button completely down and release. Taking pictures/videos Using the framing marks Framing marks indicate the camera focus area. To stop recording, press and release the Shutter button again. 6 www.kodak.com/go/support Framing marks 1 Press the Shutter button halfway. Taking a video 1 3 On/Off...
...Zone, the framing marks are detected in all modes. Multiple framing marks may appear when faces are fixed at Center Wide. The camera attempts to focus on the desired subject (or if the framing marks disappear), release the Shutter button and recompose the scene. ...the Shutter button completely down and release. Taking pictures/videos Using the framing marks Framing marks indicate the camera focus area. To stop recording, press and release the Shutter button again. 6 www.kodak.com/go/support Framing marks 1 Press the Shutter button halfway. Taking a video 1 3 On/Off...

User Manual
Page 14
In low light, hold the camera steady or use a tripod. If Red-eye Pre-flash is turned off: If Red-eye Pre-flash is turned on /off, see Flash modes below). Flash Off Never. Flash-to scroll through flash modes (see page 31. 8 www.kodak.com/go/support The current flash...you take pictures at night, indoors, or outdoors in shadow or is "backlit" (when the light is taken. Press the button repeatedly to -subject distance Zoom position Wide angle Telephoto Flash distance 0.6-3.0 m (2-9.8 ft) @ ISO 160 0.6-1.7 m (2-5.6 ft) @ ISO 160 Flash modes Flash fires Auto When the lighting conditions ...
In low light, hold the camera steady or use a tripod. If Red-eye Pre-flash is turned off: If Red-eye Pre-flash is turned on /off, see Flash modes below). Flash Off Never. Flash-to scroll through flash modes (see page 31. 8 www.kodak.com/go/support The current flash...you take pictures at night, indoors, or outdoors in shadow or is "backlit" (when the light is taken. Press the button repeatedly to -subject distance Zoom position Wide angle Telephoto Flash distance 0.6-3.0 m (2-9.8 ft) @ ISO 160 0.6-1.7 m (2-5.6 ft) @ ISO 160 Flash modes Flash fires Auto When the lighting conditions ...

User Manual
Page 15
Use available light instead of use a tripod. Capturing video with sound. (See page 6.) www.kodak.com/go/support 9 Distant scenery at night. Flash does not fire. Close range. Blur Reduction Landscape Close-up Reducing blur due to subject motion. SCN ... High ISO ISO Video Point-and-shoot simplicity when taking -offers an excellent balance of image quality and ease of flash if possible. Place the camera on a flat, steady surface or use . Use this mode Auto For General picture taking pictures under special conditions. (See page...
Use available light instead of use a tripod. Capturing video with sound. (See page 6.) www.kodak.com/go/support 9 Distant scenery at night. Flash does not fire. Close range. Blur Reduction Landscape Close-up Reducing blur due to subject motion. SCN ... High ISO ISO Video Point-and-shoot simplicity when taking -offers an excellent balance of image quality and ease of flash if possible. Place the camera on a flat, steady surface or use . Use this mode Auto For General picture taking pictures under special conditions. (See page...

User Manual
Page 16
Left-Right Panorama Stitching up to 3 captured images from right to left to Auto Focus (see page 30). Place the camera on a flat, steady Landscape surface or use a tripod. Flash does not fire. Document Fireworks Bright, colorful light displays. Focus is set to right into ...one image. Assures proper focus and minimizes red eye. 10 www.kodak.com/go/support Panorama Stitching up to Auto Focus (see page 30). Night Portrait Reducing red eye of people. Place the...
Left-Right Panorama Stitching up to 3 captured images from right to left to Auto Focus (see page 30). Place the camera on a flat, steady Landscape surface or use a tripod. Flash does not fire. Document Fireworks Bright, colorful light displays. Focus is set to right into ...one image. Assures proper focus and minimizes red eye. 10 www.kodak.com/go/support Panorama Stitching up to Auto Focus (see page 30). Night Portrait Reducing red eye of people. Place the...

User Manual
Page 17
Taking pictures/videos Use this For SCN mode Children Action pictures of children in low light. Candle light Capturing subjects in bright light. Backlight Subjects that are in shadow or "backlit" (when light is behind the subject). Select an option you want to learn more about, then press the Zoom telephoto (T) button. Sunset Capturing the deep hues seen at sunset. Using camera Help To better understand each menu option, use camera Help. T Turn on Help Scroll up/down OK Turn off Help www.kodak.com/go/support 11
Taking pictures/videos Use this For SCN mode Children Action pictures of children in low light. Candle light Capturing subjects in bright light. Backlight Subjects that are in shadow or "backlit" (when light is behind the subject). Select an option you want to learn more about, then press the Zoom telephoto (T) button. Sunset Capturing the deep hues seen at sunset. Using camera Help To better understand each menu option, use camera Help. T Turn on Help Scroll up/down OK Turn off Help www.kodak.com/go/support 11

User Manual
Page 19
Taking pictures/videos Understanding the picture-taking icons Self-timer/Burst Flash Camera mode Album name Framing marks Framing grid Picture size Date stamp Pictures/time remaining Storage location Zoom: Wide, Telephoto, Digital Focus zone Exposure metering White balance Long time exposure ISO speed Battery level Exposure compensation In capture mode-shutter pressed halfway Camera mode Auto Exposure/ Auto Focus warning Battery level Exposure compensation www.kodak.com/go/support 13
Taking pictures/videos Understanding the picture-taking icons Self-timer/Burst Flash Camera mode Album name Framing marks Framing grid Picture size Date stamp Pictures/time remaining Storage location Zoom: Wide, Telephoto, Digital Focus zone Exposure metering White balance Long time exposure ISO speed Battery level Exposure compensation In capture mode-shutter pressed halfway Camera mode Auto Exposure/ Auto Focus warning Battery level Exposure compensation www.kodak.com/go/support 13

User Manual
Page 24
to view other camera settings (page 28) 3 Press to exit the menu. 18 www.kodak.com/go/support Using Kodak Perfect Touch technology Kodak Perfect Touch technology helps ensure better, brighter pictures. 1 Press the Review button, then for other parts of the 4 Press OK. The enhancement is previewed in ...
to view other camera settings (page 28) 3 Press to exit the menu. 18 www.kodak.com/go/support Using Kodak Perfect Touch technology Kodak Perfect Touch technology helps ensure better, brighter pictures. 1 Press the Review button, then for other parts of the 4 Press OK. The enhancement is previewed in ...

User Manual
Page 26
to find Edit. 3 Press to highlight Trim, then press . Manual options: You choose the first and last frames; the camera chooses 2, 7, or 14 equally spaced frames. Press to find a 2 Press the Menu button. Press to find a 2 Press the Menu button. Working with pictures/... a new video or replace the original.) I Press the Menu button to exit the menu. 20 www.kodak.com/go/support Video 4-, 9-, or 3 Press to highlight Video Action Print, 16-up picture, suitable for a 4 x 6-inch (10 x 15 cm) print. 1 Press the Review button, then video. I Press the Menu button to ...
to find Edit. 3 Press to highlight Trim, then press . Manual options: You choose the first and last frames; the camera chooses 2, 7, or 14 equally spaced frames. Press to find a 2 Press the Menu button. Press to find a 2 Press the Menu button. Working with pictures/... a new video or replace the original.) I Press the Menu button to exit the menu. 20 www.kodak.com/go/support Video 4-, 9-, or 3 Press to highlight Video Action Print, 16-up picture, suitable for a 4 x 6-inch (10 x 15 cm) print. 1 Press the Review button, then video. I Press the Menu button to ...

User Manual
Page 27
...once. The interval setting remains until you can set the display interval from 3-60 seconds. 1 On the Slide Show menu, press button. www.kodak.com/go/support 21 To interrupt the Slide Show, press the OK button. Changing the slide show 1 Press the Review button, then the ...default interval setting displays each picture for 5 seconds. Working with pictures/videos Running a slide show Use Slide Show to display your pictures/videos on the camera or on a sound tag you recorded (see page 24). To scroll through the seconds quickly, press and hold . 3 Press the OK button. ...
...once. The interval setting remains until you can set the display interval from 3-60 seconds. 1 On the Slide Show menu, press button. www.kodak.com/go/support 21 To interrupt the Slide Show, press the OK button. Changing the slide show 1 Press the Review button, then the ...default interval setting displays each picture for 5 seconds. Working with pictures/videos Running a slide show Use Slide Show to display your pictures/videos on the camera or on a sound tag you recorded (see page 24). To scroll through the seconds quickly, press and hold . 3 Press the OK button. ...

User Manual
Page 29
...are displayed in different ways Viewing as thumbnails (multi-up) 1 Press the Review button. 2 Press the Zoom Wide Angle (W) button to change from single-picture view to exit Review. Press the Telephoto (T) button to... 41. Pictures are visible at a time. I Press the Review button to multi-up view. www.kodak.com/go/support 23 Press the Wide Angle (W) button to return to select a folder. I To select ...multiple pictures/videos, see the results of your camera or card, you can sort by the date a picture was taken or-if you can sort them...
...are displayed in different ways Viewing as thumbnails (multi-up) 1 Press the Review button. 2 Press the Zoom Wide Angle (W) button to change from single-picture view to exit Review. Press the Telephoto (T) button to... 41. Pictures are visible at a time. I Press the Review button to multi-up view. www.kodak.com/go/support 23 Press the Wide Angle (W) button to return to select a folder. I To select ...multiple pictures/videos, see the results of your camera or card, you can sort by the date a picture was taken or-if you can sort them...

User Manual
Page 30
...you connect/disconnect a cable while the slide show is correct (see page 14 or page 21. CAUTION: Turn off the camera. 2 Connect the A/V cable. 3 Turn on the camera. 4 View pictures/videos/slide shows on television. Failure to do so may not be sold separately), then see page 33... can display pictures/videos/slide shows on a computer monitor or when printed.) 1 Turn off the camera before connecting/disconnecting the A/V cable. To connect the camera to the camera, pictures, or memory card. 24 www.kodak.com/go/support NOTE: Ensure that the Video Out setting (NTSC or PAL) is running. (...
...you connect/disconnect a cable while the slide show is correct (see page 14 or page 21. CAUTION: Turn off the camera. 2 Connect the A/V cable. 3 Turn on the camera. 4 View pictures/videos/slide shows on television. Failure to do so may not be sold separately), then see page 33... can display pictures/videos/slide shows on a computer monitor or when printed.) 1 Turn off the camera before connecting/disconnecting the A/V cable. To connect the camera to the camera, pictures, or memory card. 24 www.kodak.com/go/support NOTE: Ensure that the Video Out setting (NTSC or PAL) is running. (...

User Manual
Page 31
... is inserted in Multi-Up mode, page 23.) 1 Press the Review button, then picture/video. Protection settings are copied, not moved. www.kodak.com/go/support 25 Working with pictures/videos Selecting multiple pictures/videos Use the multi-select feature when you have two or more pictures/videos... or delete the selected pictures. To remove pictures/videos from which you are not copied. Tags that you copy, make sure that: I The camera's image storage location is set to the location from the original location after copying, delete them (see page 17). to find a Selected pictures ...
... is inserted in Multi-Up mode, page 23.) 1 Press the Review button, then picture/video. Protection settings are copied, not moved. www.kodak.com/go/support 25 Working with pictures/videos Selecting multiple pictures/videos Use the multi-select feature when you have two or more pictures/videos... or delete the selected pictures. To remove pictures/videos from which you are not copied. Tags that you copy, make sure that: I The camera's image storage location is set to the location from the original location after copying, delete them (see page 17). to find a Selected pictures ...

User Manual
Page 34
4 Doing more with your camera. others, until you change settings to highlight a setting, then press the OK button. 4 Choose an option, then press the OK button. NOTE: Some settings remain ... choose a tab: I Capture for the most common picture-taking settings I Setup for other camera settings 3 Press to get the best results from your camera Using the menu button to change settings You can change modes or turn off the camera. NOTE: For Review and Review plus for other picture-taking settings I Capture plus...
4 Doing more with your camera. others, until you change settings to highlight a setting, then press the OK button. 4 Choose an option, then press the OK button. NOTE: Some settings remain ... choose a tab: I Capture for the most common picture-taking settings I Setup for other camera settings 3 Press to get the best results from your camera Using the menu button to change settings You can change modes or turn off the camera. NOTE: For Review and Review plus for other picture-taking settings I Capture plus...

User Manual
Page 35
... (4:3)-medium file size. 2.2 MP (3:2)-for printing on pictures. www.kodak.com/go /support 29 Doing more with your camera Using the capture tab Press Menu, , , and OK to access settings Options Picture Size 10.1 MP (4:3)-Highest resolution; Date Stamp On Imprint the date on EasyShare printer docks and For recommended print sizes, photo printers...
... (4:3)-medium file size. 2.2 MP (3:2)-for printing on pictures. www.kodak.com/go /support 29 Doing more with your camera Using the capture tab Press Menu, , , and OK to access settings Options Picture Size 10.1 MP (4:3)-Highest resolution; Date Stamp On Imprint the date on EasyShare printer docks and For recommended print sizes, photo printers...


