
User Manual
Page 1
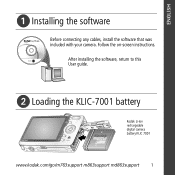
After installing the software, return to this User guide. ᕢ Loading the KLIC-7001 battery Kodak Li-Ion rechargeable digital camera battery KLIC 7001 www.kodak.com/go/m763support m863support md863support 1 ENGLISH ᕡ Installing the software Before connecting any cables, install the software that was included with your camera. Follow the on-screen instructions.
After installing the software, return to this User guide. ᕢ Loading the KLIC-7001 battery Kodak Li-Ion rechargeable digital camera battery KLIC 7001 www.kodak.com/go/m763support m863support md863support 1 ENGLISH ᕡ Installing the software Before connecting any cables, install the software that was included with your camera. Follow the on-screen instructions.
User Manual
Page 2
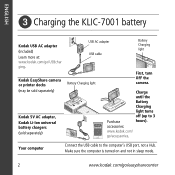
... sleep mode. 2 www.kodak.com/go /USBchar ging. ENGLISH ᕣ Charging the KLIC-7001 battery Kodak USB AC adapter (included) Learn more at: www.kodak.com/go /easysharecenter Your computer Connect the USB cable to 3 Purchase hours). Charge until the Battery Charging light turns off (up to the computer's USB port, not a Hub. Kodak EasyShare camera or printer docks (may be sold separately) Kodak 5V AC adapter, Kodak Li-Ion universal battery chargers (sold separately) USB AC adapter USB cable Battery Charging light Battery Charging light First, turn...
... sleep mode. 2 www.kodak.com/go /USBchar ging. ENGLISH ᕣ Charging the KLIC-7001 battery Kodak USB AC adapter (included) Learn more at: www.kodak.com/go /easysharecenter Your computer Connect the USB cable to 3 Purchase hours). Charge until the Battery Charging light turns off (up to the computer's USB port, not a Hub. Kodak EasyShare camera or printer docks (may be sold separately) Kodak 5V AC adapter, Kodak Li-Ion universal battery chargers (sold separately) USB AC adapter USB cable Battery Charging light Battery Charging light First, turn...
User Manual
Page 4
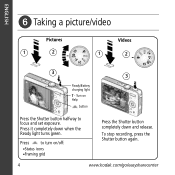
To stop recording, press the Shutter button again. 4 www.kodak.com/go/easysharecenter Press to focus and set exposure. Press it completely down and release. ENGLISH ᕦ Taking a picture/video Pictures 1 2 Videos 1 2 3 3 Ready/Battery charging light T - Turn on Help button Press the Shutter button halfway to turn on/off: •Status icons •Framing grid Press the Shutter button completely down when the Ready light turns green.
To stop recording, press the Shutter button again. 4 www.kodak.com/go/easysharecenter Press to focus and set exposure. Press it completely down and release. ENGLISH ᕦ Taking a picture/video Pictures 1 2 Videos 1 2 3 3 Ready/Battery charging light T - Turn on Help button Press the Shutter button halfway to turn on/off: •Status icons •Framing grid Press the Shutter button completely down when the Ready light turns green.
User Manual
Page 5
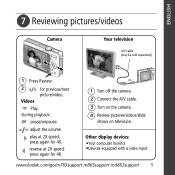
During playback: OK pause/unpause. press again for 4X. 1 Turn off the camera. 2 Connect the A/V cable. 3 Turn on the camera. 4 Review pictures/videos/slide shows on television. press again for 4X. adjust the volume. Other display devices: •Your computer monitor •Devices equipped with a video input www.kodak.com/go/m763support m863support md863support 5 play at 2X speed; reverse at 2X speed; ENGLISH ᕧ Reviewing pictures/videos Camera Your television A/V cable (may be sold separately...
During playback: OK pause/unpause. press again for 4X. 1 Turn off the camera. 2 Connect the A/V cable. 3 Turn on the camera. 4 Review pictures/videos/slide shows on television. press again for 4X. adjust the volume. Other display devices: •Your computer monitor •Devices equipped with a video input www.kodak.com/go/m763support m863support md863support 5 play at 2X speed; reverse at 2X speed; ENGLISH ᕧ Reviewing pictures/videos Camera Your television A/V cable (may be sold separately...
User Manual
Page 6
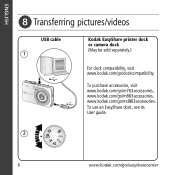
ENGLISH ᕨ Transferring pictures/videos USB cable 1 Kodak EasyShare printer dock or camera dock (May be sold separately.) For dock compatibility, visit www.kodak.com/go /md863accessories. To purchase accessories, visit www.kodak.com/go/m763accessories, www.kodak.com/go/m863accessories, www.kodak.com/go /dockcompatibility. To use an EasyShare dock, see its User guide. 2 6 www.kodak.com/go/easysharecenter
ENGLISH ᕨ Transferring pictures/videos USB cable 1 Kodak EasyShare printer dock or camera dock (May be sold separately.) For dock compatibility, visit www.kodak.com/go /md863accessories. To purchase accessories, visit www.kodak.com/go/m763accessories, www.kodak.com/go/m863accessories, www.kodak.com/go /dockcompatibility. To use an EasyShare dock, see its User guide. 2 6 www.kodak.com/go/easysharecenter

User Manual
Page 7
... www.kodak.com/go/easysharecenter for: • the Extended user guide • interactive troubleshooting and repairs • interactive tutorials • FAQs • downloads • accessories • printing information • product registration www.kodak.com/go/m763support m863support md863support 7 Congratulations! You have: • set up your camera • taken pictures • transferred pictures to your camera! Finish reading this book, so you can take and share your best pictures!
... www.kodak.com/go/easysharecenter for: • the Extended user guide • interactive troubleshooting and repairs • interactive tutorials • FAQs • downloads • accessories • printing information • product registration www.kodak.com/go/m763support m863support md863support 7 Congratulations! You have: • set up your camera • taken pictures • transferred pictures to your camera! Finish reading this book, so you can take and share your best pictures!
User Manual
Page 10
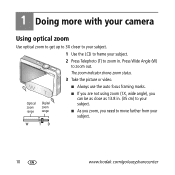
I As you zoom, you can be as close as 13.8 in . 1 Doing more with your camera Using optical zoom Use optical zoom to get up to 3X closer to your subject. 1 Use the LCD to frame your subject. 2 Press Telephoto (T) to zoom out. Optical zoom range Digital zoom range I If you are not using zoom (1X, wide angle), you need to your subject. I Always use the auto focus framing marks. Press Wide Angle (W) to zoom in . (35 cm) to move further from your subject. W TD 10 www.kodak.com/go/easysharecenter The zoom indicator shows zoom status. 3 Take the picture or video.
I As you zoom, you can be as close as 13.8 in . 1 Doing more with your camera Using optical zoom Use optical zoom to get up to 3X closer to your subject. 1 Use the LCD to frame your subject. 2 Press Telephoto (T) to zoom out. Optical zoom range Digital zoom range I If you are not using zoom (1X, wide angle), you need to your subject. I Always use the auto focus framing marks. Press Wide Angle (W) to zoom in . (35 cm) to move further from your subject. W TD 10 www.kodak.com/go/easysharecenter The zoom indicator shows zoom status. 3 Take the picture or video.
User Manual
Page 11
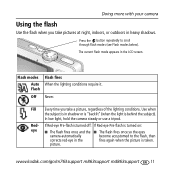
... flash mode appears in heavy shadows. Red- In low light, hold the camera steady or use a tripod. Flash modes Auto Flash Flash fires When the lighting conditions require it. www.kodak.com/go/m763support m863support md863support 11 Off Never. Doing more with your camera Using the flash Use the flash when you take pictures at night, indoors, or outdoors in the LCD screen. If Red-eye Pre-flash is turned off: If Red-eye Pre-flash is turned on: eye I The flash...
... flash mode appears in heavy shadows. Red- In low light, hold the camera steady or use a tripod. Flash modes Auto Flash Flash fires When the lighting conditions require it. www.kodak.com/go/m763support m863support md863support 11 Off Never. Doing more with your camera Using the flash Use the flash when you take pictures at night, indoors, or outdoors in the LCD screen. If Red-eye Pre-flash is turned off: If Red-eye Pre-flash is turned on: eye I The flash...

User Manual
Page 12
... range. SCN Scene High ISO ISO Video Point-and-shoot simplicity when taking modes Choose the mode that best suits your camera Using different picture-taking pictures under special conditions. (See page 13.) People in low-light scenes indoors using a higher ISO. Doing more with sound. (See page 4.) Favorites Reviewing favorite pictures. 12 www.kodak.com/go/easysharecenter Use this mode For Auto General picture taking-offers an excellent balance of image quality and ease of...
... range. SCN Scene High ISO ISO Video Point-and-shoot simplicity when taking modes Choose the mode that best suits your camera Using different picture-taking pictures under special conditions. (See page 13.) People in low-light scenes indoors using a higher ISO. Doing more with sound. (See page 4.) Favorites Reviewing favorite pictures. 12 www.kodak.com/go/easysharecenter Use this mode For Auto General picture taking-offers an excellent balance of image quality and ease of...
User Manual
Page 13
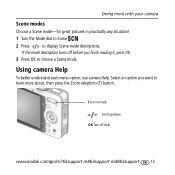
T Turn on Help Scroll up/down OK Turn off before you want to display Scene mode descriptions. Select an option you finish reading it, press OK. 3 Press OK to choose a Scene mode. Doing more with your camera Scene modes Choose a Scene mode-for great pictures in practically any situation! 1 Turn the Mode dial to Scene . 2 Press to learn more about, then press the Zoom telephoto (T) button. If the mode description turns off Help www.kodak.com/go/m763support m863support md863support 13 Using camera Help To better understand each menu option, use camera Help.
T Turn on Help Scroll up/down OK Turn off before you want to display Scene mode descriptions. Select an option you finish reading it, press OK. 3 Press OK to choose a Scene mode. Doing more with your camera Scene modes Choose a Scene mode-for great pictures in practically any situation! 1 Turn the Mode dial to Scene . 2 Press to learn more about, then press the Zoom telephoto (T) button. If the mode description turns off Help www.kodak.com/go/m763support m863support md863support 13 Using camera Help To better understand each menu option, use camera Help.
User Manual
Page 14
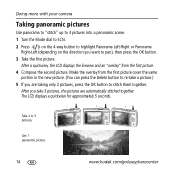
Make the overlay from the first picture. 4 Compose the second picture. Doing more with your camera Taking panoramic pictures Use panorama to "stitch" up to 3 pictures into a panoramic scene. 1 Turn the Mode dial to SCN. 2 Press on the 4-way button to highlight Panorama Left-Right or Panorama Right-Left (depending on the direction you take a picture.) 5 If you are automatically stitched together. After a quickview, the LCD displays the liveview and an "overlay...
Make the overlay from the first picture. 4 Compose the second picture. Doing more with your camera Taking panoramic pictures Use panorama to "stitch" up to 3 pictures into a panoramic scene. 1 Turn the Mode dial to SCN. 2 Press on the 4-way button to highlight Panorama Left-Right or Panorama Right-Left (depending on the direction you take a picture.) 5 If you are automatically stitched together. After a quickview, the LCD displays the liveview and an "overlay...
User Manual
Page 15
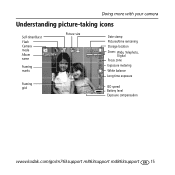
Doing more with your camera Understanding picture-taking icons Self-timer/Burst Flash Camera mode Album name Framing marks Framing grid Picture size Date stamp Pictures/time remaining Storage location Zoom: Wide, Telephoto, Digital Focus zone Exposure metering White balance Long time exposure ISO speed Battery level Exposure compensation www.kodak.com/go/m763support m863support md863support 15
Doing more with your camera Understanding picture-taking icons Self-timer/Burst Flash Camera mode Album name Framing marks Framing grid Picture size Date stamp Pictures/time remaining Storage location Zoom: Wide, Telephoto, Digital Focus zone Exposure metering White balance Long time exposure ISO speed Battery level Exposure compensation www.kodak.com/go/m763support m863support md863support 15
User Manual
Page 17
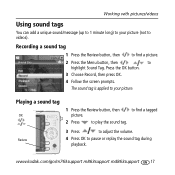
... to adjust the volume. 4 Press OK to play the sound tag. Working with pictures/videos Using sound tags You can add a unique sound/message (up to 1 minute long) to your picture. The sound tag is applied to your picture (not to highlight Sound Tag. to find a picture. 2 Press the Menu button, then to videos). Recording a sound tag 1 Press the Review button, then to find a tagged 2 Press to pause or replay the sound tag during playback.
... to adjust the volume. 4 Press OK to play the sound tag. Working with pictures/videos Using sound tags You can add a unique sound/message (up to 1 minute long) to your picture. The sound tag is applied to your picture (not to highlight Sound Tag. to find a picture. 2 Press the Menu button, then to videos). Recording a sound tag 1 Press the Review button, then to find a tagged 2 Press to pause or replay the sound tag during playback.
User Manual
Page 18
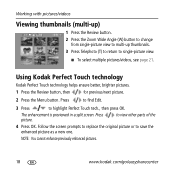
...-picture view. The enhancement is previewed in a split screen. Working with pictures/videos Viewing thumbnails (multi-up) 1 Press the Review button. 2 Press the Zoom Wide Angle (W) button to change from single-picture view to multi-up thumbnails. 3 Press Telephoto (T) to return to highlight Perfect Touch tech., then press OK. to save the enhanced picture as a new one. Follow the screen prompts to replace the original picture or to view other parts...
...-picture view. The enhancement is previewed in a split screen. Working with pictures/videos Viewing thumbnails (multi-up) 1 Press the Review button. 2 Press the Zoom Wide Angle (W) button to change from single-picture view to multi-up thumbnails. 3 Press Telephoto (T) to return to highlight Perfect Touch tech., then press OK. to save the enhanced picture as a new one. Follow the screen prompts to replace the original picture or to view other parts...
User Manual
Page 20
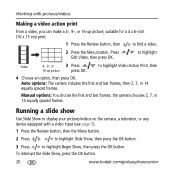
... equally spaced frames. Working with a video input (see page 5). 1 Press the Review button, then the Menu button. 2 Press to highlight Slide Show, then press the OK button. 3 Press to find a video. 2 Press the Menu button. Running a slide show Use Slide Show to display your pictures/videos on the camera, a television, or any device equipped with pictures/videos Making a video action print From a video, you can make a 4-, 9-, or 16-up picture press OK. 4 Choose...
... equally spaced frames. Working with a video input (see page 5). 1 Press the Review button, then the Menu button. 2 Press to highlight Slide Show, then press the OK button. 3 Press to find a video. 2 Press the Menu button. Running a slide show Use Slide Show to display your pictures/videos on the camera, a television, or any device equipped with pictures/videos Making a video action print From a video, you can make a 4-, 9-, or 16-up picture press OK. 4 Choose...

User Manual
Page 22
... only immediately after you accidentally delete a picture, use Undo Delete to highlight Undo Delete. 2 Press OK. See Using the undo delete feature for previous/next picture/video. 3 Press the Delete button. 4 Follow the screen prompts. The deleted picture (overlaid with the Undo Delete option) appears. Using the undo delete feature If you delete a picture in Review mode. Working with pictures/videos Deleting pictures/videos 1 Press the Review button. 2 Press for more pictures, the Delete menu on a blank screen appears. If there are no...
... only immediately after you accidentally delete a picture, use Undo Delete to highlight Undo Delete. 2 Press OK. See Using the undo delete feature for previous/next picture/video. 3 Press the Delete button. 4 Follow the screen prompts. The deleted picture (overlaid with the Undo Delete option) appears. Using the undo delete feature If you delete a picture in Review mode. Working with pictures/videos Deleting pictures/videos 1 Press the Review button. 2 Press for more pictures, the Delete menu on a blank screen appears. If there are no...

User Manual
Page 23
I Remove the battery, then reinsert correctly (see page 2). rechargeable digital camera battery KLIC-7001. www.kodak.com/go /md863support and select Interactive Troubleshooting & Repairs. Try one or more of the flash. excessive use of the following activities that quickly deplete battery power: with Kodak Li-Ion reviewing pictures/videos on /off. Battery does not I Insert a card into the slot, then push to seat. 3 Solving camera problems For support, visit www.kodak.com/go/m763support...
I Remove the battery, then reinsert correctly (see page 2). rechargeable digital camera battery KLIC-7001. www.kodak.com/go /md863support and select Interactive Troubleshooting & Repairs. Try one or more of the flash. excessive use of the following activities that quickly deplete battery power: with Kodak Li-Ion reviewing pictures/videos on /off. Battery does not I Insert a card into the slot, then push to seat. 3 Solving camera problems For support, visit www.kodak.com/go/m763support...

User Manual
Page 24
..., including coins. I If using this product; I Remove the battery when the product is not recommended by the battery manufacturer. The use only. Contact Kodak customer support. I Do not charge non-rechargeable batteries. I Use only a USB-certified computer. Kodak AC adapters and battery chargers are no user-serviceable parts inside the product, contact Kodak customer support. it to cool; 4 Appendix Important safety instructions CAUTION: Do not disassemble this product in exposure to shock and...
..., including coins. I If using this product; I Remove the battery when the product is not recommended by the battery manufacturer. The use only. Contact Kodak customer support. I Do not charge non-rechargeable batteries. I Use only a USB-certified computer. Kodak AC adapters and battery chargers are no user-serviceable parts inside the product, contact Kodak customer support. it to cool; 4 Appendix Important safety instructions CAUTION: Do not disassemble this product in exposure to shock and...
User Manual
Page 25
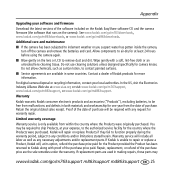
... not use cleaning solutions unless designed specifically for at its option, refund the purchase price paid . Do not allow chemicals, such as any necessary adjustments and/or replacement parts. Retain the original dated sales receipt. Kodak will be free from the date of the software included on the Kodak EasyShare software CD and the camera firmware (the software that runs on the lens or LCD to the authorized service facility...
... not use cleaning solutions unless designed specifically for at its option, refund the purchase price paid . Do not allow chemicals, such as any necessary adjustments and/or replacement parts. Retain the original dated sales receipt. Kodak will be free from the date of the software included on the Kodak EasyShare software CD and the camera firmware (the software that runs on the lens or LCD to the authorized service facility...
User Manual
Page 27
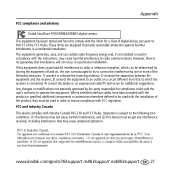
... equipment and the receiver; 3) connect the equipment to an outlet on , the user is no guarantee that interference will not occur in a residential installation. FCC compliance and advisory Appendix Kodak EasyShare M763/M863/MD863 digital camera This equipment has been tested and found to comply with the limits for a Class B digital device, pursuant to Part 15 of the product, they...
... equipment and the receiver; 3) connect the equipment to an outlet on , the user is no guarantee that interference will not occur in a residential installation. FCC compliance and advisory Appendix Kodak EasyShare M763/M863/MD863 digital camera This equipment has been tested and found to comply with the limits for a Class B digital device, pursuant to Part 15 of the product, they...


