User guide
Page 2
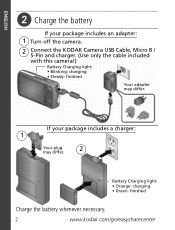
If your package includes an adapter: 1 Turn off the camera. 2 Connect the KODAK Camera USB Cable, Micro B / 5-Pin and charger. (Use only the cable included with this camera!) Battery Charging light: • Blinking: charging • Steady: finished Your adapter may differ. 2 Battery Charging light: • Orange: charging • Green: finished Charge the battery whenever necessary. 2 www.kodak.com/go/easysharecenter ENGLISH ᕢ Charge the battery If your package includes a charger: 1 Your plug may differ.
If your package includes an adapter: 1 Turn off the camera. 2 Connect the KODAK Camera USB Cable, Micro B / 5-Pin and charger. (Use only the cable included with this camera!) Battery Charging light: • Blinking: charging • Steady: finished Your adapter may differ. 2 Battery Charging light: • Orange: charging • Green: finished Charge the battery whenever necessary. 2 www.kodak.com/go/easysharecenter ENGLISH ᕢ Charge the battery If your package includes a charger: 1 Your plug may differ.
User guide
Page 3
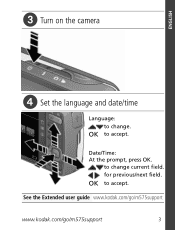
See the Extended user guide www.kodak.com/go/m575support www.kodak.com/go/m575support 3 for previous/next field. to change . Date/Time: At the prompt, press OK. ENGLISH ᕣ Turn on the camera ᕤ Set the language and date/time Language: to change current field. OK to accept. OK to accept.
See the Extended user guide www.kodak.com/go/m575support www.kodak.com/go/m575support 3 for previous/next field. to change . Date/Time: At the prompt, press OK. ENGLISH ᕣ Turn on the camera ᕤ Set the language and date/time Language: to change current field. OK to accept. OK to accept.
User guide
Page 4
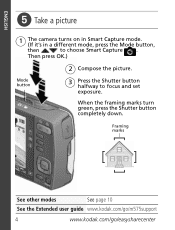
When the framing marks turn green, press the Shutter button completely down. ENGLISH ᕥ Take a picture 1 The camera turns on in Smart Capture mode. (If it's in a different mode, press the Mode button, then to focus and set exposure. Framing marks See other modes See page 10 See the Extended user guide www.kodak.com/go/m575support 4 www.kodak.com/go/easysharecenter Then press OK.) Mode button 2 Compose the picture. 3 Press the Shutter button halfway to choose Smart Capture .
When the framing marks turn green, press the Shutter button completely down. ENGLISH ᕥ Take a picture 1 The camera turns on in Smart Capture mode. (If it's in a different mode, press the Mode button, then to focus and set exposure. Framing marks See other modes See page 10 See the Extended user guide www.kodak.com/go/m575support 4 www.kodak.com/go/easysharecenter Then press OK.) Mode button 2 Compose the picture. 3 Press the Shutter button halfway to choose Smart Capture .

User guide
Page 6
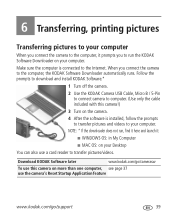
... the computer, it : ■ WINDOWS OS: in My Computer ■ MAC OS: on your Desktop Download KODAK Software To use this camera!) 3 Turn on the camera. 4 After the software is connected to the computer, the KODAK Software Downloader automatically runs. When you to your computer. Make sure the computer is installed, follow the prompts to...
... the computer, it : ■ WINDOWS OS: in My Computer ■ MAC OS: on your Desktop Download KODAK Software To use this camera!) 3 Turn on the camera. 4 After the software is connected to the computer, the KODAK Software Downloader automatically runs. When you to your computer. Make sure the computer is installed, follow the prompts to...
User guide
Page 11
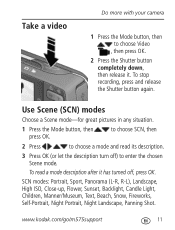
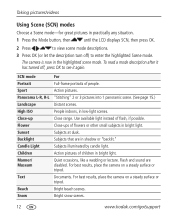
To read its description. 3 Press OK (or let the description turn off , press OK. to choose SCN, then 2 Press to enter the chosen Scene mode. www.kodak.com/go/m575support 11 Use Scene (SCN) modes Choose a Scene mode-for great pictures in any situation. 1 Press the Mode button, then ... Candle Light, Children, Manner/Museum, Text, Beach, Snow, Fireworks, Self-Portrait, Night Portrait, Night Landscape, Panning Shot. Take a video Do more with your camera 1 Press the Mode button, then to choose Video , then press OK. 2 Press the Shutter button completely down, then release it has...
To read its description. 3 Press OK (or let the description turn off , press OK. to choose SCN, then 2 Press to enter the chosen Scene mode. www.kodak.com/go/m575support 11 Use Scene (SCN) modes Choose a Scene mode-for great pictures in any situation. 1 Press the Mode button, then ... Candle Light, Children, Manner/Museum, Text, Beach, Snow, Fireworks, Self-Portrait, Night Portrait, Night Landscape, Panning Shot. Take a video Do more with your camera 1 Press the Mode button, then to choose Video , then press OK. 2 Press the Shutter button completely down, then release it has...
User guide
Page 24
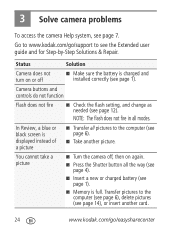
....kodak.com/go /easysharecenter 3 Solve camera problems To access the camera Help system, see page 12). Transfer pictures to see page 14), or insert another picture. Camera buttons and controls do not function Flash does not fire ■ Check the flash setting, and change as needed (see page 7. You cannot take a picture ■ Turn the camera...
....kodak.com/go /easysharecenter 3 Solve camera problems To access the camera Help system, see page 12). Transfer pictures to see page 14), or insert another picture. Camera buttons and controls do not function Flash does not fire ■ Check the flash setting, and change as needed (see page 7. You cannot take a picture ■ Turn the camera...
Extended user guide
Page 5
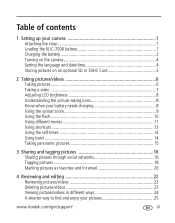
... the strap 1 Loading the KLIC-7006 battery 1 Charging the battery 2 Turning on the camera 4 Setting the language and date/time 4 Storing pictures on an optional SD or SDHC Card 5 2 Taking pictures/videos 6 Taking pictures 6 Taking a video 7 Adjusting LCD brightness 8 ... Reviewing pictures/videos 22 Deleting pictures/videos 23 Viewing pictures/videos in different ways 24 A smarter way to find and enjoy your pictures 25 www.kodak.com/go/support iii
... the strap 1 Loading the KLIC-7006 battery 1 Charging the battery 2 Turning on the camera 4 Setting the language and date/time 4 Storing pictures on an optional SD or SDHC Card 5 2 Taking pictures/videos 6 Taking pictures 6 Taking a video 7 Adjusting LCD brightness 8 ... Reviewing pictures/videos 22 Deleting pictures/videos 23 Viewing pictures/videos in different ways 24 A smarter way to find and enjoy your pictures 25 www.kodak.com/go/support iii
Extended user guide
Page 8
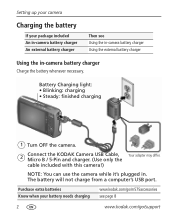
... charger Then see page 8 2 www.kodak.com/go /m575accessories see Using the in-camera battery charger Using the external battery charger Using the in . The battery will not charge from a computer's USB port. Battery Charging light: • Blinking: charging • Steady: finished charging 1 Turn OFF the camera. 2 Connect the KODAK Camera USB Cable, Micro B / 5-Pin and...
... charger Then see page 8 2 www.kodak.com/go /m575accessories see Using the in-camera battery charger Using the external battery charger Using the in . The battery will not charge from a computer's USB port. Battery Charging light: • Blinking: charging • Steady: finished charging 1 Turn OFF the camera. 2 Connect the KODAK Camera USB Cable, Micro B / 5-Pin and...
Extended user guide
Page 10
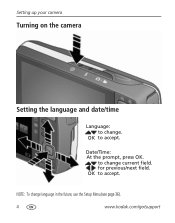
Setting up your camera Turning on the camera Setting the language and date/time Language: to change language in the future, use the Setup Menu (see page 36). 4 www.kodak.com/go/support for previous/next field. NOTE: To change . OK to change current field. to accept. Date/Time: At the prompt, press OK. OK to accept.
Setting up your camera Turning on the camera Setting the language and date/time Language: to change language in the future, use the Setup Menu (see page 36). 4 www.kodak.com/go/support for previous/next field. NOTE: To change . OK to change current field. to accept. Date/Time: At the prompt, press OK. OK to accept.
Extended user guide
Page 11
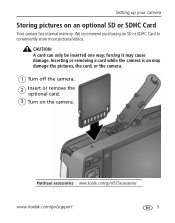
Setting up your camera Storing pictures on the camera. We recommend purchasing an SD or SDHC Card to conveniently store more pictures/videos. CAUTION: A card can only be inserted one way; Inserting or removing a card while the camera is on may cause damage. forcing it may damage the pictures, the card, or the camera. 1 Turn off the camera. 2 Insert or remove the optional card. 3 Turn on an optional SD or SDHC Card Your camera has internal memory. Purchase accessories www.kodak.com/go/m575accessories www.kodak.com/go/support 5
Setting up your camera Storing pictures on the camera. We recommend purchasing an SD or SDHC Card to conveniently store more pictures/videos. CAUTION: A card can only be inserted one way; Inserting or removing a card while the camera is on may cause damage. forcing it may damage the pictures, the card, or the camera. 1 Turn off the camera. 2 Insert or remove the optional card. 3 Turn on an optional SD or SDHC Card Your camera has internal memory. Purchase accessories www.kodak.com/go/m575accessories www.kodak.com/go/support 5

Extended user guide
Page 12
... Press the Shutter button halfway to take the picture. To access your camera's Help system, see page 43. 6 www.kodak.com/go/support Using the framing marks Framing marks Framing marks indicate the camera focus area. 1 Press the Shutter button halfway. NOTE: Multiple framing ...marks may appear when faces are detected. 2 Taking pictures/videos Taking pictures To get clear, focused pictures: 1 The camera turns ...
... Press the Shutter button halfway to take the picture. To access your camera's Help system, see page 43. 6 www.kodak.com/go/support Using the framing marks Framing marks Framing marks indicate the camera focus area. 1 Press the Shutter button halfway. NOTE: Multiple framing ...marks may appear when faces are detected. 2 Taking pictures/videos Taking pictures To get clear, focused pictures: 1 The camera turns ...
Extended user guide
Page 17
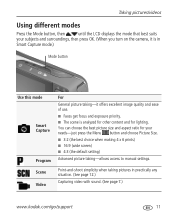
... and for lighting. You can choose the best picture size and aspect ratio for your subjects and surroundings, then press OK. (When you turn on the camera, it offers excellent image quality and ease of use. ■ Faces get focus and exposure priority. ■ The scene is in practically... any situation. (See page 12.) Capturing video with sound. (See page 7.) www.kodak.com/go/support 11 Point-and-shoot simplicity when taking pictures in...
... and for lighting. You can choose the best picture size and aspect ratio for your subjects and surroundings, then press OK. (When you turn on the camera, it offers excellent image quality and ease of use. ■ Faces get focus and exposure priority. ■ The scene is in practically... any situation. (See page 12.) Capturing video with sound. (See page 7.) www.kodak.com/go/support 11 Point-and-shoot simplicity when taking pictures in...
Extended user guide
Page 18
... to see it has turned off ) to enter the highlighted Scene mode. Flash and sound are in the highlighted scene mode. Sunset Subjects at dusk. Taking pictures/videos Using Scene (SCN) modes Choose a Scene mode-for great pictures in low-light scenes. For best results, place the camera on a steady surface ...or tripod. Snow Bright snow scenes. 12 www.kodak.com/go/support
... to see it has turned off ) to enter the highlighted Scene mode. Flash and sound are in the highlighted scene mode. Sunset Subjects at dusk. Taking pictures/videos Using Scene (SCN) modes Choose a Scene mode-for great pictures in low-light scenes. For best results, place the camera on a steady surface ...or tripod. Snow Bright snow scenes. 12 www.kodak.com/go/support
Extended user guide
Page 20
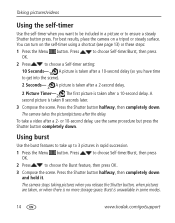
...8 seconds later. 3 Compose the scene. Press the Shutter button halfway, then completely down . The camera takes the picture/pictures after a 2- Using burst Use the burst features to take a video after ... 2 Picture Timer-2x The first picture is unavailable in rapid succession. 1 Press the Menu button. You can turn on a tripod or steady surface. Burst is taken after a 10-second delay (so you have time to... to be included in a picture or to 3 pictures in some modes. 14 www.kodak.com/go/support A second picture is no more storage space. or 10-second delay,...
...8 seconds later. 3 Compose the scene. Press the Shutter button halfway, then completely down . The camera takes the picture/pictures after a 2- Using burst Use the burst features to take a video after ... 2 Picture Timer-2x The first picture is unavailable in rapid succession. 1 Press the Menu button. You can turn on a tripod or steady surface. Burst is taken after a 10-second delay (so you have time to... to be included in a picture or to 3 pictures in some modes. 14 www.kodak.com/go/support A second picture is no more storage space. or 10-second delay,...
Extended user guide
Page 24
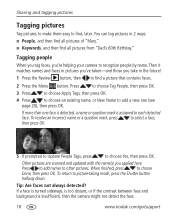
..., press to other pictures. Press to add names to choose Yes, then press OK. Tip: Are faces not always detected? If a face is turned sideways, is too distant, or if the contrast between face and background is assigned to each detected face. Other pictures are scanned and updated with... the name(s) you 're helping your camera to add a new one face is detected, a name or question mark is insufficient, then the camera might not detect the face. 18 www.kodak.com/go/support To return to choose Done, then press OK. Then it ...
..., press to other pictures. Press to add names to choose Yes, then press OK. Tip: Are faces not always detected? If a face is turned sideways, is too distant, or if the contrast between face and background is assigned to each detected face. Other pictures are scanned and updated with... the name(s) you 're helping your camera to add a new one face is detected, a name or question mark is insufficient, then the camera might not detect the face. 18 www.kodak.com/go/support To return to choose Done, then press OK. Then it ...
Extended user guide
Page 36
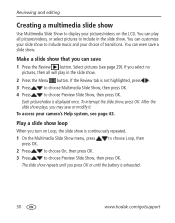
... a slide show loop When you select no pictures, then all will play all pictures/videos, or select pictures to display your camera's Help system, see page 29). If you turn on the LCD. To interrupt the slide show Use Multimedia Slide Show to include in the slide show plays, you press OK... or until the battery is continuously repeated. 1 On the Multimedia Slide Show menu, press press OK. You can play in the slide show is exhausted. 30 www.kodak...
... a slide show loop When you select no pictures, then all will play all pictures/videos, or select pictures to display your camera's Help system, see page 29). If you turn on the LCD. To interrupt the slide show Use Multimedia Slide Show to include in the slide show plays, you press OK... or until the battery is continuously repeated. 1 On the Multimedia Slide Show menu, press press OK. You can play in the slide show is exhausted. 30 www.kodak...
Extended user guide
Page 38
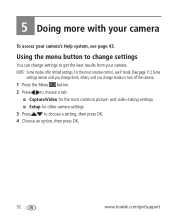
...Using the menu button to change settings You can change modes or turn off the camera. 1 Press the Menu button. 2 Press to choose a tab: ■ Capture/Video for other camera settings 3 Press to get the best results from your camera's Help system, see page 43. others, until you change settings... to choose a setting, then press OK. 4 Choose an option, then press OK. 32 www.kodak.com/go/support NOTE: Some modes ...
...Using the menu button to change settings You can change modes or turn off the camera. 1 Press the Menu button. 2 Press to choose a tab: ■ Capture/Video for other camera settings 3 Press to get the best results from your camera's Help system, see page 43. others, until you change settings... to choose a setting, then press OK. 4 Choose an option, then press OK. 32 www.kodak.com/go/support NOTE: Some modes ...
Extended user guide
Page 45
... automatically runs. When you to the Internet. Download KODAK Software later www.kodak.com/go /support 39 Follow the prompts to download and install KODAK Software.* 1 Turn off the camera. 2 Use the KODAK Camera USB Cable, Micro B / 5-Pin to connect camera to computer. (Use only the cable included with this camera on your computer. NOTE: * If the downloader does...
... automatically runs. When you to the Internet. Download KODAK Software later www.kodak.com/go /support 39 Follow the prompts to download and install KODAK Software.* 1 Turn off the camera. 2 Use the KODAK Camera USB Cable, Micro B / 5-Pin to connect camera to computer. (Use only the cable included with this camera on your computer. NOTE: * If the downloader does...

Extended user guide
Page 46
....) All Pictures-Print all pictures in internal memory or on the camera. Printing from the camera to redisplay it. 2 Choose a printing option, then press OK. Connecting the camera to a KODAK All-in -One Printer 1 Turn on the printer. To transfer pictures to your printer is displayed.)... If the menu turns off the camera and printer. 2 Connect the appropriate USB cable from a KODAK All-in -One Printer 1 Turn off , press any button to the...
....) All Pictures-Print all pictures in internal memory or on the camera. Printing from the camera to redisplay it. 2 Choose a printing option, then press OK. Connecting the camera to a KODAK All-in -One Printer 1 Turn on the printer. To transfer pictures to your printer is displayed.)... If the menu turns off the camera and printer. 2 Connect the appropriate USB cable from a KODAK All-in -One Printer 1 Turn off , press any button to the...
Extended user guide
Page 49
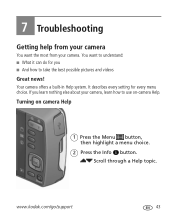
You want the most from your camera You want to understand: ■ What it can do for every menu choice. Scroll through a Help topic. If you ■ And how to take the best possible pictures and videos Great news! Your camera offers a built-in Help system. www.kodak.com/go/support 43 It describes every setting for you learn nothing else about your camera, learn how to use on camera Help 1 Press the Menu button, then highlight a menu choice. 2 Press the Info button. 7 Troubleshooting Getting help from your camera. Turning on -camera Help.
You want the most from your camera You want to understand: ■ What it can do for every menu choice. Scroll through a Help topic. If you ■ And how to take the best possible pictures and videos Great news! Your camera offers a built-in Help system. www.kodak.com/go/support 43 It describes every setting for you learn nothing else about your camera, learn how to use on camera Help 1 Press the Menu button, then highlight a menu choice. 2 Press the Info button. 7 Troubleshooting Getting help from your camera. Turning on -camera Help.


