User guide
Page 2
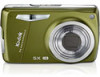
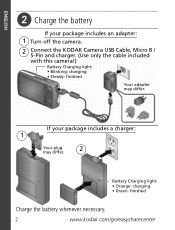
ENGLISH ᕢ Charge the battery If your package includes a charger: 1 Your plug may differ. If your package includes an adapter: 1 Turn off the camera. 2 Connect the KODAK Camera USB Cable, Micro B / 5-Pin and charger. (Use only the cable included with this camera!) Battery Charging light: • Blinking: charging • Steady: finished Your adapter may differ. 2 Battery Charging light: • Orange: charging • Green: finished Charge the battery whenever necessary. 2 www.kodak.com/go/easysharecenter
ENGLISH ᕢ Charge the battery If your package includes a charger: 1 Your plug may differ. If your package includes an adapter: 1 Turn off the camera. 2 Connect the KODAK Camera USB Cable, Micro B / 5-Pin and charger. (Use only the cable included with this camera!) Battery Charging light: • Blinking: charging • Steady: finished Your adapter may differ. 2 Battery Charging light: • Orange: charging • Green: finished Charge the battery whenever necessary. 2 www.kodak.com/go/easysharecenter
User guide
Page 3
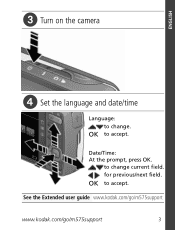
to change . OK to accept. OK to accept. for previous/next field. See the Extended user guide www.kodak.com/go/m575support www.kodak.com/go/m575support 3 Date/Time: At the prompt, press OK. ENGLISH ᕣ Turn on the camera ᕤ Set the language and date/time Language: to change current field.
to change . OK to accept. OK to accept. for previous/next field. See the Extended user guide www.kodak.com/go/m575support www.kodak.com/go/m575support 3 Date/Time: At the prompt, press OK. ENGLISH ᕣ Turn on the camera ᕤ Set the language and date/time Language: to change current field.
User guide
Page 4
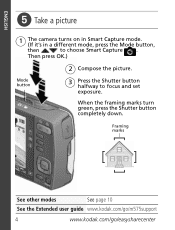
When the framing marks turn green, press the Shutter button completely down. ENGLISH ᕥ Take a picture 1 The camera turns on in Smart Capture mode. (If it's in a different mode, press the Mode button, then to focus and set exposure. Framing marks See other modes See page 10 See the Extended user guide www.kodak.com/go/m575support 4 www.kodak.com/go/easysharecenter Then press OK.) Mode button 2 Compose the picture. 3 Press the Shutter button halfway to choose Smart Capture .
When the framing marks turn green, press the Shutter button completely down. ENGLISH ᕥ Take a picture 1 The camera turns on in Smart Capture mode. (If it's in a different mode, press the Mode button, then to focus and set exposure. Framing marks See other modes See page 10 See the Extended user guide www.kodak.com/go/m575support 4 www.kodak.com/go/easysharecenter Then press OK.) Mode button 2 Compose the picture. 3 Press the Shutter button halfway to choose Smart Capture .

User guide
Page 6
...install KODAK Software. 1 Turn off the camera. 2 Use the KODAK Camera USB Cable, Micro B / 5-Pin to connect camera to computer. (Use only the cable included with this camera on more than one computer www.kodak.com/go/camerasw See the Extended user guide at www.kodak.com/go/m575support 6 www.kodak....ENGLISH ᕧ Download software, transfer pictures When you connect the camera to the computer, it : ■ WINDOWS OS: in My Computer ■ MAC OS: on your Desktop Download KODAK Software To use this camera!) 3 Turn on the camera. 4 After the software is connected to the Internet. When ...
...install KODAK Software. 1 Turn off the camera. 2 Use the KODAK Camera USB Cable, Micro B / 5-Pin to connect camera to computer. (Use only the cable included with this camera on more than one computer www.kodak.com/go/camerasw See the Extended user guide at www.kodak.com/go/m575support 6 www.kodak....ENGLISH ᕧ Download software, transfer pictures When you connect the camera to the computer, it : ■ WINDOWS OS: in My Computer ■ MAC OS: on your Desktop Download KODAK Software To use this camera!) 3 Turn on the camera. 4 After the software is connected to the Internet. When ...
User guide
Page 7
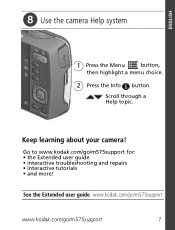
ENGLISH ᕨ Use the camera Help system 1 Press the Menu button, then highlight a menu choice. 2 Press the Info button. Keep learning about your camera! Go to www.kodak.com/go /m575support 7 Scroll through a Help topic. See the Extended user guide www.kodak.com/go/m575support www.kodak.com/go /m575support for: • the Extended user guide • interactive troubleshooting and repairs • interactive tutorials • and more!
ENGLISH ᕨ Use the camera Help system 1 Press the Menu button, then highlight a menu choice. 2 Press the Info button. Keep learning about your camera! Go to www.kodak.com/go /m575support 7 Scroll through a Help topic. See the Extended user guide www.kodak.com/go/m575support www.kodak.com/go /m575support for: • the Extended user guide • interactive troubleshooting and repairs • interactive tutorials • and more!
User guide
Page 10
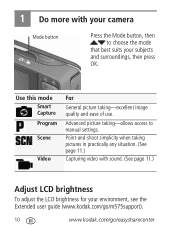
Point-and-shoot simplicity when taking pictures in practically any situation. (See page 11.) Capturing video with your camera Mode button Press the Mode button, then to manual settings. Advanced picture taking -excellent image quality and ease of use. Use this mode Smart ...Scene Video For General picture taking -allows access to choose the mode that best suits your environment, see the Extended user guide (www.kodak.com/go/m575support). 10 www.kodak.com/go/easysharecenter 1 Do more with sound. (See page 11.) Adjust LCD brightness To adjust the LCD brightness for your subjects and...
Point-and-shoot simplicity when taking pictures in practically any situation. (See page 11.) Capturing video with your camera Mode button Press the Mode button, then to manual settings. Advanced picture taking -excellent image quality and ease of use. Use this mode Smart ...Scene Video For General picture taking -allows access to choose the mode that best suits your environment, see the Extended user guide (www.kodak.com/go/m575support). 10 www.kodak.com/go/easysharecenter 1 Do more with sound. (See page 11.) Adjust LCD brightness To adjust the LCD brightness for your subjects and...
User guide
Page 11
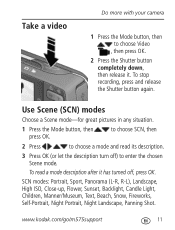
www.kodak.com/go/m575support 11 Use Scene (SCN) modes Choose a Scene mode-for great pictures in any situation. 1 Press the Mode button, then press OK. To ..., Sunset, Backlight, Candle Light, Children, Manner/Museum, Text, Beach, Snow, Fireworks, Self-Portrait, Night Portrait, Night Landscape, Panning Shot. Take a video Do more with your camera 1 Press the Mode button, then to choose a mode and read a mode description after it .
www.kodak.com/go/m575support 11 Use Scene (SCN) modes Choose a Scene mode-for great pictures in any situation. 1 Press the Mode button, then press OK. To ..., Sunset, Backlight, Candle Light, Children, Manner/Museum, Text, Beach, Snow, Fireworks, Self-Portrait, Night Portrait, Night Landscape, Panning Shot. Take a video Do more with your camera 1 Press the Mode button, then to choose a mode and read a mode description after it .
User guide
Page 12
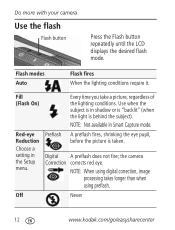
...lighting conditions require it. Preflash A preflash fires, shrinking the eye pupil, before the picture is behind the subject). NOTE: When using digital correction, image processing takes longer than when using preflash. Fill (Flash On) Every time you take a picture, regardless of the lighting... conditions. Do more with your camera Use the flash Flash button Press the Flash button repeatedly until the LCD displays the desired flash mode. the camera Correction corrects red eye. Off Never 12 www.kodak.com/go/easysharecenter
...lighting conditions require it. Preflash A preflash fires, shrinking the eye pupil, before the picture is behind the subject). NOTE: When using digital correction, image processing takes longer than when using preflash. Fill (Flash On) Every time you take a picture, regardless of the lighting... conditions. Do more with your camera Use the flash Flash button Press the Flash button repeatedly until the LCD displays the desired flash mode. the camera Correction corrects red eye. Off Never 12 www.kodak.com/go/easysharecenter

User guide
Page 13
The shortcuts appear. Shortcuts www.kodak.com/go/m575support Press to frame your subject. 2 To zoom in different modes.) 3 Press to the most popular capture and review functions: 1 Press the Info button. Do more with your camera Use the optical zoom 1 Use the LCD to show/hide shortcuts. 13 To zoom out, press... like Exposure Compensation, Self-timer, and Auto focus. (You'll see different functions in , press Telephoto (T). For quick access to choose a setting. Use shortcuts Your camera has a clean, uncluttered interface.
The shortcuts appear. Shortcuts www.kodak.com/go/m575support Press to frame your subject. 2 To zoom in different modes.) 3 Press to the most popular capture and review functions: 1 Press the Info button. Do more with your camera Use the optical zoom 1 Use the LCD to show/hide shortcuts. 13 To zoom out, press... like Exposure Compensation, Self-timer, and Auto focus. (You'll see different functions in , press Telephoto (T). For quick access to choose a setting. Use shortcuts Your camera has a clean, uncluttered interface.
User guide
Page 14
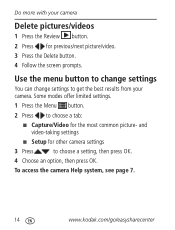
...then press OK. and video-taking settings ■ Setup for the most common picture- To access the camera Help system, see page 7. 14 www.kodak.com/go/easysharecenter Do more with your camera. Some modes offer limited settings. 1 Press the Menu button. 2 Press to choose a tab: &#...9632; Capture/Video for other camera settings 3 Press to get the best results from your camera Delete pictures/videos 1 Press the...
...then press OK. and video-taking settings ■ Setup for the most common picture- To access the camera Help system, see page 7. 14 www.kodak.com/go/easysharecenter Do more with your camera. Some modes offer limited settings. 1 Press the Menu button. 2 Press to choose a tab: &#...9632; Capture/Video for other camera settings 3 Press to get the best results from your camera Delete pictures/videos 1 Press the...

User guide
Page 15
Do more with your camera Understand the picture-taking icons Focus mode Self timer/Burst Exposure compensation Flash mode Capture mode Pictures/time remaining Zoom slider Keyword tag Understand the review icons Video duration Select picture/video Add text tag View thumbnails Play video Upload Favorite Text tag Battery level Print/number of prints Protected Email Picture/Video number Battery level www.kodak.com/go/m575support 15
Do more with your camera Understand the picture-taking icons Focus mode Self timer/Burst Exposure compensation Flash mode Capture mode Pictures/time remaining Zoom slider Keyword tag Understand the review icons Video duration Select picture/video Add text tag View thumbnails Play video Upload Favorite Text tag Battery level Print/number of prints Protected Email Picture/Video number Battery level www.kodak.com/go/m575support 15
User guide
Page 16
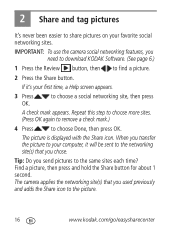
...social networking site, then press A check mark appears. Tip: Do you used previously and adds the Share icon to the picture. 16 www.kodak.com/go/easysharecenter 2 Share and tag pictures It's never been easier to share pictures on your first time, a Help screen appears. 3 Press OK.... The camera applies the networking site(s) that you need to download KODAK Software. (See page 6.) 1 Press the Review button, then to the same sites each time? The picture is displayed ...
...social networking site, then press A check mark appears. Tip: Do you used previously and adds the Share icon to the picture. 16 www.kodak.com/go/easysharecenter 2 Share and tag pictures It's never been easier to share pictures on your first time, a Help screen appears. 3 Press OK.... The camera applies the networking site(s) that you need to download KODAK Software. (See page 6.) 1 Press the Review button, then to the same sites each time? The picture is displayed ...

User guide
Page 17
To access the camera Help system, see page 7. When you are in Review and press the Share button, your favorite sites appear. 1 In Review, press the Menu button. 2 Press ... down. To return to choose Show/Hide. Share and tag pictures Choose networking sites to show You can show/hide social networking sites on your camera so that only your chosen sites appear. Repeat this step for each network. 4 When finished, press to choose Done, then press OK. www...
To access the camera Help system, see page 7. When you are in Review and press the Share button, your favorite sites appear. 1 In Review, press the Menu button. 2 Press ... down. To return to choose Show/Hide. Share and tag pictures Choose networking sites to show You can show/hide social networking sites on your camera so that only your chosen sites appear. Repeat this step for each network. 4 When finished, press to choose Done, then press OK. www...
User guide
Page 18
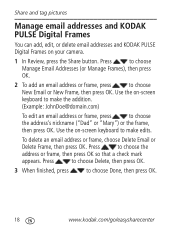
...the address's nickname ("Dad" or "Mary") or the frame, then press OK. Use the on-screen keyboard to make edits. Use the on your camera. 1 In Review, press the Share button. Press to make the addition. (Example: [email protected]) To edit an email address or frame, ...press to choose Done, then press OK. 18 www.kodak.com/go/easysharecenter Share and tag pictures Manage email addresses and KODAK PULSE Digital Frames You can add, edit, or delete email addresses and KODAK PULSE Digital Frames on -screen keyboard to choose the address or frame, then press...
...the address's nickname ("Dad" or "Mary") or the frame, then press OK. Use the on-screen keyboard to make edits. Use the on your camera. 1 In Review, press the Share button. Press to make the addition. (Example: [email protected]) To edit an email address or frame, ...press to choose Done, then press OK. 18 www.kodak.com/go/easysharecenter Share and tag pictures Manage email addresses and KODAK PULSE Digital Frames You can add, edit, or delete email addresses and KODAK PULSE Digital Frames on -screen keyboard to choose the address or frame, then press...

User guide
Page 19
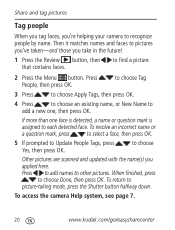
..., then press OK. You can tag pictures in 2 ways: ■ People, and then find all pictures of "Mary." ■ Keywords, and then find , later. www.kodak.com/go/m575support 19 Tag pictures Tag pictures to make them easy to find all faces that match this one. The name is assigned to... need it. 1 Press to choose a letter, then press OK. 2 When finished, press to choose OK, then press OK. 3 If you've added a new name, the camera prompts you to update all faces to all pictures from "Dad's 60th Birthday."
..., then press OK. You can tag pictures in 2 ways: ■ People, and then find all pictures of "Mary." ■ Keywords, and then find , later. www.kodak.com/go/m575support 19 Tag pictures Tag pictures to make them easy to find all faces that match this one. The name is assigned to... need it. 1 Press to choose a letter, then press OK. 2 When finished, press to choose OK, then press OK. 3 If you've added a new name, the camera prompts you to update all faces to all pictures from "Dad's 60th Birthday."
User guide
Page 20
... , then press OK. When finished, press to recognize people by name. Share and tag pictures Tag people When you tag faces, you're helping your camera to choose Done, then press OK. To resolve an incorrect name or a question mark, press to select a face, then press OK. 5 If prompted to other... pictures. Press to add names to Update People Tags, press Yes, then press OK. To access the camera Help system, see page 7. 20 www.kodak.com/go/easysharecenter Press People, then press OK.
... , then press OK. When finished, press to recognize people by name. Share and tag pictures Tag people When you tag faces, you're helping your camera to choose Done, then press OK. To resolve an incorrect name or a question mark, press to select a face, then press OK. 5 If prompted to other... pictures. Press to add names to Update People Tags, press Yes, then press OK. To access the camera Help system, see page 7. 20 www.kodak.com/go/easysharecenter Press People, then press OK.
User guide
Page 21
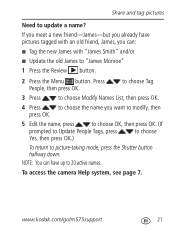
To access the camera Help system, see page 7. www.kodak.com/go/m575support 21 Press People, then press OK. NOTE: You can have pictures tagged with an old friend, James, you can: ■ Tag the ...
To access the camera Help system, see page 7. www.kodak.com/go/m575support 21 Press People, then press OK. NOTE: You can have pictures tagged with an old friend, James, you can: ■ Tag the ...
User guide
Page 22
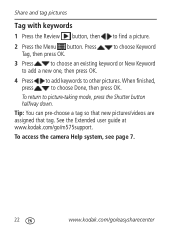
... to picture-taking mode, press the Shutter button halfway down. To return to choose Done, then press OK. See the Extended user guide at www.kodak.com/go /easysharecenter Tip: You can pre-choose a tag so that new pictures/videos are assigned that tag. Share and tag pictures Tag with keywords... add a new one, then press OK. 4 Press to add keywords to find a picture. 2 Press the Menu button. Press Tag, then press OK. To access the camera Help system, see page 7. 22 www.kodak.com/go /m575support.
... to picture-taking mode, press the Shutter button halfway down. To return to choose Done, then press OK. See the Extended user guide at www.kodak.com/go /easysharecenter Tip: You can pre-choose a tag so that new pictures/videos are assigned that tag. Share and tag pictures Tag with keywords... add a new one, then press OK. 4 Press to add keywords to find a picture. 2 Press the Menu button. Press Tag, then press OK. To access the camera Help system, see page 7. 22 www.kodak.com/go /m575support.
User guide
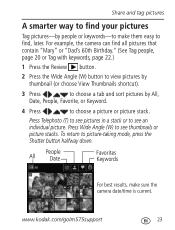
Page 23
...a stack or to see thumbnails or picture stacks. Press Wide Angle (W) to choose a picture or picture stack. To return to find, later. www.kodak.com/go/m575support 23 Share and tag pictures A smarter way to find your pictures Tag pictures-by All, Date, People, Favorite, or Keyword. 4 ...pictures by thumbnail (or choose View Thumbnails shortcut). 3 Press to choose a tab and sort pictures by people or keywords-to make sure the camera date/time is current. People All Date Favorites Keywords For best results, make them easy to picture-taking mode, press the Shutter button halfway ...
...a stack or to see thumbnails or picture stacks. Press Wide Angle (W) to choose a picture or picture stack. To return to find, later. www.kodak.com/go/m575support 23 Share and tag pictures A smarter way to find your pictures Tag pictures-by All, Date, People, Favorite, or Keyword. 4 ...pictures by thumbnail (or choose View Thumbnails shortcut). 3 Press to choose a tab and sort pictures by people or keywords-to make sure the camera date/time is current. People All Date Favorites Keywords For best results, make them easy to picture-taking mode, press the Shutter button halfway ...
User guide
Page 24
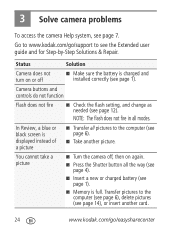
...6), delete pictures (see the Extended user guide and for Step-by-Step Solutions & Repair. Go to www.kodak.com/go/support to the computer (see page 1). Camera buttons and controls do not function Flash does not fire ■ Check the flash setting, and change as needed... battery (see page 1). ■ Memory is charged and installed correctly (see page 6). ■ Take another card. 24 www.kodak.com/go/easysharecenter 3 Solve camera problems To access the camera Help system, see page 12). In Review, a blue or black screen is displayed instead of a picture ■ Transfer all ...
...6), delete pictures (see the Extended user guide and for Step-by-Step Solutions & Repair. Go to www.kodak.com/go/support to the computer (see page 1). Camera buttons and controls do not function Flash does not fire ■ Check the flash setting, and change as needed... battery (see page 1). ■ Memory is charged and installed correctly (see page 6). ■ Take another card. 24 www.kodak.com/go/easysharecenter 3 Solve camera problems To access the camera Help system, see page 12). In Review, a blue or black screen is displayed instead of a picture ■ Transfer all ...


