

User Manual
Page 1
Battery Charging light: • Blinking: charging • Steady: finished charging KLIC-7003 battery 2 Connect the KODAK USB Cable, Model U-8. After installing the software, return to this user guide. ᕢ Loading and charging the battery 1 Turn OFF the camera. See the Extended user guide www.kodak.com/go/m420support www.kodak.com/go/m420support 1 Follow the on-screen instructions. ENGLISH ᕡ Installing the software Before connecting any cables, install the software that was included with your camera.
Battery Charging light: • Blinking: charging • Steady: finished charging KLIC-7003 battery 2 Connect the KODAK USB Cable, Model U-8. After installing the software, return to this user guide. ᕢ Loading and charging the battery 1 Turn OFF the camera. See the Extended user guide www.kodak.com/go/m420support www.kodak.com/go/m420support 1 Follow the on-screen instructions. ENGLISH ᕡ Installing the software Before connecting any cables, install the software that was included with your camera.
User Manual
Page 2
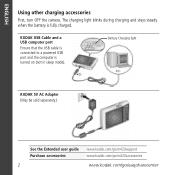
KODAK USB Cable and a USB computer port Ensure that the USB cable is connected to a powered USB port and the computer is fully charged. The charging light blinks during charging and stays steady when the battery is turned on (not in sleep mode). Battery Charging light KODAK 5V AC Adapter (May be sold separately.) See the Extended user guide Purchase accessories www.kodak.com/go/m420support www.kodak.com/go/m420accessories 2 www.kodak.com/go/easysharecenter ENGLISH Using other charging accessories First, turn OFF the camera.
KODAK USB Cable and a USB computer port Ensure that the USB cable is connected to a powered USB port and the computer is fully charged. The charging light blinks during charging and stays steady when the battery is turned on (not in sleep mode). Battery Charging light KODAK 5V AC Adapter (May be sold separately.) See the Extended user guide Purchase accessories www.kodak.com/go/m420support www.kodak.com/go/m420accessories 2 www.kodak.com/go/easysharecenter ENGLISH Using other charging accessories First, turn OFF the camera.
User Manual
Page 3
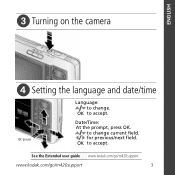
Date/Time: At the prompt, press OK. to change . See the Extended user guide www.kodak.com/go/m420support www.kodak.com/go/m420support 3 for previous/next field. OK to accept. OK to accept. ENGLISH ᕣ Turning on the camera ᕤ Setting the language and date/time OK (press) Language: to change current field.
Date/Time: At the prompt, press OK. to change . See the Extended user guide www.kodak.com/go/m420support www.kodak.com/go/m420support 3 for previous/next field. OK to accept. OK to accept. ENGLISH ᕣ Turning on the camera ᕤ Setting the language and date/time OK (press) Language: to change current field.

User Manual
Page 4
See the Extended user guide www.kodak.com/go/m420support 4 www.kodak.com/go/easysharecenter ENGLISH ᕥ Taking a picture 1 Slide the Mode switch to focus and set exposure. Framing marks To learn more about Smart Capture and other modes, see page 11. Compose the picture. 2 Press the Shutter button halfway to Smart Capture. When the framing marks turn green, press the Shutter button completely down.
See the Extended user guide www.kodak.com/go/m420support 4 www.kodak.com/go/easysharecenter ENGLISH ᕥ Taking a picture 1 Slide the Mode switch to focus and set exposure. Framing marks To learn more about Smart Capture and other modes, see page 11. Compose the picture. 2 Press the Shutter button halfway to Smart Capture. When the framing marks turn green, press the Shutter button completely down.

User Manual
Page 7
... it can do for every menu choice. If you become. 1 Press the Menu button, then highlight a menu choice. 2 Press the Info button. Your camera offers a built-in Help system. ENGLISH ᕨ Getting help from your camera. You want the most from your camera You want to use on-camera Help. Scroll through a Help topic See the Extended user guide www.kodak.com/go/m420support www.kodak.com/go/m420support 7
... it can do for every menu choice. If you become. 1 Press the Menu button, then highlight a menu choice. 2 Press the Info button. Your camera offers a built-in Help system. ENGLISH ᕨ Getting help from your camera. You want the most from your camera You want to use on-camera Help. Scroll through a Help topic See the Extended user guide www.kodak.com/go/m420support www.kodak.com/go/m420support 7

User Manual
Page 8
... user guide • interactive troubleshooting and repairs • interactive tutorials • FAQs • downloads • accessories • printing information • product registration See the Extended user guide www.kodak.com/go/m420support 8 www.kodak.com/go/easysharecenter ENGLISH ᕩ Keep learning about your best pictures! Finish reading this book, so you can take and share your camera! Congratulations! You have: • set up your camera • taken pictures • transferred pictures...
... user guide • interactive troubleshooting and repairs • interactive tutorials • FAQs • downloads • accessories • printing information • product registration See the Extended user guide www.kodak.com/go/m420support 8 www.kodak.com/go/easysharecenter ENGLISH ᕩ Keep learning about your best pictures! Finish reading this book, so you can take and share your camera! Congratulations! You have: • set up your camera • taken pictures • transferred pictures...

User Manual
Page 11
... recording, press and release the Shutter button again. 1 Doing more with sound. Scene Point-and-shoot simplicity when taking -it . You can choose the best picture size and aspect ratio for your subjects and surroundings. Mode switch Use this mode Smart Capture Video For General picture taking pictures in practically any situation. (See page 12.) Taking a video 1 Slide the Mode switch to the mode that best suits your needs-just press the Menu button...
... recording, press and release the Shutter button again. 1 Doing more with sound. Scene Point-and-shoot simplicity when taking -it . You can choose the best picture size and aspect ratio for your subjects and surroundings. Mode switch Use this mode Smart Capture Video For General picture taking pictures in practically any situation. (See page 12.) Taking a video 1 Slide the Mode switch to the mode that best suits your needs-just press the Menu button...
User Manual
Page 12
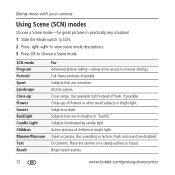
... Landscape Close-up Flower Sunset Backlight Candle Light Children Manner/Museum Text Beach For Advanced picture taking-allows more with your camera Using Scene (SCN) modes Choose a Scene mode-for great pictures in practically any situation! 1 Slide the Mode switch to SCN. 2 Press to view scene mode descriptions. 3 Press OK to manual settings. Full-frame portraits of flash, if possible. Distant scenes. Subjects at dusk...
... Landscape Close-up Flower Sunset Backlight Candle Light Children Manner/Museum Text Beach For Advanced picture taking-allows more with your camera Using Scene (SCN) modes Choose a Scene mode-for great pictures in practically any situation! 1 Slide the Mode switch to SCN. 2 Press to view scene mode descriptions. 3 Press OK to manual settings. Full-frame portraits of flash, if possible. Distant scenes. Subjects at dusk...

User Manual
Page 13
.... Self-Portrait Close-ups of motion; Panning Capturing the illusion of yourself. Digital zoom is blurry. Doing more with your camera SCN mode For Snow Bright snow scenes. Place the camera on a steady surface or tripod. To use the 5X digital zoom in Smart Capture mode. High ISO People indoors, in low-light scenes. www.kodak.com/go/m420support 13 In picture-taking mode, press Telephoto (T). Flash does...
.... Self-Portrait Close-ups of motion; Panning Capturing the illusion of yourself. Digital zoom is blurry. Doing more with your camera SCN mode For Snow Bright snow scenes. Place the camera on a steady surface or tripod. To use the 5X digital zoom in Smart Capture mode. High ISO People indoors, in low-light scenes. www.kodak.com/go/m420support 13 In picture-taking mode, press Telephoto (T). Flash does...
User Manual
Page 14
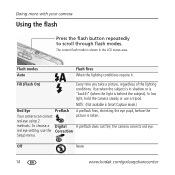
... time you take a picture, regardless of the lighting conditions. red eye setting, use a tripod. Flash modes Auto Flash fires When the lighting conditions require it. Use when the subject is in shadow or is "backlit" (when the light is taken. NOTE: (Not available in the LCD status area. The current flash mode is shown in Smart Capture mode.) Red Eye Preflash A preflash fires, shrinking the eye pupil, before the Your camera can correct picture...
... time you take a picture, regardless of the lighting conditions. red eye setting, use a tripod. Flash modes Auto Flash fires When the lighting conditions require it. Use when the subject is in shadow or is "backlit" (when the light is taken. NOTE: (Not available in the LCD status area. The current flash mode is shown in Smart Capture mode.) Red Eye Preflash A preflash fires, shrinking the eye pupil, before the Your camera can correct picture...
User Manual
Page 15
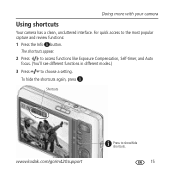
For quick access to choose a setting. The shortcuts appear. 2 Press to access functions like Exposure Compensation, Self-timer, and Auto focus. (You'll see different functions in different modes.) 3 Press to the most popular capture and review functions: 1 Press the Info button. Doing more with your camera Using shortcuts Your camera has a clean, uncluttered interface. To hide the shortcuts again, press . Shortcuts www.kodak.com/go/m420support Press to show/hide shortcuts. 15
For quick access to choose a setting. The shortcuts appear. 2 Press to access functions like Exposure Compensation, Self-timer, and Auto focus. (You'll see different functions in different modes.) 3 Press to the most popular capture and review functions: 1 Press the Info button. Doing more with your camera Using shortcuts Your camera has a clean, uncluttered interface. To hide the shortcuts again, press . Shortcuts www.kodak.com/go/m420support Press to show/hide shortcuts. 15
User Manual
Page 16
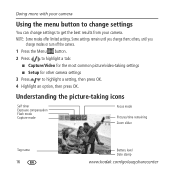
... camera Using the menu button to change settings You can change them; others, until you change modes or turn off the camera. 1 Press the Menu button. 2 Press to highlight a tab: ■ Capture/Video for other camera settings 3 Press to get the best results from your camera. Understanding the picture-taking settings ■ Setup for the most common picture/video-taking icons Self timer Exposure compensation Flash mode Capture mode Focus mode Pictures/time remaining Zoom slider Tag name 16 Battery level Date stamp www.kodak.com/go/easysharecenter NOTE: Some modes...
... camera Using the menu button to change settings You can change them; others, until you change modes or turn off the camera. 1 Press the Menu button. 2 Press to highlight a tab: ■ Capture/Video for other camera settings 3 Press to get the best results from your camera. Understanding the picture-taking settings ■ Setup for the most common picture/video-taking icons Self timer Exposure compensation Flash mode Capture mode Focus mode Pictures/time remaining Zoom slider Tag name 16 Battery level Date stamp www.kodak.com/go/easysharecenter NOTE: Some modes...

User Manual
Page 17
www.kodak.com/go/m420support 17 Then press the Telephoto (T) button. ■ Press the Shutter button halfway down to return to highlight it. The camera shows the last picture that was taken. 2 Press the Wide Angle (W) button to view pictures/videos as thumbnails 1 Press the Review button. 2 Working with pictures/videos Deleting pictures/videos 1 Press the Review button. 2 Press for previous/next picture/video. 3 Press the Delete button. 4 Follow the screen prompts. Viewing pictures as thumbnails. (Press it...
www.kodak.com/go/m420support 17 Then press the Telephoto (T) button. ■ Press the Shutter button halfway down to return to highlight it. The camera shows the last picture that was taken. 2 Press the Wide Angle (W) button to view pictures/videos as thumbnails 1 Press the Review button. 2 Working with pictures/videos Deleting pictures/videos 1 Press the Review button. 2 Press for previous/next picture/video. 3 Press the Delete button. 4 Follow the screen prompts. Viewing pictures as thumbnails. (Press it...

User Manual
Page 18
... replace the original picture or to save the enhanced picture as a new one. ■ Press the Shutter button halfway down to return to view other parts of the picture. 3 Press OK. The enhancement is already applied.) 1 Press the Review button, then for previous/next picture. 2 Press the Menu button, then to which PERFECT TOUCH Technology is previewed. Working with pictures/videos Using KODAK PERFECT TOUCH Technology KODAK PERFECT TOUCH Technology helps...
... replace the original picture or to save the enhanced picture as a new one. ■ Press the Shutter button halfway down to return to view other parts of the picture. 3 Press OK. The enhancement is already applied.) 1 Press the Review button, then for previous/next picture. 2 Press the Menu button, then to which PERFECT TOUCH Technology is previewed. Working with pictures/videos Using KODAK PERFECT TOUCH Technology KODAK PERFECT TOUCH Technology helps...

User Manual
Page 19
Working with pictures/videos Understanding the review icons Video duration Print tag/number of prints Protected Email tag Picture/Video number Shortcuts* Select picture Add text tag View multi-up Play video Upload tag Favorite tag Text tag name Battery level Date stamp * For more about shortcuts, see page 15. www.kodak.com/go/m420support 19
Working with pictures/videos Understanding the review icons Video duration Print tag/number of prints Protected Email tag Picture/Video number Shortcuts* Select picture Add text tag View multi-up Play video Upload tag Favorite tag Text tag name Battery level Date stamp * For more about shortcuts, see page 15. www.kodak.com/go/m420support 19

User Manual
Page 20
and each begins with a picture. Prints • 4 x 6 pictures • Enlargements, posters • Collages • Photo books Photo gifts • Cards • Calendars • Mugs • Ties • Shirts Digitally • EASYSHARE Digital Picture Frame • HDTV devices • Email ...and much more! 20 www.kodak.com/go/easysharecenter How do you tell yours? 3 Share your stories! A thousand ways to tell a story...
and each begins with a picture. Prints • 4 x 6 pictures • Enlargements, posters • Collages • Photo books Photo gifts • Cards • Calendars • Mugs • Ties • Shirts Digitally • EASYSHARE Digital Picture Frame • HDTV devices • Email ...and much more! 20 www.kodak.com/go/easysharecenter How do you tell yours? 3 Share your stories! A thousand ways to tell a story...
User Manual
Page 22
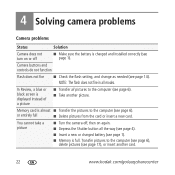
...; Take another card. 22 www.kodak.com/go/easysharecenter In Review, a blue or black screen is full. Camera buttons and controls do not function Flash does not fire ■ Check the flash setting, and change as needed (see page 1). ■ Memory is displayed instead of a picture ■ Transfer all pictures to the computer (see page 6). 4 Solving camera problems Camera problems Status Solution Camera does not turn on or off , then on again. ■ Depress the Shutter button all modes. NOTE...
...; Take another card. 22 www.kodak.com/go/easysharecenter In Review, a blue or black screen is full. Camera buttons and controls do not function Flash does not fire ■ Check the flash setting, and change as needed (see page 1). ■ Memory is displayed instead of a picture ■ Transfer all pictures to the computer (see page 6). 4 Solving camera problems Camera problems Status Solution Camera does not turn on or off , then on again. ■ Depress the Shutter button all modes. NOTE...

User Manual
Page 23
... hot, or leak. ■ Do not disassemble, install backward, or expose batteries to local and national regulations. Contact Kodak customer support. ■ The use of controls, adjustments, or procedures other than those specified herein may be hot. ■ Follow all instructions of time. KODAK AC Adapters and Battery Chargers are no user-serviceable parts inside the product, contact Kodak customer support. ■ In the unlikely event that is...
... hot, or leak. ■ Do not disassemble, install backward, or expose batteries to local and national regulations. Contact Kodak customer support. ■ The use of controls, adjustments, or procedures other than those specified herein may be hot. ■ Follow all instructions of time. KODAK AC Adapters and Battery Chargers are no user-serviceable parts inside the product, contact Kodak customer support. ■ In the unlikely event that is...

User Manual
Page 24
... necessary adjustments and/or replacement parts. Warranty service will repair or replace Products if they fail to function properly during the warranty period, subject to any request for warranty repair. If Kodak is unable to repair or replace a Product, Kodak will be required with incompatible accessories or attachments (such as third party ink or ink tanks), failure to follow Kodak's operation, maintenance or repacking instructions...
... necessary adjustments and/or replacement parts. Warranty service will repair or replace Products if they fail to function properly during the warranty period, subject to any request for warranty repair. If Kodak is unable to repair or replace a Product, Kodak will be required with incompatible accessories or attachments (such as third party ink or ink tanks), failure to follow Kodak's operation, maintenance or repacking instructions...
User Manual
Page 25
... countries other act. Unless a specific Kodak warranty is communicated to the purchaser in a particular installation. Where shielded interface cables have been provided with the product or specified additional components or accessories elsewhere defined to operate the equipment. If this warranty may be determined by turning the equipment off and on, the user is encouraged to try to...
... countries other act. Unless a specific Kodak warranty is communicated to the purchaser in a particular installation. Where shielded interface cables have been provided with the product or specified additional components or accessories elsewhere defined to operate the equipment. If this warranty may be determined by turning the equipment off and on, the user is encouraged to try to...


