

User Manual
Page 4
Product features Back View 89 10 11 7 12 6 13 14 5 43 2 1 1 Camera screen (LCD) 8 Ready light 2 Share button 9 Self Timer/Burst button 3 OK button (press) 10 Flash/status button 4 4-way controller 11 Zoom (Wide Angle/Telephoto) 5 DC-In (3V) ,for optional AC adapter 12 Grip 6 Delete button 13 Menu button 7 Viewfinder 14 Review button ii
Product features Back View 89 10 11 7 12 6 13 14 5 43 2 1 1 Camera screen (LCD) 8 Ready light 2 Share button 9 Self Timer/Burst button 3 OK button (press) 10 Flash/status button 4 4-way controller 11 Zoom (Wide Angle/Telephoto) 5 DC-In (3V) ,for optional AC adapter 12 Grip 6 Delete button 13 Menu button 7 Viewfinder 14 Review button ii

User Manual
Page 6
...MMC card 7 2 Taking pictures and videos 8 Taking a picture 8 Taking a video 8 Camera modes 9 Using the camera screen as a viewfinder 10 Reviewing the picture or video just taken 12 Using optical zoom 13 Using digital zoom 13 Using the flash 14 Putting yourself in the picture 16 Putting yourself in the... video 16 Taking a burst series of pictures 17 Changing picture-taking settings 18 Customizing your camera 20 Pre-tagging for album names 22 3 Reviewing pictures and ...
...MMC card 7 2 Taking pictures and videos 8 Taking a picture 8 Taking a video 8 Camera modes 9 Using the camera screen as a viewfinder 10 Reviewing the picture or video just taken 12 Using optical zoom 13 Using digital zoom 13 Using the flash 14 Putting yourself in the picture 16 Putting yourself in the... video 16 Taking a burst series of pictures 17 Changing picture-taking settings 18 Customizing your camera 20 Pre-tagging for album names 22 3 Reviewing pictures and ...
User Manual
Page 10
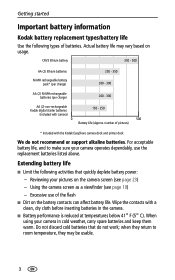
... rechargeable batteries (per charge) 200 - 300 AA (2) non-rechargeable Kodak digital starter batteries 150 - 250 (included with a clean, dry cloth before inserting batteries in cold weather, carry spare batteries and keep them warm. Reviewing your camera operates dependably, use of pictures) * Included with the Kodak EasyShare camera dock and printer dock We do not work; Actual battery...
... rechargeable batteries (per charge) 200 - 300 AA (2) non-rechargeable Kodak digital starter batteries 150 - 250 (included with a clean, dry cloth before inserting batteries in cold weather, carry spare batteries and keep them warm. Reviewing your camera operates dependably, use of pictures) * Included with the Kodak EasyShare camera dock and printer dock We do not work; Actual battery...

User Manual
Page 13
... name Mode description Flash Picture/video quality Pictures/time remaining Storage location Digital zoom Review screen Print tag/number of prints Favorite tag Email tag Camera mode Low battery (flashing = exhausted) Protect Picture/video number Image storage location Scroll arrows Review mode 6 Getting started Checking camera and picture status The icons that appear on the...
... name Mode description Flash Picture/video quality Pictures/time remaining Storage location Digital zoom Review screen Print tag/number of prints Favorite tag Email tag Camera mode Low battery (flashing = exhausted) Protect Picture/video number Image storage location Scroll arrows Review mode 6 Getting started Checking camera and picture status The icons that appear on the...
User Manual
Page 19
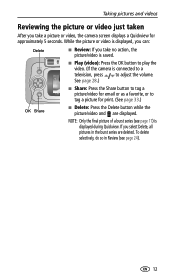
... 17) is connected to a television, press to adjust the volume. While the picture or video is displayed, you can: Delete ■ Review: If you take a picture or video, the camera screen displays a Quickview for print. (See page 33.) OK Share ■ Delete: Press the Delete button while the picture/video and are.... See page 28.) ■ Share: Press the Share button to tag a picture/video for email or as a favorite, or to play the video. (If the camera is displayed during Quickview.
... 17) is connected to a television, press to adjust the volume. While the picture or video is displayed, you can: Delete ■ Review: If you take a picture or video, the camera screen displays a Quickview for print. (See page 33.) OK Share ■ Delete: Press the Delete button while the picture/video and are.... See page 28.) ■ Share: Press the Share button to tag a picture/video for email or as a favorite, or to play the video. (If the camera is displayed during Quickview.

User Manual
Page 30
...the previous or next row of the screen. Viewing multiple pictures and videos 1 Press the Review button. 2 Press . To scroll through pictures and videos. (For fast scrolling, press and hold .) 3 Press the Review button to view and work with a black bar at a time, press . NOTE: You..., press the OK button. 23 To save battery power, use the optional Kodak EasyShare camera or printer dock, or Kodak 3-volt AC adapter. (See www.kodak.com/go/cx7330accessories.) Viewing single pictures and videos 1 Press the Review button. 2 Press to scroll backward or forward through the thumbnails one at ...
...the previous or next row of the screen. Viewing multiple pictures and videos 1 Press the Review button. 2 Press . To scroll through pictures and videos. (For fast scrolling, press and hold .) 3 Press the Review button to view and work with a black bar at a time, press . NOTE: You..., press the OK button. 23 To save battery power, use the optional Kodak EasyShare camera or printer dock, or Kodak 3-volt AC adapter. (See www.kodak.com/go/cx7330accessories.) Viewing single pictures and videos 1 Press the Review button. 2 Press to scroll backward or forward through the thumbnails one at ...

User Manual
Page 31
...previous or next picture or video, press . To go to Step 2. Reviewing pictures and videos Playing a video 1 Press the Review button. 2 Press to locate a video. (In Multi-up view, the video duration is displayed at the top of the camera screen.) 3 To play or pause a video, press the OK button. ...(If the camera is highlighted in multiple view), then press the Delete button....
...previous or next picture or video, press . To go to Step 2. Reviewing pictures and videos Playing a video 1 Press the Review button. 2 Press to locate a video. (In Multi-up view, the video duration is displayed at the top of the camera screen.) 3 To play or pause a video, press the OK button. ...(If the camera is highlighted in multiple view), then press the Delete button....

User Manual
Page 32
... the picture, press . To exit Magnify, press the Menu button. To exit Review mode, press the Review button. Reviewing pictures and videos Changing optional review settings In Review mode, press the Menu button to access optional review settings. NOTE: You can also press the Menu button, highlight , then press... playback.) Multi-up (page 23) Picture/Video Information (page 29) Album (page 26) Setup Menu (page 19) Magnifying pictures 1 Press the Review button, then locate a picture. 2 To magnify at the 1X (original) size, press the OK button again. To redisplay the picture at 2X...
... the picture, press . To exit Magnify, press the Menu button. To exit Review mode, press the Review button. Reviewing pictures and videos Changing optional review settings In Review mode, press the Menu button to access optional review settings. NOTE: You can also press the Menu button, highlight , then press... playback.) Multi-up (page 23) Picture/Video Information (page 29) Album (page 26) Setup Menu (page 19) Magnifying pictures 1 Press the Review button, then locate a picture. 2 To magnify at the 1X (original) size, press the OK button again. To redisplay the picture at 2X...
User Manual
Page 33
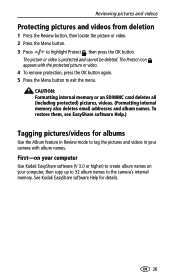
... internal memory also deletes email addresses and album names. First-on your computer Use Kodak EasyShare software (V 3.0 or higher) to create album names on your camera with album names. Reviewing pictures and videos Protecting pictures and videos from deletion 1 Press the Review button, then locate the picture or video. 2 Press the Menu button. 3 Press to...
... internal memory also deletes email addresses and album names. First-on your computer Use Kodak EasyShare software (V 3.0 or higher) to create album names on your camera with album names. Reviewing pictures and videos Protecting pictures and videos from deletion 1 Press the Review button, then locate the picture or video. 2 Press the Menu button. 3 Press to...

User Manual
Page 34
... the order in the appropriate album folder. To remove a selection, highlight an album name and press the OK button. Reviewing pictures and videos Second-on your camera 1 Press the Review button, then locate the picture or video. 2 Press the Menu button. 3 Press to highlight Album , then press ...album name appears with the picture. Running a slide show on a television or on the camera screen. To run a slide show Use the Slide Show to your computer, the Kodak EasyShare software opens and categorizes your pictures and videos in which you transfer the tagged pictures and ...
... the order in the appropriate album folder. To remove a selection, highlight an album name and press the OK button. Reviewing pictures and videos Second-on your camera 1 Press the Review button, then locate the picture or video. 2 Press the Menu button. 3 Press to highlight Album , then press ...album name appears with the picture. Running a slide show on a television or on the camera screen. To run a slide show Use the Slide Show to your computer, the Kodak EasyShare software opens and categorizes your pictures and videos in which you transfer the tagged pictures and ...

User Manual
Page 35
... videos Changing the slide show display interval The default interval setting displays each picture for details. 2 Review pictures and videos on the television. 28 The slide show is exhausted. The slide show stops if you connect or disconnect the cable while the .... to highlight On, then press the OK button. The interval setting remains until battery power is running. 1 Connect the optional audio/video cable from the camera video-out port to the television video-in port (yellow) and audio-in port (white). to highlight Loop, then press the OK 2 Press to highlight...
... videos Changing the slide show display interval The default interval setting displays each picture for details. 2 Review pictures and videos on the television. 28 The slide show is exhausted. The slide show stops if you connect or disconnect the cable while the .... to highlight On, then press the OK button. The interval setting remains until battery power is running. 1 Connect the optional audio/video cable from the camera video-out port to the television video-in port (yellow) and audio-in port (white). to highlight Loop, then press the OK 2 Press to highlight...

User Manual
Page 36
... pictures and videos from your selected storage location to the Review menu. To remove pictures and videos from the original location after they are copied, delete them (see page 24). ■ Tags that : ■ A card is inserted in the camera. ■ The camera's picture storage location is set to a picture or video, see...
... pictures and videos from your selected storage location to the Review menu. To remove pictures and videos from the original location after they are copied, delete them (see page 24). ■ Tags that : ■ A card is inserted in the camera. ■ The camera's picture storage location is set to a picture or video, see...

User Manual
Page 39
... computer, you take a picture/video, during Quickview. In a burst series, only the last picture is tagged during Quickview (see page 12). ■ After pressing the Review button (see page 23). 32 Press the Share button to tag pictures/videos: ■ Any time (The most recent picture/video taken is not copied...
... computer, you take a picture/video, during Quickview. In a burst series, only the last picture is tagged during Quickview (see page 12). ■ After pressing the Review button (see page 23). 32 Press the Share button to tag pictures/videos: ■ Any time (The most recent picture/video taken is not copied...

User Manual
Page 45
... charged batteries. ■ Place the camera on a Kodak EasyShare camera or printer dock (sold separately), then try again. ■ Connect the camera to the computer. For updates to the computer. black screen is operating normally. (The camera estimates the number of pictures remaining after taking a picture ■ Continue taking pictures. In Review, a blue or ■ Transfer the...
... charged batteries. ■ Place the camera on a Kodak EasyShare camera or printer dock (sold separately), then try again. ■ Connect the camera to the computer. For updates to the computer. black screen is operating normally. (The camera estimates the number of pictures remaining after taking a picture ■ Continue taking pictures. In Review, a blue or ■ Transfer the...

User Manual
Page 52
... (320 x 240) Frame rate: 15 fps Image file format Still: EXIF 2.2 (JPEG compression), file organization DCF Video: QuickTime; CRV3; Appendix Kodak EasyShare CX7330 zoom digital camera Exposure mode Programmed AE mode: Auto, Sports, Night Shot, Landscape, Macro Exposure Compensation: +2.0EV with computer USB 2.0 (PIMA 15740 protocol), via USB cable... or SD Card of the SD Card Association.) (The SD logo is a trademark Internal storage 16 MB internal memory capacity Review Quickview Yes Video output NTSC or PAL Power Kodak Max digital camera batteries 2-AA; 2-AA lithium; 2-AA Ni-MH;
... (320 x 240) Frame rate: 15 fps Image file format Still: EXIF 2.2 (JPEG compression), file organization DCF Video: QuickTime; CRV3; Appendix Kodak EasyShare CX7330 zoom digital camera Exposure mode Programmed AE mode: Auto, Sports, Night Shot, Landscape, Macro Exposure Compensation: +2.0EV with computer USB 2.0 (PIMA 15740 protocol), via USB cable... or SD Card of the SD Card Association.) (The SD logo is a trademark Internal storage 16 MB internal memory capacity Review Quickview Yes Video output NTSC or PAL Power Kodak Max digital camera batteries 2-AA; 2-AA lithium; 2-AA Ni-MH;

User Manual
Page 57
... ii OK, 5 on/off, ii review, ii, 23 self timer/burst, 17 share, ii, 32 shutter, i zoom, ii, 13 C cable audio/video, 28 USB, 1, 36 camera dock, 4 camera dock connector on camera, iii camera screen reviewing pictures, 23 reviewing videos, 23 using as viewfinder, 10 ...Canadian compliance, 48 caring for your camera, 46 clock, setting, 5 close-up, 9 color mode, 19 computer connecting camera, 36 transfer to, 36 connector for camera dock, iii contents, camera box...
... ii OK, 5 on/off, ii review, ii, 23 self timer/burst, 17 share, ii, 32 shutter, i zoom, ii, 13 C cable audio/video, 28 USB, 1, 36 camera dock, 4 camera dock connector on camera, iii camera screen reviewing pictures, 23 reviewing videos, 23 using as viewfinder, 10 ...Canadian compliance, 48 caring for your camera, 46 clock, setting, 5 close-up, 9 color mode, 19 computer connecting camera, 36 transfer to, 36 connector for camera dock, iii contents, camera box...

User Manual
Page 59
..., 34 magnifying, 25 printing, 37 printing tagged, 33 protecting, 26 quality problems, 40 reviewing, 23 Index storage capacity, 47 tagging, 22, 26 taking, modes, 9 transfer via USB cable, 36 power auto off, 47 camera, 4 switch, ii printer dock, 4, 37 printing from a card, 37 optimizing printer,... light, ii, 41 recycling, disposal, 46 red-eye, flash, 14 regulatory information, 48 review button, ii, 23 reviewing pictures as you take them, 12 camera screen, 23 deleting, 24 magnifying, 25 protecting, 26 slide show, 27 reviewing videos camera screen, 23 deleting, 24 protecting, 26 slide show, 27 52
..., 34 magnifying, 25 printing, 37 printing tagged, 33 protecting, 26 quality problems, 40 reviewing, 23 Index storage capacity, 47 tagging, 22, 26 taking, modes, 9 transfer via USB cable, 36 power auto off, 47 camera, 4 switch, ii printer dock, 4, 37 printing from a card, 37 optimizing printer,... light, ii, 41 recycling, disposal, 46 red-eye, flash, 14 regulatory information, 48 review button, ii, 23 reviewing pictures as you take them, 12 camera screen, 23 deleting, 24 magnifying, 25 protecting, 26 slide show, 27 reviewing videos camera screen, 23 deleting, 24 protecting, 26 slide show, 27 52

User Manual
Page 61
U upgrading software, firmware, 49 URLs, Kodak web sites, 42 USB (universal serial bus) connection location, iii transferring pictures, 36 V video out, 21 videos checking settings, 6, 7 copying, 29 deleting, 24 emailing tagged, 34 protecting, 26 reviewing, 23 storage capacities, 47 transfer to computer, 36 viewing, 23 viewfinder, i, ii using camera screen, 10 viewing picture after taking, 12, 23 magnified, 25 viewing picture, video information, 29 W wide angle button, ii Windows computers installing software, 31 wrist strap post, i Z zoom button, ii digital, 13 optical, 13 Index 54
U upgrading software, firmware, 49 URLs, Kodak web sites, 42 USB (universal serial bus) connection location, iii transferring pictures, 36 V video out, 21 videos checking settings, 6, 7 copying, 29 deleting, 24 emailing tagged, 34 protecting, 26 reviewing, 23 storage capacities, 47 transfer to computer, 36 viewing, 23 viewfinder, i, ii using camera screen, 10 viewing picture after taking, 12, 23 magnified, 25 viewing picture, video information, 29 W wide angle button, ii Windows computers installing software, 31 wrist strap post, i Z zoom button, ii digital, 13 optical, 13 Index 54


