User Manual
Page 1
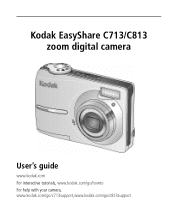
Kodak EasyShare C713/C813 zoom digital camera User's guide www.kodak.com For interactive tutorials, www.kodak.com/go/howto For help with your camera, www.kodak.com/go/c713support,www.kodak.com/go/c813support
Kodak EasyShare C713/C813 zoom digital camera User's guide www.kodak.com For interactive tutorials, www.kodak.com/go/howto For help with your camera, www.kodak.com/go/c713support,www.kodak.com/go/c813support

User Manual
Page 2
Kodak, EasyShare, and Perfect Touch are simulated. Eastman Kodak Company Rochester, NY 14650 © Eastman Kodak Company, 2007 All screen images are trademarks of Eastman Kodak Company. P/N 2F6596_en
Kodak, EasyShare, and Perfect Touch are simulated. Eastman Kodak Company Rochester, NY 14650 © Eastman Kodak Company, 2007 All screen images are trademarks of Eastman Kodak Company. P/N 2F6596_en
User Manual
Page 18
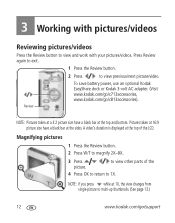
... the Review button to magnify 2X-8X. 3 Press picture. to 1X. To save battery power, use an optional Kodak EasyShare dock or Kodak 3-volt AC adapter. (Visit www.kodak.com/go/c713accessories, www.kodak.com/go /support Pictures taken at 16:9 picture size have a black bar at the sides. Review NOTE: Pictures .../next picture/video. Press Review again to exit. 1 Press the Review button. 2 Press to multi-up thumbnails. (See page 13.) 12 www.kodak.com/go /c813accessories). NOTE: If you press while at the top of the 4 Press OK to return to view other parts of the LCD.
... the Review button to magnify 2X-8X. 3 Press picture. to 1X. To save battery power, use an optional Kodak EasyShare dock or Kodak 3-volt AC adapter. (Visit www.kodak.com/go/c713accessories, www.kodak.com/go /support Pictures taken at 16:9 picture size have a black bar at the sides. Review NOTE: Pictures .../next picture/video. Press Review again to exit. 1 Press the Review button. 2 Press to multi-up thumbnails. (See page 13.) 12 www.kodak.com/go /c813accessories). NOTE: If you press while at the top of the 4 Press OK to return to view other parts of the LCD.
User Manual
Page 29
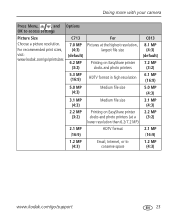
.../go /support 23 Doing more with your camera Press Menu, , and Options OK to conserve space 1.2 MP (4:3) www.kodak.com/go /printsizes C713 For 7.0 MP Pictures at the highest resolution, (4:3) largest file size (default) 6.2 MP (3:2) Printing on EasyShare printer docks and photo printers C813 8.1 MP (4:3) (default) 7.2 MP (3:2) 5.3 MP (16:9) HDTV format in high resolution...
.../go /support 23 Doing more with your camera Press Menu, , and Options OK to conserve space 1.2 MP (4:3) www.kodak.com/go /printsizes C713 For 7.0 MP Pictures at the highest resolution, (4:3) largest file size (default) 6.2 MP (3:2) Printing on EasyShare printer docks and photo printers C813 8.1 MP (4:3) (default) 7.2 MP (3:2) 5.3 MP (16:9) HDTV format in high resolution...
User Manual
Page 30
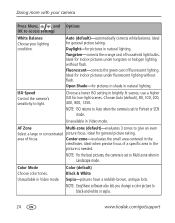
...Ideal when precise focus of focus. NOTE: ISO returns to Auto when the camera is needed. Doing more with your camera Press Menu, , and Options OK to black-and-white or sepia. 24 www.kodak.com/go/support Tungsten-corrects the orange cast of fluorescent lighting. use a... higher ISO for low-light scenes. area of a specific area in brightly lit scenes; NOTE: EasyShare software also...
...Ideal when precise focus of focus. NOTE: ISO returns to Auto when the camera is needed. Doing more with your camera Press Menu, , and Options OK to black-and-white or sepia. 24 www.kodak.com/go/support Tungsten-corrects the orange cast of fluorescent lighting. use a... higher ISO for low-light scenes. area of a specific area in brightly lit scenes; NOTE: EasyShare software also...
User Manual
Page 35
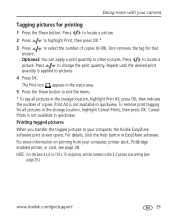
...Print All, press OK, then indicate the number of copies (0-99). For details, click the Help button in quickview. For more with your computer, the Kodak EasyShare software print screen opens. NOTE: For the best 4 x 6 in quickview. Repeat until the desired print quantity is not available in . (10 x... 15 cm) prints, set the camera to select the number of copies. Press to locate a picture. 2 Press to highlight Print, then press OK.* 3 Press to the 3:2 picture size setting (...
...Print All, press OK, then indicate the number of copies (0-99). For details, click the Help button in quickview. For more with your computer, the Kodak EasyShare software print screen opens. NOTE: For the best 4 x 6 in quickview. Repeat until the desired print quantity is not available in . (10 x... 15 cm) prints, set the camera to select the number of copies. Press to locate a picture. 2 Press to highlight Print, then press OK.* 3 Press to the 3:2 picture size setting (...
User Manual
Page 36
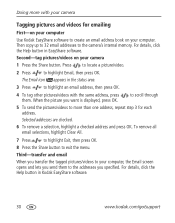
For details, click the Help button in Kodak EasyShare software. 30 www.kodak.com/go/support When the picture you specified. Second-tag pictures/videos on your computer. to scroll through 5 To send the pictures/videos to more with the same address, press them to the camera's internal memory. Selected addresses are checked. 6 ... to the addresses you want is displayed, press OK. Doing more than one address, repeat step 3 for emailing First-on your computer Use Kodak EasyShare software to highlight an email address, then press OK. 4 To tag other pictures/videos with your...
For details, click the Help button in Kodak EasyShare software. 30 www.kodak.com/go/support When the picture you specified. Second-tag pictures/videos on your computer. to scroll through 5 To send the pictures/videos to more with the same address, press them to the camera's internal memory. Selected addresses are checked. 6 ... to the addresses you want is displayed, press OK. Doing more than one address, repeat step 3 for emailing First-on your computer Use Kodak EasyShare software to highlight an email address, then press OK. 4 To tag other pictures/videos with your...
User Manual
Page 37
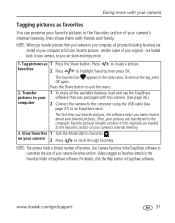
...camera Favorites section. View favorites 1 Turn the Mode dial to locate a picture. Use Camera Favorites in the EasyShare software to customize the size of your camera 2 Press to scroll through favorites. Doing more with your camera...camera's internal memory, then share them with this camera. (See page 36.) 2 Connect the camera to the computer using the USB cable (see page 37) or an EasyShare dock. NOTE: The camera...) are transferred to your camera's internal memory. 3. Press the Share button to highlight Favorite, then press OK. are loaded to your camera, so you make choices ...
...camera Favorites section. View favorites 1 Turn the Mode dial to locate a picture. Use Camera Favorites in the EasyShare software to customize the size of your camera 2 Press to scroll through favorites. Doing more with your camera...camera's internal memory, then share them with this camera. (See page 36.) 2 Connect the camera to the computer using the USB cable (see page 37) or an EasyShare dock. NOTE: The camera...) are transferred to your camera's internal memory. 3. Press the Share button to highlight Favorite, then press OK. are loaded to your camera, so you make choices ...
User Manual
Page 39
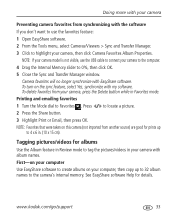
...pictures/videos in your camera with album names. NOTE: If your camera model is not visible, use the favorites feature: 1 Open EasyShare software. 2 From the Tools menu, select Cameras/Viewers > Sync and Transfer Manager. 3 Click to highlight your camera, then click Camera Favorites Album Properties. ... Favorites that were taken on this camera (not imported from your camera, press the Delete button while in . (10 x 15 cm). www.kodak.com/go/support 33 Tagging pictures/videos for details. Doing more with your camera Preventing camera favorites from synchronizing with the software ...
...pictures/videos in your camera with album names. NOTE: If your camera model is not visible, use the favorites feature: 1 Open EasyShare software. 2 From the Tools menu, select Cameras/Viewers > Sync and Transfer Manager. 3 Click to highlight your camera, then click Camera Favorites Album Properties. ... Favorites that were taken on this camera (not imported from your camera, press the Delete button while in . (10 x 15 cm). www.kodak.com/go/support 33 Tagging pictures/videos for details. Doing more with your camera Preventing camera favorites from synchronizing with the software ...
User Manual
Page 40
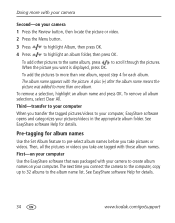
...your camera 1 Press the Review button, then locate the picture or video. 2 Press the Menu button. 3 Press to highlight Album, then press OK. 4 Press to more than one album. To remove a selection, highlight an album name and press OK. See EasyShare software Help for details. 34 www.kodak.com.../go/support First-on your computer Use the EasyShare software that was added to highlight an album folder, then press OK. To remove all the pictures...
...your camera 1 Press the Review button, then locate the picture or video. 2 Press the Menu button. 3 Press to highlight Album, then press OK. 4 Press to more than one album. To remove a selection, highlight an album name and press OK. See EasyShare software Help for details. 34 www.kodak.com.../go/support First-on your computer Use the EasyShare software that was added to highlight an album folder, then press OK. To remove all the pictures...
User Manual
Page 41
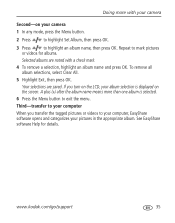
... is displayed on the screen. Your selections are noted with your camera Second-on your camera 1 In any mode, press the Menu button. 2 Press to highlight Set Album, then press OK. 3 Press to your computer, EasyShare software opens and categorizes your album selection is selected. 6 Press ...See EasyShare software Help for albums. Selected albums are saved. To remove all album selections, select Clear All. 5 Highlight Exit, then press OK. A plus (+) after the album name means more with a check mark. 4 To remove a selection, highlight an album name and press OK. www.kodak.com/...
... is displayed on the screen. Your selections are noted with your camera Second-on your camera 1 In any mode, press the Menu button. 2 Press to highlight Set Album, then press OK. 3 Press to your computer, EasyShare software opens and categorizes your album selection is selected. 6 Press ...See EasyShare software Help for albums. Selected albums are saved. To remove all album selections, select Clear All. 5 Highlight Exit, then press OK. A plus (+) after the album name means more with a check mark. 4 To remove a selection, highlight an album name and press OK. www.kodak.com/...
User Manual
Page 42
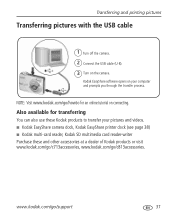
... to install the software. 5 Transferring and printing pictures Installing the software CAUTION: Install EasyShare software before connecting the camera to electronically register your computer (including anti-virus software). 2 Place the EasyShare software CD into the CD-ROM drive. 3 Load the software: Windows OS-if ...from the Start menu and type d:\setup.exe where d is the drive letter that are open on the EasyShare software CD, click the Help button in EasyShare software. 36 www.kodak.com/go /register. 5 If prompted, restart the computer. NOTE: When prompted, take few minutes to ...
... to install the software. 5 Transferring and printing pictures Installing the software CAUTION: Install EasyShare software before connecting the camera to electronically register your computer (including anti-virus software). 2 Place the EasyShare software CD into the CD-ROM drive. 3 Load the software: Windows OS-if ...from the Start menu and type d:\setup.exe where d is the drive letter that are open on the EasyShare software CD, click the Help button in EasyShare software. 36 www.kodak.com/go /register. 5 If prompted, restart the computer. NOTE: When prompted, take few minutes to ...
User Manual
Page 43
... to transfer your computer and prompts you through the transfer process. Also available for an online tutorial on the camera. Kodak EasyShare software opens on your pictures and videos. ■ Kodak EasyShare camera dock, Kodak EasyShare printer dock (see page 38) ■ Kodak multi-card reader, Kodak SD multimedia card reader-writer Purchase these and other accessories at a dealer of...
... to transfer your computer and prompts you through the transfer process. Also available for an online tutorial on the camera. Kodak EasyShare software opens on your pictures and videos. ■ Kodak EasyShare camera dock, Kodak EasyShare printer dock (see page 38) ■ Kodak multi-card reader, Kodak SD multimedia card reader-writer Purchase these and other accessories at a dealer of...
User Manual
Page 44
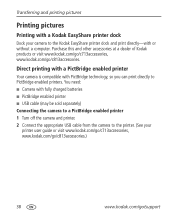
... printer. 2 Connect the appropriate USB cable from the camera to PictBridge enabled printers. Direct printing with a PictBridge enabled printer Your camera is compatible with or without a computer. Transferring and printing pictures Printing pictures Printing with a Kodak EasyShare printer dock Dock your camera to the Kodak EasyShare printer dock and print directly-with PictBridge technology, so you can...
... printer. 2 Connect the appropriate USB cable from the camera to PictBridge enabled printers. Direct printing with a PictBridge enabled printer Your camera is compatible with or without a computer. Transferring and printing pictures Printing pictures Printing with a Kodak EasyShare printer dock Dock your camera to the Kodak EasyShare printer dock and print directly-with PictBridge technology, so you can...
User Manual
Page 45
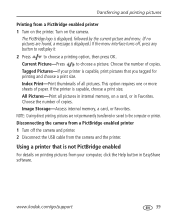
... are found, a message is displayed.) If the menu interface turns off the camera and printer. 2 Disconnect the USB cable from the camera and the printer. Disconnecting the camera from a PictBridge enabled printer 1 Turn off , press any button to redisplay it...Current Picture-Press to the computer or printer. Image Storage-Access internal memory, a card, or Favorites. www.kodak.com/go/support 39 Turn on printing pictures from your printer is capable, print pictures that is capable, choose ... Favorites. Tagged Pictures-If your computer, click the Help button in EasyShare software.
... are found, a message is displayed.) If the menu interface turns off the camera and printer. 2 Disconnect the USB cable from the camera and the printer. Disconnecting the camera from a PictBridge enabled printer 1 Turn off , press any button to redisplay it...Current Picture-Press to the computer or printer. Image Storage-Access internal memory, a card, or Favorites. www.kodak.com/go/support 39 Turn on printing pictures from your printer is capable, print pictures that is capable, choose ... Favorites. Tagged Pictures-If your computer, click the Help button in EasyShare software.
User Manual
Page 46
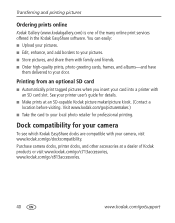
... optional SD card ■ Automatically print tagged pictures when you insert your card into a printer with your camera To see which Kodak EasyShare docks are compatible with an SD card slot. Dock compatibility for your camera, visit www.kodak.com/go /picturemaker.) ■ Take the card to your printer user's guide for professional printing. Purchase...
... optional SD card ■ Automatically print tagged pictures when you insert your card into a printer with your camera To see which Kodak EasyShare docks are compatible with an SD card slot. Dock compatibility for your camera, visit www.kodak.com/go /picturemaker.) ■ Take the card to your printer user's guide for professional printing. Purchase...
User Manual
Page 47
... not turn on the LCD; rechargeable digital camera ■ Limit the following Camera does not ■ Install new batteries (see page 1). corrupted. Try one or more of the flash. www.kodak.com/go /c813support and select Interactive Troubleshooting & Repairs. batteries. ■ If you own an EasyShare camera dock series 3 or EasyShare printer dock series 3, use of the...
... not turn on the LCD; rechargeable digital camera ■ Limit the following Camera does not ■ Install new batteries (see page 1). corrupted. Try one or more of the flash. www.kodak.com/go /c813support and select Interactive Troubleshooting & Repairs. batteries. ■ If you own an EasyShare camera dock series 3 or EasyShare printer dock series 3, use of the...

User Manual
Page 50
...cannot be read (Please format internal memory) ■ Format the internal memory (see page 27). Disconnect cable or rem. (remove) camera from the image storage location you are copying to to display ■ Change image storage location setting (see page 3). (Files not ...copied) Not enough space ■ Delete pictures from dock. Troubleshooting LCD screen messages If... To restore them, see the Kodak EasyShare software Help.) No memory card ■ Insert a card (see page 25). Caution: Formatting a card deletes all pictures and videos, including protected...
...cannot be read (Please format internal memory) ■ Format the internal memory (see page 27). Disconnect cable or rem. (remove) camera from the image storage location you are copying to to display ■ Change image storage location setting (see page 3). (Files not ...copied) Not enough space ■ Delete pictures from dock. Troubleshooting LCD screen messages If... To restore them, see the Kodak EasyShare software Help.) No memory card ■ Insert a card (see page 25). Caution: Formatting a card deletes all pictures and videos, including protected...

User Manual
Page 51
... for 10 minutes, then turn it back on camera (Connect with computer to internal memory memory card) (see page 3). Read-only memory card. See the Kodak EasyShare software Help. If the message reappears, visit www.kodak.com/go/c713support or www.kodak.com/go /support 45 See the Kodak EasyShare software Help. Troubleshooting If... Try one or...
... for 10 minutes, then turn it back on camera (Connect with computer to internal memory memory card) (see page 3). Read-only memory card. See the Kodak EasyShare software Help. If the message reappears, visit www.kodak.com/go/c713support or www.kodak.com/go /support 45 See the Kodak EasyShare software Help. Troubleshooting If... Try one or...
User Manual
Page 53
...) Get help with the Windows operating system and www.kodak.com/go/pcbasics working with digital pictures Other Get support for other cameras, software, accessories www.kodak.com/go/support Get information on Kodak EasyShare printer docks www.kodak.com/go/printerdocks Get information on Kodak inkjet products www.kodak.com/go/inkjet Optimize your printer for truer, more...
...) Get help with the Windows operating system and www.kodak.com/go/pcbasics working with digital pictures Other Get support for other cameras, software, accessories www.kodak.com/go/support Get information on Kodak EasyShare printer docks www.kodak.com/go/printerdocks Get information on Kodak inkjet products www.kodak.com/go/inkjet Optimize your printer for truer, more...


