
User Manual
Page 1
ENGLISH ᕡ Installing the software Before connecting any cables, install the software that was included with your camera. Follow the on-screen instructions. After installing the software, return to this Getting Started Guide. ᕢ Loading the batteries • Kodak oxy-alkaline digital camera batteries AA • Kodak Ni-MH rechargeable digital camera batteries AA • Kodak Ni-MH rechargeable digital camera battery KAA2HR • alkaline batteries AA • lithium batteries AA www.kodak.com/go/c713support or c813support 1
ENGLISH ᕡ Installing the software Before connecting any cables, install the software that was included with your camera. Follow the on-screen instructions. After installing the software, return to this Getting Started Guide. ᕢ Loading the batteries • Kodak oxy-alkaline digital camera batteries AA • Kodak Ni-MH rechargeable digital camera batteries AA • Kodak Ni-MH rechargeable digital camera battery KAA2HR • alkaline batteries AA • lithium batteries AA www.kodak.com/go/c713support or c813support 1

User Manual
Page 2
for previous/next field. Date/Time: 1 At the prompt, press OK. 2 to change . 2 OK to accept. OK to accept. 2 www.kodak.com/go/easysharecenter ENGLISH ᕣ Turning on the camera ᕤ Setting the language, date/time Language: 1 to change .
for previous/next field. Date/Time: 1 At the prompt, press OK. 2 to change . 2 OK to accept. OK to accept. 2 www.kodak.com/go/easysharecenter ENGLISH ᕣ Turning on the camera ᕤ Setting the language, date/time Language: 1 to change .

User Manual
Page 3
www.kodak.com/go/c713support or c813support 3 When the framing brackets turn green, press the Shutter button completely down and release. To stop recording, press and release the Shutter button again. ENGLISH ᕥ Taking a picture/video Pictures Videos 1 1 2 2 Framing brackets Press the Shutter button halfway to focus and set exposure. Press the Shutter button completely down .
www.kodak.com/go/c713support or c813support 3 When the framing brackets turn green, press the Shutter button completely down and release. To stop recording, press and release the Shutter button again. ENGLISH ᕥ Taking a picture/video Pictures Videos 1 1 2 2 Framing brackets Press the Shutter button halfway to focus and set exposure. Press the Shutter button completely down .
User Manual
Page 4
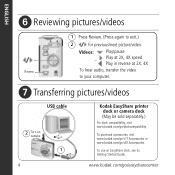
... www.kodak.com/go /c813accessories To use an EasyShare dock, see its Getting Started Guide. Videos: Play/pause Play at 2X, 4X speed Play in reverse at 2X, 4X Review To hear audio, transfer the video to exit.) 2 for previous/next picture/video. ENGLISH ᕦ Reviewing pictures/videos 1 Press Review. (Press again to your computer. ᕧ Transferring pictures/videos USB cable 2 Turn on camera 1 4 Kodak EasyShare printer dock or camera dock (May be sold separately.) For dock compatibility, visit www.kodak.com/go...
... www.kodak.com/go /c813accessories To use an EasyShare dock, see its Getting Started Guide. Videos: Play/pause Play at 2X, 4X speed Play in reverse at 2X, 4X Review To hear audio, transfer the video to exit.) 2 for previous/next picture/video. ENGLISH ᕦ Reviewing pictures/videos 1 Press Review. (Press again to your computer. ᕧ Transferring pictures/videos USB cable 2 Turn on camera 1 4 Kodak EasyShare printer dock or camera dock (May be sold separately.) For dock compatibility, visit www.kodak.com/go...

User Manual
Page 5
...: • set up your camera • taken pictures • transferred pictures to your best pictures! ENGLISH ᕨ Keep learning about your camera! To better understand each menu option, use camera Help. (Highlight a menu choice, then press the button.) Visit www.kodak.com/go/c713support or www.kodak.com/go/c813support for: • the extended user's guide • interactive troubleshooting and repairs • interactive tutorials • FAQs • downloads • accessories • printing information...
...: • set up your camera • taken pictures • transferred pictures to your best pictures! ENGLISH ᕨ Keep learning about your camera! To better understand each menu option, use camera Help. (Highlight a menu choice, then press the button.) Visit www.kodak.com/go/c713support or www.kodak.com/go/c813support for: • the extended user's guide • interactive troubleshooting and repairs • interactive tutorials • FAQs • downloads • accessories • printing information...

User Manual
Page 8
... card, pictures, or camera may cause damage. We recommend Kodak SD or MMC cards. 1 Turn off the camera. 2 Insert or remove the optional card. 3 Turn on an SD or MMC card Your camera has internal memory. You can only be damaged. 8 www.kodak.com/go /c813accessories). If you insert or remove a card while the camera is accessing it may be inserted one way; 1 Doing more pictures and videos (www.kodak.com...
... card, pictures, or camera may cause damage. We recommend Kodak SD or MMC cards. 1 Turn off the camera. 2 Insert or remove the optional card. 3 Turn on an SD or MMC card Your camera has internal memory. You can only be damaged. 8 www.kodak.com/go /c813accessories). If you insert or remove a card while the camera is accessing it may be inserted one way; 1 Doing more pictures and videos (www.kodak.com...
User Manual
Page 9
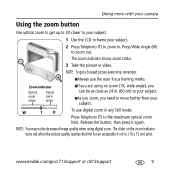
...) to your subject. Zoom indicator Optical zoom range Digital zoom range IIf you are using digital zoom. www.kodak.com/go/c713support or c813support 9 NOTE: You may notice decreased image quality when using no zoom (1X, wide angle), you need to zoom out. Doing more with your camera Using the zoom button Use optical zoom to get a focused picture every time, remember: IAlways use digital zoom in . W T D To use the auto focus framing marks. Release the button, then press it...
...) to your subject. Zoom indicator Optical zoom range Digital zoom range IIf you are using digital zoom. www.kodak.com/go/c713support or c813support 9 NOTE: You may notice decreased image quality when using no zoom (1X, wide angle), you need to zoom out. Doing more with your camera Using the zoom button Use optical zoom to get a focused picture every time, remember: IAlways use digital zoom in . W T D To use the auto focus framing marks. Release the button, then press it...

User Manual
Page 10
... www.kodak.com/go/easysharecenter Flash Distance Wide angle: 0.6-3.6 m (2-11.8 ft) @ ISO 200 Telephoto: 0.6-2.1 m (2-6.9 ft) @ ISO 200 Flash modes Flash fires Auto When the lighting conditions require it. Red-eye The flash fires twice-once, then again when the picture is behind the subject). In low light, hold the camera steady or use a tripod. The current flash mode appears in the LCD screen. Flash Fill Every time you take a picture, regardless of the lighting conditions. Use...
... www.kodak.com/go/easysharecenter Flash Distance Wide angle: 0.6-3.6 m (2-11.8 ft) @ ISO 200 Telephoto: 0.6-2.1 m (2-6.9 ft) @ ISO 200 Flash modes Flash fires Auto When the lighting conditions require it. Red-eye The flash fires twice-once, then again when the picture is behind the subject). In low light, hold the camera steady or use a tripod. The current flash mode appears in the LCD screen. Flash Fill Every time you take a picture, regardless of the lighting conditions. Use...

User Manual
Page 11
... taking pictures under special conditions. (See page 12.) Capturing video with your camera Using different picture-taking -offers an excellent balance of image quality and ease of camera shake and subject movement. Close range. The camera automatically sets the focus distance depending on the zoom position. www.kodak.com/go/c713support or c813support 11 Use available light instead of flash if possible. Doing more with sound. (See page 3.) Favorites Reviewing...
... taking pictures under special conditions. (See page 12.) Capturing video with your camera Using different picture-taking -offers an excellent balance of image quality and ease of camera shake and subject movement. Close range. The camera automatically sets the focus distance depending on the zoom position. www.kodak.com/go/c713support or c813support 11 Use available light instead of flash if possible. Doing more with sound. (See page 3.) Favorites Reviewing...

User Manual
Page 12
...! 1 Turn the Mode dial to Scene . 2 Press to Auto. If the mode description turns off before you finish reading it, press OK. 3 Press OK to choose a Scene mode. The camera uses infinity auto-focus. Night Portrait Reducing red eye of people. Place the camera on a flat, steady surface or use a tripod. Auto-focus framing marks are in motion. Subjects in shadow or "backlit" (when light is set to display...
...! 1 Turn the Mode dial to Scene . 2 Press to Auto. If the mode description turns off before you finish reading it, press OK. 3 Press OK to choose a Scene mode. The camera uses infinity auto-focus. Night Portrait Reducing red eye of people. Place the camera on a flat, steady surface or use a tripod. Auto-focus framing marks are in motion. Subjects in shadow or "backlit" (when light is set to display...
User Manual
Page 13
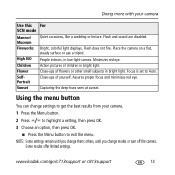
Flash and sound are disabled. Flower Close-ups of flowers or other small subjects in bright light. Assures proper focus and minimizes red eye. NOTE: Some settings remain until you change them; Flash does not fire. Minimizes red eye. Focus is set to exit the menu. Fireworks Bright, colorful light displays. Children Action pictures of yourself. others, until you change settings to get the best results from your camera Use this For SCN mode Manner...
Flash and sound are disabled. Flower Close-ups of flowers or other small subjects in bright light. Assures proper focus and minimizes red eye. NOTE: Some settings remain until you change them; Flash does not fire. Minimizes red eye. Focus is set to exit the menu. Fireworks Bright, colorful light displays. Children Action pictures of yourself. others, until you change settings to get the best results from your camera Use this For SCN mode Manner...

User Manual
Page 14
Highlight a menu choice, then press the button. Turn on/off Help Scroll up/down Understanding the picture-taking icons Flash Self-timer Date stamp 14 Picture size Pictures/time remaining Storage location Zoom: Wide Telephoto Digital Exposure metering White balance ISO speed Low battery Camera mode Exposure compensation www.kodak.com/go/easysharecenter Doing more with your camera Using camera Help To better understand each menu option, use camera Help.
Highlight a menu choice, then press the button. Turn on/off Help Scroll up/down Understanding the picture-taking icons Flash Self-timer Date stamp 14 Picture size Pictures/time remaining Storage location Zoom: Wide Telephoto Digital Exposure metering White balance ISO speed Low battery Camera mode Exposure compensation www.kodak.com/go/easysharecenter Doing more with your camera Using camera Help To better understand each menu option, use camera Help.

User Manual
Page 16
... previously enhanced pictures. Follow the screen prompts to replace the original picture or to exit the menu. 16 www.kodak.com/go/easysharecenter Press picture. The enhancement is previewed in a split screen. I Press the Menu button to save the enhanced picture as a new one. Working with pictures/videos Using Kodak Perfect Touch technology Kodak Perfect Touch technology helps ensure better, brighter pictures. 1 Press the Review button, then for previous/next picture. 2 Press the Menu button.
... previously enhanced pictures. Follow the screen prompts to replace the original picture or to exit the menu. 16 www.kodak.com/go/easysharecenter Press picture. The enhancement is previewed in a split screen. I Press the Menu button to save the enhanced picture as a new one. Working with pictures/videos Using Kodak Perfect Touch technology Kodak Perfect Touch technology helps ensure better, brighter pictures. 1 Press the Review button, then for previous/next picture. 2 Press the Menu button.

User Manual
Page 18
to highlight Video Picture 3 Press to highlight Make Picture, then press OK. 4 Press OK to select a video frame. 5 Follow the screen prompts to exit the menu. 18 www.kodak.com/go/easysharecenter A picture is created. (The original video is saved.) I Press the Menu button to save the picture. Press Edit Video, then press OK. Working with pictures/videos Editing videos Making a picture from a video You can choose a single frame from a video, then make a picture suitable for printing. 1 Press the Review button, then to find a video. 2 Press the Menu button.
to highlight Video Picture 3 Press to highlight Make Picture, then press OK. 4 Press OK to select a video frame. 5 Follow the screen prompts to exit the menu. 18 www.kodak.com/go/easysharecenter A picture is created. (The original video is saved.) I Press the Menu button to save the picture. Press Edit Video, then press OK. Working with pictures/videos Editing videos Making a picture from a video You can choose a single frame from a video, then make a picture suitable for printing. 1 Press the Review button, then to find a video. 2 Press the Menu button.

User Manual
Page 19
... Menu button to find a video. 2 Press the Menu button. Working with pictures/videos Making a video action print From a video, you can make a 4-, 9-, or 16-up picture press OK. 4 Choose an option, then press OK. to highlight Video 4-, 9-, or 3 Press to highlight Video Action Print, then 16-up picture, suitable for a 4 x 6-inch (10 x 15 cm) print. 1 Press the Review button, then to exit the menu. www.kodak.com/go/c713support or c813support 19 the camera...
... Menu button to find a video. 2 Press the Menu button. Working with pictures/videos Making a video action print From a video, you can make a 4-, 9-, or 16-up picture press OK. 4 Choose an option, then press OK. to highlight Video 4-, 9-, or 3 Press to highlight Video Action Print, then 16-up picture, suitable for a 4 x 6-inch (10 x 15 cm) print. 1 Press the Review button, then to exit the menu. www.kodak.com/go/c713support or c813support 19 the camera...

User Manual
Page 20
Picture number Image storage location Scroll arrows Videos Protected Favorite tag Email tag Review mode Video length Video number Image storage location Date/Time Scroll arrows 20 Review mode www.kodak.com/go/easysharecenter Working with pictures/videos Understanding the review icons Pictures Print tag/number of prints Protected Favorite tag Email tag Album Blur warning Kodak Perfect Touch tech.
Picture number Image storage location Scroll arrows Videos Protected Favorite tag Email tag Review mode Video length Video number Image storage location Date/Time Scroll arrows 20 Review mode www.kodak.com/go/easysharecenter Working with pictures/videos Understanding the review icons Pictures Print tag/number of prints Protected Favorite tag Email tag Album Blur warning Kodak Perfect Touch tech.

User Manual
Page 21
... taking a picture. I The camera is operating normally. I Wipe the contacts with Kodak Ni-MH rechargeable digital camera batteries. I Charge rechargeable batteries. I Limit the following Camera does not turn off. Memory card full. I Install new batteries (see page 1). www.kodak.com/go /c813support and select Interactive Troubleshooting & Repairs. I If you own an EasyShare camera dock series 3 or EasyShare printer dock series 3, use of the following activities that quickly deplete battery power: reviewing pictures/videos on . If the camera still does not function...
... taking a picture. I The camera is operating normally. I Wipe the contacts with Kodak Ni-MH rechargeable digital camera batteries. I Charge rechargeable batteries. I Limit the following Camera does not turn off. Memory card full. I Install new batteries (see page 1). www.kodak.com/go /c813support and select Interactive Troubleshooting & Repairs. I If you own an EasyShare camera dock series 3 or EasyShare printer dock series 3, use of the following activities that quickly deplete battery power: reviewing pictures/videos on . If the camera still does not function...

User Manual
Page 22
... product; For approved accessories, visit www.kodak/go /easysharecenter I Use only a USB-certified computer equipped with water and contact your local Kodak customer support. Refer servicing to liquid, moisture, fire, or extreme temperature. Kodak AC adapters and battery chargers are no user-serviceable parts inside the product, contact Kodak customer support. I Do not allow it may be hot. I Use only batteries approved for an extended period of...
... product; For approved accessories, visit www.kodak/go /easysharecenter I Use only a USB-certified computer equipped with water and contact your local Kodak customer support. Refer servicing to liquid, moisture, fire, or extreme temperature. Kodak AC adapters and battery chargers are no user-serviceable parts inside the product, contact Kodak customer support. I Do not allow it may be hot. I Use only batteries approved for an extended period of...

User Manual
Page 23
... original Product, or 90 days after the date of repair or replacement, whichever is ineffective under the warranty. In the event that runs on the Kodak EasyShare software CD and the camera firmware (the software that the exclusion of any necessary adjustments and/or replacement parts. Limited warranty Kodak warrants Kodak consumer electronic products and accessories ("Products"), excluding batteries, to be one year from within...
... original Product, or 90 days after the date of repair or replacement, whichever is ineffective under the warranty. In the event that runs on the Kodak EasyShare software CD and the camera firmware (the software that the exclusion of any necessary adjustments and/or replacement parts. Limited warranty Kodak warrants Kodak consumer electronic products and accessories ("Products"), excluding batteries, to be one year from within...
User Manual
Page 24
... or services, or claims of incidental or consequential damages, so the above limitation may not apply to you. Kodak will not occur in a residential installation. However, there is Kodak's only obligation. Liability for breach of this equipment does cause harmful interference to Part 15 of the FCC Rules. FCC compliance and advisory Kodak EasyShare C713/C813 zoom digital camera This equipment...
... or services, or claims of incidental or consequential damages, so the above limitation may not apply to you. Kodak will not occur in a residential installation. However, there is Kodak's only obligation. Liability for breach of this equipment does cause harmful interference to Part 15 of the FCC Rules. FCC compliance and advisory Kodak EasyShare C713/C813 zoom digital camera This equipment...


