
User Manual
Page 4
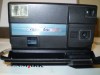
Product Overview Camera Back 1 7 8 2 3 4 9 10 11 12 13 56 1 Viewfinder light 2 Flash button 3 Menu button 4 4-way arrow button 5 Select button 6 LCD screen 7 Viewfinder 8 Speaker 9 Mode dial (see below) 10 Shutter button 11 Zoom button 12 Picture Card door 13 Wrist strap post Mode Dial Video-take videos with audio Still-take pictures Review-display pictures and play videos on the LCD Setup-customize settings iv
Product Overview Camera Back 1 7 8 2 3 4 9 10 11 12 13 56 1 Viewfinder light 2 Flash button 3 Menu button 4 4-way arrow button 5 Select button 6 LCD screen 7 Viewfinder 8 Speaker 9 Mode dial (see below) 10 Shutter button 11 Zoom button 12 Picture Card door 13 Wrist strap post Mode Dial Video-take videos with audio Still-take pictures Review-display pictures and play videos on the LCD Setup-customize settings iv

User Manual
Page 6
Putting Yourself in the Picture 22 Setting Picture Quality 23 Placing the Date on Pictures 24 3 Taking Videos 25 Taking a Video 25 Reviewing/Deleting the Video Just Taken 26 Previewing Your Video 26 Taking Close-up Videos 27 Putting Yourself in the Video 27 Setting Video ...Quality 28 Displaying the Date/Time on Videos 29 Setting Video Length 30 4 Reviewing Pictures and Videos 31 Navigating Through Pictures and Videos 31 Playing a Video 32 Deleting Pictures and Videos 33 Protecting Pictures and Videos From Deletion ...
Putting Yourself in the Picture 22 Setting Picture Quality 23 Placing the Date on Pictures 24 3 Taking Videos 25 Taking a Video 25 Reviewing/Deleting the Video Just Taken 26 Previewing Your Video 26 Taking Close-up Videos 27 Putting Yourself in the Video 27 Setting Video ...Quality 28 Displaying the Date/Time on Videos 29 Setting Video Length 30 4 Reviewing Pictures and Videos 31 Navigating Through Pictures and Videos 31 Playing a Video 32 Deleting Pictures and Videos 33 Protecting Pictures and Videos From Deletion ...
User Manual
Page 9
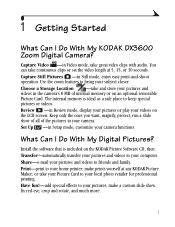
..., display your pictures or play your computer. Use the zoom features to your videos on the LCD screen. Review -in Video mode, take your Picture Card to your local photo retailer for professional printing. Install the software that is ideal as a safe place .... Capture Still Pictures -in the camera's 8 MB of the pictures in Setup mode, customize your pictures and videos in Still mode, enjoy easy point-and-shoot operation. Choose a Storage Location -take continuous clips or set the video length at any KODAK Picture Maker; Keep only the ones you want, magnify, protect, ...
..., display your pictures or play your computer. Use the zoom features to your videos on the LCD screen. Review -in Video mode, take your Picture Card to your local photo retailer for professional printing. Install the software that is ideal as a safe place .... Capture Still Pictures -in the camera's 8 MB of the pictures in Setup mode, customize your pictures and videos in Still mode, enjoy easy point-and-shoot operation. Choose a Storage Location -take continuous clips or set the video length at any KODAK Picture Maker; Keep only the ones you want, magnify, protect, ...

User Manual
Page 16
For details on the LCD screen Setup -customize your camera functions Video Menus Use Video mode whenever you are recording videos and to customize your pictures and videos on applying the menu options, refer to ... 27) Video Length (page 30) QuickView (page 26) 8 Chapter 1 Mode Dial-Settings and Menus Use the Mode dial to access four ways to use your camera: Mode dial Video -take videos with audio, and change video-taking options Still -take pictures and change picture-taking options...
For details on the LCD screen Setup -customize your camera functions Video Menus Use Video mode whenever you are recording videos and to customize your pictures and videos on applying the menu options, refer to ... 27) Video Length (page 30) QuickView (page 26) 8 Chapter 1 Mode Dial-Settings and Menus Use the Mode dial to access four ways to use your camera: Mode dial Video -take videos with audio, and change video-taking options Still -take pictures and change picture-taking options...

User Manual
Page 18
... Card only (page 36) Protect (page 34) Slide Show (page 38) Copy (page 35) Picture/ Video Information (page 40) 10 To access the Review mode menus: 1 Turn the Mode dial to Review . 2 Press the Menu button. 3 Use the arrow buttons to view and work with the pictures and videos in... Review mode to scroll through the menus and submenus. 4 Press the Select button. Chapter 1 Review Menus Use the menus in your camera. For details on applying the menu options, refer to the page numbers listed below.
... Card only (page 36) Protect (page 34) Slide Show (page 38) Copy (page 35) Picture/ Video Information (page 40) 10 To access the Review mode menus: 1 Turn the Mode dial to Review . 2 Press the Menu button. 3 Use the arrow buttons to view and work with the pictures and videos in... Review mode to scroll through the menus and submenus. 4 Press the Select button. Chapter 1 Review Menus Use the menus in your camera. For details on applying the menu options, refer to the page numbers listed below.

User Manual
Page 20
... are displayed on the screen with a picture or the first frame of a video. An arrow displayed on the LCD: Menu name m In Video , Still , and Review modes, press the Menu button to turn the Mode dial to scroll through the menus and selecting options is briefly displayed in all four of... the camera modes. The name of the selected menu is the same in the top right corner of the screen. Menu button To display the menus on...
... are displayed on the screen with a picture or the first frame of a video. An arrow displayed on the LCD: Menu name m In Video , Still , and Review modes, press the Menu button to turn the Mode dial to scroll through the menus and selecting options is briefly displayed in all four of... the camera modes. The name of the selected menu is the same in the top right corner of the screen. Menu button To display the menus on...

User Manual
Page 22
... size Picture Card for how to change the setting. Chapter 1 Choosing Internal Memory or Picture Card The KODAK DX3600 Zoom Digital Camera offers two storage options: internal camera memory or optional removable Picture Cards. Internal Memory-take and store as many pictures and videos as you ...camera's 8 MB of cards you have a Picture Card with you don't have . Use the Image Storage menu, available in all four positions on a Picture Card, then copy and save your images are stored when you like, depending on our Web site at Best Quality) in Review mode. Optional KODAK...
... size Picture Card for how to change the setting. Chapter 1 Choosing Internal Memory or Picture Card The KODAK DX3600 Zoom Digital Camera offers two storage options: internal camera memory or optional removable Picture Cards. Internal Memory-take and store as many pictures and videos as you ...camera's 8 MB of cards you have a Picture Card with you don't have . Use the Image Storage menu, available in all four positions on a Picture Card, then copy and save your images are stored when you like, depending on our Web site at Best Quality) in Review mode. Optional KODAK...

User Manual
Page 23
... a Picture Card is in the camera. 15 AUTO (default)-when the setting is Auto, the camera uses the Picture Card if one is installed. 4 Select Continue (or Cancel to all camera functions-saving pictures and videos as you take them, and reviewing and working with the pictures and ...videos that are stored in the camera. A message appears while the camera changes storage locations...
... a Picture Card is in the camera. 15 AUTO (default)-when the setting is Auto, the camera uses the Picture Card if one is installed. 4 Select Continue (or Cancel to all camera functions-saving pictures and videos as you take them, and reviewing and working with the pictures and ...videos that are stored in the camera. A message appears while the camera changes storage locations...

User Manual
Page 24
... the status bar. In this example, pictures and videos will be stored on the Picture Card. In this example, the displayed picture is stored. m In Review mode, the storage location icon indicates where the currently displayed picture or video is stored in the status bar indicates: -Picture Card -Internal Memory m In...
... the status bar. In this example, pictures and videos will be stored on the Picture Card. In this example, the displayed picture is stored. m In Review mode, the storage location icon indicates where the currently displayed picture or video is stored in the status bar indicates: -Picture Card -Internal Memory m In...

User Manual
Page 34
... battery life, press Select to turn the Mode dial to Video , then press Select. NOTE: In Video mode, the camera default is deleted from the camera. SELECT The Delete Video? screen appears. 3 Highlight Yes, then press Select. Previewing Your Video When the Preview feature is... displayed on . If the automatic display disappears, bring it off. Chapter 3 Reviewing/Deleting the Video Just Taken The QuickView feature...
... battery life, press Select to turn the Mode dial to Video , then press Select. NOTE: In Video mode, the camera default is deleted from the camera. SELECT The Delete Video? screen appears. 3 Highlight Yes, then press Select. Previewing Your Video When the Preview feature is... displayed on . If the automatic display disappears, bring it off. Chapter 3 Reviewing/Deleting the Video Just Taken The QuickView feature...
User Manual
Page 39
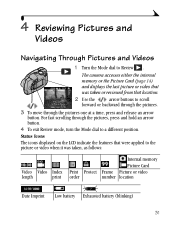
... and Videos Navigating Through Pictures and Videos 1 Turn the Mode dial to the picture or video when it was taken or reviewed from that were applied to Review . Status Icons The icons displayed on the LCD indicate the features that location. 2 Use the arrow buttons to scroll forward or... backward through the pictures. 3 To move through the pictures, press and hold an arrow button. 4 To exit Review mode, turn the Mode dial to a different position. The camera accesses either the internal memory or the Picture Card (page 14) and displays the last picture or video that was ...
... and Videos Navigating Through Pictures and Videos 1 Turn the Mode dial to the picture or video when it was taken or reviewed from that were applied to Review . Status Icons The icons displayed on the LCD indicate the features that location. 2 Use the arrow buttons to scroll forward or... backward through the pictures. 3 To move through the pictures, press and hold an arrow button. 4 To exit Review mode, turn the Mode dial to a different position. The camera accesses either the internal memory or the Picture Card (page 14) and displays the last picture or video that was ...

User Manual
Page 41
...displayed picture or video, then displays the next available picture or video. ALL-deletes all pictures and videos from the camera's internal memory or the Picture Card. 1 Turn the Mode dial to Review and press the Menu button. 2 Highlight the Delete menu , then press the Select button. 3 Highlight the delete... option you to the Review menus. NOTE: Protected pictures and videos cannot be deleted; remove protection before deleting (page 34). 33 Chapter 4 Deleting Pictures and Videos Use the...
...displayed picture or video, then displays the next available picture or video. ALL-deletes all pictures and videos from the camera's internal memory or the Picture Card. 1 Turn the Mode dial to Review and press the Menu button. 2 Highlight the Delete menu , then press the Select button. 3 Highlight the delete... option you to the Review menus. NOTE: Protected pictures and videos cannot be deleted; remove protection before deleting (page 34). 33 Chapter 4 Deleting Pictures and Videos Use the...

User Manual
Page 42
... Protect icon appears whenever the protected picture or video is protected and cannot be deleted. To protect a picture or video: 1 Turn the Mode dial to Review and display the picture or video you wish to prevent specific pictures and videos from being accidentally deleted from the internal memory or from the...
... Protect icon appears whenever the protected picture or video is protected and cannot be deleted. To protect a picture or video: 1 Turn the Mode dial to Review and display the picture or video you wish to prevent specific pictures and videos from being accidentally deleted from the internal memory or from the...

User Manual
Page 43
...the Select button. ALL-copies all of the pictures and videos from . NOTE: Pictures and videos are copying from your local photo retailer. m the camera's picture storage location is set to the location you may wish to copy pictures and videos to a Picture Card for portability: for viewing on a Picture... copy and save your selected storage location to the Copy screen. Or, you are copied, not moved. Copying Pictures 1 Turn the Mode dial to Review and press the Menu button. 2 Highlight the Copy menu , then press the Select button. 3 Highlight the Copy option you wish to use: PICTURE...
...the Select button. ALL-copies all of the pictures and videos from . NOTE: Pictures and videos are copying from your local photo retailer. m the camera's picture storage location is set to the location you may wish to copy pictures and videos to a Picture Card for portability: for viewing on a Picture... copy and save your selected storage location to the Copy screen. Or, you are copied, not moved. Copying Pictures 1 Turn the Mode dial to Review and press the Menu button. 2 Highlight the Copy menu , then press the Select button. 3 Highlight the Copy option you wish to use: PICTURE...

User Manual
Page 44
...detail on your pictures. NOTE: Magnify is available for automatic printing. When you insert the Picture Card into a KODAK Personal Picture Maker, or most printers equipped with a card reader, the selected pictures are automatically printed. Selecting Pictures... Press Select to redisplay the picture at the original size. Creating a Print Order 1 Turn the Mode dial to Review and press the Menu button. 2 Highlight the Print Order menu , then press the Select button. 36 This feature...Chapter 4 Magnifying Still Pictures Use the Magnify feature to zoom in the camera's internal memory.
...detail on your pictures. NOTE: Magnify is available for automatic printing. When you insert the Picture Card into a KODAK Personal Picture Maker, or most printers equipped with a card reader, the selected pictures are automatically printed. Selecting Pictures... Press Select to redisplay the picture at the original size. Creating a Print Order 1 Turn the Mode dial to Review and press the Menu button. 2 Highlight the Print Order menu , then press the Select button. 36 This feature...Chapter 4 Magnifying Still Pictures Use the Magnify feature to zoom in the camera's internal memory.

User Manual
Page 46
Starting the Slide Show 1 Turn the Mode dial to 60 seconds. You can increase the display interval to up to Review and press the Menu button. 2 Highlight the Slide Show menu , then press the Select button. 3 Highlight Begin Show, then press Select. The interval setting ...remains until you change it. 38 Changing the Display Interval The factory interval setting displays each 3 Press the Select button. Then the camera returns to the Menu screen. 4 To cancel the Slide Show, press Select. to select how long you wish to display each picture for connecting to...
Starting the Slide Show 1 Turn the Mode dial to 60 seconds. You can increase the display interval to up to Review and press the Menu button. 2 Highlight the Slide Show menu , then press the Select button. 3 Highlight Begin Show, then press Select. The interval setting ...remains until you change it. 38 Changing the Display Interval The factory interval setting displays each 3 Press the Select button. Then the camera returns to the Menu screen. 4 To cancel the Slide Show, press Select. to select how long you wish to display each picture for connecting to...

User Manual
Page 48
... and includes: file name, location of the file (Directory), date and time the picture was taken, and the quality setting. 3 Press the arrow buttons to Review and press the Menu button. 2 Highlight the Picture Info menu , then press the Select button. The information about each picture or video stored in your...
... and includes: file name, location of the file (Directory), date and time the picture was taken, and the quality setting. 3 Press the arrow buttons to Review and press the Menu button. 2 Highlight the Picture Info menu , then press the Select button. The information about each picture or video stored in your...

User Manual
Page 59
... Software Autostart If you do not want KODAK Picture Transfer and Picture Software to start automatically, you review each picture, give it a name, and select a destination folder on your computer, using Picture Transfer Software, refer to your computer. For this application. m Or, select ...
... Software Autostart If you do not want KODAK Picture Transfer and Picture Software to start automatically, you review each picture, give it a name, and select a destination folder on your computer, using Picture Transfer Software, refer to your computer. For this application. m Or, select ...

User Manual
Page 75
In Review mode, The camera may not be Check the picture storage you do not see a accessing the correct location setting (page 14). The subject is too dark. Picture is ... is missing. or do not see the picture you expected. The subject is too far Move so there is not behind the subject. removed. Chapter 9 Camera Problem Cause Solution Part of Change your position so the a bright light (backlit). picture on the flash (page 21). function. Your eye or the picture...
In Review mode, The camera may not be Check the picture storage you do not see a accessing the correct location setting (page 14). The subject is too dark. Picture is ... is missing. or do not see the picture you expected. The subject is too far Move so there is not behind the subject. removed. Chapter 9 Camera Problem Cause Solution Part of Change your position so the a bright light (backlit). picture on the flash (page 21). function. Your eye or the picture...
User Manual
Page 89
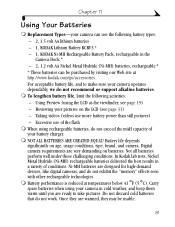
... 2, 1.5 volt AA lithium batteries - 1, KODAK Lithium Battery KCRV3 * - 1, KODAK Ni-MH Rechargeable Battery Pack, rechargeable in the Camera Dock * - 2, 1.2 volt AA Nickel Metal Hydride (Ni-MH) batteries, rechargeable * * These batteries can be usable. 81 Reviewing your camera operates dependably, we do not exceed the mAH... capacity of your battery charger. Battery life depends significantly on the LCD (see page 19) - In Kodak lab tests, Nickel Metal Hydride (Ni-MH) rechargeable...
... 2, 1.5 volt AA lithium batteries - 1, KODAK Lithium Battery KCRV3 * - 1, KODAK Ni-MH Rechargeable Battery Pack, rechargeable in the Camera Dock * - 2, 1.2 volt AA Nickel Metal Hydride (Ni-MH) batteries, rechargeable * * These batteries can be usable. 81 Reviewing your camera operates dependably, we do not exceed the mAH... capacity of your battery charger. Battery life depends significantly on the LCD (see page 19) - In Kodak lab tests, Nickel Metal Hydride (Ni-MH) rechargeable...


