User Manual
Page 2
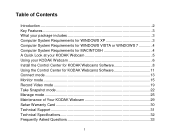
... package includes 3 Computer System Requirements for WINDOWS XP 3 Computer System Requirements for WINDOWS VISTA or WINDOWS 7 4 Computer System Requirements for MACINTOSH 4 A Quick Look at your KODAK Webcam 5 Using your KODAK Webcam 6 Install the Control Center for KODAK Webcams Software 8 Using the Control Center for KODAK Webcams Software 11 Connect mode...13 Monitor mode ...15 Record Video mode 19 Take Snapshot mode 22 Manage mode ...25 Maintenance of Your KODAK Webcam 29 Sakar Warranty Card 30 Technical Support 31 Technical Specifications 32 Frequently Asked Questions 33 1
... package includes 3 Computer System Requirements for WINDOWS XP 3 Computer System Requirements for WINDOWS VISTA or WINDOWS 7 4 Computer System Requirements for MACINTOSH 4 A Quick Look at your KODAK Webcam 5 Using your KODAK Webcam 6 Install the Control Center for KODAK Webcams Software 8 Using the Control Center for KODAK Webcams Software 11 Connect mode...13 Monitor mode ...15 Record Video mode 19 Take Snapshot mode 22 Manage mode ...25 Maintenance of Your KODAK Webcam 29 Sakar Warranty Card 30 Technical Support 31 Technical Specifications 32 Frequently Asked Questions 33 1
User Manual
Page 3
... the most popular social network sites from within the software application. Everything you for KODAK Webcams‟ software in real time. Introduction Thank you need to use your webcam to visually connect with webcam enabled VOIP applications including SKYPE Software and other popular instant messengers. These applications provide their own settings for the webcam We recommend installing and using the „Control Center for purchasing the KODAK P310 Webcam HD.
... the most popular social network sites from within the software application. Everything you for KODAK Webcams‟ software in real time. Introduction Thank you need to use your webcam to visually connect with webcam enabled VOIP applications including SKYPE Software and other popular instant messengers. These applications provide their own settings for the webcam We recommend installing and using the „Control Center for purchasing the KODAK P310 Webcam HD.
User Manual
Page 4
... network websites - Key Features Adjustable clamp to mount the webcam on any LCD monitor Control Center for KODAK Webcams software for uploading and managing photos and videos to your PC, you will need the following minimum configuration: PENTIUM 4 processor or above with WINDOWS XP service pack 2 512 MB RAM, with built-in USB cable Control Center for KODAK Webcams software Installation CD (Includes user manual) Quick Start Guide...
... network websites - Key Features Adjustable clamp to mount the webcam on any LCD monitor Control Center for KODAK Webcams software for uploading and managing photos and videos to your PC, you will need the following minimum configuration: PENTIUM 4 processor or above with WINDOWS XP service pack 2 512 MB RAM, with built-in USB cable Control Center for KODAK Webcams software Installation CD (Includes user manual) Quick Start Guide...
User Manual
Page 5
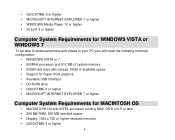
... WINDOWS 7 To be able to download photos and videos to your PC your will need the following minimum configuration: WINDOWS VISTA or 7 800MHz processor and 512 MB of system memory 20GB hard drive with at least 15GB of available space Support for Super VGA graphics Available USB Interface CD-ROM drive QUICKTIME 6 or higher MICROSOFT INTERNET EXPLORER...
... WINDOWS 7 To be able to download photos and videos to your PC your will need the following minimum configuration: WINDOWS VISTA or 7 800MHz processor and 512 MB of system memory 20GB hard drive with at least 15GB of available space Support for Super VGA graphics Available USB Interface CD-ROM drive QUICKTIME 6 or higher MICROSOFT INTERNET EXPLORER...
User Manual
Page 8
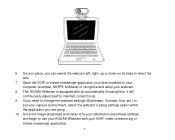
... computer (example: SKYPE Software) to recognize and setup your capture environment, select the webcam`s setup settings option within the application you are using. 10. It will continuously adjust itself to use your KODAK Webcam with an automatically focusing lens. Open the VOIP or instant messenger application you need to change the webcam settings (Brightness, Contrast, Hue, etc.) to direct the lens. 7. If you have installed on its...
... computer (example: SKYPE Software) to recognize and setup your capture environment, select the webcam`s setup settings option within the application you are using. 10. It will continuously adjust itself to use your KODAK Webcam with an automatically focusing lens. Open the VOIP or instant messenger application you need to change the webcam settings (Brightness, Contrast, Hue, etc.) to direct the lens. 7. If you have installed on its...
User Manual
Page 9
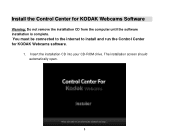
The installation screen should automatically open. 8 Insert the installation CD into your CD-ROM drive. Install the Control Center for KODAK Webcams software. 1. You must be connected to the internet to install and run the Control Center for KODAK Webcams Software Warning: Do not remove the installation CD from the computer until the software installation is complete.
The installation screen should automatically open. 8 Insert the installation CD into your CD-ROM drive. Install the Control Center for KODAK Webcams software. 1. You must be connected to the internet to install and run the Control Center for KODAK Webcams Software Warning: Do not remove the installation CD from the computer until the software installation is complete.
User Manual
Page 10
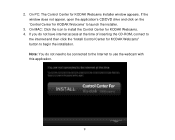
...;Control Center for KODAK Webcams‟ to install the Control Center for KODAK Webcams. 4. On PC: The Control Center for KODAK Webcams" button to use the webcam with this application. 9 On MAC: Click the icon to launch the installer. 3. Note: You do not have internet access at the time of inserting the CD-ROM, connect to the internet and then click the "Install Control Center for KODAK Webcams Installer window appears. If you do not need to be connected...
...;Control Center for KODAK Webcams‟ to install the Control Center for KODAK Webcams. 4. On PC: The Control Center for KODAK Webcams" button to use the webcam with this application. 9 On MAC: Click the icon to launch the installer. 3. Note: You do not have internet access at the time of inserting the CD-ROM, connect to the internet and then click the "Install Control Center for KODAK Webcams Installer window appears. If you do not need to be connected...

User Manual
Page 11
.... 9. On Macintosh: Click the "Quit" button when the installation is being installed on your webcam model" window opens. 6. Select your computer. 12. If you have internet access, the "Select your computer. 10 Please wait while the application is complete. 13. On PC: Click the "Close" button when the installation is complete. Click the "Launch Control Center for KODAK Webcams" installer create the folder to continue...
.... 9. On Macintosh: Click the "Quit" button when the installation is being installed on your webcam model" window opens. 6. Select your computer. 12. If you have internet access, the "Select your computer. 10 Please wait while the application is complete. 13. On PC: Click the "Close" button when the installation is complete. Click the "Launch Control Center for KODAK Webcams" installer create the folder to continue...
User Manual
Page 12
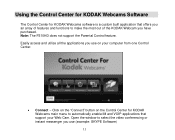
Easily access and utilize all the applications you use (example: SKYPE Software) 11 Open the window to make the most out of the KODAK Webcam you have purchased. Click on the "Connect" button on your Web Cam. Using the Control Center for KODAK Webcams Software The Control Center for KODAK Webcams main menu to automatically enable IM and VOIP applications that offers you an array of features and functions to select the video conferencing...
Easily access and utilize all the applications you use (example: SKYPE Software) 11 Open the window to make the most out of the KODAK Webcam you have purchased. Click on the "Connect" button on your Web Cam. Using the Control Center for KODAK Webcams Software The Control Center for KODAK Webcams main menu to automatically enable IM and VOIP applications that offers you an array of features and functions to select the video conferencing...

User Manual
Page 13
... the main menu to open to the Webcam Tab / Monitor screen in the center of which the image of that what the webcam "sees" will open a visual tour of how to manually adjust the webcam display settings Record Videos - Click on the "Take a Tour" button on the Control Center for KODAK Webcams main menu. To start recording a video with sound of this Control Center for KODAK Webcams software 12 The application will...
... the main menu to open to the Webcam Tab / Monitor screen in the center of which the image of that what the webcam "sees" will open a visual tour of how to manually adjust the webcam display settings Record Videos - Click on the "Take a Tour" button on the Control Center for KODAK Webcams main menu. To start recording a video with sound of this Control Center for KODAK Webcams software 12 The application will...
User Manual
Page 15
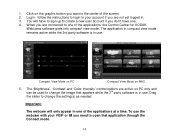
... Compact View Mode on the graphic button you want in the center of the screen. 2. Drag the slider to change the image that application through the Connect mode. 14 Important: The webcam will have one. 4. follow the instructions to login to your account if you are not yet logged in use the webcam with your VOIP or IM you need to create a new user account...
... Compact View Mode on the graphic button you want in the center of the screen. 2. Drag the slider to change the image that application through the Connect mode. 14 Important: The webcam will have one. 4. follow the instructions to login to your account if you are not yet logged in use the webcam with your VOIP or IM you need to create a new user account...
User Manual
Page 18
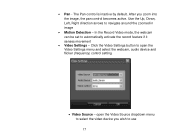
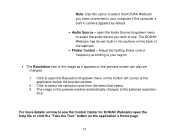
... Video Settings - The Pan control is inactive by default. In the Record Video mode, the webcam can be set to open the Video Source dropdown menu to select the video device you zoom into the image, the pan control becomes active. Use the Up, Down, Left, Right direction arrows to use 17 Pan - After you wish to navigate around the zoomed in image Motion Detection - open the Video Settings menu and select the webcam, audio device...
... Video Settings - The Pan control is inactive by default. In the Record Video mode, the webcam can be set to open the Video Source dropdown menu to select the video device you zoom into the image, the pan control becomes active. Use the Up, Down, Left, Right direction arrows to use 17 Pan - After you wish to navigate around the zoomed in image Motion Detection - open the Video Settings menu and select the webcam, audio device...
User Manual
Page 19
... menu that opens. 3. The KODAK Webcam has its own built-in microphone on how to use . The image in camera appears by default Audio Source - Adjust the lighting flicker control frequency according to your computer if the computer`s built in the preview window automatically changes to the selected resolution size. For more details on the back of the application below the preview window. 2. open the Help file or...
... menu that opens. 3. The KODAK Webcam has its own built-in microphone on how to use . The image in camera appears by default Audio Source - Adjust the lighting flicker control frequency according to your computer if the computer`s built in the preview window automatically changes to the selected resolution size. For more details on the back of the application below the preview window. 2. open the Help file or...
User Manual
Page 22
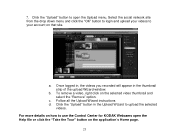
... "OK" button to login and upload your videos to open the Help file or click the "Take the Tour" button on how to upload the selected videos. For more details on the application`s Home page. 21 To remove a video, right click on that site. b. Once logged in, the videos you recorded will appear in the Upload Wizard to use the Control Center for KODAK Webcams open the Upload menu. a. Click the "Upload" button in...
... "OK" button to login and upload your videos to open the Help file or click the "Take the Tour" button on how to upload the selected videos. For more details on the application`s Home page. 21 To remove a video, right click on that site. b. Once logged in, the videos you recorded will appear in the Upload Wizard to use the Control Center for KODAK Webcams open the Upload menu. a. Click the "Upload" button in...

User Manual
Page 25
... down menu and click the "OK" button to login and upload your account on the thumbnail strip. Click the "Upload" button to open the Upload Wizard and menu. Once logged in, the photos you recorded will appear in the Manager mode. 7. b. The new photo is saved in jpeg format in the "Webcam Snapshot" album and can be viewed in the "Photos" tab directory in...
... down menu and click the "OK" button to login and upload your account on the thumbnail strip. Click the "Upload" button to open the Upload Wizard and menu. Once logged in, the photos you recorded will appear in the Manager mode. 7. b. The new photo is saved in jpeg format in the "Webcam Snapshot" album and can be viewed in the "Photos" tab directory in...
User Manual
Page 26
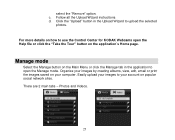
... the Upload Wizard to use the Control Center for KODAK Webcams open the Manage mode. Manage mode Select the Manage button on the application`s Home page. Click the "Upload" button in the application to your computer. c. Follow all the Upload Wizard instructions d. select the "Remove" option. There are 2 main tabs - For more details on popular social network sites. Photos and Videos. 25 Organize your images by creating albums, view, edit, email...
... the Upload Wizard to use the Control Center for KODAK Webcams open the Manage mode. Manage mode Select the Manage button on the application`s Home page. Click the "Upload" button in the application to your computer. c. Follow all the Upload Wizard instructions d. select the "Remove" option. There are 2 main tabs - For more details on popular social network sites. Photos and Videos. 25 Organize your images by creating albums, view, edit, email...

User Manual
Page 28
... add photos, select the time interval between photos and select background music to select and email the photos through the application with the default printer connected to your photo. 6. Email Photos - Print Photos - The Slideshow wizard allows you use on your computer. 9. Drag your images from the preview window to easily upload them to your computer. 8. 5. Click the "Print Photos" button to open...
... add photos, select the time interval between photos and select background music to select and email the photos through the application with the default printer connected to your photo. 6. Email Photos - Print Photos - The Slideshow wizard allows you use on your computer. 9. Drag your images from the preview window to easily upload them to your computer. 8. 5. Click the "Print Photos" button to open...

User Manual
Page 32
... Attention: Service Department 195 Carter Drive Edison, NJ 08817 In the U.K. For phone support please call, toll free 1-800-763-8491 in the US, or 0-800-917-4831 in a residential installati on. This equipment generates, uses and can be determined by turning the equipment...help. 31 Can‟t find manuals, software and FAQ‟s at www.sakar.com/kodaksupport. Caution: changes or modifications not expressly approved by one or more of the FCC rules. These limits are looking for compliance could void the user's authority to Part 15 of the FCC Rule. The user is connected...
... Attention: Service Department 195 Carter Drive Edison, NJ 08817 In the U.K. For phone support please call, toll free 1-800-763-8491 in the US, or 0-800-917-4831 in a residential installati on. This equipment generates, uses and can be determined by turning the equipment...help. 31 Can‟t find manuals, software and FAQ‟s at www.sakar.com/kodaksupport. Caution: changes or modifications not expressly approved by one or more of the FCC rules. These limits are looking for compliance could void the user's authority to Part 15 of the FCC Rule. The user is connected...
User Manual
Page 33
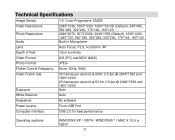
... (MAC) Photo Format JPEG Flicker Control Frequency None, 50Hz, 60Hz Video Frame rate Exposure 30 frames per second at 60Hz (15 fps @ 2048*1536 and 1600*1200) 25 frames per second at 50 Hz (13 fps @ 2048*1536 and 1600*1200) Auto White Balance Auto Snapshots By software Power source From USB Port Computer interface USB 2.0 for best performance Operating systems WINDOWS XP / VISTA / WINDOWS 7 / MAC...
... (MAC) Photo Format JPEG Flicker Control Frequency None, 50Hz, 60Hz Video Frame rate Exposure 30 frames per second at 60Hz (15 fps @ 2048*1536 and 1600*1200) 25 frames per second at 50 Hz (13 fps @ 2048*1536 and 1600*1200) Auto White Balance Auto Snapshots By software Power source From USB Port Computer interface USB 2.0 for best performance Operating systems WINDOWS XP / VISTA / WINDOWS 7 / MAC...
User Manual
Page 34
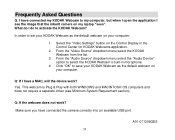
... driver (see the image that the inbuilt camera on your computer: 1. From the "Video Source" dropdown menu select the KODAK Webcam from the list. 3. Q: If I have a MAC, will the device work ? Make sure you have connected the camera correctly into an available USB port. What do to set your KODAK Webcam as the default webcam on my laptop "sees". Yes. In order to activate the KODAK Webcam? Select the "Video Settings" button...
... driver (see the image that the inbuilt camera on your computer: 1. From the "Video Source" dropdown menu select the KODAK Webcam from the list. 3. Q: If I have a MAC, will the device work ? Make sure you have connected the camera correctly into an available USB port. What do to set your KODAK Webcam as the default webcam on my laptop "sees". Yes. In order to activate the KODAK Webcam? Select the "Video Settings" button...

