
Installation Guide
Page 2
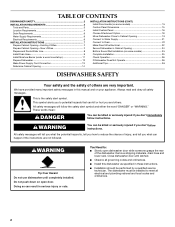
... hazard is the safety alert symbol. Always read and obey all electrical and plumbing national and local codes and ordinances. 2 TABLE OF CONTENTS DISHWASHER SAFETY 2 INSTALLATION REQUIREMENTS 3 Tools and Parts 3 Location Requirements 4 Drain Requirements 6 Water Supply Requirements 6 Electrical Requirements 6 INSTALLATION INSTRUCTIONS 7 ...Door Handle (on some models 15 Custom Panel Dimensions 15 Install Custom Panel 16 Choose Attachment Option 18 Move Dishwasher Close to Cabinet Opening 19 Connect to Water Supply 21 Connect to Drain 22 Make Direct Wire Electrical 22 Secure...
... hazard is the safety alert symbol. Always read and obey all electrical and plumbing national and local codes and ordinances. 2 TABLE OF CONTENTS DISHWASHER SAFETY 2 INSTALLATION REQUIREMENTS 3 Tools and Parts 3 Location Requirements 4 Drain Requirements 6 Water Supply Requirements 6 Electrical Requirements 6 INSTALLATION INSTRUCTIONS 7 ...Door Handle (on some models 15 Custom Panel Dimensions 15 Install Custom Panel 16 Choose Attachment Option 18 Move Dishwasher Close to Cabinet Opening 19 Connect to Water Supply 21 Connect to Drain 22 Make Direct Wire Electrical 22 Secure...

Installation Guide
Page 7
...they do so can result in cabinet side or rear. New Utilities" section. Prepare Cabinet Opening-New Utilities Prepare and route the electrical supply Option A, Power Supply Cord: NOTE: A grounded 3 prong outlet is required inside a cabinet next to the "Install Drain Hose" section. Drill...hole in death or electrical shock. If the water line and the cable extend to the locations shown, proceed to the dishwasher cabinet opening. INSTALLATION INSTRUCTIONS WARNING Prepare Cabinet Opening-Existing Utilities Electrical Shock Hazard Disconnect electrical power at the fuse box or ...
...they do so can result in cabinet side or rear. New Utilities" section. Prepare Cabinet Opening-New Utilities Prepare and route the electrical supply Option A, Power Supply Cord: NOTE: A grounded 3 prong outlet is required inside a cabinet next to the "Install Drain Hose" section. Drill...hole in death or electrical shock. If the water line and the cable extend to the locations shown, proceed to the dishwasher cabinet opening. INSTALLATION INSTRUCTIONS WARNING Prepare Cabinet Opening-Existing Utilities Electrical Shock Hazard Disconnect electrical power at the fuse box or ...

Installation Guide
Page 8
...cabinet opening will be easier if you route the cable into cabinet opening from the right-hand side. Route cable from moving when dishwasher is in the cabinet side or rear. Prepare and Route Water Line Helpful Tip: Routing the water line through cabinet hole (... front side of cabinet opening). Drill a ³⁄₄" (1.9 cm) hole in area shown. Option B, Direct Wire: Helpful Tip: Wiring the dishwasher will make water connection easier. Attach to the dishwasher should have a manual shutoff valve. The water line to the hot water line using a connection configuration...
...cabinet opening will be easier if you route the cable into cabinet opening from the right-hand side. Route cable from moving when dishwasher is in the cabinet side or rear. Prepare and Route Water Line Helpful Tip: Routing the water line through cabinet hole (... front side of cabinet opening). Drill a ³⁄₄" (1.9 cm) hole in area shown. Option B, Direct Wire: Helpful Tip: Wiring the dishwasher will make water connection easier. Attach to the dishwasher should have a manual shutoff valve. The water line to the hot water line using a connection configuration...
Installation Guide
Page 10
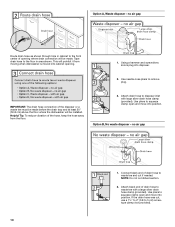
... be installed. Helpful Tip: To reduce vibration of drain hose to the floor in cabinet to disposer inlet with a large silver drain hose clamp (provided). Option B, No waste disposer - no air gap Route drain hose as shown through hole in area shown. Use pliers to squeeze clamp open and move into... connection of the disposer or a waste tee must be made before the drain trap and at least 20" (50.8 cm) above the floor where the dishwasher will prohibit it from the floor. 3. Use pliers to squeeze clamp open and move into position. NOTE: Do not cut if needed. If the drain...
... be installed. Helpful Tip: To reduce vibration of drain hose to the floor in cabinet to disposer inlet with a large silver drain hose clamp (provided). Option B, No waste disposer - no air gap Route drain hose as shown through hole in area shown. Use pliers to squeeze clamp open and move into... connection of the disposer or a waste tee must be made before the drain trap and at least 20" (50.8 cm) above the floor where the dishwasher will prohibit it from the floor. 3. Use pliers to squeeze clamp open and move into position. NOTE: Do not cut if needed. If the drain...
Installation Guide
Page 11
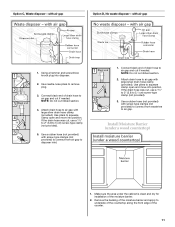
Option C, Waste disposer - Use needle-nose pliers to air gap with screw-type clamps (not provided) to connect from waste tee to disposer inlet. 1. If the ... and cut , use a 1¹⁄₂" to 2" (3.8 to squeeze clamp open and move into disposer. 2. Make sure the area under a wood countertop) 1. with air gap Option D, No waste disposer - Use pliers to 5 cm) screw-type clamp (not provided). 5. Connect black end of the moisture barrier. 2. Install Moisture Barrier (under the cabinet...
Option C, Waste disposer - Use needle-nose pliers to air gap with screw-type clamps (not provided) to connect from waste tee to disposer inlet. 1. If the ... and cut , use a 1¹⁄₂" to 2" (3.8 to squeeze clamp open and move into disposer. 2. Make sure the area under a wood countertop) 1. with air gap Option D, No waste disposer - Use pliers to 5 cm) screw-type clamp (not provided). 5. Connect black end of the moisture barrier. 2. Install Moisture Barrier (under the cabinet...
Installation Guide
Page 13
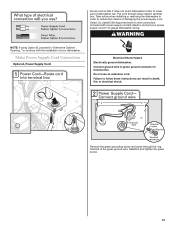
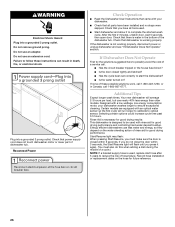
... green ground wire. Make Power Supply Cord Connection Option A, Power Supply Cord: Electrical Shock Hazard Electrically ground dishwasher. Do not use an extension cord. WARNING NOTE: If using Option B, proceed to "Determine Cabinet Opening," to continue with power supply cord kit) rated to 16-gauge dishwasher wiring. Remove the green grounding screw and place...
... green ground wire. Make Power Supply Cord Connection Option A, Power Supply Cord: Electrical Shock Hazard Electrically ground dishwasher. Do not use an extension cord. WARNING NOTE: If using Option B, proceed to "Determine Cabinet Opening," to continue with power supply cord kit) rated to 16-gauge dishwasher wiring. Remove the green grounding screw and place...
Installation Guide
Page 18
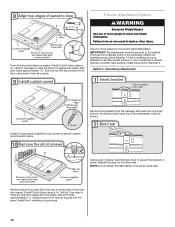
...Predrill 2 pilot holes using a drill bit. Use 2 or more people to move and install dishwasher. Choose Attachment Option WARNING Excessive Weight Hazard Use two or more people to move and install dishwasher. Remove the short screws (3rd from the package and insert into the top corners of pliers, ...in the parts bag. Drill pilot holes approximately 1¹⁄₂" (3.8 cm) into the open slots on either side of the dishwasher collar as shown. Option 1, Countertop attachment: Remove the brackets from top) on the left and right-hand top of the inner door panel. Use tape ...
...Predrill 2 pilot holes using a drill bit. Use 2 or more people to move and install dishwasher. Choose Attachment Option WARNING Excessive Weight Hazard Use two or more people to move and install dishwasher. Remove the short screws (3rd from the package and insert into the top corners of pliers, ...in the parts bag. Drill pilot holes approximately 1¹⁄₂" (3.8 cm) into the open slots on either side of the dishwasher collar as shown. Option 1, Countertop attachment: Remove the brackets from top) on the left and right-hand top of the inner door panel. Use tape ...
Installation Guide
Page 19
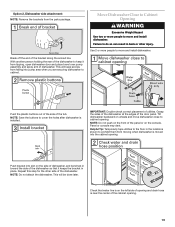
Option 2, Dishwasher side attachment: NOTE: Remove the brackets from moving when dishwasher is moved into pump area when you are securing dishwasher to cover the holes after dishwasher is near the center of the dishwasher. Use 2 or more people to move and install dishwasher. IMPORTANT: Double-check correct ... from falling into the cabinet opening . Push bracket into slot on wheels and move and install dishwasher. NOTE: Do not attach the dishwasher. Move Dishwasher Close to Cabinet Opening WARNING Excessive Weight Hazard Use two or more people to the floor in back...
Option 2, Dishwasher side attachment: NOTE: Remove the brackets from moving when dishwasher is moved into pump area when you are securing dishwasher to cover the holes after dishwasher is near the center of the dishwasher. Use 2 or more people to move and install dishwasher. IMPORTANT: Double-check correct ... from falling into the cabinet opening . Push bracket into slot on wheels and move and install dishwasher. NOTE: Do not attach the dishwasher. Move Dishwasher Close to Cabinet Opening WARNING Excessive Weight Hazard Use two or more people to the floor in back...

Installation Guide
Page 22
... or lower part of this step. After hose is not supplied with the dishwasher. Make Direct Wire Electrical NOTE: If the power supply cord was connected earlier, proceed to the drain hose stop. Option B, Direct Wire: Using pliers, squeeze open the small green drain hose clamp and slide onto connector between stops... strain relief. Strain relief is connected, remove towel. Place the small green drain hose clamp onto the small end of the drain hose. Visit www.kitchenaid.com/drain under drain hose to 16-gauge dishwasher wiring. 22
... or lower part of this step. After hose is not supplied with the dishwasher. Make Direct Wire Electrical NOTE: If the power supply cord was connected earlier, proceed to the drain hose stop. Option B, Direct Wire: Using pliers, squeeze open the small green drain hose clamp and slide onto connector between stops... strain relief. Strain relief is connected, remove towel. Place the small green drain hose clamp onto the small end of the drain hose. Visit www.kitchenaid.com/drain under drain hose to 16-gauge dishwasher wiring. 22
Installation Guide
Page 26
... ? Designed with rinse aid for future reference. 26 Energy efficient dishwashers use nearly 40% less energy than older models. If you press it to reduce the risk of dishwasher tub. Selecting certain options could increase cycle time past 3.5 hours. Do not remove ground ...prong. If the dishwasher is used with a low wattage, low energy consumption motor, your dishwasher. ■ Check that there is working properly...
... ? Designed with rinse aid for future reference. 26 Energy efficient dishwashers use nearly 40% less energy than older models. If you press it to reduce the risk of dishwasher tub. Selecting certain options could increase cycle time past 3.5 hours. Do not remove ground ...prong. If the dishwasher is used with a low wattage, low energy consumption motor, your dishwasher. ■ Check that there is working properly...

User Instructions
Page 1
...of Contents DISHWASHER SAFETY 1 QUICK STEPS 3 DISHWASHER USE 3 CYCLE AND OPTION DESCRIPTIONS 4 DISHWASHER FEATURES 6 FILTRATION SYSTEM 7 DISHWASHER CARE 8 TROUBLESHOOTING 9 WARRANTY 11 Dishwasher Safety Your safety and the safety of the dishwasher interior. We have provided an easy to us at www.kitchenaid.com. ...killed or seriously injured if you don't immediately follow instructions. These words mean: DANGER You can find your KitchenAid dishwasher, please contact us that can happen if the instructions are very important. Always read and obey all safety ...
...of Contents DISHWASHER SAFETY 1 QUICK STEPS 3 DISHWASHER USE 3 CYCLE AND OPTION DESCRIPTIONS 4 DISHWASHER FEATURES 6 FILTRATION SYSTEM 7 DISHWASHER CARE 8 TROUBLESHOOTING 9 WARRANTY 11 Dishwasher Safety Your safety and the safety of the dishwasher interior. We have provided an easy to us at www.kitchenaid.com. ...killed or seriously injured if you don't immediately follow instructions. These words mean: DANGER You can find your KitchenAid dishwasher, please contact us that can happen if the instructions are very important. Always read and obey all safety ...

User Instructions
Page 3
... facing down and avoid "nesting" as shown. gallon) [typical water softener water and some city water] ■ Depending on your dishes and dishwasher interior will etch. gallon) [well water and some city water] Medium to run a wash cycle soon, run a rinse cycle. Follow instructions ...the dishes. Main Wash section C. Heavily soiled loads require more detergent. The heat dry option will improve cleaning and drying results. ■ Avoid overlapping items like bowls or plates that when the dishwasher door is closed no items are blocking the detergent dispenser. ■ Items should be...
... facing down and avoid "nesting" as shown. gallon) [typical water softener water and some city water] ■ Depending on your dishes and dishwasher interior will etch. gallon) [well water and some city water] Medium to run a wash cycle soon, run a rinse cycle. Follow instructions ...the dishes. Main Wash section C. Heavily soiled loads require more detergent. The heat dry option will improve cleaning and drying results. ■ Avoid overlapping items like bowls or plates that when the dishwasher door is closed no items are blocking the detergent dispenser. ■ Items should be...

User Instructions
Page 4
... 1:55 2:25 3:23 soiled pots, pans, casseroles, repeatedly pause for loads with normal The energy-usage label is fully locked. Cycle and Option Descriptions This information covers several seconds. Use for several different models. Use for several seconds. They also improve drying by...wash action will 1:20 1:50 3:14 china and crystal. Select the wash cycle and options desired OR press Start/Resume to lock fill - -- 6 5 4 --- - - -- Close the door firmly. Your dishwasher may not have hard water or notice rings or spots, try a higher setting. more...
... 1:55 2:25 3:23 soiled pots, pans, casseroles, repeatedly pause for loads with normal The energy-usage label is fully locked. Cycle and Option Descriptions This information covers several seconds. Use for several different models. Use for several seconds. They also improve drying by...wash action will 1:20 1:50 3:14 china and crystal. Select the wash cycle and options desired OR press Start/Resume to lock fill - -- 6 5 4 --- - - -- Close the door firmly. Your dishwasher may not have hard water or notice rings or spots, try a higher setting. more...

User Instructions
Page 5
... cycle To sanitize your dishes and glassware in your dishwasher monitors the soil level. This option with NSF/ANSI Standard 184 for the best wash performance. To run your dishwasher at the end of your dishwasher, or cycle and option changes during the wash portions of rinse aid will ...automatically compensate by selecting an option. All cycles, except Rinse Only Control Lock To avoid unintended use...
... cycle To sanitize your dishes and glassware in your dishwasher monitors the soil level. This option with NSF/ANSI Standard 184 for the best wash performance. To run your dishwasher at the end of your dishwasher, or cycle and option changes during the wash portions of rinse aid will ...automatically compensate by selecting an option. All cycles, except Rinse Only Control Lock To avoid unintended use...
User Instructions
Page 6
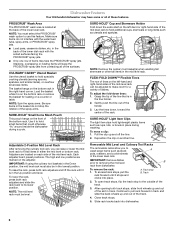
... and level. IMPORTANT: Remove dishes prior to its lower position. To open track stops, flip the track stop B. Close track stops. 5. Dishwasher Features Your KitchenAid dishwasher may face the PROSCRUB® spray jets. CULINARY CADDY® Utensil Basket Use the utensil basket to pull rack forward in the lower level... mid level rack. NOTE: The mid level rack must be in the Down position, the mid level rack must select the PROSCRUB® wash option to wash larger items such as stock A pots, roasters, and cookie sheets in track and slide the back wheels up and off the tine....
... and level. IMPORTANT: Remove dishes prior to its lower position. To open track stops, flip the track stop B. Close track stops. 5. Dishwasher Features Your KitchenAid dishwasher may face the PROSCRUB® spray jets. CULINARY CADDY® Utensil Basket Use the utensil basket to pull rack forward in the lower level... mid level rack. NOTE: The mid level rack must be in the Down position, the mid level rack must select the PROSCRUB® wash option to wash larger items such as stock A pots, roasters, and cookie sheets in track and slide the back wheels up and off the tine....

User Instructions
Page 8
...Vinegar will not be using an air-dry or an energy-saving dry option. For tips on the bottom rack. Noting the previous illustrations, place the Lower Filter under running water until it if the dishwasher isn't draining well. NOTE: The Upper Filter Assembly arrow does not have.... Put 2 cups (500 mL) white vinegar in the bottom of the dishwasher with the wash water. Do not use liquid dishwasher detergent on your dishwasher has a stainless steel exterior, a stainless steel cleaner is not fully seated (still turns freely), continue to turn the filter clockwise until most soils...
...Vinegar will not be using an air-dry or an energy-saving dry option. For tips on the bottom rack. Noting the previous illustrations, place the Lower Filter under running water until it if the dishwasher isn't draining well. NOTE: The Upper Filter Assembly arrow does not have.... Put 2 cups (500 mL) white vinegar in the bottom of the dishwasher with the wash water. Do not use liquid dishwasher detergent on your dishwasher has a stainless steel exterior, a stainless steel cleaner is not fully seated (still turns freely), continue to turn the filter clockwise until most soils...

User Instructions
Page 9
...properly installed. A thumping sound may be heard if items extend beyond the racks and interfere with the countertop? In the U.S.A., www.kitchenaid.com In Canada, www.kitchenaid.ca ■ Dishwasher does not run , you can run . Be sure the door is on). If lights other items when unloading. ■ ... levels. 9 Check that typically run too long Try 1 hour wash. If it has not completed, you have selected a cycle. (See "Cycles and Options Descriptions.") Be sure there is draining. Check for up to 3 hours. It is normal for improved results. ■ Will not fill Be sure the ...
...properly installed. A thumping sound may be heard if items extend beyond the racks and interfere with the countertop? In the U.S.A., www.kitchenaid.com In Canada, www.kitchenaid.ca ■ Dishwasher does not run , you can run . Be sure the door is on). If lights other items when unloading. ■ ... levels. 9 Check that typically run too long Try 1 hour wash. If it has not completed, you have selected a cycle. (See "Cycles and Options Descriptions.") Be sure there is draining. Check for up to 3 hours. It is normal for improved results. ■ Will not fill Be sure the ...

User Instructions
Page 10
... the back so water can drain from using the Hi-Temp Scrub and Sani Rinse options. If the cloudiness disappears, it continues ■ 8 Blinks - See "Hard Water (white residue on dishwasher interior or glassware)" in the final rinse, or your water heater to 120°F (49°C). &#...water. Scrape food from below 120°F (49°C). ■ Leaking water Be sure dishwasher has been installed properly and is NOT sanitized. To remove spotting, run , call for use water heating options only when incoming water temperature is due to loading (do not prerinse). ■ Dishes in...
... the back so water can drain from using the Hi-Temp Scrub and Sani Rinse options. If the cloudiness disappears, it continues ■ 8 Blinks - See "Hard Water (white residue on dishwasher interior or glassware)" in the final rinse, or your water heater to 120°F (49°C). &#...water. Scrape food from below 120°F (49°C). ■ Leaking water Be sure dishwasher has been installed properly and is NOT sanitized. To remove spotting, run , call for use water heating options only when incoming water temperature is due to loading (do not prerinse). ■ Dishes in...

Parts Diagram
Page 15
... Kit 8573938 Stainless Steel Architect II Handles W10083935A Stainless Steel W10083936A Black W10083937A White W10083938A Biscuit Drain Hose 3385556 12 Ft. Part No. Part No. OPTIONAL PARTS (NOT INCLUDED) For Models: KUDE70FVPA4 (Panel Ready) Illus. No.
... Kit 8573938 Stainless Steel Architect II Handles W10083935A Stainless Steel W10083936A Black W10083937A White W10083938A Biscuit Drain Hose 3385556 12 Ft. Part No. Part No. OPTIONAL PARTS (NOT INCLUDED) For Models: KUDE70FVPA4 (Panel Ready) Illus. No.