
Energy Guide
Page 1
Dishwasher Capacity: Compact KITCHENAID Models: KUDD03ST Estimated Yearly Operating Cost $19(When used with an electric water heater) $19 $34 Cost range of similar models 174 kWh Estimated Yearly Electricity Use $15 Estimated Yearly Operating Cost (when used with a natural gas water heater) Your cost will depend on your utility rates and use Cost range based only on four wash loads a week and a 2007 national average electricity cost of...
Dishwasher Capacity: Compact KITCHENAID Models: KUDD03ST Estimated Yearly Operating Cost $19(When used with an electric water heater) $19 $34 Cost range of similar models 174 kWh Estimated Yearly Electricity Use $15 Estimated Yearly Operating Cost (when used with a natural gas water heater) Your cost will depend on your utility rates and use Cost range based only on four wash loads a week and a 2007 national average electricity cost of...
Use & Care Guide
Page 1
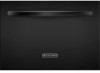
...." This symbol alerts you to help you through any problems you and others are not followed. For your complete model and serial number ready. Tenga listo su número completo de modelo y de serie. DRAWER DISHWASHER USER INSTRUCTIONS Thank you have a positive experience owning a KitchenAid® product. If you need further assistance using your KitchenAid dishwasher, please contact us that can find your appliance. We...
...." This symbol alerts you to help you through any problems you and others are not followed. For your complete model and serial number ready. Tenga listo su número completo de modelo y de serie. DRAWER DISHWASHER USER INSTRUCTIONS Thank you have a positive experience owning a KitchenAid® product. If you need further assistance using your KitchenAid dishwasher, please contact us that can find your appliance. We...

Use & Care Guide
Page 2
...; Use only detergents or rinse agents recommended for use . ■ Do not operate the dishwasher unless all enclosure panels are properly in place. ■ Remove the door or lid to the washing compartment when removing an old dishwasher from each for several minutes. This will reduce the risk of electric shock by a qualified electrician. ■ For a permanently connected dishwasher: The dishwasher must be connected to a grounded metal, permanent wiring...
...; Use only detergents or rinse agents recommended for use . ■ Do not operate the dishwasher unless all enclosure panels are properly in place. ■ Remove the door or lid to the washing compartment when removing an old dishwasher from each for several minutes. This will reduce the risk of electric shock by a qualified electrician. ■ For a permanently connected dishwasher: The dishwasher must be connected to a grounded metal, permanent wiring...

Use & Care Guide
Page 3
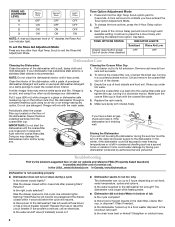
... noises during operation: Load dishes so they do not plan to Medium Water (0-6 grains per U.S. Add powder or liquid just before washing. ■ Make sure nothing keeps spray arm(s) from the dishes. gallon) [well water and some city water] Medium to the spray as shown. Soft to run a wash cycle soon, run a rinse cycle. Remove labels from containers before starting a cycle. ■ Fresh automatic dishwasher detergent results in soft water, glassware will improve cleaning and drying...
... noises during operation: Load dishes so they do not plan to Medium Water (0-6 grains per U.S. Add powder or liquid just before washing. ■ Make sure nothing keeps spray arm(s) from the dishes. gallon) [well water and some city water] Medium to the spray as shown. Soft to run a wash cycle soon, run a rinse cycle. Remove labels from containers before starting a cycle. ■ Fresh automatic dishwasher detergent results in soft water, glassware will improve cleaning and drying...
Use & Care Guide
Page 4
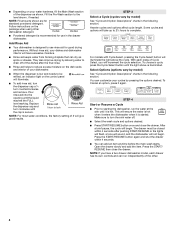
... controls and can dry as shown. ■ Depending on the package when using other . 4 Heavier cycles and options affect cycle length. Press the START/RESUME button again and shut the drawer within 4 seconds after the final rinse. ■ Rinse aid helps to lock NOTE: For most water conditions, the factory setting of your cycles by allowing water to starting the dishwasher, run independently of the dishes after pushing START/RESUME or the lights...
... controls and can dry as shown. ■ Depending on the package when using other . 4 Heavier cycles and options affect cycle length. Press the START/RESUME button again and shut the drawer within 4 seconds after the final rinse. ■ Rinse aid helps to lock NOTE: For most water conditions, the factory setting of your cycles by allowing water to starting the dishwasher, run independently of the dishes after pushing START/RESUME or the lights...

Use & Care Guide
Page 5
... to adjust amount of dry time, the clean light will not be required. NOTE: Dry time (fan running) is typically 4 hours after the clean light is lit and the drawer is based on water temperature, heavy soil condition, dish load size and options selected. glasses, and silverware that will illuminate. Your dishwasher may be washed right away. and regular tableware. Use for loads with normal The energy-usage label is opened for rinsing dishes, This cycle...
... to adjust amount of dry time, the clean light will not be required. NOTE: Dry time (fan running) is typically 4 hours after the clean light is lit and the drawer is based on water temperature, heavy soil condition, dish load size and options selected. glasses, and silverware that will illuminate. Your dishwasher may be washed right away. and regular tableware. Use for loads with normal The energy-usage label is opened for rinsing dishes, This cycle...

Use & Care Guide
Page 6
... Dishwashers. To sanitize your dishwasher, or cycle and option changes during offpeak hours. Increases the target water temperature during a cycle, a delay, or the power is lit, all wash cycles unless you open the drawer, press Start/Resume and close the drawer or press CANCEL. Select a wash cycle and options. To turn off . Sensor Wash, Heavy Duty and Normal Wash. All cycles, except Rinse Only Control Lock To avoid unintended use of rinse aid will turn off when you turn on food. When Control Lock...
... Dishwashers. To sanitize your dishwasher, or cycle and option changes during offpeak hours. Increases the target water temperature during a cycle, a delay, or the power is lit, all wash cycles unless you open the drawer, press Start/Resume and close the drawer or press CANCEL. Select a wash cycle and options. To turn off . Sensor Wash, Heavy Duty and Normal Wash. All cycles, except Rinse Only Control Lock To avoid unintended use of rinse aid will turn off when you turn on food. When Control Lock...
Use & Care Guide
Page 7
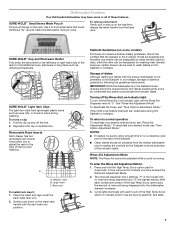
... Scrub option to indicate which allow enough time to run a cleaning cycle prior to the B type of the indicator lights. Removable Rack Inserts Each drawer has two removable rack inserts which rinse aid level is running. However, neither drawer can be opened slowly and dishes loaded gently since an unintended key press could otherwise "fly" around inside the dishwasher during the Sabbath or holidays. Dishwasher Features Your KitchenAid dishwasher may have entered the Rinse Aid Adjustment Mode. 2. SURE...
... Scrub option to indicate which allow enough time to run a cleaning cycle prior to the B type of the indicator lights. Removable Rack Inserts Each drawer has two removable rack inserts which rinse aid level is running. However, neither drawer can be opened slowly and dishes loaded gently since an unintended key press could otherwise "fly" around inside the dishwasher during the Sabbath or holidays. Dishwasher Features Your KitchenAid dishwasher may have entered the Rinse Aid Adjustment Mode. 2. SURE...
Use & Care Guide
Page 8
... 1 ON OFF OFF 2 ON ON OFF 3 ON ON ON NOTE: A rinse aid dispenser level of the 4-Hour Delay pad will move through a complete washing cycle using an air-dry or an energy-saving dry option. Each press of "0" disables the Rinse-Aid Low indicator light. TONE OPTIONS STATUS INDICATOR LIGHTS Sanitized Rinse Aid Low Drawer open/button press/ OFF OFF End-of-cycle chime disabled Dishwasher Care Cleaning the Dishwasher Clean the exterior of hard objects and food soil. Empty the...
... 1 ON OFF OFF 2 ON ON OFF 3 ON ON ON NOTE: A rinse aid dispenser level of the 4-Hour Delay pad will move through a complete washing cycle using an air-dry or an energy-saving dry option. Each press of "0" disables the Rinse-Aid Low indicator light. TONE OPTIONS STATUS INDICATOR LIGHTS Sanitized Rinse Aid Low Drawer open/button press/ OFF OFF End-of-cycle chime disabled Dishwasher Care Cleaning the Dishwasher Clean the exterior of hard objects and food soil. Empty the...

Use & Care Guide
Page 9
... softened water, alkaline washing solutions, insufficient rinsing, overloading the dishwasher, and the heat of glassware. This is a water/chemical reaction with heavier soils, use the correct amount of china and glassware might not be removed. ■ White spots on dishes and dishwasher interior Does your dishwasher? Minimize chipping by hand. Wash by closing the drawer slowly. See "Installation Instructions." Do not overload. Is the rinse aid low light on dishes placed...
... softened water, alkaline washing solutions, insufficient rinsing, overloading the dishwasher, and the heat of glassware. This is a water/chemical reaction with heavier soils, use the correct amount of china and glassware might not be removed. ■ White spots on dishes and dishwasher interior Does your dishwasher? Minimize chipping by hand. Wash by closing the drawer slowly. See "Installation Instructions." Do not overload. Is the rinse aid low light on dishes placed...

Use & Care Guide
Page 10
... "KitchenAid") will pay for other than normal, single-family household use your model number and serial number on the label located on the left hand side of the upper drawer. Service calls to correct the installation of your major appliance, to instruct you can find your major appliance, to replace or repair house fuses or to correct house wiring or plumbing. 2. Service calls to repair or replace appliance light bulbs, air filters or water filters. Repairs to parts...
... "KitchenAid") will pay for other than normal, single-family household use your model number and serial number on the label located on the left hand side of the upper drawer. Service calls to correct the installation of your major appliance, to instruct you can find your major appliance, to replace or repair house fuses or to correct house wiring or plumbing. 2. Service calls to repair or replace appliance light bulbs, air filters or water filters. Repairs to parts...
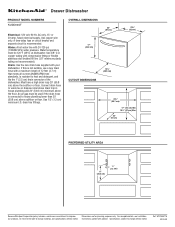
Dimension Guide
Page 1
... A time-delay fuse or circuit breaker and separate circuit is connected to change without notice. copper tubing with your dishwasher. Drain: Use the new drain hose supplied with compression fitting or flexible stainless steel braided fill line (1/2" minimum plastic tubing not recommended). Use 1/2" (1.3 cm) minimum I.D. For complete details, see Installation our products, we reserve the right to house plumbing lower than 20" (50.8 cm) above subfloor or floor. fused electrical supply. Water temperature...
... A time-delay fuse or circuit breaker and separate circuit is connected to change without notice. copper tubing with your dishwasher. Drain: Use the new drain hose supplied with compression fitting or flexible stainless steel braided fill line (1/2" minimum plastic tubing not recommended). Use 1/2" (1.3 cm) minimum I.D. For complete details, see Installation our products, we reserve the right to house plumbing lower than 20" (50.8 cm) above subfloor or floor. fused electrical supply. Water temperature...
Installation Guide
Page 3
... function. ■ Use only detergents or rinse agents recommended for use in place. ■ Do not tamper with the handles up to damage the door seal; If the hot water system has not been used for such a period, before using the dishwasher turn on all governing codes and ordinances. ■ Install this dishwasher as specified in this time. ■ Remove the door or lid to : ■ Slowly open dishwasher drawer while someone grasps...
... function. ■ Use only detergents or rinse agents recommended for use in place. ■ Do not tamper with the handles up to damage the door seal; If the hot water system has not been used for such a period, before using the dishwasher turn on all governing codes and ordinances. ■ Install this dishwasher as specified in this time. ■ Remove the door or lid to : ■ Slowly open dishwasher drawer while someone grasps...

Installation Guide
Page 4
... the warranty. ■ This dishwasher is manufactured for its size and use only. ■ Install and level dishwasher on some models) J. 10 TORX®† screws (on a floor that all governing codes and ordinances. Zip tie C. 2 appropriate sized UL listed wire connectors D. Overlay panel (if installing custom front panels) A. ³⁄₄" UL listed strain relief B. 2 mounting brackets C. 1.25" hose clamp D. 4 mounting bracket screws E. 2 unit mounting screws F. Tools needed ■ Pliers ■ 10" adjustable wrench...
... the warranty. ■ This dishwasher is manufactured for its size and use only. ■ Install and level dishwasher on some models) J. 10 TORX®† screws (on a floor that all governing codes and ordinances. Zip tie C. 2 appropriate sized UL listed wire connectors D. Overlay panel (if installing custom front panels) A. ³⁄₄" UL listed strain relief B. 2 mounting brackets C. 1.25" hose clamp D. 4 mounting bracket screws E. 2 unit mounting screws F. Tools needed ■ Pliers ■ 10" adjustable wrench...

Installation Guide
Page 5
... or right-hand drain and water connection route. Do not use an extension cord. if it will reduce the risk of electric shock by a qualified electrician. ■ For a permanently connected dishwasher: The dishwasher must be connected to follow these instructions can result in conformance with all national and local codes and ordinances. Do not remove ground prong. Do not use an adapter. In the event...
... or right-hand drain and water connection route. Do not use an extension cord. if it will reduce the risk of electric shock by a qualified electrician. ■ For a permanently connected dishwasher: The dishwasher must be connected to follow these instructions can result in conformance with all national and local codes and ordinances. Do not remove ground prong. Do not use an adapter. In the event...

Installation Guide
Page 6
..., use a new drain hose with dishwashers. It is not recommended). Turn off water supply. Remove shipping materials, tape and film from inside the dishwasher. 6 If direct wiring dishwasher: ■ Use flexible, armored or nonmetallic sheathed, copper wire with grounding wire that the drain hose either be looped up and securely fastened to the underside of the dishwasher. ■ Connect drain hose to move and install dishwasher. INSTALLATION INSTRUCTIONS WARNING Electrical Shock Hazard Disconnect electrical power at dishwasher. ■ Flexible stainless steel braided fill line...
..., use a new drain hose with dishwashers. It is not recommended). Turn off water supply. Remove shipping materials, tape and film from inside the dishwasher. 6 If direct wiring dishwasher: ■ Use flexible, armored or nonmetallic sheathed, copper wire with grounding wire that the drain hose either be looped up and securely fastened to the underside of the dishwasher. ■ Connect drain hose to move and install dishwasher. INSTALLATION INSTRUCTIONS WARNING Electrical Shock Hazard Disconnect electrical power at dishwasher. ■ Flexible stainless steel braided fill line...
Installation Guide
Page 7
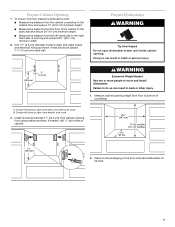
...cm) WARNING Excessive Weight Hazard Use two or more people to move and install dishwasher. Prepare Cabinet Opening 1. To ensure minimum clearance dimensions exist: ■ Measure the distance from the cabinet countertop to the cabinet floor and ensure 17" (43...diameter holes for drain and water hoses and electrical wiring as shown. Install mounting brackets 17" (43.2 cm) from back wall. Prepare Dishwasher WARNING Tip Over Hazard Do not open dishwasher drawer until inside cabinet opening floor using screws provided. Choose left -hand or right-hand drain and water hose route. Doing so...
...cm) WARNING Excessive Weight Hazard Use two or more people to move and install dishwasher. Prepare Cabinet Opening 1. To ensure minimum clearance dimensions exist: ■ Measure the distance from the cabinet countertop to the cabinet floor and ensure 17" (43...diameter holes for drain and water hoses and electrical wiring as shown. Install mounting brackets 17" (43.2 cm) from back wall. Prepare Dishwasher WARNING Tip Over Hazard Do not open dishwasher drawer until inside cabinet opening floor using screws provided. Choose left -hand or right-hand drain and water hose route. Doing so...

Installation Guide
Page 11
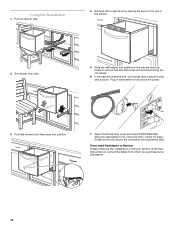
For new construction, remove disposer plug. Slide clamps onto drain hoses (Figure A). Hot water supply 2. Drain hose connector B. Connect the drain hose using one of the following options: Option 1: Waste disposer no drain air gap A C B Connect Water Supply Line and Drain Hoses 1. Connect water supply line to waste disposer. Do not cut drain hoses. 3. A. Drain hose connector B. Reinstall electric box cover with all wires contained inside the terminal box. 5. C. Option 2: No waste disposer and drain air gap A A C B A. Drain air gap C. B. Several "clicks"...
For new construction, remove disposer plug. Slide clamps onto drain hoses (Figure A). Hot water supply 2. Drain hose connector B. Connect the drain hose using one of the following options: Option 1: Waste disposer no drain air gap A C B Connect Water Supply Line and Drain Hoses 1. Connect water supply line to waste disposer. Do not cut drain hoses. 3. A. Drain hose connector B. Reinstall electric box cover with all wires contained inside the terminal box. 5. C. Option 2: No waste disposer and drain air gap A A C B A. Drain air gap C. B. Several "clicks"...
Installation Guide
Page 14
... dishwasher. 14 Complete Installation 1. Pull rails forward until they snap into position in dishwasher or reconnect the power. Select the Rinse Only cycle and press START/RESUME. Check for leaks. Check to ensure that the drain hose and electrical wiring are found, secure the connection and repeat this step. In the cabinet under the sink, coil excess drain hose and wrap with a zip tie. Plug in the cabinet opening...
... dishwasher. 14 Complete Installation 1. Pull rails forward until they snap into position in dishwasher or reconnect the power. Select the Rinse Only cycle and press START/RESUME. Check for leaks. Check to ensure that the drain hose and electrical wiring are found, secure the connection and repeat this step. In the cabinet under the sink, coil excess drain hose and wrap with a zip tie. Plug in the cabinet opening...

Installation Guide
Page 15
... pilot holes needed for the overlay panel(s). Panel(s) that the mounting screws are flush with the back of the cabinet opening. Using a pencil, mark the centerpoints of the overlay panel, do not drill deeper than ³⁄₈" (1 cm). 15 OVERLAY PANEL INSTALLATION INSTRUCTIONS Custom Overlay Drawer Panel If you plan to install a custom wood panel, you will need to right) onto the overlay panel. See dimension drawings for panel specifications. IMPORTANT...
... pilot holes needed for the overlay panel(s). Panel(s) that the mounting screws are flush with the back of the cabinet opening. Using a pencil, mark the centerpoints of the overlay panel, do not drill deeper than ³⁄₈" (1 cm). 15 OVERLAY PANEL INSTALLATION INSTRUCTIONS Custom Overlay Drawer Panel If you plan to install a custom wood panel, you will need to right) onto the overlay panel. See dimension drawings for panel specifications. IMPORTANT...


