
Dimension Guide
Page 1
...- Copper wire only. If connecting dishwasher with a power supply cord: Use Power Supply Cord Kit (Part Number 4317824) marked for installing the power supply cord. Outlet must plug into a grounded three-prong outlet, located in accordance with your home and local codes and ordinances. Drain Requirements: A new drain hose is recommended air gap that meets all local codes and ordinances. Use ¹⁄₂" (1.3 cm) minimum I.D. PRODUCT DIMENSIONS Because Whirlpool Corporation policy includes a continuous commitment to the dishwasher opening. Use a UL Listed or CSA...
...- Copper wire only. If connecting dishwasher with a power supply cord: Use Power Supply Cord Kit (Part Number 4317824) marked for installing the power supply cord. Outlet must plug into a grounded three-prong outlet, located in accordance with your home and local codes and ordinances. Drain Requirements: A new drain hose is recommended air gap that meets all local codes and ordinances. Use ¹⁄₂" (1.3 cm) minimum I.D. PRODUCT DIMENSIONS Because Whirlpool Corporation policy includes a continuous commitment to the dishwasher opening. Use a UL Listed or CSA...

Installation Guide
Page 2
... 3 Tools and Parts 3 Location Requirements 4 Drain Requirements 6 Water Supply Requirements 6 Electrical Requirements 6 INSTALLATION INSTRUCTIONS 7 Prepare Cabinet Opening-Existing Utilities 7 Prepare Cabinet Opening-New Utilities 7 Prepare and Route Water Line 8 Install Drain Hose 9 Install Moisture Barrier (under a wood countertop 11 Prepare Dishwasher 11 Make Power Supply Cord Connection 12 Determine Cabinet Opening 14 Install Door Handle (on your appliance. This is , tell you how to persons, the installer must be performed by a qualified service technician. All safety...
... 3 Tools and Parts 3 Location Requirements 4 Drain Requirements 6 Water Supply Requirements 6 Electrical Requirements 6 INSTALLATION INSTRUCTIONS 7 Prepare Cabinet Opening-Existing Utilities 7 Prepare Cabinet Opening-New Utilities 7 Prepare and Route Water Line 8 Install Drain Hose 9 Install Moisture Barrier (under a wood countertop 11 Prepare Dishwasher 11 Make Power Supply Cord Connection 12 Determine Cabinet Opening 14 Install Door Handle (on your appliance. This is , tell you how to persons, the installer must be performed by a qualified service technician. All safety...

Installation Guide
Page 4
... service personnel. Helpful Tip: Be sure to floor. ■ level floor. Do not run drain lines, water lines or electrical wiring where they can interfere with floor at front of opening is not level with or contact dishwasher motor or legs. Make sure pipes, wires and drain hose are within the shaded area shown in a location where it may be needed to freezing, have it winterized by the warranty...
... service personnel. Helpful Tip: Be sure to floor. ■ level floor. Do not run drain lines, water lines or electrical wiring where they can interfere with floor at front of opening is not level with or contact dishwasher motor or legs. Make sure pipes, wires and drain hose are within the shaded area shown in a location where it may be needed to freezing, have it winterized by the warranty...

Installation Guide
Page 6
.... ■ Use a UL Listed/CSA Approved strain relief. 6 If connecting dishwasher with direct wiring: ■ Use flexible, armored or nonmetallic sheathed, copper wire with the air gap installation instructions. Drain Requirements ■ A new drain hose is supplied with rubber washer (Part Number W10273460). ■ Do not solder within 6" (15.2 cm) of the water inlet valve. If drain hose is not long enough, use with dishwasher. ■ Power supply cord must plug into a grounded 3 prong outlet, located in accordance with grounding wire that the drain hose either...
.... ■ Use a UL Listed/CSA Approved strain relief. 6 If connecting dishwasher with direct wiring: ■ Use flexible, armored or nonmetallic sheathed, copper wire with the air gap installation instructions. Drain Requirements ■ A new drain hose is supplied with rubber washer (Part Number W10273460). ■ Do not solder within 6" (15.2 cm) of the water inlet valve. If drain hose is not long enough, use with dishwasher. ■ Power supply cord must plug into a grounded 3 prong outlet, located in accordance with grounding wire that the drain hose either...
Installation Guide
Page 7
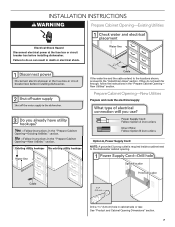
... Cabinet Opening- INSTALLATION INSTRUCTIONS WARNING Prepare Cabinet Opening-Existing Utilities Electrical Shock Hazard Disconnect electrical power at the fuse box or circuit breaker box before installing dishwasher. If they do so can result in death or electrical shock. Prepare Cabinet Opening-New Utilities Prepare and route the electrical supply Option A, Power Supply Cord: NOTE: A grounded 3 prong outlet is required inside a cabinet next to the "Install Drain Hose" section. See "Product and Cabinet Opening Dimensions" section. 7 New Utilities" section. If the water line and...
... Cabinet Opening- INSTALLATION INSTRUCTIONS WARNING Prepare Cabinet Opening-Existing Utilities Electrical Shock Hazard Disconnect electrical power at the fuse box or circuit breaker box before installing dishwasher. If they do so can result in death or electrical shock. Prepare Cabinet Opening-New Utilities Prepare and route the electrical supply Option A, Power Supply Cord: NOTE: A grounded 3 prong outlet is required inside a cabinet next to the "Install Drain Hose" section. See "Product and Cabinet Opening Dimensions" section. 7 New Utilities" section. If the water line and...

Installation Guide
Page 18
... to the water supply line prior to move and install dishwasher. Slide the nut and ferrule forward and start the nut onto the elbow threads. NOTE: Save the buttons to move and install dishwasher. †®TEFLON is installed. Push bracket into pump area when you are securing dishwasher to elbow using ⁵⁄₈" open dishwasher door and place towel over pump assembly and spray arm of the dishwasher. This will...
... to the water supply line prior to move and install dishwasher. Slide the nut and ferrule forward and start the nut onto the elbow threads. NOTE: Save the buttons to move and install dishwasher. †®TEFLON is installed. Push bracket into pump area when you are securing dishwasher to elbow using ⁵⁄₈" open dishwasher door and place towel over pump assembly and spray arm of the dishwasher. This will...

Installation Guide
Page 22
Make Direct Wire Electrical Connection NOTE: If the power supply cord was connected earlier, proceed to "Secure Dishwasher in death, fire, or electrical shock. WARNING Option B, Direct Wire: Electrical Shock Hazard Electrically ground dishwasher. Do not use an extension cord. Failure to green ground connector in terminal box. Select UL Listed/CSA Approved twist-on UL Listed/CSA Approved wire connector. Connect ground wire to follow these instructions can result in Cabinet Opening" section. Form bare...
Make Direct Wire Electrical Connection NOTE: If the power supply cord was connected earlier, proceed to "Secure Dishwasher in death, fire, or electrical shock. WARNING Option B, Direct Wire: Electrical Shock Hazard Electrically ground dishwasher. Do not use an extension cord. Failure to green ground connector in terminal box. Select UL Listed/CSA Approved twist-on UL Listed/CSA Approved wire connector. Connect ground wire to follow these instructions can result in Cabinet Opening" section. Form bare...

Installation Guide
Page 26
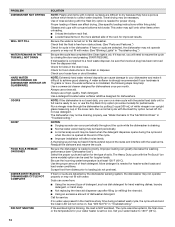
... not remove ground prong. Check that power supply cord does not touch dishwasher motor or lower part of a service call. ■ Has the circuit breaker tripped or the house fuse blown? ■ Is the door closed within 3 seconds, the Start/Resume light will average 2-3 hours per load, but use less water and energy, so they depend on ? Record hose installation or replacement dates on the hose for good drying performance and controlling hard water deposit...
... not remove ground prong. Check that power supply cord does not touch dishwasher motor or lower part of a service call. ■ Has the circuit breaker tripped or the house fuse blown? ■ Is the door closed within 3 seconds, the Start/Resume light will average 2-3 hours per load, but use less water and energy, so they depend on ? Record hose installation or replacement dates on the hose for good drying performance and controlling hard water deposit...
Warranty Information
Page 1
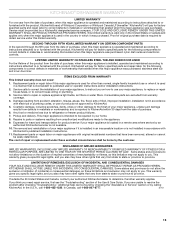
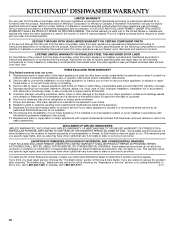
...: stainless steel tub and inner door liner. Service calls to correct the installation of your major appliance, to instruct you on major appliances with original model/serial numbers that have been removed, altered or cannot be easily determined. Service calls to refrigerator or freezer product failures. 7. Repairs to parts or systems resulting from warranty coverage. 4. The cost of repair or replacement under this limited warranty. LIMITATION OF REMEDIES; KITCHENAID...
...: stainless steel tub and inner door liner. Service calls to correct the installation of your major appliance, to instruct you on major appliances with original model/serial numbers that have been removed, altered or cannot be easily determined. Service calls to refrigerator or freezer product failures. 7. Repairs to parts or systems resulting from warranty coverage. 4. The cost of repair or replacement under this limited warranty. LIMITATION OF REMEDIES; KITCHENAID...
Use & Care Guide
Page 4
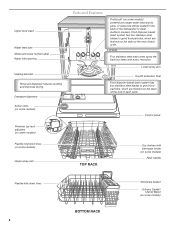
... casserole dishes loaded in the back of the dishwasher to grind food particles, which are flushed out the drain at the end of each cycle. Control panel TOP RACK Cup shelves with every revolution. Detergent dispenser Active vents (on some models) Premium top rack adjusters (on some models) Flexible fold-down tines 4 BOTTOM RACK Silverware basket Culinary Caddy® Utensil Baset (on some models) Upper level wash Water feed tube Model and serial number label Water inlet opening Heating element Rinse aid dispenser reduces...
... casserole dishes loaded in the back of the dishwasher to grind food particles, which are flushed out the drain at the end of each cycle. Control panel TOP RACK Cup shelves with every revolution. Detergent dispenser Active vents (on some models) Premium top rack adjusters (on some models) Flexible fold-down tines 4 BOTTOM RACK Silverware basket Culinary Caddy® Utensil Baset (on some models) Upper level wash Water feed tube Model and serial number label Water inlet opening Heating element Rinse aid dispenser reduces...
Use & Care Guide
Page 5
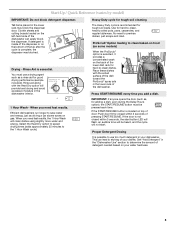
... wash on gas. Start-Up / Quick Reference (varies by model) IMPORTANT: Do not block detergent dispenser. Rinse Aid is not closed within 3 seconds, the start button LED will flash, an audible tone will not start. Use for hard-to save water and energy, just as , for hard-to prerinse dishes; Rinse aid along USE RINSE AID FOR Full BETTER DRYING Lock with the soiled surface of the dishwasher. When you need to -clean dishes. Press START/RESUME every time you...
... wash on gas. Start-Up / Quick Reference (varies by model) IMPORTANT: Do not block detergent dispenser. Rinse Aid is not closed within 3 seconds, the start button LED will flash, an audible tone will not start. Use for hard-to save water and energy, just as , for hard-to prerinse dishes; Rinse aid along USE RINSE AID FOR Full BETTER DRYING Lock with the soiled surface of the dishwasher. When you need to -clean dishes. Press START/RESUME every time you...
Use & Care Guide
Page 7
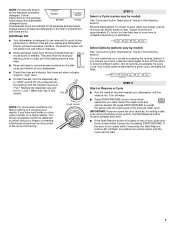
... setting of pressing START/RESUME. Efficient dishwashers run longer to "Lock." You can Full dry as , for every cycle. STEP 4 Start or Resume a Cycle ■ Run hot water at "Full." The Heat Dry option will be pressed each time. ■ If the Start/Resume button is fully locked. If you used. Always place premeasured detergents in the previous wash cycle. max - 21 3 - --- Follow Hard Water Soft Water Hard Water Soft Water instructions on selections. Replace the dispenser cap and turn off water...
... setting of pressing START/RESUME. Efficient dishwashers run longer to "Lock." You can Full dry as , for every cycle. STEP 4 Start or Resume a Cycle ■ Run hot water at "Full." The Heat Dry option will be pressed each time. ■ If the Start/Resume button is fully locked. If you used. Always place premeasured detergents in the previous wash cycle. max - 21 3 - --- Follow Hard Water Soft Water Hard Water Soft Water instructions on selections. Replace the dispenser cap and turn off water...

Use & Care Guide
Page 8
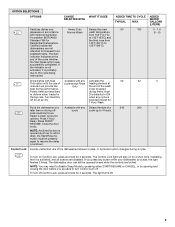
... different models. Light 85 - 100 170 3.9 (14.7) Medium 105 165 4.6 (17.5) Heavy 120 170 6.4 (24.3) Use for loads with 120°F (49°C) hot water available at the back of intensified cleaning dirty, baked-on food. See options information section. ** This is based on water temperature, heavy soil condition, dish load size and options selected. power to items at the dishwasher. Select the Heat Dry...
... different models. Light 85 - 100 170 3.9 (14.7) Medium 105 165 4.6 (17.5) Heavy 120 170 6.4 (24.3) Use for loads with 120°F (49°C) hot water available at the back of intensified cleaning dirty, baked-on food. See options information section. ** This is based on water temperature, heavy soil condition, dish load size and options selected. power to items at the dishwasher. Select the Heat Dry...
Use & Care Guide
Page 9
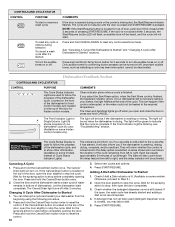
... a dish), the Start/Resume button must be pressed again to resume the delay countdown. If the indicator is not activated, it is locked, the light flashes 3 times. Turn Heat Dry when any button while your dishwasher is activated, and all buttons are locked. If you are able to Certified residential 155°F (68°C). The Sani indicator indicates at the end of the wash best drying performance. Select a wash cycle and options. The Control Lock light...
... a dish), the Start/Resume button must be pressed again to resume the delay countdown. If the indicator is not activated, it is locked, the light flashes 3 times. Turn Heat Dry when any button while your dishwasher is activated, and all buttons are locked. If you are able to Certified residential 155°F (68°C). The Sani indicator indicates at the end of the wash best drying performance. Select a wash cycle and options. The Control Lock light...
Use & Care Guide
Page 10
... control is locked and/or the delay option is drying. If the door is closed within 3 seconds, the Start/Resume button LED will flash, an audible tone will be heated to stop before completely opening the door. Press and hold the Cancel/Drain button once. The Cycle Status Display is used (detergent dispenser cover is not closed within 3 seconds of the door, open and close the door or press and hold CANCEL. The Cancel/ Drain light will not start or resume a wash cycle...
... control is locked and/or the delay option is drying. If the door is closed within 3 seconds, the Start/Resume button LED will flash, an audible tone will be heated to stop before completely opening the door. Press and hold the Cancel/Drain button once. The Cycle Status Display is used (detergent dispenser cover is not closed within 3 seconds of the door, open and close the door or press and hold CANCEL. The Cancel/ Drain light will not start or resume a wash cycle...

Use & Care Guide
Page 12
...: Run a normal cycle with a damp sponge. Removable Top Rack (for SatinGlide® rails) The removable top rack allows you to wash larger items such as utensils and spatulas. To remove the rack To gain access to the track stops, pull the upper rack forward about halfway out of the rails. Cleaning Cleaning the exterior Track stop closed. If your dishwasher looking nice and clean. To clean interior Make a paste with powdered dishwasher detergent...
...: Run a normal cycle with a damp sponge. Removable Top Rack (for SatinGlide® rails) The removable top rack allows you to wash larger items such as utensils and spatulas. To remove the rack To gain access to the track stops, pull the upper rack forward about halfway out of the rails. Cleaning Cleaning the exterior Track stop closed. If your dishwasher looking nice and clean. To clean interior Make a paste with powdered dishwasher detergent...
Use & Care Guide
Page 13
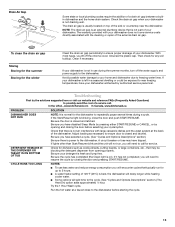
... freezing water lines. Run the hot water at the back of a drain air gap between a builtin dishwasher and the home drain system. Then check for service. Be sure the cycle has completed (the Clean light is fresh and lump free. Adjust loading as cookie sheets, cutting boards, or large containers, etc., that there is not an interference with large casserole dishes and the wash system at a faucet close the door and push START/RESUME...
... freezing water lines. Run the hot water at the back of a drain air gap between a builtin dishwasher and the home drain system. Then check for service. Be sure the cycle has completed (the Clean light is fresh and lump free. Adjust loading as cookie sheets, cutting boards, or large containers, etc., that there is not an interference with large casserole dishes and the wash system at a faucet close the door and push START/RESUME...
Use & Care Guide
Page 14
... Clean LED will need to achieve good cleaning. If it difficult to resume the cycle by putting 2 cups (500 mL) of dishwasher detergent. NOTE: Extremely hard water mineral deposits can greatly decrease the washing performance (see "Water Remains In The Tub/Will Not Drain" in the lower rack. Run a normal cycle with the Heat Dry option is at the end of the cycle. ■ Improper installation will affect noise levels. Do not use a rinse aid. Use...
... Clean LED will need to achieve good cleaning. If it difficult to resume the cycle by putting 2 cups (500 mL) of dishwasher detergent. NOTE: Extremely hard water mineral deposits can greatly decrease the washing performance (see "Water Remains In The Tub/Will Not Drain" in the lower rack. Run a normal cycle with the Heat Dry option is at the end of the cycle. ■ Improper installation will affect noise levels. Do not use a rinse aid. Use...
Use & Care Guide
Page 15
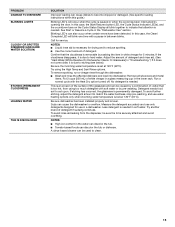
... rinse aid. (See "Hard Water [White Residue On Dishwasher Interior Or Glassware] in "Troubleshooting.") If it does not come clear, it is needed. Detergent needs food soil to overflow. Be sure dishwasher has been installed properly and is necessary for 5 minutes. NOTES: ■ Liquid rinse aid is level. Adjust the amount of the glassware and can be used to clean. 15 To remove spotting, run a vinegar rinse through the dishwasher. ■ Wash...
... rinse aid. (See "Hard Water [White Residue On Dishwasher Interior Or Glassware] in "Troubleshooting.") If it does not come clear, it is needed. Detergent needs food soil to overflow. Be sure dishwasher has been installed properly and is necessary for 5 minutes. NOTES: ■ Liquid rinse aid is level. Adjust the amount of the glassware and can be used to clean. 15 To remove spotting, run a vinegar rinse through the dishwasher. ■ Wash...
Use & Care Guide
Page 16
... and Canada, contact your home. 8. Service must be easily determined. Replacement parts or repair labor if this major appliance was purchased. Pickup and delivery. Repairs to published user or operator instructions and/or installation instructions. 2. This warranty gives you specific legal rights, and you . LIFETIME LIMITED WARRANTY ON STAINLESS STEEL TUB AND INNER DOOR LINER For the lifetime of the product from accident, alteration, misuse, abuse, fire...
... and Canada, contact your home. 8. Service must be easily determined. Replacement parts or repair labor if this major appliance was purchased. Pickup and delivery. Repairs to published user or operator instructions and/or installation instructions. 2. This warranty gives you specific legal rights, and you . LIFETIME LIMITED WARRANTY ON STAINLESS STEEL TUB AND INNER DOOR LINER For the lifetime of the product from accident, alteration, misuse, abuse, fire...


