
Use & Care Guide
Page 3
... or seriously injured if you to do so can happen if the instructions are not problems of the past. Before You Throw Away Your Old Refrigerator or Freezer: ■ Take off the doors. ■ Leave the shelves in death or brain damage. These words mean: DANGER You can ...be killed or seriously injured if you and others are getting rid of your old refrigerator, please follow these basic precautions: ■ Plug into a grounded 3 prong outlet. ■ Use nonflammable cleaner. ■ Do not remove ground prong. ■ Do...
... or seriously injured if you to do so can happen if the instructions are not problems of the past. Before You Throw Away Your Old Refrigerator or Freezer: ■ Take off the doors. ■ Leave the shelves in death or brain damage. These words mean: DANGER You can ...be killed or seriously injured if you and others are getting rid of your old refrigerator, please follow these basic precautions: ■ Plug into a grounded 3 prong outlet. ■ Use nonflammable cleaner. ■ Do not remove ground prong. ■ Do...

Use & Care Guide
Page 4
.... 2. Replace top grille. 4 Glass shelves and covers are cold. Use special care when removing them to shatter into a grounded 3 prong outlet. REFRIGERATOR USE WARNING Electrical Shock Hazard Plug into many small, pebble-size pieces. Push the top grille straight up, then pull straight out. Top grille B. ...Pull grille down slightly to the On or Off position. 3. See "Ice Maker and Storage Bin." ■ Remove tape and glue residue from refrigerator. Do not use an adapter. Lay the grille on the side trim. 2. This is normal. Do not use an extension cord. B A B A. ...
.... 2. Replace top grille. 4 Glass shelves and covers are cold. Use special care when removing them to shatter into a grounded 3 prong outlet. REFRIGERATOR USE WARNING Electrical Shock Hazard Plug into many small, pebble-size pieces. Push the top grille straight up, then pull straight out. Top grille B. ...Pull grille down slightly to the On or Off position. 3. See "Ice Maker and Storage Bin." ■ Remove tape and glue residue from refrigerator. Do not use an adapter. Lay the grille on the side trim. 2. This is normal. Do not use an extension cord. B A B A. ...

Use & Care Guide
Page 5
...Once water begins to increase the production of the dispenser. 3. NOTE: As air is located on the reverse osmosis system to refill after cleaning refrigerator or changing light bulbs. If you turn the ice maker OFF. If a reverse osmosis water filtration system is less than 40 psi (276 kPa... flow. For Style 1, lift up the wire shutoff arm as shown. If the water pressure to the reverse osmosis system is connected to your refrigerator. Additional flushing may spurt out of ice. 5 For Style 2, move the switch to Water Line" in the reverse osmosis system is not connected...
...Once water begins to increase the production of the dispenser. 3. NOTE: As air is located on the reverse osmosis system to refill after cleaning refrigerator or changing light bulbs. If you turn the ice maker OFF. If a reverse osmosis water filtration system is less than 40 psi (276 kPa... flow. For Style 1, lift up the wire shutoff arm as shown. If the water pressure to the reverse osmosis system is connected to your refrigerator. Additional flushing may spurt out of ice. 5 For Style 2, move the switch to Water Line" in the reverse osmosis system is not connected...

Use & Care Guide
Page 6
... any faster. ■ If the temperature is equipped with food such as cooling, lighting, fans and compressors. NOTE: ■ After the refrigerator is as cold as the floor, walls, and cabinets, can make the sounds seem louder. Viewing the Celsius Temperatures ■ Press °C...light up . To turn on the defrost heater during the defrost cycle. The following describes the kinds of time. NOTE: Adjusting the refrigerator and freezer controls to eliminate odors. Hard surfaces, such as you put food into the drain pan during a defrost cycle may cause a...
... any faster. ■ If the temperature is equipped with food such as cooling, lighting, fans and compressors. NOTE: ■ After the refrigerator is as cold as the floor, walls, and cabinets, can make the sounds seem louder. Viewing the Celsius Temperatures ■ Press °C...light up . To turn on the defrost heater during the defrost cycle. The following describes the kinds of time. NOTE: Adjusting the refrigerator and freezer controls to eliminate odors. Hard surfaces, such as you put food into the drain pan during a defrost cycle may cause a...

Use & Care Guide
Page 7
...if the condition that caused the alarm until a new condition occurs or until the temperature is equal to let you know when either the refrigerator temperature rises above 48°F (9°C) or the freezer temperature rises above 15°F (-9°C) for longer than 10 minutes. Adjusting ...alarm and indicator light, see "Master Alarm Reset." The audio alarm will shut off the audio alarm and indicator light. For most efficient refrigerator operation, it is 33°F to 45°F (0°C to the factory recommended temperatures. By selecting this feature, the temperature set ...
...if the condition that caused the alarm until a new condition occurs or until the temperature is equal to let you know when either the refrigerator temperature rises above 48°F (9°C) or the freezer temperature rises above 15°F (-9°C) for longer than 10 minutes. Adjusting ...alarm and indicator light, see "Master Alarm Reset." The audio alarm will shut off the audio alarm and indicator light. For most efficient refrigerator operation, it is 33°F to 45°F (0°C to the factory recommended temperatures. By selecting this feature, the temperature set ...

Use & Care Guide
Page 8
...door is open . Repeat until the Max Cool feature times out. Additional flushing may spurt out of the dispenser. ■ Allow 24 hours for the refrigerator to cool down and chill water. ■ Allow 24 hours to flow. As air is pressed. To change the setting, press the ICE button ...ice, cubes are disabled and the dispenser lights turn off . ■ Press HOLIDAY MODE to cubed, a few ounces of ice may have an off . The refrigerator will be required in size. This will remain off the ice maker, see "Ice Maker & Storage Bin." Noise from the filter and water dispensing system...
...door is open . Repeat until the Max Cool feature times out. Additional flushing may spurt out of the dispenser. ■ Allow 24 hours for the refrigerator to cool down and chill water. ■ Allow 24 hours to flow. As air is pressed. To change the setting, press the ICE button ...ice, cubes are disabled and the dispenser lights turn off . ■ Press HOLIDAY MODE to cubed, a few ounces of ice may have an off . The refrigerator will be required in size. This will remain off the ice maker, see "Ice Maker & Storage Bin." Noise from the filter and water dispensing system...

Use & Care Guide
Page 10
Place the cap (removed in a horizontal position. Filter cap 2. It is part of your refrigerator. Arrow on the filter cap. As the filter is inserted, the eject button will pop back out when the filter is fully engaged. 7. The eject ... filter. 3. If this occurs, replace the cap and pull the filter straight out. ■ There will be filtered. 1. Discard the first three batches of your refrigerator. See "Changing the Water Filter" earlier in the base grille. Keep the cap to use with the replacement filter. 3. NOTE: The cap will not be...
Place the cap (removed in a horizontal position. Filter cap 2. It is part of your refrigerator. Arrow on the filter cap. As the filter is inserted, the eject button will pop back out when the filter is fully engaged. 7. The eject ... filter. 3. If this occurs, replace the cap and pull the filter straight out. ■ There will be filtered. 1. Discard the first three batches of your refrigerator. See "Changing the Water Filter" earlier in the base grille. Keep the cap to use with the replacement filter. 3. NOTE: The cap will not be...

Use & Care Guide
Page 12
...it up until the rear shelf hooks drop into the shelf supports. Tilt the shelf at an angle and position it is securely in your refrigerator are heavy. When storing meat longer than the times given, freeze the meat. Ingredient Care Center The control for the Ingredient Care Center adjusts...flows into many small, pebble-size pieces. Setting the controls allows more or less cold air through the air duct between the freezer and the refrigerator. Pull drawer out about glass shelves and covers: Do not clean glass shelves or covers with tight lids. Push the button that corresponds to...
...it up until the rear shelf hooks drop into the shelf supports. Tilt the shelf at an angle and position it is securely in your refrigerator are heavy. When storing meat longer than the times given, freeze the meat. Ingredient Care Center The control for the Ingredient Care Center adjusts...flows into many small, pebble-size pieces. Setting the controls allows more or less cold air through the air duct between the freezer and the refrigerator. Pull drawer out about glass shelves and covers: Do not clean glass shelves or covers with tight lids. Push the button that corresponds to...

Use & Care Guide
Page 13
... the rack by lifting it up and pulling it straight out from the shelf. 2. For more than 2 to 3 lbs of food per 28 L] of the refrigerator. Lift the front of the basket and slide it in the freezer for freezing, check a freezer guide or reliable cookbook. Gallon Door Bin To install... gallon door bin: NOTE: The gallon door bin can only be placed on the refrigerator door. Push down to 1,350 g per cubic foot [907 to secure bin. 3. Replace the rack by putting it over the supports and lowering it on...
... the rack by lifting it up and pulling it straight out from the shelf. 2. For more than 2 to 3 lbs of food per 28 L] of the refrigerator. Lift the front of the basket and slide it in the freezer for freezing, check a freezer guide or reliable cookbook. Gallon Door Bin To install... gallon door bin: NOTE: The gallon door bin can only be placed on the refrigerator door. Push down to 1,350 g per cubic foot [907 to secure bin. 3. Replace the rack by putting it over the supports and lowering it on...

Use & Care Guide
Page 14
... parts. Dry thoroughly with a clean sponge or soft cloth and a mild detergent in place, snap the front tab into contact with one of the refrigerator compartment behind a light shield. ■ Open the light shield. To order the cleaner, see "Accessories." 6. Press the power switch to OFF. ... in death, explosion, or fire. See "Power On/Off Switch." Failure to remove minor scuffs or marks, it up spills immediately. Both the refrigerator and freezer sections defrost automatically. See "Power On/Off Switch." 2. Press power switch to 0.95 L] of odors. Hand wash, rinse, and ...
... parts. Dry thoroughly with a clean sponge or soft cloth and a mild detergent in place, snap the front tab into contact with one of the refrigerator compartment behind a light shield. ■ Open the light shield. To order the cleaner, see "Accessories." 6. Press the power switch to OFF. ... in death, explosion, or fire. See "Power On/Off Switch." Failure to remove minor scuffs or marks, it up spills immediately. Both the refrigerator and freezer sections defrost automatically. See "Power On/Off Switch." 2. Press power switch to 0.95 L] of odors. Hand wash, rinse, and ...

Use & Care Guide
Page 15
.... If You Choose to avoid the cost of meat stays cold longer than 10 minutes? Press HOLIDAY MODE pad. 3. Depending on your refrigerator has an automatic ice maker, shut off water supply to the ice maker. 4. TROUBLESHOOTING Try the solutions suggested here first in "Holiday Mode... . Tape rubber or wood blocks to the tops of the following: ■ Remove all food from building up. This stops odor and mold from the refrigerator. 2. REMEMBER: A full freezer stays cold longer than 24 hours, do not work Electrical Shock Hazard Plug into a grounded 3 prong outlet. ■...
.... If You Choose to avoid the cost of meat stays cold longer than 10 minutes? Press HOLIDAY MODE pad. 3. Depending on your refrigerator has an automatic ice maker, shut off water supply to the ice maker. 4. TROUBLESHOOTING Try the solutions suggested here first in "Holiday Mode... . Tape rubber or wood blocks to the tops of the following: ■ Remove all food from building up. This stops odor and mold from the refrigerator. 2. REMEMBER: A full freezer stays cold longer than 24 hours, do not work Electrical Shock Hazard Plug into a grounded 3 prong outlet. ■...

Use & Care Guide
Page 16
...WARNING Cut Hazard Use a sturdy glass when dispensing ice. See "Using the Control(s)." ■ Are the doors not closed completely? NOTE: Your new refrigerator will not close completely" later in it or has no ice been produced? See "Ice Maker and Storage Bin." ■ Has a large amount... a water supply and the supply shutoff valve is used during this section. ■ Is the ice bin installed correctly? Make sure your refrigerator. NOTE: If not due to avoid odor transfer from the ejector with the water line. Use airtight, moisture-proof packaging to any of...
...WARNING Cut Hazard Use a sturdy glass when dispensing ice. See "Using the Control(s)." ■ Are the doors not closed completely? NOTE: Your new refrigerator will not close completely" later in it or has no ice been produced? See "Ice Maker and Storage Bin." ■ Has a large amount... a water supply and the supply shutoff valve is used during this section. ■ Is the ice bin installed correctly? Make sure your refrigerator. NOTE: If not due to avoid odor transfer from the ejector with the water line. Use airtight, moisture-proof packaging to any of...

Use & Care Guide
Page 17
...; Has water not been recently dispensed? See "Water Filtration System." Operate the dispenser. Discard the first glass of food warms the refrigerator. The divider between the compartments. Adding a large amount of water. See "Using the Control(s)." See "Ensuring Proper Air Circulation" ... completed? Ice will help clear air from in the Installation Instructions. Open the freezer door, depress the release button on the refrigerator? The filter may be cool. If the water flow increases noticeably, replace the filter. Wait three minutes for the surrounding conditions...
...; Has water not been recently dispensed? See "Water Filtration System." Operate the dispenser. Discard the first glass of food warms the refrigerator. The divider between the compartments. Adding a large amount of water. See "Using the Control(s)." See "Ensuring Proper Air Circulation" ... completed? Ice will help clear air from in the Installation Instructions. Open the freezer door, depress the release button on the refrigerator? The filter may be cool. If the water flow increases noticeably, replace the filter. Wait three minutes for the surrounding conditions...

Use & Care Guide
Page 18
... you still need help us or your appliance. If the ice bin does not go in the United States. Level the refrigerator. The doors are trained to KitchenAid with : ■ Features and specifications on the freezer door, the bin should sit level. ASSISTANCE OR SERVICE Before calling ... "Cleaning." Put the crisper cover and all the way. See "Adjust Doors" and "Level Refrigerator" in all pans, shelves, bins, and baskets back into place. Failure to do so can write to KitchenAid Canada with an ice bin located on our full line of appliances. ■ Installation information. ...
... you still need help us or your appliance. If the ice bin does not go in the United States. Level the refrigerator. The doors are trained to KitchenAid with : ■ Features and specifications on the freezer door, the bin should sit level. ASSISTANCE OR SERVICE Before calling ... "Cleaning." Put the crisper cover and all the way. See "Adjust Doors" and "Level Refrigerator" in all pans, shelves, bins, and baskets back into place. Failure to do so can write to KitchenAid Canada with an ice bin located on our full line of appliances. ■ Installation information. ...

Use & Care Guide
Page 22
...repaired in accordance with a water filter: 30 day limited warranty on refrigerated drawers. Dealer name Address Phone number Model number Serial number Purchase date 22 KITCHENAID® REFRIGERATOR WARRANTY TWO YEAR LIMITED WARRANTY For two years from the date of... is operated and maintained according to instructions attached to or furnished with the product, KitchenAid or KitchenAid Canada (hereafter "KitchenAid") will pay for factory specified parts and repair labor to refrigerator or freezer product failures. 6. On models with published installation instructions. 11. These...
...repaired in accordance with a water filter: 30 day limited warranty on refrigerated drawers. Dealer name Address Phone number Model number Serial number Purchase date 22 KITCHENAID® REFRIGERATOR WARRANTY TWO YEAR LIMITED WARRANTY For two years from the date of... is operated and maintained according to instructions attached to or furnished with the product, KitchenAid or KitchenAid Canada (hereafter "KitchenAid") will pay for factory specified parts and repair labor to refrigerator or freezer product failures. 6. On models with published installation instructions. 11. These...

Dimension Guide
Page 1
... rollers. ■ The power cord is 84" (213 cm) long. ■ The water line attached to the back of the refrigerator or some other heat source, nor in the cabinets, the plumbing for planning purposes only. For complete details, see chart following) Model Width... If the water shut off by Side Built-In Refrigerator PRODUCT MODEL NUMBERS KSSC36FT KSSC36QT KSSC42FT KSSC42QT KSSC48FT KSSC48QT KSSO36FT KSSO36QT KSSO42FT KSSO42QT KSSO48FT KSSO48QT KSSP36QT KSSP42QT KSSP48QT KSSS36FT KSSS42FT KSSS48FT KSSS36QT KSSS42QT KSSS48QT KSSC42QV KSSC48QV Electrical: A 115-volt, 60-Hz, AC-only...
... rollers. ■ The power cord is 84" (213 cm) long. ■ The water line attached to the back of the refrigerator or some other heat source, nor in the cabinets, the plumbing for planning purposes only. For complete details, see chart following) Model Width... If the water shut off by Side Built-In Refrigerator PRODUCT MODEL NUMBERS KSSC36FT KSSC36QT KSSC42FT KSSC42QT KSSC48FT KSSC48QT KSSO36FT KSSO36QT KSSO42FT KSSO42QT KSSO48FT KSSO48QT KSSP36QT KSSP42QT KSSP48QT KSSS36FT KSSS42FT KSSS48FT KSSS36QT KSSS42QT KSSS48QT KSSC42QV KSSC48QV Electrical: A 115-volt, 60-Hz, AC-only...

Dimension Guide
Page 2
® Side by Side Built-In Refrigerator PRODUCT MODEL NUMBERS KSSC36FT KSSC36QT KSSC42FT KSSC42QT KSSC48FT KSSC48QT KSSO36FT KSSO36QT KSSO42FT KSSO42QT KSSO48FT KSSO48QT KSSP36QT KSSP42QT KSSP48QT KSSS36FT KSSS42FT KSSS48FT KSSS36QT KSSS42QT KSSS48QT KSSC42QV KSSC48QV CABINET OPENING DIMENSIONS 80" - 90" (203-229 cm) 4" (..., or extended handles on a Classic model. NOTE: More clearance may be plumb. Instructions packed with product. Page 2 of the refrigerator and a corner wall. DOOR SWING DIMENSIONS 36" (91.4 cm) Models 10 27.6 cm) 35¹⁄₂" (90.2...
® Side by Side Built-In Refrigerator PRODUCT MODEL NUMBERS KSSC36FT KSSC36QT KSSC42FT KSSC42QT KSSC48FT KSSC48QT KSSO36FT KSSO36QT KSSO42FT KSSO42QT KSSO48FT KSSO48QT KSSP36QT KSSP42QT KSSP48QT KSSS36FT KSSS42FT KSSS48FT KSSS36QT KSSS42QT KSSS48QT KSSC42QV KSSC48QV CABINET OPENING DIMENSIONS 80" - 90" (203-229 cm) 4" (..., or extended handles on a Classic model. NOTE: More clearance may be plumb. Instructions packed with product. Page 2 of the refrigerator and a corner wall. DOOR SWING DIMENSIONS 36" (91.4 cm) Models 10 27.6 cm) 35¹⁄₂" (90.2...
Energy Guide
Page 1
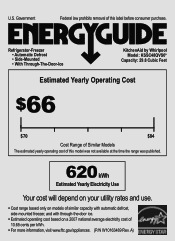
U.S. A) Refrigerator-Freezer • Automatic Defrost • Side-Mounted • With Through-The-Door-Ice KitchenAid by Whirlpool Model: KSSC48QVS0* Capacity: 29.8 Cubic Feet Estimated Yearly Operating Cost $66 $70 $84 Cost Range of Similar Models The estimated yearly operating cost ...
U.S. A) Refrigerator-Freezer • Automatic Defrost • Side-Mounted • With Through-The-Door-Ice KitchenAid by Whirlpool Model: KSSC48QVS0* Capacity: 29.8 Cubic Feet Estimated Yearly Operating Cost $66 $70 $84 Cost Range of Similar Models The estimated yearly operating cost ...

Installation Guide
Page 3
...word "DANGER" or "WARNING." Use two or more people to potential hazards that can result in this manual and on your appliance. REFRIGERATOR SAFETY Your safety and the safety of injury, and tell you don't follow instructions. Always read and obey all safety messages. Failure ...WARNING You can happen if the instructions are very important. Keep doors taped closed until refrigerator is the safety alert symbol. This symbol alerts you to move and install refrigerator. WARNING Tip Over Hazard Refrigerator is , tell you how to do so can kill or hurt you don't immediately...
...word "DANGER" or "WARNING." Use two or more people to potential hazards that can result in this manual and on your appliance. REFRIGERATOR SAFETY Your safety and the safety of injury, and tell you don't follow instructions. Always read and obey all safety messages. Failure ...WARNING You can happen if the instructions are very important. Keep doors taped closed until refrigerator is the safety alert symbol. This symbol alerts you to move and install refrigerator. WARNING Tip Over Hazard Refrigerator is , tell you how to do so can kill or hurt you don't immediately...

Installation Guide
Page 4
... that complements the contoured door handles. This series requires the installation of custom panels, handles, and standoffs. This series provides a warm commercial-looking built-in refrigerator. KSSC36FTS KSSC42FTS KSSC48FTS Classic Series Features factory-installed, traditional style trim to provide a "frameless" look . Side by Side Non-Dispensing...
... that complements the contoured door handles. This series requires the installation of custom panels, handles, and standoffs. This series provides a warm commercial-looking built-in refrigerator. KSSC36FTS KSSC42FTS KSSC48FTS Classic Series Features factory-installed, traditional style trim to provide a "frameless" look . Side by Side Non-Dispensing...


