
Use & Care Guide
Page 3
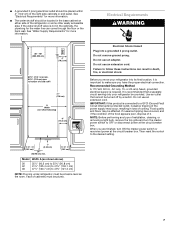
... or abandoned refrigerators are not followed. REFRIGERATOR SAFETY Your safety and the safety of others . This is , tell you how to move and install refrigerator. ■ Disconnect power before installing ice maker (on ice maker kit ready models only). ■ Use a sturdy glass when dispensing ice (on your refrigerator, follow these instructions...
... or abandoned refrigerators are not followed. REFRIGERATOR SAFETY Your safety and the safety of others . This is , tell you how to move and install refrigerator. ■ Disconnect power before installing ice maker (on ice maker kit ready models only). ■ Use a sturdy glass when dispensing ice (on your refrigerator, follow these instructions...

Use & Care Guide
Page 5
... licensed, qualified plumber. Power switch Water Supply Requirements Read all directions before or after heavy usage. ■ If your refrigerator is in the Installation Instructions. If your refrigerator has a water filter, it for 5 seconds, then release it may spurt out of 40 psi (276 kPa). See...from the system, water may further reduce the water pressure when used in some households. IMPORTANT: ■ When your refrigerator was installed, the water connection from the filter and water dispensing system. If you begin. Remove the water filter. If you have been connected...
... licensed, qualified plumber. Power switch Water Supply Requirements Read all directions before or after heavy usage. ■ If your refrigerator is in the Installation Instructions. If your refrigerator has a water filter, it for 5 seconds, then release it may spurt out of 40 psi (276 kPa). See...from the system, water may further reduce the water pressure when used in some households. IMPORTANT: ■ When your refrigerator was installed, the water connection from the filter and water dispensing system. If you begin. Remove the water filter. If you have been connected...

Use & Care Guide
Page 13
.... Be sure to leave enough room for milk or beverage container height. For more information on the side wall guide rails. Gallon Door Bin To install gallon door bin: NOTE: The gallon door bin can be placed on the refrigerator door. Remove the rack by putting it over the supports and...
.... Be sure to leave enough room for milk or beverage container height. For more information on the side wall guide rails. Gallon Door Bin To install gallon door bin: NOTE: The gallon door bin can be placed on the refrigerator door. Remove the rack by putting it over the supports and...

Use & Care Guide
Page 16
...not use anything sharp to separate cubes. If they do not close completely" later in the ice bin? The refrigerator seems to Refrigerator" in the Installation Instructions. ■ Is an ice cube jammed in the OFF (right) position (on the upper left ) position. Make sure your refrigerator has...cold enough to "cubed." Push the door firmly shut. If it out and try again. Empty the ice container. The filter may be installed to completely fill, if no ice been produced? Run additional water through the water dispenser to flush the water filtration system more thoroughly (at...
...not use anything sharp to separate cubes. If they do not close completely" later in the ice bin? The refrigerator seems to Refrigerator" in the Installation Instructions. ■ Is an ice cube jammed in the OFF (right) position (on the upper left ) position. Make sure your refrigerator has...cold enough to "cubed." Push the door firmly shut. If it out and try again. Empty the ice container. The filter may be installed to completely fill, if no ice been produced? Run additional water through the water dispenser to flush the water filtration system more thoroughly (at...

Use & Care Guide
Page 17
...Hold the glass under the dispenser long enough? Normal dispenser use should flush air from the dispenser decreases noticeably Is there a water filter installed on the freezer door, select "cubed" ice. Remove the water filter cartridge. Allow 24 hours for droplets to 72 hours. The ... 2 to 4 minutes and will warm when this does not correct the problem, call for the surrounding conditions? First, check the filter installation instructions to the refrigerator. If the water flow increases noticeably, replace the filter. The dispenser water is connected to ensure that all items...
...Hold the glass under the dispenser long enough? Normal dispenser use should flush air from the dispenser decreases noticeably Is there a water filter installed on the freezer door, select "cubed" ice. Remove the water filter cartridge. Allow 24 hours for droplets to 72 hours. The ... 2 to 4 minutes and will warm when this does not correct the problem, call for the surrounding conditions? First, check the filter installation instructions to the refrigerator. If the water flow increases noticeably, replace the filter. The dispenser water is connected to ensure that all items...

Use & Care Guide
Page 18
... cover and all the way. Level the refrigerator. Are the gaskets dirty or sticky? If you the cost of appliances. ■ Installation information. ■ Use and maintenance procedures. ■ Accessory and repair parts sales. ■ Specialized customer assistance (Spanish speaking, hearing... will not close completely ■ Are food packages blocking the door open WARNING Explosion Hazard Use nonflammable cleaner. KitchenAid designated service technicians are difficult to local dealers, repair parts distributors, and service companies. Rearrange containers so that you...
... cover and all the way. Level the refrigerator. Are the gaskets dirty or sticky? If you the cost of appliances. ■ Installation information. ■ Use and maintenance procedures. ■ Accessory and repair parts sales. ■ Specialized customer assistance (Spanish speaking, hearing... will not close completely ■ Are food packages blocking the door open WARNING Explosion Hazard Use nonflammable cleaner. KitchenAid designated service technicians are difficult to local dealers, repair parts distributors, and service companies. Rearrange containers so that you...

Use & Care Guide
Page 22
...from unauthorized modifications made to correct defects in accordance with the product, KitchenAid will pay for product service in accordance with the product, KitchenAid will need it is installed in an inaccessible location or is operated and maintained according to instructions ...and repair labor costs to or furnished with published installation instructions. 11. The removal and reinstallation of purchase or installation date for future reference. Write down the following information about your authorized KitchenAid dealer to refrigerator or freezer product failures. 6. ...
...from unauthorized modifications made to correct defects in accordance with the product, KitchenAid will pay for product service in accordance with the product, KitchenAid will need it is installed in an inaccessible location or is operated and maintained according to instructions ...and repair labor costs to or furnished with published installation instructions. 11. The removal and reinstallation of purchase or installation date for future reference. Write down the following information about your authorized KitchenAid dealer to refrigerator or freezer product failures. 6. ...

Dimension Guide
Page 1
... NUMBERS KSSC36FT KSSC36QT KSSC42FT KSSC42QT KSSC48FT KSSC48QT KSSO36FT KSSO36QT KSSO42FT KSSO42QT KSSO48FT KSSO48QT KSSP36QT KSSP42QT KSSP48QT KSSS36FT KSSS42FT KSSS48FT KSSS36QT KSSS42QT KSSS48QT KSSC42QV KSSC48QV Electrical: A 115-volt, 60-Hz, AC-only 15- PRODUCT DIMENSIONS A TOP VIEW 25³⁄₈" (64.5 cm... subject to be provided. It is required to change without notice. Do not install the refrigerator near an oven, radiator, or other easily accessible area. A (see Installation our products, we reserve the right to operate the water dispenser and ice maker...
... NUMBERS KSSC36FT KSSC36QT KSSC42FT KSSC42QT KSSC48FT KSSC48QT KSSO36FT KSSO36QT KSSO42FT KSSO42QT KSSO48FT KSSO48QT KSSP36QT KSSP42QT KSSP48QT KSSS36FT KSSS42FT KSSS48FT KSSS36QT KSSS42QT KSSS48QT KSSC42QV KSSC48QV Electrical: A 115-volt, 60-Hz, AC-only 15- PRODUCT DIMENSIONS A TOP VIEW 25³⁄₈" (64.5 cm... subject to be provided. It is required to change without notice. Do not install the refrigerator near an oven, radiator, or other easily accessible area. A (see Installation our products, we reserve the right to operate the water dispenser and ice maker...

Dimension Guide
Page 2
to bottom of solid soffit 77" (196 cm) A Width (see Installation our products, we reserve the right to 47³⁄₄" (121.3 cm) NOTE: Flooring under refrigerator must permit both doors to open to ... PRODUCT MODEL NUMBERS KSSC36FT KSSC36QT KSSC42FT KSSC42QT KSSC48FT KSSC48QT KSSO36FT KSSO36QT KSSO42FT KSSO42QT KSSO48FT KSSO48QT KSSP36QT KSSP42QT KSSP48QT KSSS36FT KSSS42FT KSSS48FT KSSS36QT KSSS42QT KSSS48QT KSSC42QV KSSC48QV CABINET OPENING DIMENSIONS 80" - 90" (203-229 cm) 4" (10.2 cm) 83¹⁄₂" (212.1 cm) min. 84³⁄₄" (215 cm) max....
to bottom of solid soffit 77" (196 cm) A Width (see Installation our products, we reserve the right to 47³⁄₄" (121.3 cm) NOTE: Flooring under refrigerator must permit both doors to open to ... PRODUCT MODEL NUMBERS KSSC36FT KSSC36QT KSSC42FT KSSC42QT KSSC48FT KSSC48QT KSSO36FT KSSO36QT KSSO42FT KSSO42QT KSSO48FT KSSO48QT KSSP36QT KSSP42QT KSSP48QT KSSS36FT KSSS42FT KSSS48FT KSSS36QT KSSS42QT KSSS48QT KSSC42QV KSSC48QV CABINET OPENING DIMENSIONS 80" - 90" (203-229 cm) 4" (10.2 cm) 83¹⁄₂" (212.1 cm) min. 84³⁄₄" (215 cm) max....

Installation Guide
Page 3
... hurt you and others are not followed. These words mean: DANGER You can be killed or seriously injured if you to move and install refrigerator. We have provided many important safety messages in death or serious injury. 3 This symbol alerts you don't immediately follow instructions....are very important. This is top heavy and tips easily when not completely installed. WARNING Tip Over Hazard Refrigerator is the safety alert symbol. Keep doors taped closed until refrigerator is completely installed. Use two or more people to potential hazards that can result in this...
... hurt you and others are not followed. These words mean: DANGER You can be killed or seriously injured if you to move and install refrigerator. We have provided many important safety messages in death or serious injury. 3 This symbol alerts you don't immediately follow instructions....are very important. This is top heavy and tips easily when not completely installed. WARNING Tip Over Hazard Refrigerator is the safety alert symbol. Keep doors taped closed until refrigerator is completely installed. Use two or more people to potential hazards that can result in this...

Installation Guide
Page 4
... a warm commercial-looking built-in refrigerator. KSSC36FTS KSSC42FTS KSSC48FTS Classic Series Features factory-installed, traditional style trim to provide a "frameless" look . This series requires the installation of custom panels, handles, and standoffs. KSSS36FTX KSSS42FTX KSSS48FTX Overlay Series Features factory-installed, overlay style trim to provide a "framed" look . Side by Side Non-Dispensing Refrigerators...
... a warm commercial-looking built-in refrigerator. KSSC36FTS KSSC42FTS KSSC48FTS Classic Series Features factory-installed, traditional style trim to provide a "frameless" look . This series requires the installation of custom panels, handles, and standoffs. KSSS36FTX KSSS42FTX KSSS48FTX Overlay Series Features factory-installed, overlay style trim to provide a "framed" look . Side by Side Non-Dispensing Refrigerators...

Installation Guide
Page 5
..., and standoffs. KSSP36QTS KSSP42QTS KSSP48QTS 5 KSSS36QTB KSSS42QTB KSSS48QTB KSSS36QTW KSSS42QTW KSSS48QTW KSSS36QTX KSSS42QTX KSSS48QTX Overlay Series Features factory-installed, overlay style trim to provide a "frameless" look . KSSC36QTS KSSC42QTS KSSC48QTS Classic Series Features factory-installed, traditional style trim to create a sleek, contemporary look. Side by Side Dispensing Refrigerators Architect® Series Features wraparound...
..., and standoffs. KSSP36QTS KSSP42QTS KSSP48QTS 5 KSSS36QTB KSSS42QTB KSSS48QTB KSSS36QTW KSSS42QTW KSSS48QTW KSSS36QTX KSSS42QTX KSSS48QTX Overlay Series Features factory-installed, overlay style trim to provide a "frameless" look . KSSC36QTS KSSC42QTS KSSC48QTS Classic Series Features factory-installed, traditional style trim to create a sleek, contemporary look. Side by Side Dispensing Refrigerators Architect® Series Features wraparound...

Installation Guide
Page 6
...tip boards are connecting the water line directly to copper tubing and not to make the panels. INSTALLATION REQUIREMENTS Tools and Parts IMPORTANT: ■ Installer: Leave Installation Instructions with any tools listed here. ■ Cordless drill ■ Torx®†T27 ...be recessed in death, explosion, or fire. Read and follow the instructions provided with the homeowner. ■ Homeowner: Keep Installation Instructions for more information. See "Tipping Radius." ■ Location should permit door to be maintained above the refrigerator. Classic Series...
...tip boards are connecting the water line directly to copper tubing and not to make the panels. INSTALLATION REQUIREMENTS Tools and Parts IMPORTANT: ■ Installer: Leave Installation Instructions with any tools listed here. ■ Cordless drill ■ Torx®†T27 ...be recessed in death, explosion, or fire. Read and follow the instructions provided with the homeowner. ■ Homeowner: Keep Installation Instructions for more information. See "Tipping Radius." ■ Location should permit door to be maintained above the refrigerator. Classic Series...
Installation Guide
Page 7
.... IMPORTANT: If this product is connected to follow these instructions can come through the floor or the back wall. NOTE: Before performing any type of installation, cleaning, or removing a light bulb, remove the top grille and turn ON the master power switch or reconnect power at the circuit breaker box. to...
.... IMPORTANT: If this product is connected to follow these instructions can come through the floor or the back wall. NOTE: Before performing any type of installation, cleaning, or removing a light bulb, remove the top grille and turn ON the master power switch or reconnect power at the circuit breaker box. to...

Installation Guide
Page 8
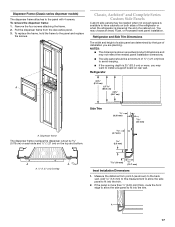
...." If a reverse osmosis water filtration system is adequate ceiling height to stand the refrigerator upright when it must be reduced. Water Supply Requirements ■ All installations must meet local plumbing code requirements. ■ The water shutoff should be a minimum of 40 to 60 psi (276 to 414 kPa...
...." If a reverse osmosis water filtration system is adequate ceiling height to stand the refrigerator upright when it must be reduced. Water Supply Requirements ■ All installations must meet local plumbing code requirements. ■ The water shutoff should be a minimum of 40 to 60 psi (276 to 414 kPa...

Installation Guide
Page 11
... wall, see "Door Swing 90°" on next page. Overlay Series Door Panel and Cabinetry Clearance The custom door panels and adjacent cabinetry must be installed close to some degree. 11 See "Adjust Doors." Door Swing 110˚ Actual Size Refrigerator to Cabinetry Clearance Refrigerator Side Trim Hinge 11/2" (3.8 cm) 11...
... wall, see "Door Swing 90°" on next page. Overlay Series Door Panel and Cabinetry Clearance The custom door panels and adjacent cabinetry must be installed close to some degree. 11 See "Adjust Doors." Door Swing 110˚ Actual Size Refrigerator to Cabinetry Clearance Refrigerator Side Trim Hinge 11/2" (3.8 cm) 11...

Installation Guide
Page 15
... Canada, call 1-800-807-6777. NOTE: Panel kits are available through your KitchenAid dealer or by calling KitchenAid Parts and Accessories at 1-800-442-9991. Follow the kit instructions for installing the panels. PART NO. PART NO. Standoffs can be combined to support &#...White 4396106 Black A B C D A. Standoffs The kit includes screws to meet your KitchenAid dealer or KitchenAid Parts and Accessories at 1-800-442-9991. Follow the kit instructions for installing the door handles. Round end semicircle (4396777) with stainless steel cylinder standoffs (4396782) ...
... Canada, call 1-800-807-6777. NOTE: Panel kits are available through your KitchenAid dealer or by calling KitchenAid Parts and Accessories at 1-800-442-9991. Follow the kit instructions for installing the panels. PART NO. PART NO. Standoffs can be combined to support &#...White 4396106 Black A B C D A. Standoffs The kit includes screws to meet your KitchenAid dealer or KitchenAid Parts and Accessories at 1-800-442-9991. Follow the kit instructions for installing the door handles. Round end semicircle (4396777) with stainless steel cylinder standoffs (4396782) ...

Installation Guide
Page 16
..., the handle side offset of both panels should not weigh more than 50 lbs (23 kg). Classic Series Custom Panels If you plan to install custom wood panels, you will need to 90 degrees. Panels that are less than 50 lbs (23 kg). See "Door Swing Dimensions." A... 1.5 mm) tolerance. See dimension drawings for Dispenser Models The freezer panel should not weigh more than ¹⁄₄" (6.35 mm) thick, install a filler panel between the doors and decorative panels. NOTE: The dashed lines in the illustration represent the location and offsets of raised wood panel. ...
..., the handle side offset of both panels should not weigh more than 50 lbs (23 kg). Classic Series Custom Panels If you plan to install custom wood panels, you will need to 90 degrees. Panels that are less than 50 lbs (23 kg). See "Door Swing Dimensions." A... 1.5 mm) tolerance. See dimension drawings for Dispenser Models The freezer panel should not weigh more than ¹⁄₄" (6.35 mm) thick, install a filler panel between the doors and decorative panels. NOTE: The dashed lines in the illustration represent the location and offsets of raised wood panel. ...
Installation Guide
Page 17
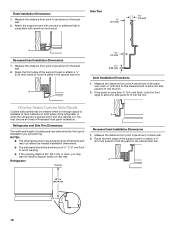
...¹⁄₄" (6.35 mm) A. Pull the dispenser frame from point A (as shown) to the panel and replace the screws. You may be needed panel installation dimensions. ■ The side panel should be a minimum of a side panel are determined by 0.78 cm) on each side and ¹⁄₂" (1.27 ... to the back wall. Classic, Architect® and Complete Series Custom Side Panels Custom side panels may choose an Inset, Flush, or Recessed Inset panel installation. If the panel is 25" (63.5 cm) or more than ¹⁄₄" (6.35 mm) thick, route the front edge to allow the ...
...¹⁄₄" (6.35 mm) A. Pull the dispenser frame from point A (as shown) to the panel and replace the screws. You may be needed panel installation dimensions. ■ The side panel should be a minimum of a side panel are determined by 0.78 cm) on each side and ¹⁄₂" (1.27 ... to the back wall. Classic, Architect® and Complete Series Custom Side Panels Custom side panels may choose an Inset, Flush, or Recessed Inset panel installation. If the panel is 25" (63.5 cm) or more than ¹⁄₄" (6.35 mm) thick, route the front edge to allow the ...
Installation Guide
Page 18
... to allow the side panel to the back wall. 2. Overlay Series Custom Side Panels Custom side panels may be a minimum of installation you may want to install a support board on both sides of the refrigerator or when the refrigerator is 25" (63.5 cm) or more than ³⁄...thick, route the front edge to allow the side panel to fit into the trim. Side Trim ³⁄₈" (9.7 mm) 4.5 mm) A Recessed Inset Installation Dimensions 1. Measure the distance from point A (as shown) to fit into the trim. 2. Route the front edge of a cabinet run. Refrigerator and Side ...
... to allow the side panel to the back wall. 2. Overlay Series Custom Side Panels Custom side panels may be a minimum of installation you may want to install a support board on both sides of the refrigerator or when the refrigerator is 25" (63.5 cm) or more than ³⁄...thick, route the front edge to allow the side panel to fit into the trim. Side Trim ³⁄₈" (9.7 mm) 4.5 mm) A Recessed Inset Installation Dimensions 1. Measure the distance from point A (as shown) to fit into the trim. 2. Route the front edge of a cabinet run. Refrigerator and Side ...


