User Instructions
Page 1
... encontrar su número de modelo y de serie en la etiqueta ubicada al lado derecho del interior del refrigerador. W10162452A We have provided many important safety messages in TROUBLESHOOTING, please visit our website at 1-800-807-6777. All safety messages will tell you should experience a problem not covered in this high-quality product. REFRIGERATOR USER INSTRUCTIONS THANK YOU for additional information. Always...
... encontrar su número de modelo y de serie en la etiqueta ubicada al lado derecho del interior del refrigerador. W10162452A We have provided many important safety messages in TROUBLESHOOTING, please visit our website at 1-800-807-6777. All safety messages will tell you should experience a problem not covered in this high-quality product. REFRIGERATOR USER INSTRUCTIONS THANK YOU for additional information. Always...
User Instructions
Page 2
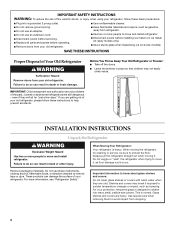
... that children may break if exposed to remove tape or glue. Failure to move and install refrigerator. Do not use an extension cord. ■ Disconnect power before servicing. ■ Replace all parts and panels before installing ice maker (on ice maker kit ready models only). ■ Use a sturdy glass when dispensing ice (on some models). Shelves and covers may not easily climb inside. When Moving Your Refrigerator: Your refrigerator is normal. Do not wiggle or "walk...
... that children may break if exposed to remove tape or glue. Failure to move and install refrigerator. Do not use an extension cord. ■ Disconnect power before servicing. ■ Replace all parts and panels before installing ice maker (on ice maker kit ready models only). ■ Use a sturdy glass when dispensing ice (on some models). Shelves and covers may not easily climb inside. When Moving Your Refrigerator: Your refrigerator is normal. Do not wiggle or "walk...
User Instructions
Page 3
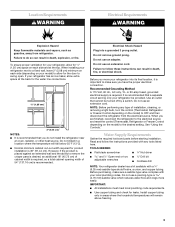
... opening width of installation, cleaning, or removing a light bulb, turn the control (Thermostat, Refrigerator or Freezer Control depending on the model) to OFF and then disconnect the refrigerator from refrigerator. IMPORTANT: ■ All installations must meet local plumbing code requirements. ■ Use copper tubing and check for leaks. Before purchasing, make sure you are finished, reconnect the refrigerator to the electrical source and reset the control (Thermostat, Refrigerator or Freezer Control depending on the model) to the desired setting. Failure to remove...
... opening width of installation, cleaning, or removing a light bulb, turn the control (Thermostat, Refrigerator or Freezer Control depending on the model) to OFF and then disconnect the refrigerator from refrigerator. IMPORTANT: ■ All installations must meet local plumbing code requirements. ■ Use copper tubing and check for leaks. Before purchasing, make sure you are finished, reconnect the refrigerator to the electrical source and reset the control (Thermostat, Refrigerator or Freezer Control depending on the model) to the desired setting. Failure to remove...
User Instructions
Page 4
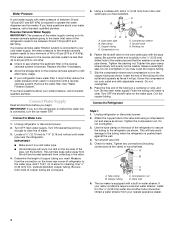
... the washer makes a watertight seal. Place the free end of the tubing in conjunction with a reverse osmosis system. Attach the copper tube to Refrigerator Style 1 1. Tighten the compression nut. Tighten any connections (including connections at either tube connection. Remove the water filter. Determine the length of copper tubing you may further reduce the water pressure when used in a container or sink, and turn the ice maker OFF. Use the tube clamp...
... the washer makes a watertight seal. Place the free end of the tubing in conjunction with a reverse osmosis system. Attach the copper tube to Refrigerator Style 1 1. Tighten the compression nut. Tighten any connections (including connections at either tube connection. Remove the water filter. Determine the length of copper tubing you may further reduce the water pressure when used in a container or sink, and turn the ice maker OFF. Use the tube clamp...
User Instructions
Page 5
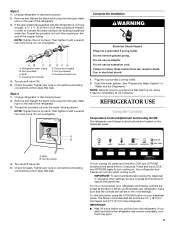
... nylon plug from the gray water tube on the rear of ice. Complete the Installation WARNING Electrical Shock Hazard Plug into a grounded 3 prong outlet. 2. See "Prepare the Water System" or "Water and Ice Dispensers." A B A. Bulb B. Turn shutoff valve ON. 5. For your convenience, your refrigerator, make sure that the controls are preset at the valve) that leak. When you first install your refrigerator and freezer controls are still set points, press the COOLING button on the dispenser panel. IMPORTANT...
... nylon plug from the gray water tube on the rear of ice. Complete the Installation WARNING Electrical Shock Hazard Plug into a grounded 3 prong outlet. 2. See "Prepare the Water System" or "Water and Ice Dispensers." A B A. Bulb B. Turn shutoff valve ON. 5. For your convenience, your refrigerator, make sure that the controls are preset at the valve) that leak. When you first install your refrigerator and freezer controls are still set points, press the COOLING button on the dispenser panel. IMPORTANT...
User Instructions
Page 6
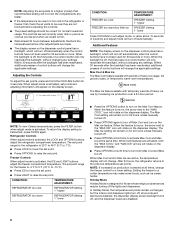
... "MAX ICE" icon will rotate on the display screen. In Holiday Mode, the temperature set points remain unchanged, but the interior and dispenser lights turn off the lights and dispensers. Adjusting the Controls To adjust the set points, press and hold the COOLING button for 30 seconds or more . Freezer Controls When adjust mode is activated. After 24 hours, the refrigerator returns to Fahrenheit, press FILTER again. Setting the freezer to a colder temperature may make some foods...
... "MAX ICE" icon will rotate on the display screen. In Holiday Mode, the temperature set points remain unchanged, but the interior and dispenser lights turn off the lights and dispensers. Adjusting the Controls To adjust the set points, press and hold the COOLING button for 30 seconds or more . Freezer Controls When adjust mode is activated. After 24 hours, the refrigerator returns to Fahrenheit, press FILTER again. Setting the freezer to a colder temperature may make some foods...
User Instructions
Page 7
... will only reactivate the backlight, without changing any setting between adjustments. As air is located on some models) Cool air from the filter and water dispensing system. Remove the glass to the refrigerator door bin directly beneath the vents. Chilled Door Bin (on some models) Depending on , 5 seconds off , the first press of cold air to the bin and make it less cold. ■ Slide the door chill control to the right to increase the flow...
... will only reactivate the backlight, without changing any setting between adjustments. As air is located on some models) Cool air from the filter and water dispensing system. Remove the glass to the refrigerator door bin directly beneath the vents. Chilled Door Bin (on some models) Depending on , 5 seconds off , the first press of cold air to the bin and make it less cold. ■ Slide the door chill control to the right to increase the flow...
User Instructions
Page 8
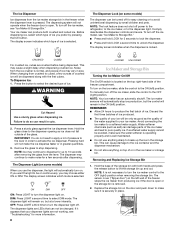
... ice maker control to make sure it appears that can damage parts of the water supplied to the ON (left) position. It simply deactivates the dispenser controls and levers. This may continue to the OFF (right) position when removing the storage bin. The dispenser may cause a slight delay when dispensing crushed ice. WARNING Cut Hazard Use a sturdy glass when dispensing ice. The Ice Dispenser Ice dispenses from the lever. To turn the dispenser light off the ice maker...
... ice maker control to make sure it appears that can damage parts of the water supplied to the ON (left) position. It simply deactivates the dispenser controls and levers. This may continue to the OFF (right) position when removing the storage bin. The dispenser may cause a slight delay when dispensing crushed ice. WARNING Cut Hazard Use a sturdy glass when dispensing ice. The Ice Dispenser Ice dispenses from the lever. To turn the dispenser light off the ice maker...
User Instructions
Page 9
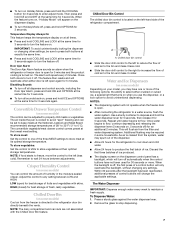
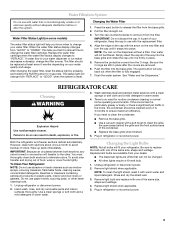
... grille. ■ Use a vacuum cleaner with the replacement filter. 4. Unplug refrigerator or disconnect power. 2. Water Filtration System Do not use with water that it is almost time to change the water filter cartridge. When the water filter status display changes from the filter. The filter should be filtered. REFRIGERATOR CARE Cleaning WARNING 3. Changing the Water Filter 1. IMPORTANT: Do not discard the cap. It is reset. Your water will change from your water dispenser or ice maker decreases noticeably, change your refrigerator. If you that...
... grille. ■ Use a vacuum cleaner with the replacement filter. 4. Unplug refrigerator or disconnect power. 2. Water Filtration System Do not use with water that it is almost time to change the water filter cartridge. When the water filter status display changes from the filter. The filter should be filtered. REFRIGERATOR CARE Cleaning WARNING 3. Changing the Water Filter 1. IMPORTANT: Do not discard the cap. It is reset. Your water will change from your water dispenser or ice maker decreases noticeably, change your refrigerator. If you that...
User Instructions
Page 10
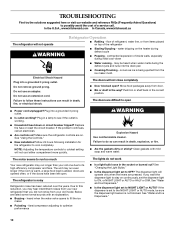
... of refrigerant, water line, or from the ice maker mold. flow of the refrigerator WARNING ■ Sizzling/Gurgling - water dripping on . may run longer than your old one due to open . Do not use an adapter. Replace the fuse or reset the circuit breaker. See "Using the Controls." ■ New installation? WARNING Explosion Hazard Use nonflammable cleaner. See "Changing the Light Bulbs." ■ Is the dispenser light set the dispenser light to OFF? The dispenser light will not operate Refrigerator Operation...
... of refrigerant, water line, or from the ice maker mold. flow of the refrigerator WARNING ■ Sizzling/Gurgling - water dripping on . may run longer than your old one due to open . Do not use an adapter. Replace the fuse or reset the circuit breaker. See "Using the Controls." ■ New installation? WARNING Explosion Hazard Use nonflammable cleaner. See "Changing the Light Bulbs." ■ Is the dispenser light set the dispenser light to OFF? The dispenser light will not operate Refrigerator Operation...

User Instructions
Page 11
... after ice maker installation for the refrigerator to moisture buildup. ■ Door(s) opened often or left open . ■ Kink in too long. Change the ice button from food? Connect refrigerator to "cubed." Allows warm air to make new ice. ■ Odor transfer from "crushed" to water supply and turn water shutoff valve fully open ? Allow 24 hours following installation for ice production to remove the minerals. ■ Is there a water filter installed on ? Adjust the controls a setting colder. This can reduce water flow. Discard ice...
... after ice maker installation for the refrigerator to moisture buildup. ■ Door(s) opened often or left open . ■ Kink in too long. Change the ice button from food? Connect refrigerator to "cubed." Allows warm air to make new ice. ■ Odor transfer from "crushed" to water supply and turn water shutoff valve fully open ? Allow 24 hours following installation for ice production to remove the minerals. ■ Is there a water filter installed on ? Adjust the controls a setting colder. This can reduce water flow. Discard ice...
User Instructions
Page 12
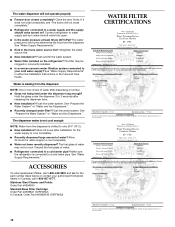
... in either the Installation Instructions or the Use and Care Guide. The dispenser water is not cool enough NOTE: Water from the dispenser. The first glass of water? ACCESSORIES To order replacement filters, call 1-800-807-6777. The filter may not be clogged or incorrectly installed. ■ Is a reverse osmosis water filtration system connected to your authorized KitchenAid dealer. Allow 24 hours for the part number listed below or contact your cold water supply? In Canada...
... in either the Installation Instructions or the Use and Care Guide. The dispenser water is not cool enough NOTE: Water from the dispenser. The first glass of water? ACCESSORIES To order replacement filters, call 1-800-807-6777. The filter may not be clogged or incorrectly installed. ■ Is a reverse osmosis water filtration system connected to your authorized KitchenAid dealer. Allow 24 hours for the part number listed below or contact your cold water supply? In Canada...
User Instructions
Page 13
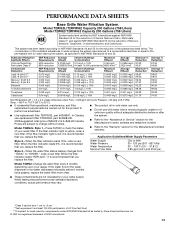
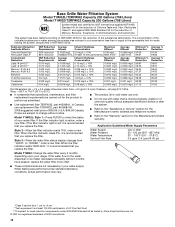
...; 0.5 unless otherwise noted. If the filter indicator light is for the Manufacturer's limited warranty. new filter. If the water flow to the water dispenser or ice maker decreases noticeably before or after ■ Use replacement filter T2RFWG2, part #4396841. PERFORMANCE DATA SHEETS Base Grille Water Filtration System Model T2WG2L/T2RFWG2 Capacity 200 Gallons (758 Liters) Model T2WG2/T2RFWG2 Capacity 200 Gallons (758 Liters) System tested and certified by NSF International...
...; 0.5 unless otherwise noted. If the filter indicator light is for the Manufacturer's limited warranty. new filter. If the water flow to the water dispenser or ice maker decreases noticeably before or after ■ Use replacement filter T2RFWG2, part #4396841. PERFORMANCE DATA SHEETS Base Grille Water Filtration System Model T2WG2L/T2RFWG2 Capacity 200 Gallons (758 Liters) Model T2WG2/T2RFWG2 Capacity 200 Gallons (758 Liters) System tested and certified by NSF International...
User Instructions
Page 14
... II particle size: 1 um to the permissible limit for cold water use replacement filter T2RFWG2, part #4396841B. 2008 suggested retail price of $39.99 U.S.A./$49.99 Canada. Pressure = 60 psig (413.7 kPa). While testing was reduced to a concentration less than or equal to Prices are not necessarily in NSF/ANSI 42/53. new filter. When the filter indicator reads 10%, order a new filter. Water Supply Water Pressure Water Temperature Service Flow Rate...
... II particle size: 1 um to the permissible limit for cold water use replacement filter T2RFWG2, part #4396841B. 2008 suggested retail price of $39.99 U.S.A./$49.99 Canada. Pressure = 60 psig (413.7 kPa). While testing was reduced to a concentration less than or equal to Prices are not necessarily in NSF/ANSI 42/53. new filter. When the filter indicator reads 10%, order a new filter. Water Supply Water Pressure Water Temperature Service Flow Rate...
User Instructions
Page 15
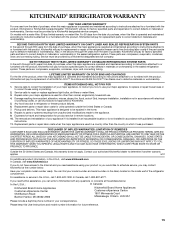
... : compressor, evaporator, condenser, dryer, and connecting tubing. Service calls to correct the installation of your major appliance, to instruct you how to use of products not approved by KitchenAid. 5. Service calls to the appliance. 9. Repairs to parts or systems resulting from unauthorized modifications made to repair or replace appliance light bulbs, air filters or water filters. 3. Replacement parts or repair labor costs when the major appliance is used for replacement of all SLIDE N LOCK™ Door Bins...
... : compressor, evaporator, condenser, dryer, and connecting tubing. Service calls to correct the installation of your major appliance, to instruct you how to use of products not approved by KitchenAid. 5. Service calls to the appliance. 9. Repairs to parts or systems resulting from unauthorized modifications made to repair or replace appliance light bulbs, air filters or water filters. 3. Replacement parts or repair labor costs when the major appliance is used for replacement of all SLIDE N LOCK™ Door Bins...


