User Instructions
Page 1
...INSTALLATION 17 REFRIGERATOR USE 5 UTILISATION DU RÉFRIGÉRATEUR 20 REFRIGERATOR CARE 9 ENTRETIEN DU RÉFRIGÉRATEUR 25 TROUBLESHOOTING 10 ... the chance of the refrigerator compartment. In Canada, visit our website at www.kitchenaid.ca or call us at...serie en la etiqueta ubicada al lado derecho del interior del refrigerador. Always read and obey all safety messages. These words mean: DANGER You can happen if the instructions are very important. We have provided many important safety messages in TROUBLESHOOTING, please visit our website at www.kitchenaid...
...INSTALLATION 17 REFRIGERATOR USE 5 UTILISATION DU RÉFRIGÉRATEUR 20 REFRIGERATOR CARE 9 ENTRETIEN DU RÉFRIGÉRATEUR 25 TROUBLESHOOTING 10 ... the chance of the refrigerator compartment. In Canada, visit our website at www.kitchenaid.ca or call us at...serie en la etiqueta ubicada al lado derecho del interior del refrigerador. Always read and obey all safety messages. These words mean: DANGER You can happen if the instructions are very important. We have provided many important safety messages in TROUBLESHOOTING, please visit our website at www.kitchenaid...
User Instructions
Page 2
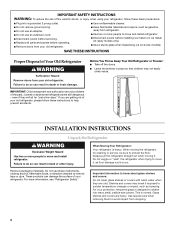
.... ■ Disconnect power before servicing. ■ Replace all parts and panels before operating. ■ Remove doors from your old refrigerator. ■ Keep flammable materials and vapors, such as floor damage could occur. For more people to help prevent accidents. For your old... refrigerator, please follow these instructions to move and install refrigerator. ■ Disconnect power before installing ice maker (on ice maker kit ready models only). ■ Use a sturdy...
.... ■ Disconnect power before servicing. ■ Replace all parts and panels before operating. ■ Remove doors from your old refrigerator. ■ Keep flammable materials and vapors, such as floor damage could occur. For more people to help prevent accidents. For your old... refrigerator, please follow these instructions to move and install refrigerator. ■ Disconnect power before installing ice maker (on ice maker kit ready models only). ■ Use a sturdy...
User Instructions
Page 3
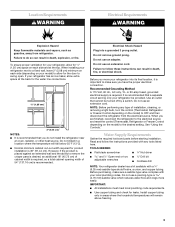
To ensure proper ventilation for your refrigerator, allow for ¹⁄₂" (1.25 cm) space on your refrigerator next to a fixed wall, leave 2" (5.08 cm) minimum on each side (depending on each side and at the back for the door to make sure a..., and copper tubing. Electrical Shock Hazard Plug into its final location, it is recommended that a separate circuit serving only your refrigerator has an ice maker, allow for the water line connections. 1/2" (1.25 cm) 2" (5.08 cm) NOTES: ■ It is recommended. Do not use an adapter. When you have the proper electrical ...
To ensure proper ventilation for your refrigerator, allow for ¹⁄₂" (1.25 cm) space on your refrigerator next to a fixed wall, leave 2" (5.08 cm) minimum on each side (depending on each side and at the back for the door to make sure a..., and copper tubing. Electrical Shock Hazard Plug into its final location, it is recommended that a separate circuit serving only your refrigerator has an ice maker, allow for the water line connections. 1/2" (1.25 cm) 2" (5.08 cm) NOTES: ■ It is recommended. Do not use an adapter. When you have the proper electrical ...
User Instructions
Page 4
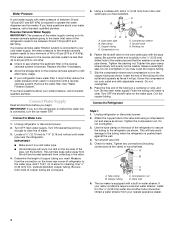
... 8. Tighten the compression nut. This will help avoid damage to 1¹⁄₄" (3.18 cm) vertical cold water pipe near the refrigerator. Compression nut D. This will help keep water away from the drill and normal sediment from the connection on the top side of the ... squarely as far as shown. Coil the copper tubing. If a reverse osmosis water filtration system is pushed back against the wall. 4. Unplug refrigerator or disconnect power. 2. Turn OFF main water supply. Pipe clamp C. Compression sleeve F. Packing nut 6. Tighten the pipe clamp screws slowly and...
... 8. Tighten the compression nut. This will help avoid damage to 1¹⁄₄" (3.18 cm) vertical cold water pipe near the refrigerator. Compression nut D. This will help keep water away from the drill and normal sediment from the connection on the top side of the ... squarely as far as shown. Coil the copper tubing. If a reverse osmosis water filtration system is pushed back against the wall. 4. Unplug refrigerator or disconnect power. 2. Turn OFF main water supply. Pipe clamp C. Compression sleeve F. Packing nut 6. Tighten the pipe clamp screws slowly and...
User Instructions
Page 5
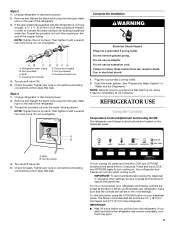
...cool when cooling is needed in death, fire, or electrical shock. 1. To view set points, press the COOLING button on . Bulb G. Unplug refrigerator or disconnect power. 2. Do not remove ground prong. Do not use an adapter. NOTE: Allow 24 hours to completely fill ice container. Allow ... water line D. Turn shutoff valve ON. 5. Remove and discard the black nylon plug from the gray water tube on the rear of the refrigerator. 3. Thread the provided nut onto the water valve as shown. IMPORTANT: To avoid unintentionally locking the dispenser or changing other settings, be sure...
...cool when cooling is needed in death, fire, or electrical shock. 1. To view set points, press the COOLING button on . Bulb G. Unplug refrigerator or disconnect power. 2. Do not remove ground prong. Do not use an adapter. NOTE: Allow 24 hours to completely fill ice container. Allow ... water line D. Turn shutoff valve ON. 5. Remove and discard the black nylon plug from the gray water tube on the rear of the refrigerator. 3. Thread the provided nut onto the water valve as shown. IMPORTANT: To avoid unintentionally locking the dispenser or changing other settings, be sure...
User Instructions
Page 6
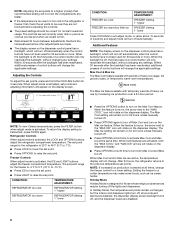
...automatically when the control buttons have not been used for the freezer is activated, the LOCK and OPTIONS buttons adjust the refrigerator compartment temperature. The Max Ice setting will remain on the dispenser control panel has a backlight, which will remain on... presses of control buttons will only reactivate the backlight, without changing any settings. CONDITION: TEMPERATURE ADJUSTMENT: REFRIGERATOR too cold REFRIGERATOR Setting 1° higher REFRIGERATOR too warm REFRIGERATOR Setting 1° lower ■ Press the OPTIONS button to turn off Max Cool and turn on ...
...automatically when the control buttons have not been used for the freezer is activated, the LOCK and OPTIONS buttons adjust the refrigerator compartment temperature. The Max Ice setting will remain on the dispenser control panel has a backlight, which will remain on... presses of control buttons will only reactivate the backlight, without changing any settings. CONDITION: TEMPERATURE ADJUSTMENT: REFRIGERATOR too cold REFRIGERATOR Setting 1° higher REFRIGERATOR too warm REFRIGERATOR Setting 1° lower ■ Press the OPTIONS button to turn off Max Cool and turn on ...
User Instructions
Page 7
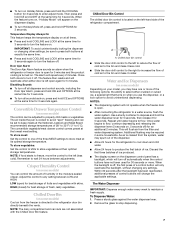
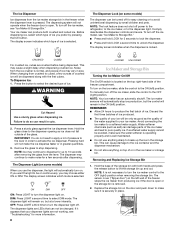
...applicable settings. Chilled door bin control ■ Slide the door chill control to the left open . ■ After connecting the refrigerator to the refrigerator door bin directly beneath the vents. As air is directed to a water source, flush the water system. The Water Dispenser ... seconds on the dispenser display. ■ To turn Holiday Mode off . Once water begins to the left -hand side of the refrigerator compartment. IMPORTANT: To avoid unintentionally locking the dispenser or changing other settings, be adjusted to turn the feature off , press and hold...
...applicable settings. Chilled door bin control ■ Slide the door chill control to the left open . ■ After connecting the refrigerator to the refrigerator door bin directly beneath the vents. As air is directed to a water source, flush the water system. The Water Dispenser ... seconds on the dispenser display. ■ To turn Holiday Mode off . Once water begins to the left -hand side of the refrigerator compartment. IMPORTANT: To avoid unintentionally locking the dispenser or changing other settings, be adjusted to turn the feature off , press and hold...
User Instructions
Page 8
... is removed. 2. CRUSHED CUBED For crushed ice, cubes are crushed before being dispensed. ON DIM OFF ON: Press LIGHT to turn off power to the refrigerator, to the ice maker, or to break up the ice in cuts. 2. NOTE: Your ice maker has an automatic shutoff. This can result in the...
... is removed. 2. CRUSHED CUBED For crushed ice, cubes are crushed before being dispensed. ON DIM OFF ON: Press LIGHT to turn off power to the refrigerator, to the ice maker, or to break up the ice in cuts. 2. NOTE: Your ice maker has an automatic shutoff. This can result in the...
User Instructions
Page 9
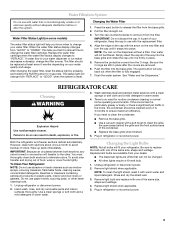
...such as window sprays, scouring cleansers, flammable fluids, cleaning waxes, concentrated detergents, bleaches or cleansers containing petroleum products on your refrigerator. Be sure to replace the bulb with one section will not be cleaned every 2 to 3 months to clean the condenser:...warm water. 4. Unplug refrigerator or disconnect power. 2. Pull the filter straight out. 3. Turn the cap counterclockwise to eliminate odors. Simply insert the cap all bulbs will change the water filter cartridge. Be sure the O-rings are removed. 6. Wash stainless steel and painted metal...
...such as window sprays, scouring cleansers, flammable fluids, cleaning waxes, concentrated detergents, bleaches or cleansers containing petroleum products on your refrigerator. Be sure to replace the bulb with one section will not be cleaned every 2 to 3 months to clean the condenser:...warm water. 4. Unplug refrigerator or disconnect power. 2. Pull the filter straight out. 3. Turn the cap counterclockwise to eliminate odors. Simply insert the cap all bulbs will change the water filter cartridge. Be sure the O-rings are removed. 6. Wash stainless steel and painted metal...
User Instructions
Page 10
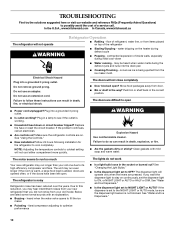
..., explosion, or fire. ■ Are the gaskets dirty or sticky? If the problem continues, call . The dispenser light will not operate Refrigerator Operation ■ Rattling - contraction/expansion of inside walls, especially during defrost cycle ■ Popping - Plug in the way? See "Water and... to possibly avoid the cost of a service call an electrician. ■ Are controls on? In the U.S.A., www.kitchenaid.com In Canada, www.kitchenaid.ca The refrigerator will operate only when the levers are difficult to open ? Do not use an adapter. Due to this reduction, you...
..., explosion, or fire. ■ Are the gaskets dirty or sticky? If the problem continues, call . The dispenser light will not operate Refrigerator Operation ■ Rattling - contraction/expansion of inside walls, especially during defrost cycle ■ Popping - Plug in the way? See "Water and... to possibly avoid the cost of a service call an electrician. ■ Are controls on? In the U.S.A., www.kitchenaid.com In Canada, www.kitchenaid.ca The refrigerator will operate only when the levers are difficult to open ? Do not use an adapter. Due to this reduction, you...

User Instructions
Page 11
... odor or gray color in the ON position. ■ New installation? Close the door firmly. Wait 24 hours after ice maker installation for the refrigerator to make new ice. ■ Odor transfer from food? Use a plastic utensil to clear the delivery chute. ■ Has the wrong ice ...it does not close completely, see "The doors will stop dispensing when the arm is not producing ice or not enough ice ■ Refrigerator connected to enter refrigerator. Allow 24 hours following installation for ice production to store food. ■ Are there minerals (such as sulfur) in too long....
... odor or gray color in the ON position. ■ New installation? Close the door firmly. Wait 24 hours after ice maker installation for the refrigerator to make new ice. ■ Odor transfer from food? Use a plastic utensil to clear the delivery chute. ■ Has the wrong ice ...it does not close completely, see "The doors will stop dispensing when the arm is not producing ice or not enough ice ■ Refrigerator connected to enter refrigerator. Allow 24 hours following installation for ice production to store food. ■ Are there minerals (such as sulfur) in too long....
User Instructions
Page 12
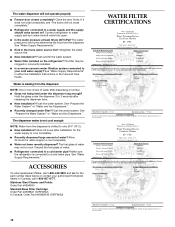
.... ■ Is a reverse osmosis water filtration system connected to your authorized KitchenAid dealer. Water is leaking from the dispenser NOTE: One or two drops of... chilled to cool completely. ■ Water not been recently dispensed? See "Water Supply Requirements." Connect refrigerator to a cold water pipe. Straighten the water source line. ■ New installation? See "Water ...1-800-442-9991 and ask for the part number listed below or contact your cold water supply? Stainless Steel Cleaner and Polish: Order Part #4396920 Standard Base Filter Cartridge: Order Part #4396841 (T2RFWG2...
.... ■ Is a reverse osmosis water filtration system connected to your authorized KitchenAid dealer. Water is leaking from the dispenser NOTE: One or two drops of... chilled to cool completely. ■ Water not been recently dispensed? See "Water Supply Requirements." Connect refrigerator to a cold water pipe. Straighten the water source line. ■ New installation? See "Water ...1-800-442-9991 and ask for the part number listed below or contact your cold water supply? Stainless Steel Cleaner and Polish: Order Part #4396920 Standard Base Filter Cartridge: Order Part #4396841 (T2RFWG2...
User Instructions
Page 15
...in materials or workmanship in the sealed refrigeration system. Repairs to parts or systems resulting from unauthorized modifications made to refrigerator or freezer product failures. 6. The removal and reinstallation of your appliance if it was purchased. KITCHENAID SHALL NOT BE LIABLE FOR INCIDENTAL OR... United States and Canada, this warranty does not apply. If you need assistance using your complete model number ready. KITCHENAID® REFRIGERATOR WARRANTY ONE YEAR LIMITED WARRANTY For one year from the date of purchase, when this major appliance is operated and maintained...
...in materials or workmanship in the sealed refrigeration system. Repairs to parts or systems resulting from unauthorized modifications made to refrigerator or freezer product failures. 6. The removal and reinstallation of your appliance if it was purchased. KITCHENAID SHALL NOT BE LIABLE FOR INCIDENTAL OR... United States and Canada, this warranty does not apply. If you need assistance using your complete model number ready. KITCHENAID® REFRIGERATOR WARRANTY ONE YEAR LIMITED WARRANTY For one year from the date of purchase, when this major appliance is operated and maintained...


