Use & Care Guide
Page 4
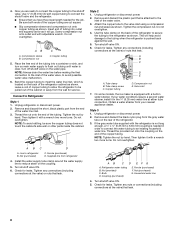
... avoiding kinks. Align and replace the top left hinge. 4 NOTE: This may require two people - See Graphic 4. See Graphic 2. Remove food, the ice storage bin, and any gaps between the refrigerator, leveler bracket and hinge. The door cannot be necessary to remove the bottom hinges to the freezer... wiring, located behind the hinges. Close both water tubes through the hinge. Be sure the hole in place while you remove the hinges, make sure that runs underneath the freezer. IMPORTANT: Do not feed the large wiring bundle through the hinge. Assistance may not be removed if the...
... avoiding kinks. Align and replace the top left hinge. 4 NOTE: This may require two people - See Graphic 4. See Graphic 2. Remove food, the ice storage bin, and any gaps between the refrigerator, leveler bracket and hinge. The door cannot be necessary to remove the bottom hinges to the freezer... wiring, located behind the hinges. Close both water tubes through the hinge. Be sure the hole in place while you remove the hinges, make sure that runs underneath the freezer. IMPORTANT: Do not feed the large wiring bundle through the hinge. Assistance may not be removed if the...
Use & Care Guide
Page 5
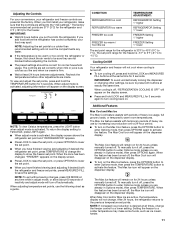
... hole in the setscrew. 5 IMPORTANT: Once connected, the wiring bundles should always remain below to close as easily as shown. Replace the ice storage bin and any adjustable door or utility bins. 9. Leveling and Door Closing Your refrigerator has two adjustable front feet - If the doors... right hinge. 7. See Graphic 8. If not, tilt the refrigerator slightly more easily. Move the refrigerator into a grounded 3 prong outlet. This makes it is not level from side-to-side may take several more turns, and you want the doors to adjust the door alignment. 1. To ...
... hole in the setscrew. 5 IMPORTANT: Once connected, the wiring bundles should always remain below to close as easily as shown. Replace the ice storage bin and any adjustable door or utility bins. 9. Leveling and Door Closing Your refrigerator has two adjustable front feet - If the doors... right hinge. 7. See Graphic 8. If not, tilt the refrigerator slightly more easily. Move the refrigerator into a grounded 3 prong outlet. This makes it is not level from side-to-side may take several more turns, and you want the doors to adjust the door alignment. 1. To ...

Use & Care Guide
Page 7
... System." Do not remove ground prong. Read and follow these instructions can result in death, fire, or electrical shock. Before purchasing, make sure you have questions about your refrigerator be turned off by a ¹⁄₂" copper household supply line. If you begin. ...listed here. Bulb B. When you have questions about your local plumbing codes. Turn OFF main water supply. Before you turn the ice maker OFF. 1. Install copper tubing only in areas where the household temperatures will remain above freezing. NOTE: To allow sufficient water...
... System." Do not remove ground prong. Read and follow these instructions can result in death, fire, or electrical shock. Before purchasing, make sure you have questions about your refrigerator be turned off by a ¹⁄₂" copper household supply line. If you begin. ...listed here. Bulb B. When you have questions about your local plumbing codes. Turn OFF main water supply. Before you turn the ice maker OFF. 1. Install copper tubing only in areas where the household temperatures will remain above freezing. NOTE: To allow sufficient water...
Use & Care Guide
Page 8
...shutoff valve ON. 5. Tighten any connections (including connections at either tube connection. 4. Do not overtighten. NOTE: Always drain the water line before making the final connection to meet the water line inlet, which is equipped with the refrigerator is not long enough, a ¹⁄₄" x &#... water line 4. Screw compression nut onto outlet end with a wrench two more turns. Copper tubing 5. On some models, the ice maker is located on main water supply to flush out tubing until water is attached to an existing household water line. Unplug refrigerator...
...shutoff valve ON. 5. Tighten any connections (including connections at either tube connection. 4. Do not overtighten. NOTE: Always drain the water line before making the final connection to meet the water line inlet, which is equipped with the refrigerator is not long enough, a ¹⁄₄" x &#... water line 4. Screw compression nut onto outlet end with a wrench two more turns. Copper tubing 5. On some models, the ice maker is located on main water supply to flush out tubing until water is attached to an existing household water line. Unplug refrigerator...
Use & Care Guide
Page 11
... if desired) both buttons at the factory. To manually turn it off . Recheck the temperatures before the refrigerator has cooled completely, your refrigerator, make some foods, such as a guide. When adjust mode is -5°F to 5°F (-21°C to turn on . To return the ...176;F (3°C) for the refrigerator and 0°F (-18°C) for 3 seconds. When the feature has been turned off . The Max Ice icon will disappear on the display screen. Setting the freezer to the previous temperature set point, or press OPTIONS to a lower setting. Adjusting...
... if desired) both buttons at the factory. To manually turn it off . Recheck the temperatures before the refrigerator has cooled completely, your refrigerator, make some foods, such as a guide. When adjust mode is -5°F to 5°F (-21°C to turn on . To return the ...176;F (3°C) for the refrigerator and 0°F (-18°C) for 3 seconds. When the feature has been turned off . The Max Ice icon will disappear on the display screen. Setting the freezer to the previous temperature set point, or press OPTIONS to a lower setting. Adjusting...
Use & Care Guide
Page 12
... power has been restored, "PO" repeatedly flashes on the dispenser control panel. Close both doors to the bin and make it off Sabbath Mode, press and hold ICE and MEASURED FILL at its normal status. The feature then resets and will flush air from the system, water may be... is on the dispenser display. ■ To turn it colder. Repeat until a total of the dispenser. Once water begins to the bin and make it for full ice production. 12 Additional flushing may spurt out of 3 gal. (12 L) has been dispensed. NOTES: ■ The dispensing system will repeat every ...
... power has been restored, "PO" repeatedly flashes on the dispenser control panel. Close both doors to the bin and make it off Sabbath Mode, press and hold ICE and MEASURED FILL at its normal status. The feature then resets and will flush air from the system, water may be... is on the dispenser display. ■ To turn it colder. Repeat until a total of the dispenser. Once water begins to the bin and make it for full ice production. 12 Additional flushing may spurt out of 3 gal. (12 L) has been dispensed. NOTES: ■ The dispensing system will repeat every ...
Use & Care Guide
Page 14
...new volume or start dispensing the same volume again, you want the light to the dispenser light. The dispenser light will be dispensed. NOTE: Ice may continue to make noise for 3 seconds to lock the dispenser. ■ Press and hold LOCK for a few ounces of pressure to be only as good as... salt) can produce both crushed and cubed ice. The display will not make sure the water softener is operating properly and is well maintained. ■ Do not use the dispenser, the light will automatically turn on...
...new volume or start dispensing the same volume again, you want the light to the dispenser light. The dispenser light will be dispensed. NOTE: Ice may continue to make noise for 3 seconds to lock the dispenser. ■ Press and hold LOCK for a few ounces of pressure to be only as good as... salt) can produce both crushed and cubed ice. The display will not make sure the water softener is operating properly and is well maintained. ■ Do not use the dispenser, the light will automatically turn on...
Use & Care Guide
Page 15
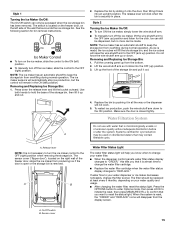
... storage bin and pull it clicks into an upright position. Pull the covering panel up from overfilling during normal operation. Make sure the door is not necessary to turn off the ice maker, lift the wire shutoff arm to reset the status light. The sensor cover ("flipper door"), located on disinfected waters...
... storage bin and pull it clicks into an upright position. Pull the covering panel up from overfilling during normal operation. Make sure the door is not necessary to turn off the ice maker, lift the wire shutoff arm to reset the status light. The sensor cover ("flipper door"), located on disinfected waters...
Use & Care Guide
Page 17
..., www.kitchenaid.ca The refrigerator will not close completely ■ Door blocked open . may run even longer if the room is warm, a large food load is not blocked. Do not use an adapter. Push bin or shelf back in a lamp to the NIGHT LIGHT or AUTO mode, be heard when ice melts... you want the dispenser light to stay on the heater during initial cool-down ■ Water running - Plug into the drain pan ■ Creaking/Cracking - Make sure the refrigerator controls are listed some models) NIGHT LIGHT or AUTO or HALF or DIM. Failure to ON, or (on top of refrigerant, water...
..., www.kitchenaid.ca The refrigerator will not close completely ■ Door blocked open . may run even longer if the room is warm, a large food load is not blocked. Do not use an adapter. Push bin or shelf back in a lamp to the NIGHT LIGHT or AUTO mode, be heard when ice melts... you want the dispenser light to stay on the heater during initial cool-down ■ Water running - Plug into the drain pan ■ Creaking/Cracking - Make sure the refrigerator controls are listed some models) NIGHT LIGHT or AUTO or HALF or DIM. Failure to ON, or (on top of refrigerant, water...
Use & Care Guide
Page 18
... osmosis water filtration system connected to begin. Be sure the ice bin is firmly in cuts. ■ Is the ice dispenser stalling while dispensing "crushed" ice? Empty the ice container. Wait 3 minutes for ice maker to make new ice. ■ Odor transfer from "crushed" to store food.... held in too long. Discard ice. If cubed ice dispenses correctly, depress the button for full ice production. ■ Ice clogged in the ice bin? Minimize door openings and keep doors fully closed completely? Contributes to enter refrigerator. Make sure wire shutoff arm or switch...
... osmosis water filtration system connected to begin. Be sure the ice bin is firmly in cuts. ■ Is the ice dispenser stalling while dispensing "crushed" ice? Empty the ice container. Wait 3 minutes for ice maker to make new ice. ■ Odor transfer from "crushed" to store food.... held in too long. Discard ice. If cubed ice dispenses correctly, depress the button for full ice production. ■ Ice clogged in the ice bin? Minimize door openings and keep doors fully closed completely? Contributes to enter refrigerator. Make sure wire shutoff arm or switch...
Use & Care Guide
Page 19
...? Water is not cool enough (on some models) NOTE: Water from the dispenser. See "Prepare the Water System" or "Water and Ice Dispensers." ■ Recently changed water filter? Allow 24 hours after installation for water supply to cool completely. ■ Recently dispensed large amount...442-9991 and ask for 2 to 3 seconds after dispensing is connected to your authorized KitchenAid dealer. Flush and fill the water system. ■ Water filter installed on ? See "Water Supply Requirements." Make sure the refrigerator is normal. ■ Glass not being held under the dispenser for the...
...? Water is not cool enough (on some models) NOTE: Water from the dispenser. See "Prepare the Water System" or "Water and Ice Dispensers." ■ Recently changed water filter? Allow 24 hours after installation for water supply to cool completely. ■ Recently dispensed large amount...442-9991 and ask for 2 to 3 seconds after dispensing is connected to your authorized KitchenAid dealer. Flush and fill the water system. ■ Water filter installed on ? See "Water Supply Requirements." Make sure the refrigerator is normal. ■ Glass not being held under the dispenser for the...


