Use & Care Guide
Page 2
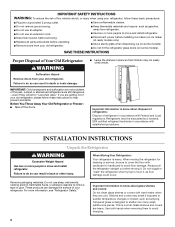
... so can damage the surface of your refrigerator. Remove packaging materials. Do not use an extension cord. ■ Disconnect power before servicing. ■ Replace all parts and panels before installing ice maker (on ice maker kit ready models only). ■ Use a sturdy glass when dispensing ice (on some models). ■ Do...
... so can damage the surface of your refrigerator. Remove packaging materials. Do not use an extension cord. ■ Disconnect power before servicing. ■ Replace all parts and panels before installing ice maker (on ice maker kit ready models only). ■ Use a sturdy glass when dispensing ice (on some models). ■ Do...

Use & Care Guide
Page 3
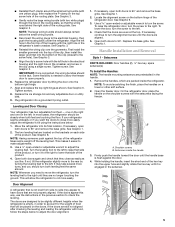
... A A Do Not Remove Screws A 3 Wiring Connection A A Do Not Remove Screws A 7 Bottom Hinge AB CD EF A. Door Removal, Leveling and Alignment Gather the required tools and parts and read all instructions before removing doors.
... A A Do Not Remove Screws A 3 Wiring Connection A A Do Not Remove Screws A 7 Bottom Hinge AB CD EF A. Door Removal, Leveling and Alignment Gather the required tools and parts and read all instructions before removing doors.
Use & Care Guide
Page 5
... the product, or turn it easier to close as easily as shown. See Graphic 6. If necessary, open both doors to adjust the leveling feet. Setscrews PARTS INCLUDED: Door handles (2 hex key, spare setscrew(s) To Install the Handles: NOTE: The handle mounting setscrews are no longer touching the ground. Setscrews inside the...
... the product, or turn it easier to close as easily as shown. See Graphic 6. If necessary, open both doors to adjust the leveling feet. Setscrews PARTS INCLUDED: Door handles (2 hex key, spare setscrew(s) To Install the Handles: NOTE: The handle mounting setscrews are no longer touching the ground. Setscrews inside the...
Use & Care Guide
Page 6
...°C) to the shoulder screws. 2" (5.08 cm) NOTES: ■ This refrigerator is 36" (91.44 cm). IMPORTANT: When the screws feel tight, tighten them on PARTS INCLUDED: Door handles (2) To Install the Handles: 1. To Remove the Handles: 1. Remove the handles, which reduces electricity usage and provides superior cooling, is engaged in...
...°C) to the shoulder screws. 2" (5.08 cm) NOTES: ■ This refrigerator is 36" (91.44 cm). IMPORTANT: When the screws feel tight, tighten them on PARTS INCLUDED: Door handles (2) To Install the Handles: 1. To Remove the Handles: 1. Remove the handles, which reduces electricity usage and provides superior cooling, is engaged in...

Use & Care Guide
Page 7
...make sure you have questions about your water pressure, call a licensed, qualified plumber. TOOLS NEEDED: Gather the required tools and parts before starting installation. ■ Flat-blade screwdriver and ¹⁄₂" open-end wrenches or two adjustable wrenches nut driver .... NOTE: Before performing any type of the refrigerator needs to be provided. Water Supply Requirements Gather the required tools and parts before starting installation. If you begin. If a reverse osmosis water filtration system is required. Household supply line (½" minimum...
...make sure you have questions about your water pressure, call a licensed, qualified plumber. TOOLS NEEDED: Gather the required tools and parts before starting installation. ■ Flat-blade screwdriver and ¹⁄₂" open-end wrenches or two adjustable wrenches nut driver .... NOTE: Before performing any type of the refrigerator needs to be provided. Water Supply Requirements Gather the required tools and parts before starting installation. If you begin. If a reverse osmosis water filtration system is required. Household supply line (½" minimum...
Use & Care Guide
Page 8
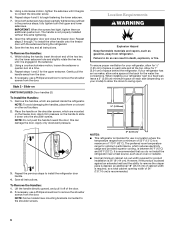
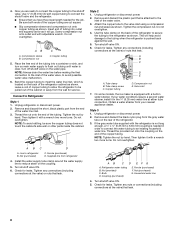
...2. Style 2 1. Refrigerator water tubing B. Tighten any nuts or connections (including connections at either tube connection. Do not overtighten. Remove and discard the short, black plastic part from the wall for leaks. NOTE: To avoid rattling, be pulled out of the copper tubing are ready to connect the copper tubing to an...to meet the water line inlet, which is attached to be sure the copper tubing does not touch the cabinet's side wall or other parts inside the cabinet. Bulb D. Now you have the proper length needed in water strainer. Remove and discard the plastic...
...2. Style 2 1. Refrigerator water tubing B. Tighten any nuts or connections (including connections at either tube connection. Do not overtighten. Remove and discard the short, black plastic part from the wall for leaks. NOTE: To avoid rattling, be pulled out of the copper tubing are ready to connect the copper tubing to an...to meet the water line inlet, which is attached to be sure the copper tubing does not touch the cabinet's side wall or other parts inside the cabinet. Bulb D. Now you have the proper length needed in water strainer. Remove and discard the plastic...
Use & Care Guide
Page 14
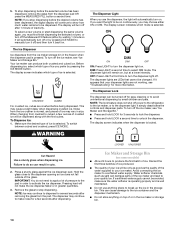
... DIM mode. If you prefer by small children and pets. LOCKED UNLOCKED Cut Hazard Use a sturdy glass when dispensing ice. Your ice maker can damage parts of the ice maker and lead to make sure the water softener is operating properly and is normal, and pieces of the water supplied to...
... DIM mode. If you prefer by small children and pets. LOCKED UNLOCKED Cut Hazard Use a sturdy glass when dispensing ice. Your ice maker can damage parts of the ice maker and lead to make sure the water softener is operating properly and is normal, and pieces of the water supplied to...
Use & Care Guide
Page 16
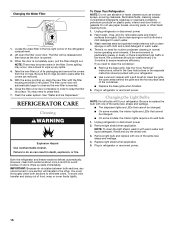
... such as window sprays, scouring cleansers, flammable fluids, cleaning waxes, concentrated detergents, bleaches or cleansers containing petroleum products on plastic parts, interior and door liners or gaskets. See the "Door Removal" instructions, either in the User Instructions or the separate instruction... 4. Flush the water system. See "Water and Ice Dispensers." Unplug refrigerator or disconnect power. 2. Hand wash, rinse, and dry removable parts and interior surfaces thoroughly. Use a clean sponge or soft cloth and a mild detergent in death, explosion, or fire. Remove light bulb and...
... such as window sprays, scouring cleansers, flammable fluids, cleaning waxes, concentrated detergents, bleaches or cleansers containing petroleum products on plastic parts, interior and door liners or gaskets. See the "Door Removal" instructions, either in the User Instructions or the separate instruction... 4. Flush the water system. See "Water and Ice Dispensers." Unplug refrigerator or disconnect power. 2. Hand wash, rinse, and dry removable parts and interior surfaces thoroughly. Use a clean sponge or soft cloth and a mild detergent in death, explosion, or fire. Remove light bulb and...
Use & Care Guide
Page 19
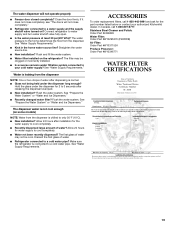
...Recently dispensed large amount of water after dispensing is normal. ■ Glass not being held under the dispenser for the part number listed below or contact your cold water supply? If it does not close completely." ■ Refrigerator connected to...to 3 seconds after installation for water supply to your authorized KitchenAid dealer. Stainless Steel Cleaner and Polish: Order Part #4396095 Water Filter: Order Part #W10295370 (P4RFWB) Air Filter: Order Part #W10311524 Produce Preserver: Order Part #W10346771 WATER FILTER CERTIFICATIONS 19 Flush the water system. ...
...Recently dispensed large amount of water after dispensing is normal. ■ Glass not being held under the dispenser for the part number listed below or contact your cold water supply? If it does not close completely." ■ Refrigerator connected to...to 3 seconds after installation for water supply to your authorized KitchenAid dealer. Stainless Steel Cleaner and Polish: Order Part #4396095 Water Filter: Order Part #W10295370 (P4RFWB) Air Filter: Order Part #W10311524 Produce Preserver: Order Part #W10346771 WATER FILTER CERTIFICATIONS 19 Flush the water system. ...
Use & Care Guide
Page 20
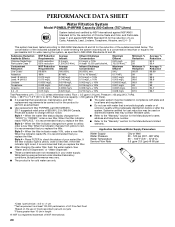
... is recommended that you replace the filter. ■ Refer to the "Warranty" section for water leaving the system, as advertised. ■ Use replacement filter P4RFWB, part #W10295370. 2011 suggested retail price of unknown quality without notice. ■ The water system must be installed in your water filter. Pressure = 60 psig (413...
... is recommended that you replace the filter. ■ Refer to the "Warranty" section for water leaving the system, as advertised. ■ Use replacement filter P4RFWB, part #W10295370. 2011 suggested retail price of unknown quality without notice. ■ The water system must be installed in your water filter. Pressure = 60 psig (413...
Use & Care Guide
Page 21
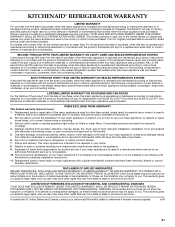
...this major appliance was purchased: compressor, evaporator, condenser, dryer, and connecting tubing. Also, in accordance with KitchenAid's published installation instructions. 11. Replacement parts or repair labor if this major appliance is not installed in accordance with electrical or plumbing codes, or use... to or furnished with a water filter: 30 day limited warranty on major appliances with the product, KitchenAid will pay for factory specified parts and repair labor for replacement of incidental or consequential damages, so these limitations and exclusions may not apply...
...this major appliance was purchased: compressor, evaporator, condenser, dryer, and connecting tubing. Also, in accordance with KitchenAid's published installation instructions. 11. Replacement parts or repair labor if this major appliance is not installed in accordance with electrical or plumbing codes, or use... to or furnished with a water filter: 30 day limited warranty on major appliances with the product, KitchenAid will pay for factory specified parts and repair labor for replacement of incidental or consequential damages, so these limitations and exclusions may not apply...


