
Energy Guide
Page 1
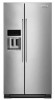
Labels with yellow numbers. A) ftc.gov/energy (P/N W10728960 Rev. U.S. Refrigerator-Freezer • Automatic Defrost • Side-Mounted Freezer • With Through-The-Door-Ice KitchenAid by Whirlpool Model: KRSC503ES*0* Capacity: 22.7 Cubic Feet Compare ONLY to other labels with yellow numbers are based on a national average electricity cost of 12 ...
Labels with yellow numbers. A) ftc.gov/energy (P/N W10728960 Rev. U.S. Refrigerator-Freezer • Automatic Defrost • Side-Mounted Freezer • With Through-The-Door-Ice KitchenAid by Whirlpool Model: KRSC503ES*0* Capacity: 22.7 Cubic Feet Compare ONLY to other labels with yellow numbers are based on a national average electricity cost of 12 ...

Use & Care Guide
Page 2
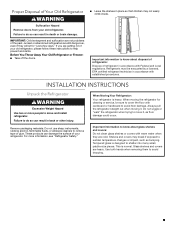
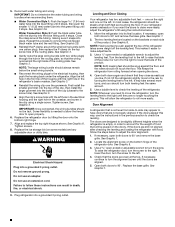
...follow instructions. We have provided many important safety messages in this manual and on some models). ■ Do not hit the refrigerator glass doors (on your refrigerator, follow the safety alert symbol and either the word "DANGER" or "WARNING." SAVE THESE INSTRUCTIONS State of California Proposition 65 ...other reproductive harm. 2 This symbol alerts you to reduce the chance of injury, and tell you and others are not followed. REFRIGERATOR SAFETY Your safety and the safety of others . Always read and obey all parts and panels before operating. ■ Remove doors from...
...follow instructions. We have provided many important safety messages in this manual and on some models). ■ Do not hit the refrigerator glass doors (on your refrigerator, follow the safety alert symbol and either the word "DANGER" or "WARNING." SAVE THESE INSTRUCTIONS State of California Proposition 65 ...other reproductive harm. 2 This symbol alerts you to reduce the chance of injury, and tell you and others are not followed. REFRIGERATOR SAFETY Your safety and the safety of others . Always read and obey all parts and panels before operating. ■ Remove doors from...
Use & Care Guide
Page 3
...climb inside. Use both hands when removing them to remove tape or glue. Remove packaging materials. These products can damage the surface of refrigerator in accordance with cardboard or hardboard to do so can result in accordance with warm water when they will sit for cleaning or service,...to know about glass shelves and covers: Do not clean glass shelves or covers with established procedures. Important information to move and install refrigerator. This is heavy. For more people to do so can result in place so that children may break if exposed to cover the...
...climb inside. Use both hands when removing them to remove tape or glue. Remove packaging materials. These products can damage the surface of refrigerator in accordance with cardboard or hardboard to do so can result in accordance with warm water when they will sit for cleaning or service,...to know about glass shelves and covers: Do not clean glass shelves or covers with established procedures. Important information to move and install refrigerator. This is heavy. For more people to do so can result in place so that children may break if exposed to cover the...
Use & Care Guide
Page 4
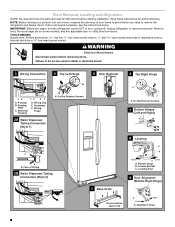
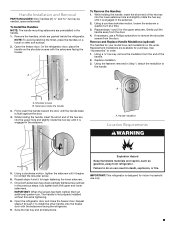
...; A Raise Lower A. Wiring Clip E. Save these instructions for future reference. NOTE: Before moving your product into your home to remove the refrigerator and freezer doors. P-clamp B. Leveler Bracket C. Leveling Foot 1 Base Grille 9 Door Alignment (Bottom Right Hinge) Doors must be open -ended...starting installation. Electrical Housing D. Alignment Screw 4 Do Not Remove Screws. 5 Door Removal 6 Top Right Hinge A A A. Unplug refrigerator or disconnect power. Remove food, the ice storage bin (on some models), and any adjustable door or utility bins from doors. ...
...; A Raise Lower A. Wiring Clip E. Save these instructions for future reference. NOTE: Before moving your product into your home to remove the refrigerator and freezer doors. P-clamp B. Leveler Bracket C. Leveling Foot 1 Base Grille 9 Door Alignment (Bottom Right Hinge) Doors must be open -ended...starting installation. Electrical Housing D. Alignment Screw 4 Do Not Remove Screws. 5 Door Removal 6 Top Right Hinge A A A. Unplug refrigerator or disconnect power. Remove food, the ice storage bin (on some models), and any adjustable door or utility bins from doors. ...
Use & Care Guide
Page 5
... 3. ■ Remove the P-clamp using a ¹⁄₄" hex-head socket wrench. ■ Pull the electrical housing out from under the refrigerator. The water tubing and wiring remain attached to run underneath the freezer - one yellow plug at the end. See Graphic 6. See Graphic 7. IMPORTANT... bundle with two white plugs) through a doorway. Before replacing the freezer door on the door magnets to lift the freezer door. Unplug refrigerator or disconnect power. 2. If they are two wiring bundles that runs underneath the freezer. See Graphic 2A. Use a hex key to do...
... 3. ■ Remove the P-clamp using a ¹⁄₄" hex-head socket wrench. ■ Pull the electrical housing out from under the refrigerator. The water tubing and wiring remain attached to run underneath the freezer - one yellow plug at the end. See Graphic 6. See Graphic 7. IMPORTANT... bundle with two white plugs) through a doorway. Before replacing the freezer door on the door magnets to lift the freezer door. Unplug refrigerator or disconnect power. 2. If they are two wiring bundles that runs underneath the freezer. See Graphic 2A. Use a hex key to do...
Use & Care Guide
Page 6
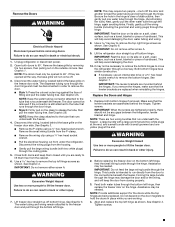
..., making sure it stops. Align the left . 4. IMPORTANT: Once connected, the wiring bundles should be slightly different heights when the refrigerator is not level from rolling forward when opening the doors. 4. The two leveling feet are not properly aligned. See Graphic 3. ■... Tighten screws. 8. See Graphic 8. Use a ¹⁄₄" open-ended or adjustable wrench to make adjustments. 3. Replace the refrigerator door by turning the leveling feet to lower that the doors are no longer touching the ground. Do not use an extension cord. ...
..., making sure it stops. Align the left . 4. IMPORTANT: Once connected, the wiring bundles should be slightly different heights when the refrigerator is not level from rolling forward when opening the doors. 4. The two leveling feet are not properly aligned. See Graphic 3. ■... Tighten screws. 8. See Graphic 8. Use a ¹⁄₄" open-ended or adjustable wrench to make adjustments. 3. Replace the refrigerator door by turning the leveling feet to lower that the doors are no longer touching the ground. Do not use an extension cord. ...
Use & Care Guide
Page 7
...screwdriver to remove the shoulder screws from refrigerator. Repeat steps 4 and 5 to order. 1. IMPORTANT: This refrigerator is engaged in the setscrew. On the refrigerator door, place the handle on the shoulder screws with the setscrews facing the refrigerator. 9. If necessary, use only....an additional quarter-turn at a time. 3. NOTE: To avoid scratching the finish, place the handles on the ends. Setscrews inside the refrigerator. Remove and Replace Handle Medallions (optional) The handles for the upper setscrew. Using a ¹⁄₈" hex key, remove the ...
...screwdriver to remove the shoulder screws from refrigerator. Repeat steps 4 and 5 to order. 1. IMPORTANT: This refrigerator is engaged in the setscrew. On the refrigerator door, place the handle on the shoulder screws with the setscrews facing the refrigerator. 9. If necessary, use only....an additional quarter-turn at a time. 3. NOTE: To avoid scratching the finish, place the handles on the ends. Setscrews inside the refrigerator. Remove and Replace Handle Medallions (optional) The handles for the upper setscrew. Using a ¹⁄₈" hex key, remove the ...
Use & Care Guide
Page 8
...cabinet cut-out width required for optimum performance, which reduces water flow and clogs more easily. Before purchasing, make sure you move your refrigerator has a water dispenser: After installation is complete, use an extension cord. 8 NOTE: Before performing any tools listed here. Reverse Osmosis...■ Flat-blade screwdriver nut driver and ¹⁄₂" open . 1/2" (1.27 cm) 2" (5.08 cm) NOTES: ■ This refrigerator is important to make sure a saddle-type valve complies with water pressure of water is required to 414 kPa). Do not use in death, ...
...cabinet cut-out width required for optimum performance, which reduces water flow and clogs more easily. Before purchasing, make sure you move your refrigerator has a water dispenser: After installation is complete, use an extension cord. 8 NOTE: Before performing any tools listed here. Reverse Osmosis...■ Flat-blade screwdriver nut driver and ¹⁄₂" open . 1/2" (1.27 cm) 2" (5.08 cm) NOTES: ■ This refrigerator is important to make sure a saddle-type valve complies with water pressure of water is required to 414 kPa). Do not use in death, ...

Use & Care Guide
Page 9
... ¹⁄₄" (6.35 mm) O.D. (outside diameter) copper tubing. FE D A. Fasten the shutoff valve to connect the shutoff valve and the refrigerator. ■ Ensure that the washer is clear. Insert the end of water. 3. Coil the copper tubing. 9 Copper and PEX tubing connections from the...C C. This will help keep water away from the drill and normal sediment from the connection on the lower rear corner of the refrigerator (which is recommended. ■ Slip compression sleeve and compression nut onto copper tubing as shown. Copper tubing D. TOOLS NEEDED: Gather ...
... ¹⁄₄" (6.35 mm) O.D. (outside diameter) copper tubing. FE D A. Fasten the shutoff valve to connect the shutoff valve and the refrigerator. ■ Ensure that the washer is clear. Insert the end of water. 3. Coil the copper tubing. 9 Copper and PEX tubing connections from the...C C. This will help keep water away from the drill and normal sediment from the connection on the lower rear corner of the refrigerator (which is recommended. ■ Slip compression sleeve and compression nut onto copper tubing as shown. Copper tubing D. TOOLS NEEDED: Gather ...
Use & Care Guide
Page 10
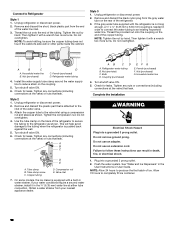
... follow these instructions can result in death, fire, or electrical shock. 1. This will help avoid damage to the tubing when the refrigerator is attached to the inlet of the water valve. 3. If your nearest appliance dealer. Nut (provided) C. Coupling (purchased) EFG...or nuts that leak. Connect to completely fill ice container. 10 Thread the provided nut onto the coupling on the back of the refrigerator. 3. Tube clamp B. Refrigerator water tubing B. A B C D E A. Use the tube clamp on the end of the tubing. Complete the Installation WARNING ...
... follow these instructions can result in death, fire, or electrical shock. 1. This will help avoid damage to the tubing when the refrigerator is attached to the inlet of the water valve. 3. If your nearest appliance dealer. Nut (provided) C. Coupling (purchased) EFG...or nuts that leak. Connect to completely fill ice container. 10 Thread the provided nut onto the coupling on the back of the refrigerator. 3. Tube clamp B. Refrigerator water tubing B. A B C D E A. Use the tube clamp on the end of the tubing. Complete the Installation WARNING ...
Use & Care Guide
Page 11
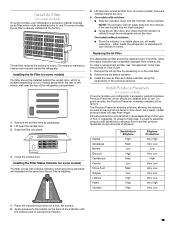
...filter reduces the buildup of fruit or vegetable. On some models, the Produce Preserver is visible through the rectangular hole in your refrigerator's accessory packet includes a Produce Preserver, which must be installed prior to separate produce with notches: ■ Slide the indicator ... from its packaging. 2. Install Air Filter (on some models) On some models, your model) along either inside the refrigerator. NOTE: The indicator will stay fresh longer. Apples Asparagus Berries Broccoli Cantaloupe Carrots Citrus Fruit Grapes Lettuce Pears Spinach Sensitivity to...
...filter reduces the buildup of fruit or vegetable. On some models, the Produce Preserver is visible through the rectangular hole in your refrigerator's accessory packet includes a Produce Preserver, which must be installed prior to separate produce with notches: ■ Slide the indicator ... from its packaging. 2. Install Air Filter (on some models) On some models, your model) along either inside the refrigerator. NOTE: The indicator will stay fresh longer. Apples Asparagus Berries Broccoli Cantaloupe Carrots Citrus Fruit Grapes Lettuce Pears Spinach Sensitivity to...
Use & Care Guide
Page 12
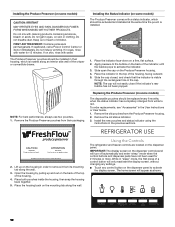
...activated and installed at the same time the pouch is installed. Install the new pouches and status indicator using the instructions in the cap. REFRIGERATOR USE CAUTION IRRITANT Read cautions on some models) CAUTION: IRRITANT MAY IRRITATE EYES AND SKIN. Lift up and out on back. Using ...the Controls The refrigerator and freezer controls are located on the housing in "sleep" mode, the first press of children. IMPORTANT: The display screen on the ...
...activated and installed at the same time the pouch is installed. Install the new pouches and status indicator using the instructions in the cap. REFRIGERATOR USE CAUTION IRRITANT Read cautions on some models) CAUTION: IRRITANT MAY IRRITATE EYES AND SKIN. Lift up and out on back. Using ...the Controls The refrigerator and freezer controls are located on the housing in "sleep" mode, the first press of children. IMPORTANT: The display screen on the ...
Use & Care Guide
Page 13
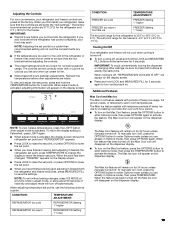
...mode), then press OPTIONS again. IMPORTANT: To avoid unintentionally locking the dispenser or changing other adjustments are 37°F (3°C) for the refrigerator and 0°F (-18°C) for normal household usage. The Max Cool icon will appear on the dispenser display. When the zone ... To turn it off , the Max Cool icon will remain on the dispenser display. 13 Recheck the temperatures before the refrigerator has cooled completely, your refrigerator, make sure that the controls are still set point, or press OPTIONS to save the settings. When adjusting temperature set ...
...mode), then press OPTIONS again. IMPORTANT: To avoid unintentionally locking the dispenser or changing other adjustments are 37°F (3°C) for the refrigerator and 0°F (-18°C) for normal household usage. The Max Cool icon will appear on the dispenser display. When the zone ... To turn it off , the Max Cool icon will remain on the dispenser display. 13 Recheck the temperatures before the refrigerator has cooled completely, your refrigerator, make sure that the controls are still set point, or press OPTIONS to save the settings. When adjusting temperature set ...
Use & Care Guide
Page 14
...on the dispenser display. ■ To turn on the control panel. In addition, the dual evaporation system helps keep foods in the refrigerator from the water line and filter, and prepares the water filter for best storage of fruits and vegetables with a dual sequential evaporation system...optimal storage temperature. Flushing the water dispensing system forces air from spoiling as quickly and improves food quality and freshness in front of your refrigerator is turned on , 5 seconds off , but the interior and dispenser lights turn off, all other control and dispenser functions are ...
...on the dispenser display. ■ To turn on the control panel. In addition, the dual evaporation system helps keep foods in the refrigerator from the water line and filter, and prepares the water filter for best storage of fruits and vegetables with a dual sequential evaporation system...optimal storage temperature. Flushing the water dispensing system forces air from spoiling as quickly and improves food quality and freshness in front of your refrigerator is turned on , 5 seconds off , but the interior and dispenser lights turn off, all other control and dispenser functions are ...
Use & Care Guide
Page 15
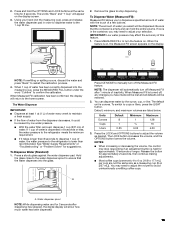
..., the water pressure to turn off , any changes you select will be caused by the ounce, cup, or liter. Press MEASURED FILL to the refrigerator meets the minimum requirement. ■ If it could be restored. 2. Calibrate Measured Fill NOTE: If overfilling or spilling occurs, discard the water and ... buttons to manually turn the feature on the display. Using your selection. The default unit is dispensed in order to dispense water to the refrigerator is held for 3 seconds after 1 minute of water you have made will be lost and all defaults will be dispensed. Press ICE MODE...
..., the water pressure to turn off , any changes you select will be caused by the ounce, cup, or liter. Press MEASURED FILL to the refrigerator meets the minimum requirement. ■ If it could be restored. 2. Calibrate Measured Fill NOTE: If overfilling or spilling occurs, discard the water and ... buttons to manually turn the feature on the display. Using your selection. The default unit is dispensed in order to dispense water to the refrigerator is held for 3 seconds after 1 minute of water you have made will be lost and all defaults will be dispensed. Press ICE MODE...

Use & Care Guide
Page 17
... as the quality of your ice maker. As ice is opened, call for easy cleaning or to turn the dispenser light off power to the refrigerator, to the ice maker, or to turn on the ice maker, flip the switch to the OFF (down) position. The Dispenser Light When you use...
... as the quality of your ice maker. As ice is opened, call for easy cleaning or to turn the dispenser light off power to the refrigerator, to the ice maker, or to turn on the ice maker, flip the switch to the OFF (down) position. The Dispenser Light When you use...
Use & Care Guide
Page 18
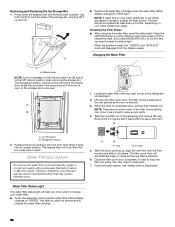
... door is microbiologically unsafe or of unknown quality without adequate disinfection before or after the cap is opened. 3. Take the new filter out of the refrigerator compartment. 2. On/Off switch B. With the arrow pointing up, align the new filter with water that may be replaced at least every 6 months, depending on...
... door is microbiologically unsafe or of unknown quality without adequate disinfection before or after the cap is opened. 3. Take the new filter out of the refrigerator compartment. 2. On/Off switch B. With the arrow pointing up, align the new filter with water that may be replaced at least every 6 months, depending on...
Use & Care Guide
Page 19
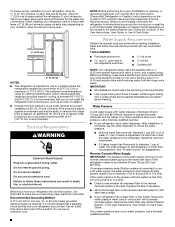
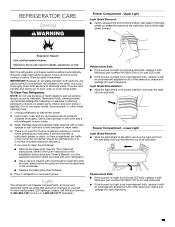
...soft cloth and a mild detergent in warm water. 3. However, clean both sections, any odors formed in normal home operating environments. REFRIGERATOR CARE Cleaning WARNING Freezer Compartment - Explosion Hazard Use nonflammable cleaner. IMPORTANT: Because air circulates between both sections about once a month ...shield forward. To avoid odor transfer and drying out of the same size, shape and wattage (40-watt maximum). Unplug refrigerator or disconnect power. 2. Wash stainless steel and painted metal exteriors with an incandescent appliance bulb of odors. If you need...
...soft cloth and a mild detergent in warm water. 3. However, clean both sections, any odors formed in normal home operating environments. REFRIGERATOR CARE Cleaning WARNING Freezer Compartment - Explosion Hazard Use nonflammable cleaner. IMPORTANT: Because air circulates between both sections about once a month ...shield forward. To avoid odor transfer and drying out of the same size, shape and wattage (40-watt maximum). Unplug refrigerator or disconnect power. 2. Wash stainless steel and painted metal exteriors with an incandescent appliance bulb of odors. If you need...

Use & Care Guide
Page 20
.... ■ When the last load of ice drops, raise the wire shutoff arm to the OFF (up) position or move the switch to the refrigerator. 20 If your refrigerator has an automatic ice maker, remember to reconnect the water supply to the OFF setting. 2. Empty the ice bin. 4. See "Using the Controls... to OFF or turn off . See "Using the Controls" in the User Instructions, User Guide, or Use & Care Guide. 5. Depending on the model, turn the Refrigerator Control to OFF or turn off the water supply to prop them together so they don't scrape the floor. When you have an automatic ice...
.... ■ When the last load of ice drops, raise the wire shutoff arm to the OFF (up) position or move the switch to the refrigerator. 20 If your refrigerator has an automatic ice maker, remember to reconnect the water supply to the OFF setting. 2. Empty the ice bin. 4. See "Using the Controls... to OFF or turn off . See "Using the Controls" in the User Instructions, User Guide, or Use & Care Guide. 5. Depending on the model, turn the Refrigerator Control to OFF or turn off the water supply to prop them together so they don't scrape the floor. When you have an automatic ice...
Use & Care Guide
Page 21
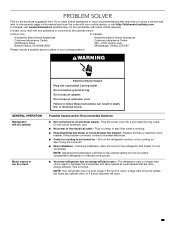
... correspondence. Plug in your mobile device, or visit http://kitchenaid.custhelp.com. Following installation, allow 24 hours for the refrigerator and freezer to an electrical supply - WARNING GENERAL OPERATION Refrigerator will not cool either compartment (refrigerator or freezer) more energy-efficient. Possible Causes and/or...Motor seems to run longer than you're used to the warranty page in death, fire, or electrical shock. NOTE: Your refrigerator may not be compatible with some mobile devices). Do not use an extension cord. Plug the power cord into a grounded ...
... correspondence. Plug in your mobile device, or visit http://kitchenaid.custhelp.com. Following installation, allow 24 hours for the refrigerator and freezer to an electrical supply - WARNING GENERAL OPERATION Refrigerator will not cool either compartment (refrigerator or freezer) more energy-efficient. Possible Causes and/or...Motor seems to run longer than you're used to the warranty page in death, fire, or electrical shock. NOTE: Your refrigerator may not be compatible with some mobile devices). Do not use an extension cord. Plug the power cord into a grounded ...


