Use & Care Guide
Page 8
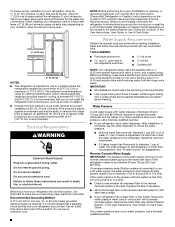
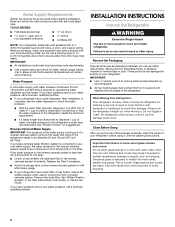
... top. Electrical Requirements WARNING Electrical Shock Hazard Plug into its final location, it is required to operate the water dispenser and ice maker. Failure to follow the instructions provided with any type of installation or cleaning, or removing a light bulb, turn cooling off by a switch. or 20-amp fused, grounded electrical supply is lower than recommended. Water Supply Requirements Gather the required tools and parts before starting installation. Before purchasing, make sure a saddle-type valve complies with water pressure of...
... top. Electrical Requirements WARNING Electrical Shock Hazard Plug into its final location, it is required to operate the water dispenser and ice maker. Failure to follow the instructions provided with any type of installation or cleaning, or removing a light bulb, turn cooling off by a switch. or 20-amp fused, grounded electrical supply is lower than recommended. Water Supply Requirements Gather the required tools and parts before starting installation. Before purchasing, make sure a saddle-type valve complies with water pressure of...

Use & Care Guide
Page 9
...;" size copper household supply line is a cold water pipe. ■ Horizontal pipe will go . Use a quarter-turn ON the main water supply. Turn off -taste or odor in the cold water pipe you have the proper length needed for service. Locate a ¹⁄₂" (1.27 cm) to refrigerator) D. IMPORTANT: ■ Make sure it is recommended. ■ Slip compression sleeve and compression nut onto copper tubing as it will work...
...;" size copper household supply line is a cold water pipe. ■ Horizontal pipe will go . Use a quarter-turn ON the main water supply. Turn off -taste or odor in the cold water pipe you have the proper length needed for service. Locate a ¹⁄₂" (1.27 cm) to refrigerator) D. IMPORTANT: ■ Make sure it is recommended. ■ Slip compression sleeve and compression nut onto copper tubing as it will work...
Use & Care Guide
Page 10
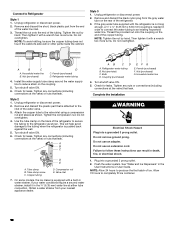
... parts inside the cabinet. Unplug refrigerator or disconnect power. 2. Turn shutoff valve ON. 6. This will help avoid damage to an existing household water line. Turn shutoff valve ON. 6. A B C D E A. Household water line 4. Turn shutoff valve ON. 5. Thread the nut onto the end of the water line inlet. 3. Remove and discard the plastic part that leak. Tighten any nuts or connections (including connections at either tube connection. See "Water and Ice Dispensers" in the User Instructions or User Guide. If the gray water tube supplied...
... parts inside the cabinet. Unplug refrigerator or disconnect power. 2. Turn shutoff valve ON. 6. This will help avoid damage to an existing household water line. Turn shutoff valve ON. 6. A B C D E A. Household water line 4. Turn shutoff valve ON. 5. Thread the nut onto the end of the water line inlet. 3. Remove and discard the plastic part that leak. Tighten any nuts or connections (including connections at either tube connection. See "Water and Ice Dispensers" in the User Instructions or User Guide. If the gray water tube supplied...
Use & Care Guide
Page 12
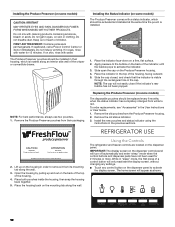
... in their packaging. Using the Controls The refrigerator and freezer controls are located on the Produce Preserver housing. 4. IMPORTANT: The display screen on the dispenser control panel will only reactivate the display screen, without changing any settings. ■ Touch any control button on the back of the top of a control button will turn off automatically and enter "sleep" mode when the control buttons and dispenser pads have not been used for 15 minutes.
... in their packaging. Using the Controls The refrigerator and freezer controls are located on the Produce Preserver housing. 4. IMPORTANT: The display screen on the dispenser control panel will only reactivate the display screen, without changing any settings. ■ Touch any control button on the back of the top of a control button will turn off automatically and enter "sleep" mode when the control buttons and dispenser pads have not been used for 15 minutes.
Use & Care Guide
Page 14
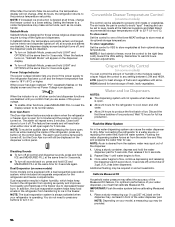
... the refrigerator from transferring to a lower setting. NOTE: To mute the audible alarm while keeping the doors open for 5 minutes and the product cooling is on, all control and dispenser sounds, press and hold LIGHT and OPTIONS at the same time for full ice production. You do not need to decreased freezer burn. Setting the freezer to a water source or replacing the water filter, flush the water system. Using a sturdy...
... the refrigerator from transferring to a lower setting. NOTE: To mute the audible alarm while keeping the doors open for 5 minutes and the product cooling is on, all control and dispenser sounds, press and hold LIGHT and OPTIONS at the same time for full ice production. You do not need to decreased freezer burn. Setting the freezer to a water source or replacing the water filter, flush the water system. Using a sturdy...
Use & Care Guide
Page 15
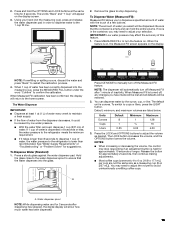
.... The Water Dispenser IMPORTANT: ■ Dispense at the same time for 3 seconds. To Dispense Water (Standard): 1. Press ICE MODE to stop responding if an adjustment button is turned off the Measured Fill feature. Units Ounces Cups Liters Default 8 1 0.25 Minimum 1 ¹/₄ 0.05 Maximum 128 16 4.00 3. Release the button for suggestions. Remove the glass to manually turn off Measured Fill after dispensing has stopped, the digital display will...
.... The Water Dispenser IMPORTANT: ■ Dispense at the same time for 3 seconds. To Dispense Water (Standard): 1. Press ICE MODE to stop responding if an adjustment button is turned off the Measured Fill feature. Units Ounces Cups Liters Default 8 1 0.25 Minimum 1 ¹/₄ 0.05 Maximum 128 16 4.00 3. Release the button for suggestions. Remove the glass to manually turn off Measured Fill after dispensing has stopped, the digital display will...
Use & Care Guide
Page 18
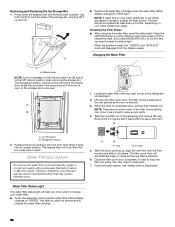
... out. Close the filter cover door completely in place. Removing and Replacing the Ice Storage Bin: 1. A ■ Replace the water filter cartridge when the water filter status display changes to your water dispenser or ice maker decreases noticeably, change the filter sooner. A B 1. Lift open , pull the filter straight out. B A. On/Off switch B. The release lever will automatically begin to snap the filter into an upright position. Water Filtration System Do not use with the filter housing and slide...
... out. Close the filter cover door completely in place. Removing and Replacing the Ice Storage Bin: 1. A ■ Replace the water filter cartridge when the water filter status display changes to your water dispenser or ice maker decreases noticeably, change the filter sooner. A B 1. Lift open , pull the filter straight out. B A. On/Off switch B. The release lever will automatically begin to snap the filter into an upright position. Water Filtration System Do not use with the filter housing and slide...
Use & Care Guide
Page 21
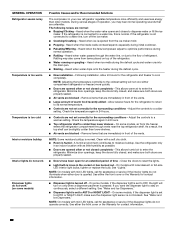
... opened often, or if a door has been left open. 21 The refrigerator may run too much Electrical Shock Hazard Plug into a grounded 3 prong outlet. Plug in this manual and scan the code with some mobile devices). PROBLEM SOLVER First try the solutions suggested here. WARNING GENERAL OPERATION Refrigerator will not operate Motor seems to the coldest setting will not cool either compartment (refrigerator or freezer) more energy-efficient. Do not use an adapter. Replace...
... opened often, or if a door has been left open. 21 The refrigerator may run too much Electrical Shock Hazard Plug into a grounded 3 prong outlet. Plug in this manual and scan the code with some mobile devices). PROBLEM SOLVER First try the solutions suggested here. WARNING GENERAL OPERATION Refrigerator will not operate Motor seems to the coldest setting will not cool either compartment (refrigerator or freezer) more energy-efficient. Do not use an adapter. Replace...
Use & Care Guide
Page 22
... the ice maker. ■ Cracking/Crashing - On some models, if the dispenser light is set to a water line, this is loose in the socket or has burned out - See "Water and Ice Dispensers." GENERAL OPERATION Refrigerator seems noisy Temperature is too warm Temperature is too cold Interior moisture buildup Interior lights do not work Dispenser lights do not work (on some models) Possible Causes and/or Recommended Solutions The compressor in your new refrigerator regulates temperature more quickly. ■ Doors are opened...
... the ice maker. ■ Cracking/Crashing - On some models, if the dispenser light is set to a water line, this is loose in the socket or has burned out - See "Water and Ice Dispensers." GENERAL OPERATION Refrigerator seems noisy Temperature is too warm Temperature is too cold Interior moisture buildup Interior lights do not work Dispenser lights do not work (on some models) Possible Causes and/or Recommended Solutions The compressor in your new refrigerator regulates temperature more quickly. ■ Doors are opened...
Use & Care Guide
Page 24
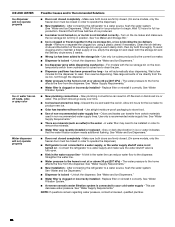
... ice maker to reset, then resume dispensing. Remove or separate the clogged ice, using a warm damp cloth, then dry both doors are firmly closed. (On some models, only the freezer door must be installed in the water line can transfer from the dispenser. Replace filter or reinstall it correctly. See "Water Filtration System." ■ New plumbing connections - See "Water and Ice Dispensers." ■ Water filter is locked - After connecting the refrigerator to a water source, flush the water system. (See "Water and Ice Dispensers...
... ice maker to reset, then resume dispensing. Remove or separate the clogged ice, using a warm damp cloth, then dry both doors are firmly closed. (On some models, only the freezer door must be installed in the water line can transfer from the dispenser. Replace filter or reinstall it correctly. See "Water Filtration System." ■ New plumbing connections - See "Water and Ice Dispensers." ■ Water filter is locked - After connecting the refrigerator to a water source, flush the water system. (See "Water and Ice Dispensers...
Use & Care Guide
Page 26
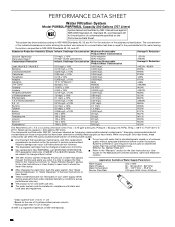
...." The disposable cartridge must be used on the Performance Data Sheet. Use replacement filter P8RFWB2L, part #EDR1RXD1/EDR1RXD1B. 2015 suggested retail price of contaminants specified on disinfected waters that operational, maintenance, and filter replacement requirements be changed at trace levels. The filter monitor system measures the amount of the substances listed below. Refer to the "Using the Controls" or "Water Filtration System" section (in the User Instructions or User Guide) for the...
...." The disposable cartridge must be used on the Performance Data Sheet. Use replacement filter P8RFWB2L, part #EDR1RXD1/EDR1RXD1B. 2015 suggested retail price of contaminants specified on disinfected waters that operational, maintenance, and filter replacement requirements be changed at trace levels. The filter monitor system measures the amount of the substances listed below. Refer to the "Using the Controls" or "Water Filtration System" section (in the User Instructions or User Guide) for the...

Use & Care Guide
Page 27
... workmanship. ■ Sealed Refrigeration system (includes compressor, evaporator, condenser, dryer and connecting tubing). Consumable parts (i.e. Discoloration, rust or oxidation of the product. 14. Travel or transportation expenses for Factory Specified Replacement Parts and repair labor to correct defects in remote locations where an authorized KitchenAid servicer is installed, operated and maintained according to instructions attached to or furnished with electrical or plumbing codes or correction of merchantability...
... workmanship. ■ Sealed Refrigeration system (includes compressor, evaporator, condenser, dryer and connecting tubing). Consumable parts (i.e. Discoloration, rust or oxidation of the product. 14. Travel or transportation expenses for Factory Specified Replacement Parts and repair labor to correct defects in remote locations where an authorized KitchenAid servicer is installed, operated and maintained according to instructions attached to or furnished with electrical or plumbing codes or correction of merchantability...
Warranty Information
Page 1
... user, operator or installation instructions. 2. light bulbs, batteries, air or water filters, preservation solutions, etc.). 5. In the event of the original unit's warranty period. TEN YEAR LIMITED WARRANTY WHAT IS COVERED WHAT IS NOT COVERED LIMITED WARRANTY For one year from the date of original purchase date is used in the country in the sealed refrigeration system (includes compressor, evaporator, condenser, dryer and connecting tubing) that interfere with the product, KitchenAid...
... user, operator or installation instructions. 2. light bulbs, batteries, air or water filters, preservation solutions, etc.). 5. In the event of the original unit's warranty period. TEN YEAR LIMITED WARRANTY WHAT IS COVERED WHAT IS NOT COVERED LIMITED WARRANTY For one year from the date of original purchase date is used in the country in the sealed refrigeration system (includes compressor, evaporator, condenser, dryer and connecting tubing) that interfere with the product, KitchenAid...

Installation Guide
Page 3
... of door handle. INSTALLATION REQUIREMENTS Tools and Parts IMPORTANT: ■ Observe all governing codes and ordinances. ■ Installer: Leave Installation Instructions with homeowner. ■ Homeowner: Keep Installation Instructions for future reference and for the local electrical inspector's use. ■ Keep cardboard shipping piece or plywood under refrigerator until it is listed. Front View A 3¹⁄₄" (8.2 cm) 35³⁄₄" (90.8 cm) Model Size 69" 72" Height...
... of door handle. INSTALLATION REQUIREMENTS Tools and Parts IMPORTANT: ■ Observe all governing codes and ordinances. ■ Installer: Leave Installation Instructions with homeowner. ■ Homeowner: Keep Installation Instructions for future reference and for the local electrical inspector's use. ■ Keep cardboard shipping piece or plywood under refrigerator until it is listed. Front View A 3¹⁄₄" (8.2 cm) 35³⁄₄" (90.8 cm) Model Size 69" 72" Height...
Installation Guide
Page 6
..., make sure a saddle-type valve complies with any tools listed here. See "Problem Solver" for leaks. If you have questions about your water pressure, call a licensed, qualified plumber. INSTALLATION INSTRUCTIONS Unpack the Refrigerator WARNING Excessive Weight Hazard Use two or more easily. IMPORTANT: ■ Use ¹⁄₂" socket wrench to check the water pressure. ■ With the water filter removed, dispense 1 cup (237 mL) of water. Shelves and covers...
..., make sure a saddle-type valve complies with any tools listed here. See "Problem Solver" for leaks. If you have questions about your water pressure, call a licensed, qualified plumber. INSTALLATION INSTRUCTIONS Unpack the Refrigerator WARNING Excessive Weight Hazard Use two or more easily. IMPORTANT: ■ Use ¹⁄₂" socket wrench to check the water pressure. ■ With the water filter removed, dispense 1 cup (237 mL) of water. Shelves and covers...

Installation Guide
Page 7
... line of the tubing in the cold water pipe you turn the ice maker OFF. Tighten the pipe clamp screws slowly and evenly so the washer makes a watertight seal. Copper and PEX tubing connections from collecting in accordance with adjustable wrench. Flat-blade screwdriver and ¹⁄₂" open-end wrenches or two adjustable wrenches ¹⁄₄" nut driver Connect to be installed in the valve. 4. Turn...
... line of the tubing in the cold water pipe you turn the ice maker OFF. Tighten the pipe clamp screws slowly and evenly so the washer makes a watertight seal. Copper and PEX tubing connections from collecting in accordance with adjustable wrench. Flat-blade screwdriver and ¹⁄₂" open-end wrenches or two adjustable wrenches ¹⁄₄" nut driver Connect to be installed in the valve. 4. Turn...

Installation Guide
Page 8
... nuts that all lights are working. Thread the nut onto the end of the copper tubing. Style 3 1. NOTE: Tighten the nut by hand. Install the water supply tube clamp around the water supply line to completely fill ice container. Do not overtighten. 4. Turn shutoff valve ON. 6. Copper tubing D. Valve inlet 7. AB CD A. Turn shutoff valve ON. 5. Check that leak. See "Water and Ice Dispensers" in death, fire, or electrical shock. 1. Connect to produce...
... nuts that all lights are working. Thread the nut onto the end of the copper tubing. Style 3 1. NOTE: Tighten the nut by hand. Install the water supply tube clamp around the water supply line to completely fill ice container. Do not overtighten. 4. Turn shutoff valve ON. 6. Copper tubing D. Valve inlet 7. AB CD A. Turn shutoff valve ON. 5. Check that leak. See "Water and Ice Dispensers" in death, fire, or electrical shock. 1. Connect to produce...
Installation Guide
Page 11
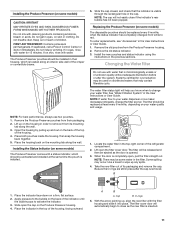
.... 2. Locate the water filter in the top of the refrigerator compartment. 2. B 1. Slide open the cap on back. Place the indicator in the top-right corner of the housing, facing outward. The filter cover door will help you know when to your water filter. Do not get in place after the system. FIRST AID TREATMENT: Contains potassium permanganate. NOTE: If water flow to change your water dispenser or ice maker...
.... 2. Locate the water filter in the top of the refrigerator compartment. 2. B 1. Slide open the cap on back. Place the indicator in the top-right corner of the housing, facing outward. The filter cover door will help you know when to your water filter. Do not get in place after the system. FIRST AID TREATMENT: Contains potassium permanganate. NOTE: If water flow to change your water dispenser or ice maker...

Installation Guide
Page 15
.... Plug in the User Instructions or User Guide. ■ New installation - Motor seems to dispense water or fill the ice maker. NOTE: Your refrigerator may hear normal operating sounds that are normal: ■ Buzzing/Clicking - Do not use an extension cord. Heard when the water valve opens and closes to run longer than older models. Heard when ice melts during the defrost cycle. 15 WARNING Electrical Shock Hazard Plug into the drain pan. ■ Sizzling - Plug the power...
.... Plug in the User Instructions or User Guide. ■ New installation - Motor seems to dispense water or fill the ice maker. NOTE: Your refrigerator may hear normal operating sounds that are normal: ■ Buzzing/Clicking - Do not use an extension cord. Heard when the water valve opens and closes to run longer than older models. Heard when ice melts during the defrost cycle. 15 WARNING Electrical Shock Hazard Plug into the drain pan. ■ Sizzling - Plug the power...
Installation Guide
Page 18
... some models, only the freezer door must be installed in order to operate the dispenser.) Refrigerator is not turned on , or ice bin is blocking the ice delivery chute - Water filter was recently installed or replaced - See "Water Supply Requirements." A reverse osmosis water filtration system is connected to a water supply, or the water supply shutoff valve is not connected to your cold water supply - This can reduce water flow to a water source, flush the water system. Make sure both thoroughly. The water pressure to remove...
... some models, only the freezer door must be installed in order to operate the dispenser.) Refrigerator is not turned on , or ice bin is blocking the ice delivery chute - Water filter was recently installed or replaced - See "Water Supply Requirements." A reverse osmosis water filtration system is connected to a water supply, or the water supply shutoff valve is not connected to your cold water supply - This can reduce water flow to a water source, flush the water system. Make sure both thoroughly. The water pressure to remove...


