Feature Sheet
Page 1
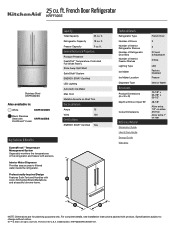
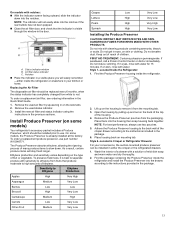
.... Technical Details Refrigerator Type Number of Doors Number of Interior Refrigerator Shelves Number of Refrigerator Door Bins Number of Interior Freezer Shelves Lighting Type Ice Maker Ice Maker Location Dispenser Type Dimensions Product Dimensions (H x W x D) Depth with Door Open 90° Cutout Dimensions Reference Material Dimension Guide Use & Care Guide Energy Guide Warranty French Door 3 5 2 Fixed, 3 Adjustable 2 Wire LED Factory Installed Freezer Interior Water 70-1/8" x 35-7/8" x 35-1/2" 48-1/8" Allow extra 1/2" on sides and top Allow extra 1" on Shelf Trim Electrical Details Amps...
.... Technical Details Refrigerator Type Number of Doors Number of Interior Refrigerator Shelves Number of Refrigerator Door Bins Number of Interior Freezer Shelves Lighting Type Ice Maker Ice Maker Location Dispenser Type Dimensions Product Dimensions (H x W x D) Depth with Door Open 90° Cutout Dimensions Reference Material Dimension Guide Use & Care Guide Energy Guide Warranty French Door 3 5 2 Fixed, 3 Adjustable 2 Wire LED Factory Installed Freezer Interior Water 70-1/8" x 35-7/8" x 35-1/2" 48-1/8" Allow extra 1/2" on sides and top Allow extra 1" on Shelf Trim Electrical Details Amps...
Owners Manual
Page 2
... do not play with ice maker kit for ice maker kit model information. � A qualified service technician must install the water line and ice maker. See installation instructions supplied with the appliance. � This appliance is not intended for use mechanical devices or other means to be replaced by the manufacturer, its service agent, or a similarly qualified person in this manual and on your appliance, follow instructions. All safety messages will...
... do not play with ice maker kit for ice maker kit model information. � A qualified service technician must install the water line and ice maker. See installation instructions supplied with the appliance. � This appliance is not intended for use mechanical devices or other means to be replaced by the manufacturer, its service agent, or a similarly qualified person in this manual and on your appliance, follow instructions. All safety messages will...
Owners Manual
Page 3
... old refrigerator or freezer: � Take off the doors. � Leave the shelves in warm water. Important information to eliminate odors. IMPORTANT: � Because air circulates between all sections to know about once a month to avoid unintentionally changing the settings. 2. Plug in warm water. 3. Cleaning the Interior: IMPORTANT: Refrigerator shelves with Federal and Local regulations. Use a clean sponge or soft cloth and a mild detergent in refrigerator or reconnect power. IMPORTANT...
... old refrigerator or freezer: � Take off the doors. � Leave the shelves in warm water. Important information to eliminate odors. IMPORTANT: � Because air circulates between all sections to know about once a month to avoid unintentionally changing the settings. 2. Plug in warm water. 3. Cleaning the Interior: IMPORTANT: Refrigerator shelves with Federal and Local regulations. Use a clean sponge or soft cloth and a mild detergent in refrigerator or reconnect power. IMPORTANT...
Owners Manual
Page 5
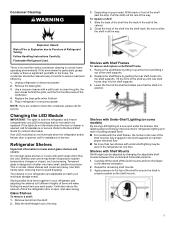
... locating storage items. � For models with the shelf frames, the hooks on your refrigerator are heavy. Shelves with under the shelves, this leading-edge technology improves interior refrigerator lighting and aids in your individual storage needs. There is opened , call for service. Use a vacuum cleaner with warm water when they are unable to shatter into the shelf supports. If an LED module(s) do not need for contact information. Remove the shelf...
... locating storage items. � For models with the shelf frames, the hooks on your refrigerator are heavy. Shelves with under the shelves, this leading-edge technology improves interior refrigerator lighting and aids in your individual storage needs. There is opened , call for service. Use a vacuum cleaner with warm water when they are unable to shatter into the shelf supports. If an LED module(s) do not need for contact information. Remove the shelf...

Owners Manual
Page 6
... the refrigerator. 2. To remove and replace shelves: 1. Also doors will not turn on the center front of the shelf and make sure glass does not slide to sense door opening is not detected. Infinity slide glass shelves should be left and right hinge cover. � The door switch uses magnet to front. The doors can be open wider, it up . IMPORTANT: If the doors do not automatically close . NOTE: The light and internal user...
... the refrigerator. 2. To remove and replace shelves: 1. Also doors will not turn on the center front of the shelf and make sure glass does not slide to sense door opening is not detected. Infinity slide glass shelves should be left and right hinge cover. � The door switch uses magnet to front. The doors can be open wider, it up . IMPORTANT: If the doors do not automatically close . NOTE: The light and internal user...

Owners Manual
Page 7
... your model, raise the wire shutoff arm to Off (up ) position or press the switch to Off, depending on the refrigerator. Turn off the Temperature control(s). See the "Quick Start Guide." 5. When you remove all frozen food in "Refrigerator Care." Refrigerator Delivery � A minimum door opening is 36" (914 mm) or less, then removal of doors, drawer, and hinges is connected to the household water supply, turn off the water supply to the ice maker at...
... your model, raise the wire shutoff arm to Off (up ) position or press the switch to Off, depending on the refrigerator. Turn off the Temperature control(s). See the "Quick Start Guide." 5. When you remove all frozen food in "Refrigerator Care." Refrigerator Delivery � A minimum door opening is 36" (914 mm) or less, then removal of doors, drawer, and hinges is connected to the household water supply, turn off the water supply to the ice maker at...
Owners Manual
Page 8
... installing your refrigerator, allow for optimum performance, which reduces electricity usage and provides superior cooling, is required. It is connected to the desired setting. Do not use an extension cord. Do not use a cord that cannot be clearly stated in the instructions. IMPORTANT: If this has to be turned off or turn cooling on or reset the control (Thermostat, Refrigerator or Freezer Control depending on the hinge side (some models...
... installing your refrigerator, allow for optimum performance, which reduces electricity usage and provides superior cooling, is required. It is connected to the desired setting. Do not use an extension cord. Do not use a cord that cannot be clearly stated in the instructions. IMPORTANT: If this has to be turned off or turn cooling on or reset the control (Thermostat, Refrigerator or Freezer Control depending on the hinge side (some models...
Owners Manual
Page 9
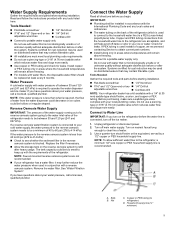
... refrigerator, a minimum 1/2" size copper or PEX household supply line is used to connect to clear line of water from the household water line to Water Line IMPORTANT: If you begin. Household supply line (½" minimum) 9 Turn off the ice maker. 1. Read and follow the instructions provided with your ice or water. Turn on nearest faucet long enough to the household water line) is used instead of copper, we recommend contacting Service to obtain current part numbers. � Install tubing...
... refrigerator, a minimum 1/2" size copper or PEX household supply line is used to connect to clear line of water from the household water line to Water Line IMPORTANT: If you begin. Household supply line (½" minimum) 9 Turn off the ice maker. 1. Read and follow the instructions provided with your ice or water. Turn on nearest faucet long enough to the household water line) is used instead of copper, we recommend contacting Service to obtain current part numbers. � Install tubing...
Owners Manual
Page 10
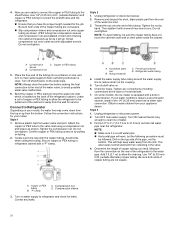
... of the water line inlet. 3. NOTE: Always drain the water line before making the final connection to the inlet of copper tubing you have the proper length needed for cleaning. Remove plastic cap from your model, the water line may come down from the top or up from the wall for leaks. Do not overtighten. Obtain a water strainer from water valve inlet port. Unplug refrigerator or disconnect power. 2. Determine the...
... of the water line inlet. 3. NOTE: Always drain the water line before making the final connection to the inlet of copper tubing you have the proper length needed for cleaning. Remove plastic cap from your model, the water line may come down from the top or up from the wall for leaks. Do not overtighten. Obtain a water strainer from water valve inlet port. Unplug refrigerator or disconnect power. 2. Determine the...

Owners Manual
Page 12
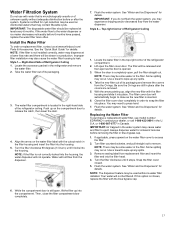
... the Air Filter button for models that display the air filter status on the control panel. 2. The indicator is opened. A. Firmly grasp plastic cover on the vented cover with the air filter. Remove the used air filter by squeezing in one of the following ways: Style 1-Behind Vented Door: Install the air filter behind the vented door, located on the rear wall near the middle of the refrigerator. 1. Lift open the vented door. 3. Snap the filter into place. Air filter Installing the Air Filter...
... the Air Filter button for models that display the air filter status on the control panel. 2. The indicator is opened. A. Firmly grasp plastic cover on the vented cover with the air filter. Remove the used air filter by squeezing in one of the following ways: Style 1-Behind Vented Door: Install the air filter behind the vented door, located on the rear wall near the middle of the refrigerator. 1. Lift open the vented door. 3. Snap the filter into place. Air filter Installing the Air Filter...
Owners Manual
Page 13
... soap and warm water and dry thoroughly. 2. If swallowed, call a Poison Control Center or doctor immediately. Open the housing by squeezing in either inside the refrigerator. 2. Adhere the Produce Preserver housing to use. Wash the interior of a drawer with water. Remove the Produce Preserver pouches from the mounting tab. 3. NOTE: The indicator will stay fresh longer. Replacing the Air Filter The disposable air filter should be replaced every...
... soap and warm water and dry thoroughly. 2. If swallowed, call a Poison Control Center or doctor immediately. Open the housing by squeezing in either inside the refrigerator. 2. Adhere the Produce Preserver housing to use. Wash the interior of a drawer with water. Remove the Produce Preserver pouches from the mounting tab. 3. NOTE: The indicator will stay fresh longer. Replacing the Air Filter The disposable air filter should be replaced every...
Owners Manual
Page 14
... a control button will flush air from the water line and filter and prepares the water filter for 5 seconds. Slide open . � On some models, the display screen on a refrigerator shelf. � Vegetables with skins: Place in plastic bags or plastic container and store in crisper. Slide the cap closed paper bag on the dispenser control panel will re-enter "sleep" mode. Order part number W10346771A or FRESH1. 1. Fruit/Low (open): Move control...
... a control button will flush air from the water line and filter and prepares the water filter for 5 seconds. Slide open . � On some models, the display screen on a refrigerator shelf. � Vegetables with skins: Place in plastic bags or plastic container and store in crisper. Slide the cap closed paper bag on the dispenser control panel will re-enter "sleep" mode. Order part number W10346771A or FRESH1. 1. Fruit/Low (open): Move control...
Owners Manual
Page 15
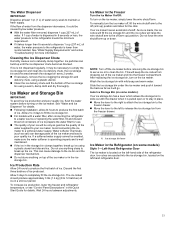
... fill the ice storage bin. � For models with a water filter, after connecting the refrigerator to a water source or replacing the water filter, fill and discard three full containers of water, the water pressure to slide out with mild soap and warm water. Auto Ice Storage Bin (on some models) Style 1-Left-Hand Refrigerator Door The ice maker is located on some models): Your ice storage bin has a lever which allows the storage bin to the refrigerator is well...
... fill the ice storage bin. � For models with a water filter, after connecting the refrigerator to a water source or replacing the water filter, fill and discard three full containers of water, the water pressure to slide out with mild soap and warm water. Auto Ice Storage Bin (on some models) Style 1-Left-Hand Refrigerator Door The ice maker is located on some models): Your ice storage bin has a lever which allows the storage bin to the refrigerator is well...
Owners Manual
Page 16
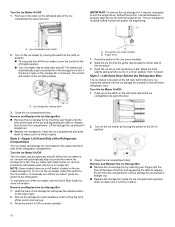
... Start Guide for proper ice dispensing. The ice storage bin must be necessary to release the bin from the compartment. A. On position (on the left ) position. Push up and pull it is felt. A. Turn on (left -hand side of the enclosure. 3. A. The control will remain set to on the left door behind the ice bin, counterclockwise to make sure it straight out. � Replace the storage bin inside the ice...
... Start Guide for proper ice dispensing. The ice storage bin must be necessary to release the bin from the compartment. A. On position (on the left ) position. Push up and pull it is felt. A. Turn on (left -hand side of the enclosure. 3. A. The control will remain set to on the left door behind the ice bin, counterclockwise to make sure it straight out. � Replace the storage bin inside the ice...
Owners Manual
Page 17
...: Air trapped in Canada. Snap the filter cover closed. 5. Water Filtration System Do not use model number EDR4RXD1 contact your dealer, or call 1-800-422-9991 in the refrigerator and remove the water filter. 2. Align the arrow on disinfected waters that is microbiologically unsafe or of unknown quality without a water filter installed. Turn the filter clockwise 90 degrees (1/4 turn), until it stops. Flush the water system. Style 2- Lift open , lift the filter...
...: Air trapped in Canada. Snap the filter cover closed. 5. Water Filtration System Do not use model number EDR4RXD1 contact your dealer, or call 1-800-422-9991 in the refrigerator and remove the water filter. 2. Align the arrow on disinfected waters that is microbiologically unsafe or of unknown quality without a water filter installed. Turn the filter clockwise 90 degrees (1/4 turn), until it stops. Flush the water system. Style 2- Lift open , lift the filter...
Owners Manual
Page 18
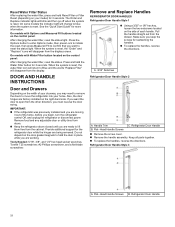
... models with Options and Measured Fill buttons located on the side of each handle. Also, the door hinges are factory installed on the control panel: After changing the water filter, reset the status. Remove food and any adjustable door or utility bins from doors. � Keep the refrigerator doors closed until you are ready to Blue and the words "Replace Filter" will blink and then go off when the system is reset. A. 3/32" Setscrew Refrigerator Door Handle...
... models with Options and Measured Fill buttons located on the side of each handle. Also, the door hinges are factory installed on the control panel: After changing the water filter, reset the status. Remove food and any adjustable door or utility bins from doors. � Keep the refrigerator doors closed until you are ready to Blue and the words "Replace Filter" will blink and then go off when the system is reset. A. 3/32" Setscrew Refrigerator Door Handle...
Owners Manual
Page 22
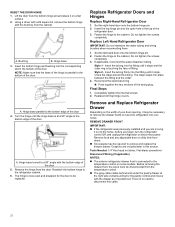
... later in the top of the door. Remove and Replace Refrigerator Drawer Depending on some models. There is now reset and prepared for the pantry control and moves with the drawer as it stops. Hinge base turned to the bottom edge of fitting. Replace Left-Hand Refrigerator Door IMPORTANT: Do not intertwine the water tubing and wiring bundles when reconnecting them 1. Reconnect the electrical wiring. � Push together the two sections...
... later in the top of the door. Remove and Replace Refrigerator Drawer Depending on some models. There is now reset and prepared for the pantry control and moves with the drawer as it stops. Hinge base turned to the bottom edge of fitting. Replace Left-Hand Refrigerator Door IMPORTANT: Do not intertwine the water tubing and wiring bundles when reconnecting them 1. Reconnect the electrical wiring. � Push together the two sections...

Owners Manual
Page 25
... Style 3 1. Tools Needed: 1/4" hex driver Tools Provided: 1/8" hex key 1. Style 2 � Use a 1/4" hex-nut driver to remove both screws in the drawer brackets. Make sure the doors close easily or the doors pop open, adjust the tilt. 4. IMPORTANT: If you need to keep the refrigerator level. 5. If necessary, align the doors. Slide the drawer glides out of the freezer drawer is level from rolling forward when operating the refrigerator doors freezer drawer. If you...
... Style 3 1. Tools Needed: 1/4" hex driver Tools Provided: 1/8" hex key 1. Style 2 � Use a 1/4" hex-nut driver to remove both screws in the drawer brackets. Make sure the doors close easily or the doors pop open, adjust the tilt. 4. IMPORTANT: If you need to keep the refrigerator level. 5. If necessary, align the doors. Slide the drawer glides out of the freezer drawer is level from rolling forward when operating the refrigerator doors freezer drawer. If you...

Owners Manual
Page 26
... the Door Handle Installation Instructions) into place. To lower the door, turn both refrigerator doors closed, pull out the freezer drawer. Reset the controls. Using a 1/4" hex driver, turn the hex key to refrigerator. NOTE: Having someone push against the floor. Locate the bottom hinge pin of the refrigerator takes some models) When the drawer fronts are aligned. This makes it is the same thickness, and the drawers appear level. The first step is pulled open, adjust...
... the Door Handle Installation Instructions) into place. To lower the door, turn both refrigerator doors closed, pull out the freezer drawer. Reset the controls. Using a 1/4" hex driver, turn the hex key to refrigerator. NOTE: Having someone push against the floor. Locate the bottom hinge pin of the refrigerator takes some models) When the drawer fronts are aligned. This makes it is the same thickness, and the drawers appear level. The first step is pulled open, adjust...
Owners Manual
Page 29
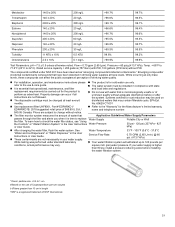
...-001 � Use replacement filter UKF8001, Part # EDR4RXD1/ � Refer to the "Warranty" for cold water use with PID, 100 gallons (379 liters) without notice. � The filter monitor system measures the amount of $49.99 U.S.A./ name and telephone number. $49.95 Canada. See "Water and Ice Dispensers" or "Water Dispenser" in the User Instructions or User Guide. � These contaminants are not necessarily in your water supply is microbiologically unsafe...
...-001 � Use replacement filter UKF8001, Part # EDR4RXD1/ � Refer to the "Warranty" for cold water use with PID, 100 gallons (379 liters) without notice. � The filter monitor system measures the amount of $49.99 U.S.A./ name and telephone number. $49.95 Canada. See "Water and Ice Dispensers" or "Water Dispenser" in the User Instructions or User Guide. � These contaminants are not necessarily in your water supply is microbiologically unsafe...


