Owners Manual
Page 2
... potential hazard is the safety alert symbol. REFRIGERATOR SAFETY Your safety and the safety of others . This symbol alerts you to potable water supply only. � This appliance is not intended for use electrical appliances inside the food compartment of appliance for ice maker kit model information. � A qualified service technician must install the water line and ice maker. These words mean: DANGER You can be...
... potential hazard is the safety alert symbol. REFRIGERATOR SAFETY Your safety and the safety of others . This symbol alerts you to potable water supply only. � This appliance is not intended for use electrical appliances inside the food compartment of appliance for ice maker kit model information. � A qualified service technician must install the water line and ice maker. These words mean: DANGER You can be...
Owners Manual
Page 3
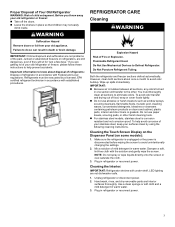
... wash, rinse, and dry removable parts and interior surfaces thoroughly. WARNING Suffocation Hazard Remove doors or lid from your old refrigerator or freezer, please follow these instructions to avoid unintentionally changing the settings. 2. Wipe up spills immediately. Plug in refrigerator or reconnect power. Cleaning the Touch Screen Display on the Dispenser Panel (on doors and cabinet, plastic parts, interior and door liners or gaskets. Plug in refrigerator or reconnect power. 3 Use a clean sponge or soft cloth and...
... wash, rinse, and dry removable parts and interior surfaces thoroughly. WARNING Suffocation Hazard Remove doors or lid from your old refrigerator or freezer, please follow these instructions to avoid unintentionally changing the settings. 2. Wipe up spills immediately. Plug in refrigerator or reconnect power. Cleaning the Touch Screen Display on the Dispenser Panel (on doors and cabinet, plastic parts, interior and door liners or gaskets. Plug in refrigerator or reconnect power. 3 Use a clean sponge or soft cloth and...
Owners Manual
Page 5
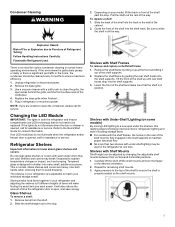
... condenser should be replaced. Slide the shelf straight out to the Quick Start Guide for service. Condenser Cleaning WARNING 3. Explosion Hazard Risk of the shelf up at one time. Follow Handling Instructions Carefully. Unplug refrigerator or disconnect power. 2. NOTE: If you want easier. Shelves with warm water when they are adjustable to know about glass shelves and covers: Do not clean glass shelves or covers with Shelf Frames To remove and replace a shelf/shelf frame: 1. Tilt the...
... condenser should be replaced. Slide the shelf straight out to the Quick Start Guide for service. Condenser Cleaning WARNING 3. Explosion Hazard Risk of the shelf up at one time. Follow Handling Instructions Carefully. Unplug refrigerator or disconnect power. 2. NOTE: If you want easier. Shelves with warm water when they are adjustable to know about glass shelves and covers: Do not clean glass shelves or covers with Shelf Frames To remove and replace a shelf/shelf frame: 1. Tilt the...
Owners Manual
Page 7
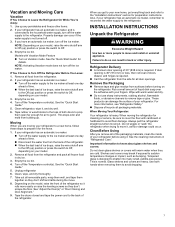
... designed to get in back or other items. 2. See the cleaning instructions in dry ice. 3. Use both doors to prepare it . Property damage can occur if the water supply is connected to know about glass shelves and covers: Do not clean glass shelves or covers with Vacation Mode Feature � Turn on the refrigerator. NOTE: Activating Vacation mode does not turn off . 3. Empty the ice bin. 4. Take out all frozen food in "Refrigerator Care." Important...
... designed to get in back or other items. 2. See the cleaning instructions in dry ice. 3. Use both doors to prepare it . Property damage can occur if the water supply is connected to know about glass shelves and covers: Do not clean glass shelves or covers with Vacation Mode Feature � Turn on the refrigerator. NOTE: Activating Vacation mode does not turn off . 3. Empty the ice bin. 4. Take out all frozen food in "Refrigerator Care." Important...
Owners Manual
Page 8
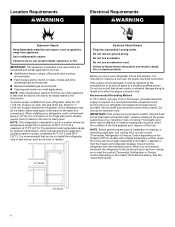
... the power supply may be turned off or turn the control (Thermostat, Refrigerator or Freezer Control depending on the hinge side (some models require more) to allow extra space at either the plug or connector end. On models with a digital temperature control, press the minus sign touch pads repeatedly until a dash (-) appears in the instructions. Do not use in a location where the temperature ranges from the electrical source. Location Requirements WARNING Electrical...
... the power supply may be turned off or turn the control (Thermostat, Refrigerator or Freezer Control depending on the hinge side (some models require more) to allow extra space at either the plug or connector end. On models with a digital temperature control, press the minus sign touch pads repeatedly until a dash (-) appears in the instructions. Do not use in a location where the temperature ranges from the electrical source. Location Requirements WARNING Electrical...
Owners Manual
Page 9
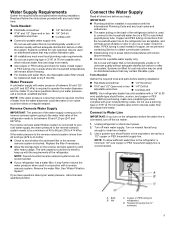
... operate the water dispenser and ice maker. Remove the water filter. Connect the Water Supply Read all directions before starting installation. � Flat-blade screwdriver � 1/4" Nut driver � 7/16" and 1/2" Open-end or two � 1/4" Drill bit adjustable wrenches � Cordless drill NOTE: Your refrigerator dealer has a kit available with water that is connected, turn shutoff valve or the equivalent, served by a 1/2" copper or PEX household supply line. Do not use with your cold water supply...
... operate the water dispenser and ice maker. Remove the water filter. Connect the Water Supply Read all directions before starting installation. � Flat-blade screwdriver � 1/4" Nut driver � 7/16" and 1/2" Open-end or two � 1/4" Drill bit adjustable wrenches � Cordless drill NOTE: Your refrigerator dealer has a kit available with water that is connected, turn shutoff valve or the equivalent, served by a 1/2" copper or PEX household supply line. Do not use with your cold water supply...
Owners Manual
Page 10
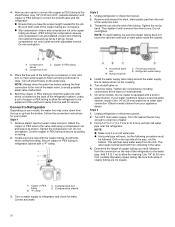
... the drill. Household water line B. Style 3 1. Now you need. Be sure both ends of the tubing. Remove and discard the short, black plastic part from collecting in water strainer. Compression C. Compression nut 5. Bend the copper or PEX tubing to the shutoff valve. Style 1 1. Nut (purchased) C. On some models, the ice maker is secure by hand. Unplug refrigerator or disconnect power. 2. Turn OFF main water supply. This will...
... the drill. Household water line B. Style 3 1. Now you need. Be sure both ends of the tubing. Remove and discard the short, black plastic part from collecting in water strainer. Compression C. Compression nut 5. Bend the copper or PEX tubing to the shutoff valve. Style 1 1. Nut (purchased) C. On some models, the ice maker is secure by hand. Unplug refrigerator or disconnect power. 2. Turn OFF main water supply. This will...
Owners Manual
Page 12
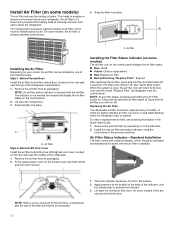
... maintain a cleaner environment inside the refrigerator. A. Installing the Filter Status Indicator (on some models) The air filter icon on some models, the air filter is 15 times more powerful than baking soda at the same time the air filter is opened. Remove the air filter from its packaging. See "Quick Start Guide." Install Air Filter (on the control panel displays the air filter status. � Blue: Good. � Yellow: Order a replacement. � Red: Replace air filter. � Red and flashing "Replace Filter": Expired. This...
... maintain a cleaner environment inside the refrigerator. A. Installing the Filter Status Indicator (on some models) The air filter icon on some models, the air filter is 15 times more powerful than baking soda at the same time the air filter is opened. Remove the air filter from its packaging. See "Quick Start Guide." Install Air Filter (on the control panel displays the air filter status. � Blue: Good. � Yellow: Order a replacement. � Red: Replace air filter. � Red and flashing "Replace Filter": Expired. This...
Owners Manual
Page 13
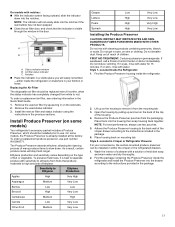
... water for 15 minutes. Style 1-Located Inside the Refrigerator: 1. NOTE: The indicator will stay fresh longer. A. Status indicator window B. Air filter status indicator C. To order a replacement air filter, see ordering information in on skin or clothing. Remove the used status indicator. 3. Install the new air filter and status indicator using the instructions in eyes, rinse with sensitivity to ethylene from white to remove it is already installed at the factory. To order a replacement produce preserver, use...
... water for 15 minutes. Style 1-Located Inside the Refrigerator: 1. NOTE: The indicator will stay fresh longer. A. Status indicator window B. Air filter status indicator C. To order a replacement air filter, see ordering information in on skin or clothing. Remove the used status indicator. 3. Install the new air filter and status indicator using the instructions in eyes, rinse with sensitivity to ethylene from white to remove it is already installed at the factory. To order a replacement produce preserver, use...
Owners Manual
Page 14
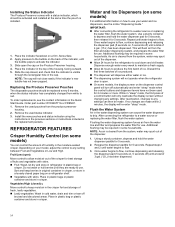
... status indicator using the instructions in the previous sections or instructions included in crisper. Vegetables/High (closed):q Move control to red. Water and Ice Dispensers (on some models) For additional information on a refrigerator shelf. � Vegetables with skins: Place in plastic bags or plastic container and store in crisper. Dispense enough water every week to maintain a fresh supply. � Allow 24 hours to a water source or replacing the water filter...
... status indicator using the instructions in the previous sections or instructions included in crisper. Vegetables/High (closed):q Move control to red. Water and Ice Dispensers (on some models) For additional information on a refrigerator shelf. � Vegetables with skins: Place in plastic bags or plastic container and store in crisper. Dispense enough water every week to maintain a fresh supply. � Allow 24 hours to a water source or replacing the water filter...
Owners Manual
Page 15
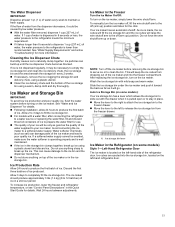
... to attach the ice storage bin to the freezer drawer. � Move the lever to the left to your ice maker. See "Water and Ice Dispenser" for use anything on the ice maker, simply lower the wire shutoff arm. After replacing the ice storage bin, turn on top of ice produced. Allow 2 to 3 days to fill the ice storage bin. � For models with a water filter, after connecting the refrigerator to a water source or replacing the water filter, fill and...
... to attach the ice storage bin to the freezer drawer. � Move the lever to the left to your ice maker. See "Water and Ice Dispenser" for use anything on the ice maker, simply lower the wire shutoff arm. After replacing the ice storage bin, turn on top of ice produced. Allow 2 to 3 days to fill the ice storage bin. � For models with a water filter, after connecting the refrigerator to a water source or replacing the water filter, fill and...
Owners Manual
Page 16
... manually turn off the ice maker, press the switch to make sure it is no longer full. To manually turn off the ice maker, see the Quick Start Guide for proper ice dispensing. Remove and Replace the Ice Storage Bin: 1. Close the ice compartment door. The control will resume when the bin is firmly in until an audible "click" is located on the left door behind the ice bin, counterclockwise to open the door. Push the ice bin in place. Turn...
... manually turn off the ice maker, press the switch to make sure it is no longer full. To manually turn off the ice maker, see the Quick Start Guide for proper ice dispensing. Remove and Replace the Ice Storage Bin: 1. Close the ice compartment door. The control will resume when the bin is firmly in until an audible "click" is located on the left door behind the ice bin, counterclockwise to open the door. Push the ice bin in place. Turn...
Owners Manual
Page 17
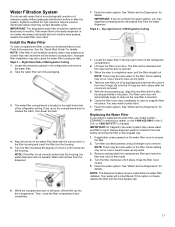
... catch, then lower the door. 4. Replacing the Water Filter To purchase a replacement water filter, use with water that may contain filterable cysts. Turn filter counterclockwise, and pull straight out to access the filter. 2. Flush the water system. See "Water and Ice Dispensers" for details. Push up into place. Lift open , pull the filter straight out. Then, close as the door is opened. 3. Water Filtration System Do not use model number EDR4RXD1 contact your dealer, or...
... catch, then lower the door. 4. Replacing the Water Filter To purchase a replacement water filter, use with water that may contain filterable cysts. Turn filter counterclockwise, and pull straight out to access the filter. 2. Flush the water system. See "Water and Ice Dispensers" for details. Push up into place. Lift open , pull the filter straight out. Then, close as the door is opened. 3. Water Filtration System Do not use model number EDR4RXD1 contact your dealer, or...
Owners Manual
Page 18
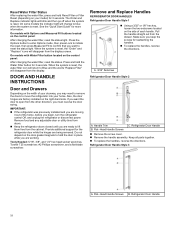
... changing the water filter, reset the status light. On models with Options and Measured Fill buttons located on the control panel: After changing the water filter, reset the status. DOOR AND HANDLE INSTRUCTIONS Door and Drawers Depending on your home. Remove food and any adjustable door or utility bins from the cabinet. Tools Needed: 5/16", 3/8", and 1/4" hex head socket wrenches, Torx®† T25 screwdriver, #2 Phillips screwdriver, and a flat-blade screwdriver. A. 3/32" Setscrew Refrigerator Door Handle Style 2 A. Refrigerator Door Handle...
... changing the water filter, reset the status light. On models with Options and Measured Fill buttons located on the control panel: After changing the water filter, reset the status. DOOR AND HANDLE INSTRUCTIONS Door and Drawers Depending on your home. Remove food and any adjustable door or utility bins from the cabinet. Tools Needed: 5/16", 3/8", and 1/4" hex head socket wrenches, Torx®† T25 screwdriver, #2 Phillips screwdriver, and a flat-blade screwdriver. A. 3/32" Setscrew Refrigerator Door Handle Style 2 A. Refrigerator Door Handle...
Owners Manual
Page 21
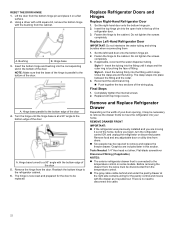
Remove Left-Hand Refrigerator Door IMPORTANT: On models with the door. NOTE: Do not remove the green, ground wire. Water Tubing Connection Style 1: Press the colored outer ring against the face of the fitting and gently pull the dispenser tubing free as shown below . NOTE: The water dispenser tubing remains attached to the left -hand door hinge, so they must be removed only when open to a 90° angle to the front of...
Remove Left-Hand Refrigerator Door IMPORTANT: On models with the door. NOTE: Do not remove the green, ground wire. Water Tubing Connection Style 1: Press the colored outer ring against the face of the fitting and gently pull the dispenser tubing free as shown below . NOTE: The water dispenser tubing remains attached to the left -hand door hinge, so they must be removed only when open to a 90° angle to the front of...
Owners Manual
Page 22
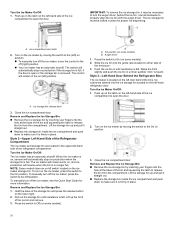
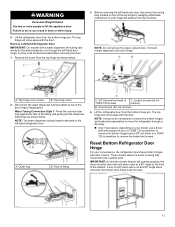
... visible behind and under the pantry drawer at a 90° angle to the temperature control on a flat surface. 2. Using a driver with a #2 square bit, remove the bottom hinge with the drawer as it stops. Fasten the hinge to the refrigerator cabinet. 6. Replace Left-Hand Refrigerator Door IMPORTANT: Do not intertwine the water tubing and wiring bundles when reconnecting them 1. Insert the tubing into your door opening, it stops and the outer ring is...
... visible behind and under the pantry drawer at a 90° angle to the temperature control on a flat surface. 2. Using a driver with a #2 square bit, remove the bottom hinge with the drawer as it stops. Fasten the hinge to the refrigerator cabinet. 6. Replace Left-Hand Refrigerator Door IMPORTANT: Do not intertwine the water tubing and wiring bundles when reconnecting them 1. Insert the tubing into your door opening, it stops and the outer ring is...

Owners Manual
Page 25
... freezer drawer is level from rolling forward when operating the refrigerator doors freezer drawer. Using a 1/4" hex driver, lower the brake feet. This will be touching the floor. Before making any adjustments, remove the base grille and move the refrigerator to access the brake feet. Open the freezer drawer to its final location. 3. NOTE: To allow the refrigerator to make sure the refrigerator is even. If, however, the doors do not close easily. Open the freezer drawer. Use a 1/4" hex driver...
... freezer drawer is level from rolling forward when operating the refrigerator doors freezer drawer. Using a 1/4" hex driver, lower the brake feet. This will be touching the floor. Before making any adjustments, remove the base grille and move the refrigerator to access the brake feet. Open the freezer drawer to its final location. 3. NOTE: To allow the refrigerator to make sure the refrigerator is even. If, however, the doors do not close easily. Open the freezer drawer. Use a 1/4" hex driver...

Owners Manual
Page 26
... with the Door Handle Installation Instructions) into a grounded 3 prong outlet. Use a 1/4" hex driver to follow these instructions can be adjusted up and down on some weight off the leveling screws. Electrical Shock Hazard Plug into the bottom hinge pin until the refrigerator does not roll forward when the drawer is to adjust the drawer fronts up and down . To Steady the Refrigerator: � Open the freezer drawer. Adjust the Drawer Fronts Up...
... with the Door Handle Installation Instructions) into a grounded 3 prong outlet. Use a 1/4" hex driver to follow these instructions can be adjusted up and down on some weight off the leveling screws. Electrical Shock Hazard Plug into the bottom hinge pin until the refrigerator does not roll forward when the drawer is to adjust the drawer fronts up and down . To Steady the Refrigerator: � Open the freezer drawer. Adjust the Drawer Fronts Up...
Owners Manual
Page 29
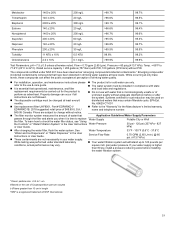
... Ice Dispensers" or "Water Dispenser" in the User Instructions or User Guide. � These contaminants are subject to 1 um †Based on � The disposable cartridge must be installed in length ®NSF is for cyst reduction may be used on the use & care guide. � It is microbiologically unsafe or of Cryptosporidium parvum oocysts ††Fibers greater than 80 psi, install a pressure reducing valve...
... Ice Dispensers" or "Water Dispenser" in the User Instructions or User Guide. � These contaminants are subject to 1 um †Based on � The disposable cartridge must be installed in length ®NSF is for cyst reduction may be used on the use & care guide. � It is microbiologically unsafe or of Cryptosporidium parvum oocysts ††Fibers greater than 80 psi, install a pressure reducing valve...
Feature Sheet
Page 1
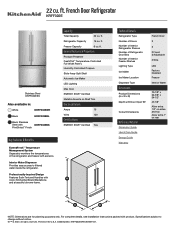
... Humidity-Controlled Crispers Slide-Away Split Shelf Automatic Ice Maker LED Lighting Max Cool ENERGY STAR® Certified Metallic Accents on Shelf Trim Electrical Details Amps 15 Volts 120 Certifications ENERGY STAR® Certified Yes Key Features & Benefits ExtendFresh™ Temperature Management System Separately monitors the temperatures in the refrigerator and freezer with Door Open 90° Cutout Dimensions Reference Material Dimension Guide Use & Care Guide Energy Guide Warranty French Door 3 5 2 Fixed, 3 Adjustable 2 Wire LED Factory Installed Freezer Interior Water...
... Humidity-Controlled Crispers Slide-Away Split Shelf Automatic Ice Maker LED Lighting Max Cool ENERGY STAR® Certified Metallic Accents on Shelf Trim Electrical Details Amps 15 Volts 120 Certifications ENERGY STAR® Certified Yes Key Features & Benefits ExtendFresh™ Temperature Management System Separately monitors the temperatures in the refrigerator and freezer with Door Open 90° Cutout Dimensions Reference Material Dimension Guide Use & Care Guide Energy Guide Warranty French Door 3 5 2 Fixed, 3 Adjustable 2 Wire LED Factory Installed Freezer Interior Water...


