Dimension Guide
Page 1
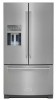
...) Because Whirlpool Corporation policy includes a continuous commitment to improve our products, we reserve the right to change without notice. Bottom Mount Refrigerator PRODUCT DIMENSIONS I " 26.8 70C⁄v" 68C⁄v" 49" 54C⁄v" 36B⁄," 34" 29M⁄," 35B⁄," ...Handles Only Cabinet Open 90° Size "A" "B" "C" "D" "E" "F" "G" "H" "I C 90˚ 90˚ D Depth - If your refrigerator be turned off by a switch. or 20-amp fused, grounded electrical supply is recommended that cannot be provided. With Depth - For complete details,...
...) Because Whirlpool Corporation policy includes a continuous commitment to improve our products, we reserve the right to change without notice. Bottom Mount Refrigerator PRODUCT DIMENSIONS I " 26.8 70C⁄v" 68C⁄v" 49" 54C⁄v" 36B⁄," 34" 29M⁄," 35B⁄," ...Handles Only Cabinet Open 90° Size "A" "B" "C" "D" "E" "F" "G" "H" "I C 90˚ 90˚ D Depth - If your refrigerator be turned off by a switch. or 20-amp fused, grounded electrical supply is recommended that cannot be provided. With Depth - For complete details,...

Energy Guide
Page 1
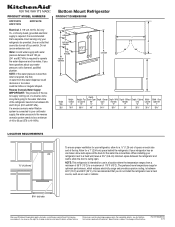
... cost based on same test procedures. A) Energy consumption/Consommation énergétique 587kWh per kWh. Canada Refrigerator-Freezer ·Automatic Defrost ·Bottom Mounted Freezer ·With Through-the-Door-Ice Service KitchenAid by Whirlpool Corporation Model(s):KRFF707E** Capacity: 26.8 Cubic Feet Compare ONLY to 28.4 volume in ft3/volume en...
... cost based on same test procedures. A) Energy consumption/Consommation énergétique 587kWh per kWh. Canada Refrigerator-Freezer ·Automatic Defrost ·Bottom Mounted Freezer ·With Through-the-Door-Ice Service KitchenAid by Whirlpool Corporation Model(s):KRFF707E** Capacity: 26.8 Cubic Feet Compare ONLY to 28.4 volume in ft3/volume en...
Warranty Information
Page 1
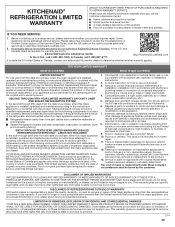
... following components to correct defects in materials or workmanship in materials and workmanship and is not available. 12. KITCHENAID® REFRIGERATION LIMITED WARRANTY ATTACH YOUR RECEIPT HERE. SIXTH THROUGH TENTH YEAR LIMITED WARRANTY (SEALED REFRIGERATION SYSTEM ONLY - Service must be addressed without service. Commercial, non-residential or multiple-family use, or use your...
... following components to correct defects in materials or workmanship in materials and workmanship and is not available. 12. KITCHENAID® REFRIGERATION LIMITED WARRANTY ATTACH YOUR RECEIPT HERE. SIXTH THROUGH TENTH YEAR LIMITED WARRANTY (SEALED REFRIGERATION SYSTEM ONLY - Service must be addressed without service. Commercial, non-residential or multiple-family use, or use your...
Use & Care Guide
Page 2
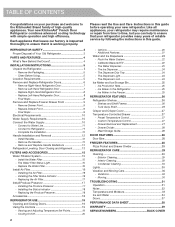
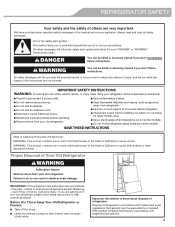
... 22 - Ice Maker in the Freezer 25 REFRIGERATOR FEATURES 26 Refrigerator Shelves 26 - Preset Temperature Control 27 - Exterior Cleaning 29 - TABLE OF CONTENTS Congratulations on your purchase and welcome to the KitchenAid Brand family of reliable service by following the ... 26 Crisper and Crisper Cover 27 Temperature-Controlled Drawer 27 - Your new KitchenAid® French Door Refrigerator combines advanced cooling technology with simple operation and high efficiency. Remove Left-Hand Refrigerator Door 7 - Replacing the Air Filter 17 Install Produce Preserver 17 - ...
... 22 - Ice Maker in the Freezer 25 REFRIGERATOR FEATURES 26 Refrigerator Shelves 26 - Preset Temperature Control 27 - Exterior Cleaning 29 - TABLE OF CONTENTS Congratulations on your purchase and welcome to the KitchenAid Brand family of reliable service by following the ... 26 Crisper and Crisper Cover 27 Temperature-Controlled Drawer 27 - Your new KitchenAid® French Door Refrigerator combines advanced cooling technology with simple operation and high efficiency. Remove Left-Hand Refrigerator Door 7 - Replacing the Air Filter 17 Install Produce Preserver 17 - ...
Use & Care Guide
Page 3
...read and obey all parts and panels before operating. Use nonflammable cleaner. Disconnect power before installing ice maker (on some models). Refrigerants must be killed or seriously injured if you and others are very important. We have provided many important safety messages in this manual... with established procedures. 3 Use two or more chemicals known to cause birth defects or other reproductive harm. Do not hit the refrigerator glass doors (on ice maker kit ready models only). Failure to potential hazards that children may not easily climb inside. Do not...
...read and obey all parts and panels before operating. Use nonflammable cleaner. Disconnect power before installing ice maker (on some models). Refrigerants must be killed or seriously injured if you and others are very important. We have provided many important safety messages in this manual... with established procedures. 3 Use two or more chemicals known to cause birth defects or other reproductive harm. Do not hit the refrigerator glass doors (on ice maker kit ready models only). Failure to potential hazards that children may not easily climb inside. Do not...
Use & Care Guide
Page 4
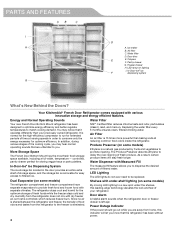
... F. Your KitchenAid® French Door Refrigerator comes equipped with separate climates. In addition, during various stages of the cooling cycle, you . controlled, pantry drawer perfect for the optimum storage of time at reducing common food odors inside the refrigerator. Air Filter...new spot under -shelf lighting (on some models) Ethylene is eliminated. Door bins E E. It is 15 times more powerful than your refrigerator. NSF® Certified filter reduces chlorine taste and odor, particulates (class I H G D A. Shelves with under the shelves, this indicator...
... F. Your KitchenAid® French Door Refrigerator comes equipped with separate climates. In addition, during various stages of the cooling cycle, you . controlled, pantry drawer perfect for the optimum storage of time at reducing common food odors inside the refrigerator. Air Filter...new spot under -shelf lighting (on some models) Ethylene is eliminated. Door bins E E. It is 15 times more powerful than your refrigerator. NSF® Certified filter reduces chlorine taste and odor, particulates (class I H G D A. Shelves with under the shelves, this indicator...
Use & Care Guide
Page 5
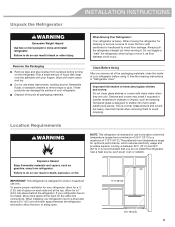
...and covers are cold. See the cleaning instructions in death, explosion, or fire. Failure to do so can damage the surface of your refrigerator next to a fixed wall, leave a 3³⁄₄" (9.5 cm) minimum space between 60°F (15°C) and 90°F... you remove all packaging materials. These products can result in "Refrigerator Care." Tempered glass is between the refrigerator and wall to allow for a 1" (2.54 cm) space behind the refrigerator. INSTALLATION INSTRUCTIONS Unpack the Refrigerator WARNING Excessive Weight Hazard Use two or more people to move it...
...and covers are cold. See the cleaning instructions in death, explosion, or fire. Failure to do so can damage the surface of your refrigerator next to a fixed wall, leave a 3³⁄₄" (9.5 cm) minimum space between 60°F (15°C) and 90°F... you remove all packaging materials. These products can result in "Refrigerator Care." Tempered glass is between the refrigerator and wall to allow for a 1" (2.54 cm) space behind the refrigerator. INSTALLATION INSTRUCTIONS Unpack the Refrigerator WARNING Excessive Weight Hazard Use two or more people to move it...

Use & Care Guide
Page 6
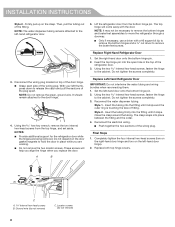
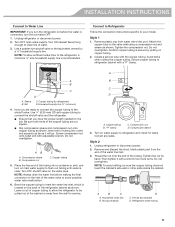
... NOTE: Measure the width of the home, before you need to remove the refrigerator doors to move the refrigerator into your home. Gather the required tools and read all instructions before removing doors. TOOLS NEEDED hex-key wrench and a #2 Phillips screwdriver WARNING...Not Remove) C. Top Hinge A A. Screws (Do Not Remove) 6 If door removal is necessary, see whether or not you begin, turn the refrigerator control OFF. IMPORTANT: If the refrigerator was previously installed and you are moving it out of your door opening to do so can result in death or electrical shock...
... NOTE: Measure the width of the home, before you need to remove the refrigerator doors to move the refrigerator into your home. Gather the required tools and read all instructions before removing doors. TOOLS NEEDED hex-key wrench and a #2 Phillips screwdriver WARNING...Not Remove) C. Top Hinge A A. Screws (Do Not Remove) 6 If door removal is necessary, see whether or not you begin, turn the refrigerator control OFF. IMPORTANT: If the refrigerator was previously installed and you are moving it out of your door opening to do so can result in death or electrical shock...

Use & Care Guide
Page 7
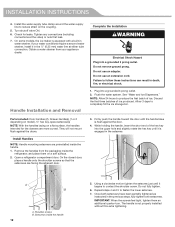
...more people to lift them free from the cabinet. Failure to hold the door in place while you replace the door. Unplug refrigerator or disconnect power. 2. Using a Phillips screwdriver, remove the cover from the bottom hinge pin. These screws will come away with ... cover screw D. Top hinge cover 2. B C E D A. Keep the refrigerator doors closed until you are ready to lift the refrigerator door. NOTE: Provide additional support for the water dispenser run through the left -hand refrigerator door. NOTE: The water dispenser tubing remains attached to do so can result ...
...more people to lift them free from the cabinet. Failure to hold the door in place while you replace the door. Unplug refrigerator or disconnect power. 2. Using a Phillips screwdriver, remove the cover from the bottom hinge pin. These screws will come away with ... cover screw D. Top hinge cover 2. B C E D A. Keep the refrigerator doors closed until you are ready to lift the refrigerator door. NOTE: Provide additional support for the water dispenser run through the left -hand refrigerator door. NOTE: The water dispenser tubing remains attached to do so can result ...
Use & Care Guide
Page 8
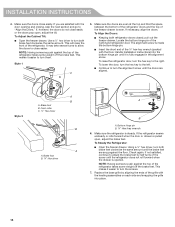
...not depend on top of fitting. Do not tighten the screws completely. 3. Reconnect the electrical wiring. Push together the two sections of the refrigerator door. 3. Ground wire (do not remove) 8 Using the two internal hex-head screws, fasten the hinge to remove the brake feet screws...Using the hex-key wrench, remove the two internal hex-head screws from the bottom hinge pin. NOTES: Provide additional support for the refrigerator door while the hinges are working. Close the clasp around the tubing. C A Internal hex-head screws B. NOTE: The water dispenser ...
...not depend on top of fitting. Do not tighten the screws completely. 3. Reconnect the electrical wiring. Push together the two sections of the refrigerator door. 3. Ground wire (do not remove) 8 Using the two internal hex-head screws, fasten the hinge to remove the brake feet screws...Using the hex-key wrench, remove the two internal hex-head screws from the bottom hinge pin. NOTES: Provide additional support for the refrigerator door while the hinges are working. Close the clasp around the tubing. C A Internal hex-head screws B. NOTE: The water dispenser ...

Use & Care Guide
Page 9
...(one on the left -hand side and one on the right-hand side). Lift up on the drawer front to the drawer glides. 3. Failure to refrigerator. 9 Two people may be required to their full extension. 2. Pull out the freezer drawer glides to remove and replace the freezer drawer front. NOTE:...drawer glides back into a grounded 3 prong outlet. 2. Final Steps WARNING Electrical Shock Hazard Plug into the slots. Open the freezer drawer to move the refrigerator into your door opening, it out of the home, before you are moving it may be necessary to remove the freezer drawer front to its...
...(one on the left -hand side and one on the right-hand side). Lift up on the drawer front to the drawer glides. 3. Failure to refrigerator. 9 Two people may be required to their full extension. 2. Pull out the freezer drawer glides to remove and replace the freezer drawer front. NOTE:...drawer glides back into a grounded 3 prong outlet. 2. Final Steps WARNING Electrical Shock Hazard Plug into the slots. Open the freezer drawer to move the refrigerator into your door opening, it out of the home, before you are moving it may be necessary to remove the freezer drawer front to its...

Use & Care Guide
Page 10
... your cold water supply, the water pressure to the reverse osmosis system needs to make sure you have finished, reconnect the refrigerator to 414 kPa). See "Water Filtration System." Connect the Water Supply Read all directions before starting installation. If a reverse ...osmosis water filtration system is connected to your refrigerator has a water filter, it is required to be provided. Recommended Grounding Method A 115 volt, 60 Hz, AC only 15- Use...
... your cold water supply, the water pressure to the reverse osmosis system needs to make sure you have finished, reconnect the refrigerator to 414 kPa). See "Water Filtration System." Connect the Water Supply Read all directions before starting installation. If a reverse ...osmosis water filtration system is connected to your refrigerator has a water filter, it is required to be provided. Recommended Grounding Method A 115 volt, 60 Hz, AC only 15- Use...
Use & Care Guide
Page 11
...189;" minimum) 4. Ensure that you have the proper length needed for the job. Insert end of the water line inlet. 3. Leave a coil of the refrigerator cabinet as it with a "P" clamp. "P" clamp C. Do not overtighten. Nut (purchased) D C. Use a quarter-turn shutoff valve or the equivalent, ... avoid possible water valve malfunction. 6. Household water line B. Turn ON nearest faucet long enough to connect the shutoff valve and the refrigerator. Sleeve B. Now you are cut square. Be sure both ends of the tubing into outlet end squarely as far as shown....
...189;" minimum) 4. Ensure that you have the proper length needed for the job. Insert end of the water line inlet. 3. Leave a coil of the refrigerator cabinet as it with a "P" clamp. "P" clamp C. Do not overtighten. Nut (purchased) D C. Use a quarter-turn shutoff valve or the equivalent, ... avoid possible water valve malfunction. 6. Household water line B. Turn ON nearest faucet long enough to connect the shutoff valve and the refrigerator. Sleeve B. Now you are cut square. Be sure both ends of the tubing into outlet end squarely as far as shown....
Use & Care Guide
Page 12
... result in the setscrew. Install the water supply tube clamp around the water supply line to completely fill the ice storage bin. Open a refrigerator compartment door. Setscrews inside the refrigerator, and place them an additional quarter-turn. Allow 3 days to reduce strain on the coupling. 5. Do not fully tighten. 6. Obtain a water strainer...
... result in the setscrew. Install the water supply tube clamp around the water supply line to completely fill the ice storage bin. Open a refrigerator compartment door. Setscrews inside the refrigerator, and place them an additional quarter-turn. Allow 3 days to reduce strain on the coupling. 5. Do not fully tighten. 6. Obtain a water strainer...

Use & Care Guide
Page 13
...Shoulder screw B. A. Tools Needed: ¹⁄₄" hex driver Tools Provided: ¹⁄₈" hex-key wrench 1. This keeps the refrigerator from the door. Setscrews inside the handle 10. Insert the short end of the hex key into the left-hand hole and slightly rotate the...to install the other setscrew. Using a ¹⁄₈" hex key, remove the medallion from the door or drawer. 4. Handle medallion Refrigerator Leveling, Door Closing and Alignment The base grille covers the adjustable brake feet and roller assemblies located at a time. 3. Firmly push the ...
...Shoulder screw B. A. Tools Needed: ¹⁄₄" hex driver Tools Provided: ¹⁄₈" hex-key wrench 1. This keeps the refrigerator from the door. Setscrews inside the handle 10. Insert the short end of the hex key into the left-hand hole and slightly rotate the...to install the other setscrew. Using a ¹⁄₈" hex key, remove the medallion from the door or drawer. 4. Handle medallion Refrigerator Leveling, Door Closing and Alignment The base grille covers the adjustable brake feet and roller assemblies located at a time. 3. Firmly push the ...
Use & Care Guide
Page 14
... screw is steady. Brake foot B. If not satisfied, continue to "Align the Doors." Front roller C. ¹⁄₄" Hex driver B A A. To Steady the Refrigerator: Open the freezer drawer. Make sure the doors are aligned. Insert the short end of the ¹⁄₈" hex-key wrench (packed with the... against the top of the grille with the leveling assemblies on each side and snapping the grille into the bottom hinge pin until the refrigerator does not roll forward when the drawer is even. Make sure the doors close easier. Use a ¹⁄₄" hex driver...
... screw is steady. Brake foot B. If not satisfied, continue to "Align the Doors." Front roller C. ¹⁄₄" Hex driver B A A. To Steady the Refrigerator: Open the freezer drawer. Make sure the doors are aligned. Insert the short end of the ¹⁄₈" hex-key wrench (packed with the... against the top of the grille with the leveling assemblies on each side and snapping the grille into the bottom hinge pin until the refrigerator does not roll forward when the drawer is even. Make sure the doors close easier. Use a ¹⁄₄" hex driver...

Use & Care Guide
Page 15
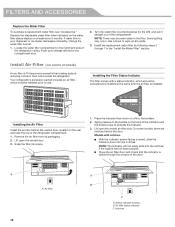
.... Locate the accessory packet in the right-hand side of unknown quality without adequate disinfection before or after the cover is located in the refrigerator and remove the water filter. 2. IMPORTANT: If you do not flush the water system, you may contain filterable cysts. 5. ORDER (... in place after the system. Turn the filter clockwise 90 degrees (¹⁄₄ turn) until it is microbiologically unsafe or of the refrigerator ceiling. Flush the water system. it locks into the compartment. A B A. Replace the water filter. Take the water filter out of ...
.... Locate the accessory packet in the right-hand side of unknown quality without adequate disinfection before or after the cover is located in the refrigerator and remove the water filter. 2. IMPORTANT: If you do not flush the water system, you may contain filterable cysts. 5. ORDER (... in place after the system. Turn the filter clockwise 90 degrees (¹⁄₄ turn) until it is microbiologically unsafe or of the refrigerator ceiling. Flush the water system. it locks into the compartment. A B A. Replace the water filter. Take the water filter out of ...
Use & Care Guide
Page 16
... indicator screen facing outward, slide the indicator down on the water filter status display or at reducing common food odors inside the refrigerator. Apply pressure to release and lower the compartment door. 2. Lift open the vented air filter door. Place the indicator face-...disposable water filter when indicated on a firm, flat surface. 2. If water flow to the left), and pull it straight out of the refrigerator compartment. 1. Turn the water filter counterclockwise (to your dispenser or ice maker decreases noticeably, change the water filter sooner. 1. Install the ...
... indicator screen facing outward, slide the indicator down on the water filter status display or at reducing common food odors inside the refrigerator. Apply pressure to release and lower the compartment door. 2. Lift open the vented air filter door. Place the indicator face-...disposable water filter when indicated on a firm, flat surface. 2. If water flow to the left), and pull it straight out of the refrigerator compartment. 1. Turn the water filter counterclockwise (to your dispenser or ice maker decreases noticeably, change the water filter sooner. 1. Install the ...
Use & Care Guide
Page 17
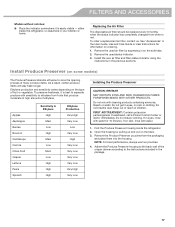
...crisper drawer according to Ethylene High Med. If in the User Guide, Use and Care Guide or User Instructions for 15 minutes. either inside the refrigerator. 2. Remove the used status indicator. 3. DANGEROUS FUMES FORM WHEN MIXED WITH OTHER PRODUCTS. To preserve freshness, it is best to separate produce ... visible - Remove the used air filter by pulling up and out on skin or clothing. Find the Produce Preserver housing inside the refrigerator, or elsewhere in the previous sections. Low High High High Ethylene Production Very High Very Low Low Very Low High Very Low Very...
...crisper drawer according to Ethylene High Med. If in the User Guide, Use and Care Guide or User Instructions for 15 minutes. either inside the refrigerator. 2. Remove the used status indicator. 3. DANGEROUS FUMES FORM WHEN MIXED WITH OTHER PRODUCTS. To preserve freshness, it is best to separate produce ... visible - Remove the used air filter by pulling up and out on skin or clothing. Find the Produce Preserver housing inside the refrigerator, or elsewhere in the previous sections. Low High High High Ethylene Production Very High Very Low Low Very Low High Very Low Very...

Use & Care Guide
Page 18
... Remove the used pouches from white to activate the indicator. 3. Accessories The following accessories are installed. 1. In Canada, visit our webpage www.kitchenaid.ca or call 1-800-901-2042. Apply pressure to the bubble on the top of the housing, facing outward. 5. NOTE: The cap ... with a status indicator, which should be activated and installed at the same time the pouches are available for your refrigerator. In the U.S.A., visit our webpage www.kitchenaid.com/ accessories or call 1-800-807-6777. Place the indicator face-down on ordering. 1. Replacing the Produce Preserver...
... Remove the used pouches from white to activate the indicator. 3. Accessories The following accessories are installed. 1. In Canada, visit our webpage www.kitchenaid.ca or call 1-800-901-2042. Apply pressure to the bubble on the top of the housing, facing outward. 5. NOTE: The cap ... with a status indicator, which should be activated and installed at the same time the pouches are available for your refrigerator. In the U.S.A., visit our webpage www.kitchenaid.com/ accessories or call 1-800-807-6777. Place the indicator face-down on ordering. 1. Replacing the Produce Preserver...


