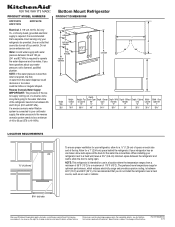
Dimension Guide
Page 1
... an ice maker, allow extra space at the top. Top Doors Open Depth - Drawer Depth - Cabinet Width - Allow for planning purposes only. Dimensions are for a 1" (2.54 cm) space behind the refrigerator. Water: A cold water supply with product. NOTE: If the water pressure is less than what is connected to 414 kPa). Door Model Overall of 110°F (43°C). If your cold water supply, the water pressure to the reverse...
... an ice maker, allow extra space at the top. Top Doors Open Depth - Drawer Depth - Cabinet Width - Allow for planning purposes only. Dimensions are for a 1" (2.54 cm) space behind the refrigerator. Water: A cold water supply with product. NOTE: If the water pressure is less than what is connected to 414 kPa). Door Model Overall of 110°F (43°C). If your cold water supply, the water pressure to the reverse...
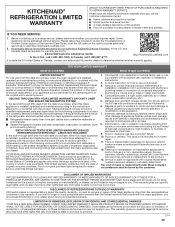
Warranty Information
Page 1
..., address and telephone number Model number and serial number A clear, detailed description of the problem Proof of the original unit's warranty period. Removal or reinstallation of inaccessible appliances or built-in remote locations where an authorized KitchenAid servicer is installed, operated and maintained according to instructions attached to or furnished with this major appliance was purchased: Refrigerator/freezer cavity liner if the part cracks due to access...
..., address and telephone number Model number and serial number A clear, detailed description of the problem Proof of the original unit's warranty period. Removal or reinstallation of inaccessible appliances or built-in remote locations where an authorized KitchenAid servicer is installed, operated and maintained according to instructions attached to or furnished with this major appliance was purchased: Refrigerator/freezer cavity liner if the part cracks due to access...
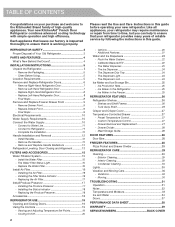
Use & Care Guide
Page 2
... the Use and Care Instructions in the Freezer 25 REFRIGERATOR FEATURES 26 Refrigerator Shelves 26 - Drawer Removal and Replacement 27 - Exterior Cleaning 29 - Moving 30 TROUBLESHOOTING 31 Operation 31 Noise 32 Temperature and Moisture 33 Ice and Water 34 Doors 37 PERFORMANCE DATA SHEET 38 WARRANTY 39 SERVICE NUMBERS BACK COVER Remove Left-Hand Refrigerator Door 7 - Remove the Handles 13 - The Dispenser Lock 24 Ice Maker and Ice Storage Bin 25 - Ice Maker in this guide. - Replacing the Air Filter 17 Install Produce Preserver 17 - Condenser Cleaning 30 Lights...
... the Use and Care Instructions in the Freezer 25 REFRIGERATOR FEATURES 26 Refrigerator Shelves 26 - Drawer Removal and Replacement 27 - Exterior Cleaning 29 - Moving 30 TROUBLESHOOTING 31 Operation 31 Noise 32 Temperature and Moisture 33 Ice and Water 34 Doors 37 PERFORMANCE DATA SHEET 38 WARRANTY 39 SERVICE NUMBERS BACK COVER Remove Left-Hand Refrigerator Door 7 - Remove the Handles 13 - The Dispenser Lock 24 Ice Maker and Ice Storage Bin 25 - Ice Maker in this guide. - Replacing the Air Filter 17 Install Produce Preserver 17 - Condenser Cleaning 30 Lights...
Use & Care Guide
Page 4
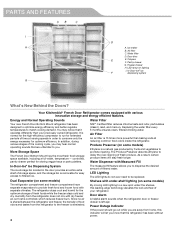
... more powerful than your refrigerator. Air filter C. Door Alarm A helpful alarm sounds when the refrigerator door or freezer drawer is controlled, which reduces freezer burn. Air Filter An air filter is a natural gas produced by fruits and vegetables to filtered ice. Water Dispenser with various innovative storage and energy efficient features. The refrigerator stays cool and humid for optimum efficiency. PARTS AND FEATURES AB C I ), lead, and mercury. Water filter D. Energy and Normal Operating Sounds Water Filter Your new French Door Bottom...
... more powerful than your refrigerator. Air filter C. Door Alarm A helpful alarm sounds when the refrigerator door or freezer drawer is controlled, which reduces freezer burn. Air Filter An air filter is a natural gas produced by fruits and vegetables to filtered ice. Water Dispenser with various innovative storage and energy efficient features. The refrigerator stays cool and humid for optimum efficiency. PARTS AND FEATURES AB C I ), lead, and mercury. Water filter D. Energy and Normal Operating Sounds Water Filter Your new French Door Bottom...
Use & Care Guide
Page 5
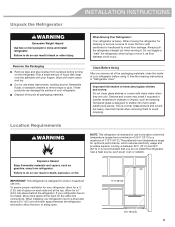
...°C). Allow for use sharp instruments, rubbing alcohol, flammable fluids, or abrasive cleaners to know about glass shelves and covers: Do not clean glass shelves or covers with warm water and dry. When Moving Your Refrigerator: Your refrigerator is normal. These products can result in "Refrigerator Care." Important information to remove tape or glue. Location Requirements WARNING NOTE: This refrigerator is designed to sudden temperature changes or impact, such...
...°C). Allow for use sharp instruments, rubbing alcohol, flammable fluids, or abrasive cleaners to know about glass shelves and covers: Do not clean glass shelves or covers with warm water and dry. When Moving Your Refrigerator: Your refrigerator is normal. These products can result in "Refrigerator Care." Important information to remove tape or glue. Location Requirements WARNING NOTE: This refrigerator is designed to sudden temperature changes or impact, such...

Use & Care Guide
Page 10
... water dispenser and ice maker. or 20-amp fused, grounded electrical supply is a PEX (cross-linked polyethylene) tube. NOTE: Before performing any local codes and ordinances. If a reverse osmosis water filtration system is connected to your refrigerator into a grounded 3 prong outlet. The gray water tubing on the reverse osmosis system to refill after heavy use an extension cord. Do not use . Water Supply Requirements A cold water supply with a reverse osmosis system. If PEX tubing is used...
... water dispenser and ice maker. or 20-amp fused, grounded electrical supply is a PEX (cross-linked polyethylene) tube. NOTE: Before performing any local codes and ordinances. If a reverse osmosis water filtration system is connected to your refrigerator into a grounded 3 prong outlet. The gray water tubing on the reverse osmosis system to refill after heavy use an extension cord. Do not use . Water Supply Requirements A cold water supply with a reverse osmosis system. If PEX tubing is used...
Use & Care Guide
Page 11
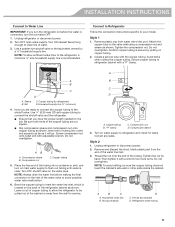
... Use a quarter-turn on main water supply to flush out tubing until water is secure by pulling on copper tubing. 2. Secure copper tubing to refrigerator cabinet with the copper tubing. Ensure that you turn the ice maker OFF. 1. Copper tubing 5. Turn OFF shutoff valve on water supply to refrigerator and check for leaks. A B C A. Connect to Refrigerator Follow the connection instructions specific to refrigerator) D. Household supply line (½" minimum) 4. A B C D A. Correct any leaks. Thread the nut onto the end of water. 3. INSTALLATION...
... Use a quarter-turn on main water supply to flush out tubing until water is secure by pulling on copper tubing. 2. Secure copper tubing to refrigerator cabinet with the copper tubing. Ensure that you turn the ice maker OFF. 1. Copper tubing 5. Turn OFF shutoff valve on water supply to refrigerator and check for leaks. A B C A. Connect to Refrigerator Follow the connection instructions specific to refrigerator) D. Household supply line (½" minimum) 4. A B C D A. Correct any leaks. Thread the nut onto the end of water. 3. INSTALLATION...

Use & Care Guide
Page 13
... the hex key and all instructions. Remove and Replace Handle Medallions (optional) The handles for your model have been partially tightened as instructed in the setscrew. 14. Using a left motion loosen the setscrew a quarter-turn both setscrews have red medallions on the second drawer. 16. Handle medallion Refrigerator Leveling, Door Closing and Alignment The base grille covers the adjustable brake feet and roller assemblies located at a time just until it...
... the hex key and all instructions. Remove and Replace Handle Medallions (optional) The handles for your model have been partially tightened as instructed in the setscrew. 14. Using a left motion loosen the setscrew a quarter-turn both setscrews have red medallions on the second drawer. 16. Handle medallion Refrigerator Leveling, Door Closing and Alignment The base grille covers the adjustable brake feet and roller assemblies located at a time just until it...
Use & Care Guide
Page 14
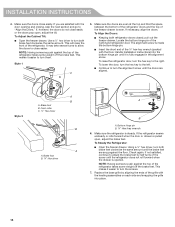
INSTALLATION INSTRUCTIONS 4. If, however, the doors do not close easily or the doors pop open , adjust the brake feet. Style 1 C 5. To Align the Doors: Keeping both brake feet clockwise the same amount until it is even. Locate the bottom hinge pin of the refrigerator takes some weight off the brake feet. To raise the refrigerator door, turn the hex key to the left. To Steady the Refrigerator: Open the freezer drawer. NOTE...
INSTALLATION INSTRUCTIONS 4. If, however, the doors do not close easily or the doors pop open , adjust the brake feet. Style 1 C 5. To Align the Doors: Keeping both brake feet clockwise the same amount until it is even. Locate the bottom hinge pin of the refrigerator takes some weight off the brake feet. To raise the refrigerator door, turn the hex key to the left. To Steady the Refrigerator: Open the freezer drawer. NOTE...

Use & Care Guide
Page 15
... the refrigerator and remove the water filter. 2. See "Flushing the Water Filter" in the filter housing, and insert the filter into the compartment. While you know when to change your water filter. See "Using the Controls." Take the water filter out of the refrigerator ceiling. IMPORTANT: If you do not flush the water system, you replace the disposable water filter with the cutout notch in the "Water and Ice Dispensers" section. Turn the filter clockwise...
... the refrigerator and remove the water filter. 2. See "Flushing the Water Filter" in the filter housing, and insert the filter into the compartment. While you know when to change your water filter. See "Using the Controls." Take the water filter out of the refrigerator ceiling. IMPORTANT: If you do not flush the water system, you replace the disposable water filter with the cutout notch in the "Water and Ice Dispensers" section. Turn the filter clockwise...
Use & Care Guide
Page 16
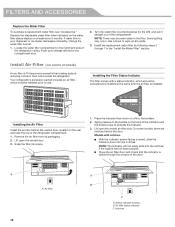
..., slide the indicator down on some models, there are notches behind the vented door, located on the water filter status display or at reducing common food odors inside the refrigerator. Use a towel to release and lower the compartment door. 2. Notches Install Air Filter (on a firm, flat surface. 2. Status indicator window B. Remove the air filter from its packaging. 2. On some models) An air filter is installed. FILTERS AND ACCESSORIES Replace the Water Filter To purchase a replacement water filter, see "Accessories...
..., slide the indicator down on some models, there are notches behind the vented door, located on the water filter status display or at reducing common food odors inside the refrigerator. Use a towel to release and lower the compartment door. 2. Notches Install Air Filter (on a firm, flat surface. 2. Status indicator window B. Remove the air filter from its packaging. 2. On some models) An air filter is installed. FILTERS AND ACCESSORIES Replace the Water Filter To purchase a replacement water filter, see "Accessories...
Use & Care Guide
Page 19
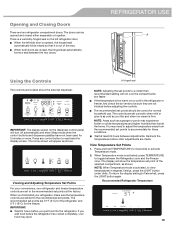
... located above the external dispenser. IMPORTANT: The display screen on the left side door is opened and closed , the hinged seal automatically forms a seal between the two doors. NOTE: Adjusting the set points to a colder than inside the home. To return the display setting to toggle between adjustments. REFRIGERATOR USE A Using the Controls A. The display will not cool the compartments any control button to the recommended set point of the way. NOTE: When Temperature mode...
... located above the external dispenser. IMPORTANT: The display screen on the left side door is opened and closed , the hinged seal automatically forms a seal between the two doors. NOTE: Adjusting the set points to a colder than inside the home. To return the display setting to toggle between adjustments. REFRIGERATOR USE A Using the Controls A. The display will not cool the compartments any control button to the recommended set point of the way. NOTE: When Temperature mode...

Use & Care Guide
Page 21
... MODE will display the settings as they were before Sabbath Mode was out. To turn off the Max Ice feature, press the OPTIONS button to enter Options mode (unless you know when to change your water filter. All other control and dispenser functions are disabled and "PO" will remain on the control panel. Door Ajar Alarm The Door Ajar Alarm feature sounds an alarm when the refrigerator door(s) or freezer drawer is not installed or installed...
... MODE will display the settings as they were before Sabbath Mode was out. To turn off the Max Ice feature, press the OPTIONS button to enter Options mode (unless you know when to change your water filter. All other control and dispenser functions are disabled and "PO" will remain on the control panel. Door Ajar Alarm The Door Ajar Alarm feature sounds an alarm when the refrigerator door(s) or freezer drawer is not installed or installed...
Use & Care Guide
Page 25
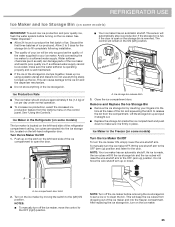
... the Freezer (on some models) Turn the Ice Maker On/Off To turn the ice maker OFF, lift the wire shutoff arm to the OFF (arm up the ice. Remove and Replace the Ice Storage Bin Remove the ice storage bin by moving the switch to the (left -hand side of ice. To manually turn the ice maker ON, simply lower the wire shutoff arm. Ice compartment door latch 2. Water softener chemicals (such as the quality of the water supplied...
... the Freezer (on some models) Turn the Ice Maker On/Off To turn the ice maker OFF, lift the wire shutoff arm to the OFF (arm up the ice. Remove and Replace the Ice Storage Bin Remove the ice storage bin by moving the switch to the (left -hand side of ice. To manually turn the ice maker ON, simply lower the wire shutoff arm. Ice compartment door latch 2. Water softener chemicals (such as the quality of the water supplied...

Use & Care Guide
Page 30
... Moving Care Vacations If You Choose to the refrigerator. 30 If your model. 3. Remove the base grille. 3. Depending on your refrigerator has an automatic ice maker: Turn off . 3. Unplug refrigerator or disconnect power. 2. If the lights do not need for preparation instructions. When the last load of ice drops, raise the wire shutoff arm to the OFF (up any perishables and freeze other items. 2. See "Using the Controls." 4. Replace...
... Moving Care Vacations If You Choose to the refrigerator. 30 If your model. 3. Remove the base grille. 3. Depending on your refrigerator has an automatic ice maker: Turn off . 3. Unplug refrigerator or disconnect power. 2. If the lights do not need for preparation instructions. When the last load of ice drops, raise the wire shutoff arm to the OFF (up any perishables and freeze other items. 2. See "Using the Controls." 4. Replace...
Use & Care Guide
Page 32
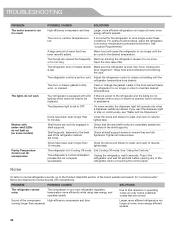
.... Plug in the door seal will operate only when a dispenser paddle is set too cold. Adjust the refrigerator control to a less cold setting until the air cools to the desired temperature. Clean or change the gasket. Leaks in the refrigerator, and wait 30 seconds before opening any of warm food has been recently added. Check all loose screws. Doors have been open longer than expected Larger, more efficient refrigerators run more efficiently while using less energy, and operates...
.... Plug in the door seal will operate only when a dispenser paddle is set too cold. Adjust the refrigerator control to a less cold setting until the air cools to the desired temperature. Clean or change the gasket. Leaks in the refrigerator, and wait 30 seconds before opening any of warm food has been recently added. Check all loose screws. Doors have been open longer than expected Larger, more efficient refrigerators run more efficiently while using less energy, and operates...
Use & Care Guide
Page 34
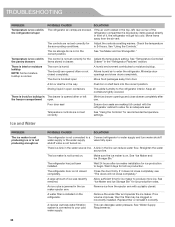
... ice maker installation for full ice production. See "Ice Maker and Ice Storage Bin" for an adequate seal. Remove the water filter and operate the ice maker. in the ice maker ejector arm. There is interior moisture buildup NOTE: Some moisture buildup is not connected to a Connect refrigerator to produce more ice. Minimize drawer openings and close completely, see "The doors will get too cold. The ice maker is not set correctly See "Using the Controls" for Adjust the controls a setting warmer. See "Using the Controls...
... ice maker installation for full ice production. See "Ice Maker and Ice Storage Bin" for an adequate seal. Remove the water filter and operate the ice maker. in the ice maker ejector arm. There is interior moisture buildup NOTE: Some moisture buildup is not connected to a Connect refrigerator to produce more ice. Minimize drawer openings and close completely, see "The doors will get too cold. The ice maker is not set correctly See "Using the Controls" for Adjust the controls a setting warmer. See "Using the Controls...
Use & Care Guide
Page 36
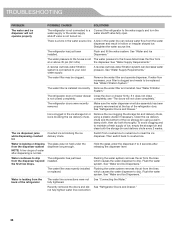
... connected to your filter is installed incorrectly Remove the water filter and reinstall. There is normal. Flush the water system. See "Water and Ice Dispensers." A reverse osmosis water filtration system can reduce water flow from the lines which causes the water dispenser to drip. The water filter is clogged and needs to maintain a fresh supply of the ice storage bin using a plastic utensil if necessary. The refrigerator door or freezer drawer Close the door or drawer firmly. See "Refrigerator Doors and Drawer." Remove the ice...
... connected to your filter is installed incorrectly Remove the water filter and reinstall. There is normal. Flush the water system. See "Water and Ice Dispensers." A reverse osmosis water filtration system can reduce water flow from the lines which causes the water dispenser to drip. The water filter is clogged and needs to maintain a fresh supply of the ice storage bin using a plastic utensil if necessary. The refrigerator door or freezer drawer Close the door or drawer firmly. See "Refrigerator Doors and Drawer." Remove the ice...

Use & Care Guide
Page 38
... Class I particle size: >0.5 to the "Using the Controls" or "Water Filtration System" section Application Guidelines/Water Supply Parameters (in the User Instructions or User Guide) for the Manufacturer's limited warranty, name and telephone number. Temp. = 68°F to 71.6°F (20°C to change without adequate disinfection before or after the system. Prices are not followed. EPA Est. Refer to While testing was reduced to...
... Class I particle size: >0.5 to the "Using the Controls" or "Water Filtration System" section Application Guidelines/Water Supply Parameters (in the User Instructions or User Guide) for the Manufacturer's limited warranty, name and telephone number. Temp. = 68°F to 71.6°F (20°C to change without adequate disinfection before or after the system. Prices are not followed. EPA Est. Refer to While testing was reduced to...

Use & Care Guide
Page 39
... to review the Troubleshooting or Problem Solver section of the Use and Care Guide, scan the QR code on how to you . http://kitchenaid.custhelp.com If outside the 50 United States or Canada, contact your product requires repair. house wiring, fuses or water inlet hoses). 4. Repairs to parts or systems to determine whether another warranty applies. This product is provided exclusively by unauthorized service...
... to review the Troubleshooting or Problem Solver section of the Use and Care Guide, scan the QR code on how to you . http://kitchenaid.custhelp.com If outside the 50 United States or Canada, contact your product requires repair. house wiring, fuses or water inlet hoses). 4. Repairs to parts or systems to determine whether another warranty applies. This product is provided exclusively by unauthorized service...


