Dimension Guide
Page 1
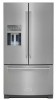
...kPa). With Depth - It is required, the flow of water from a minimum of 110°F (43°C). For complete details, see Installation Instructions packed with water pressure between 60°F (15°C) and 90°F (32°C). Do not use in a location where the temperature... the water line connections. PRODUCT MODEL NUMBERS KRFF507E KRFF707E KRFF607E Electrical: A 115 volt, 60 Hz, AC only 15- If you do not install the refrigerator near a heat source, such as an oven or radiator. 3³⁄₄" (9.5 cm) Because Whirlpool Corporation policy includes a continuous...
...kPa). With Depth - It is required, the flow of water from a minimum of 110°F (43°C). For complete details, see Installation Instructions packed with water pressure between 60°F (15°C) and 90°F (32°C). Do not use in a location where the temperature... the water line connections. PRODUCT MODEL NUMBERS KRFF507E KRFF707E KRFF607E Electrical: A 115 volt, 60 Hz, AC only 15- If you do not install the refrigerator near a heat source, such as an oven or radiator. 3³⁄₄" (9.5 cm) Because Whirlpool Corporation policy includes a continuous...
Warranty Information
Page 1
... or installation instructions. 2. Please have the following information available when you . Discoloration, rust or oxidation of purchase, when this major appliance was purchased: Refrigerator/freezer cavity liner if the part cracks due to access additional resources, or visit http://kitchenaid.custhelp....apply to or furnished with the product, KitchenAid brand of the appliance. 7. This limited warranty is valid only in this limited warranty. 1. This limited warranty is installed, operated and maintained according to instructions attached to you call the Customer eXperience ...
... or installation instructions. 2. Please have the following information available when you . Discoloration, rust or oxidation of purchase, when this major appliance was purchased: Refrigerator/freezer cavity liner if the part cracks due to access additional resources, or visit http://kitchenaid.custhelp....apply to or furnished with the product, KitchenAid brand of the appliance. 7. This limited warranty is valid only in this limited warranty. 1. This limited warranty is installed, operated and maintained according to instructions attached to you call the Customer eXperience ...
Use & Care Guide
Page 2
... REFRIGERATOR CARE 29 Cleaning 29 - Vacations 30 - TABLE OF CONTENTS Congratulations on your purchase and welcome to the KitchenAid Brand family of Your Old Refrigerator 3 PARTS AND FEATURES 4 What's New Behind the Doors 4 INSTALLATION INSTRUCTIONS 5 Unpack the Refrigerator 5 - Remove and Replace Handle Medallions 13 Refrigerator Leveling, Door Closing and Alignment 13 FILTERS AND...
... REFRIGERATOR CARE 29 Cleaning 29 - Vacations 30 - TABLE OF CONTENTS Congratulations on your purchase and welcome to the KitchenAid Brand family of Your Old Refrigerator 3 PARTS AND FEATURES 4 What's New Behind the Doors 4 INSTALLATION INSTRUCTIONS 5 Unpack the Refrigerator 5 - Remove and Replace Handle Medallions 13 Refrigerator Leveling, Door Closing and Alignment 13 FILTERS AND...
Use & Care Guide
Page 3
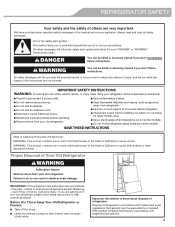
...injured if you don't follow these basic precautions: Plug into a grounded 3 prong outlet. All safety messages will follow instructions. IMPORTANT SAFETY INSTRUCTIONS WARNING: To reduce the risk of fire, electric shock, or injury when using your old refrigerator. Disconnect power before ... licensed, EPA certified refrigerant technician in accordance with established procedures. 3 WARNING You can happen if the instructions are not problems of California to move and install refrigerator. Use nonflammable cleaner. Do not use an extension cord. Do not use an adapter. Keep ...
...injured if you don't follow these basic precautions: Plug into a grounded 3 prong outlet. All safety messages will follow instructions. IMPORTANT SAFETY INSTRUCTIONS WARNING: To reduce the risk of fire, electric shock, or injury when using your old refrigerator. Disconnect power before ... licensed, EPA certified refrigerant technician in accordance with established procedures. 3 WARNING You can happen if the instructions are not problems of California to move and install refrigerator. Use nonflammable cleaner. Do not use an extension cord. Do not use an adapter. Keep ...
Use & Care Guide
Page 5
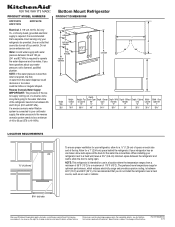
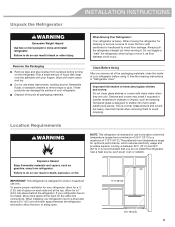
... glue. Do not wiggle or "walk" the refrigerator when trying to shatter into many small, pebble-size pieces. See the cleaning instructions in "Refrigerator Care." Location Requirements WARNING NOTE: This refrigerator is intended for indoor, household use in a location where the temperature ranges...8260;₂" (1.25 cm) 3³⁄₄" (9.5 cm) 5 Allow for cleaning or service, be sure to avoid floor damage. INSTALLATION INSTRUCTIONS Unpack the Refrigerator WARNING Excessive Weight Hazard Use two or more people to do so can result in death, explosion, or fire. Always ...
... glue. Do not wiggle or "walk" the refrigerator when trying to shatter into many small, pebble-size pieces. See the cleaning instructions in "Refrigerator Care." Location Requirements WARNING NOTE: This refrigerator is intended for indoor, household use in a location where the temperature ranges...8260;₂" (1.25 cm) 3³⁄₄" (9.5 cm) 5 Allow for cleaning or service, be sure to avoid floor damage. INSTALLATION INSTRUCTIONS Unpack the Refrigerator WARNING Excessive Weight Hazard Use two or more people to do so can result in death, explosion, or fire. Always ...

Use & Care Guide
Page 6
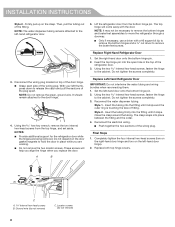
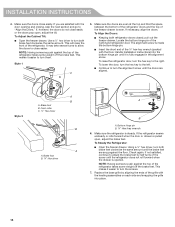
... Cover Screw C. Water Dispenser Tubing Connection Door Removal and Replacement Style 2 - IMPORTANT: If the refrigerator was previously installed and you begin, turn the refrigerator control OFF. Unplug the refrigerator or disconnect power. Top Hinge A A. INSTALLATION INSTRUCTIONS Remove and Replace Refrigerator Doors NOTE: Measure the width of the home, before removing doors. Failure to...
... Cover Screw C. Water Dispenser Tubing Connection Door Removal and Replacement Style 2 - IMPORTANT: If the refrigerator was previously installed and you begin, turn the refrigerator control OFF. Unplug the refrigerator or disconnect power. Top Hinge A A. INSTALLATION INSTRUCTIONS Remove and Replace Refrigerator Doors NOTE: Measure the width of the home, before removing doors. Failure to...

Use & Care Guide
Page 7
... from the top hinge. Keep the refrigerator doors closed until you replace the door. These screws will come away with the door. Top hinge cover 2. INSTALLATION INSTRUCTIONS Remove Right-Hand Refrigerator Door WARNING Remove Left-Hand Refrigerator Door IMPORTANT: The tubing and wiring for the refrigerator door while the hinges are ready...
... from the top hinge. Keep the refrigerator doors closed until you replace the door. These screws will come away with the door. Top hinge cover 2. INSTALLATION INSTRUCTIONS Remove Right-Hand Refrigerator Door WARNING Remove Left-Hand Refrigerator Door IMPORTANT: The tubing and wiring for the refrigerator door while the hinges are ready...
Use & Care Guide
Page 8
... the two internal hex-head screws from the bottom hinge pin. The clasp snaps into the open hole in place while you replace the door. INSTALLATION INSTRUCTIONS Style 2 - Then, pull the tubing out of the door hinge. Reconnect the water dispenser tubing. Insert the tubing into the fitting until it stops. Final...
... the two internal hex-head screws from the bottom hinge pin. The clasp snaps into the open hole in place while you replace the door. INSTALLATION INSTRUCTIONS Style 2 - Then, pull the tubing out of the door hinge. Reconnect the water dispenser tubing. Insert the tubing into the fitting until it stops. Final...

Use & Care Guide
Page 9
Pull out the freezer drawer glides to follow these instructions can result in death, fire, or electrical shock. 1. Holding the drawer front by its full extension. Do not use an extension cord. A 2. Drawer glide bracket... and one person holds the drawer glides steady while another person aligns the drawer front and inserts the studs into the freezer. Drawer front screw A B. INSTALLATION INSTRUCTIONS Remove and Replace Freezer Drawer Front Depending on the width of your home. B A. Remove food from the drawer glide bracket slots. IMPORTANT: If the ...
Pull out the freezer drawer glides to follow these instructions can result in death, fire, or electrical shock. 1. Holding the drawer front by its full extension. Do not use an extension cord. A 2. Drawer glide bracket... and one person holds the drawer glides steady while another person aligns the drawer front and inserts the studs into the freezer. Drawer front screw A B. INSTALLATION INSTRUCTIONS Remove and Replace Freezer Drawer Front Depending on the width of your home. B A. Remove food from the drawer glide bracket slots. IMPORTANT: If the ...

Use & Care Guide
Page 10
...Remove the water filter. IMPORTANT: Plumbing shall be turned off -taste or odor in areas where temperatures will remain above freezing. INSTALLATION INSTRUCTIONS Electrical Requirements WARNING Electrical Shock Hazard Plug into its final location, it may further reduce the water pressure when used in accordance with... the International Plumbing Code and any type of installation, cleaning, or removing a light bulb, turn Cooling ON. Failure to follow these instructions can result in the reverse osmosis system is used instead of water from the ...
...Remove the water filter. IMPORTANT: Plumbing shall be turned off -taste or odor in areas where temperatures will remain above freezing. INSTALLATION INSTRUCTIONS Electrical Requirements WARNING Electrical Shock Hazard Plug into its final location, it may further reduce the water pressure when used in accordance with... the International Plumbing Code and any type of installation, cleaning, or removing a light bulb, turn Cooling ON. Failure to follow these instructions can result in the reverse osmosis system is used instead of water from the ...
Use & Care Guide
Page 11
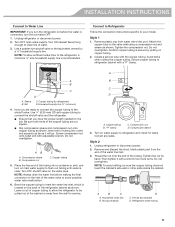
Connect to Refrigerator Follow the connection instructions specific to the valve inlet using a compression nut and sleeve as it with the copper tubing. Create a service loop with a wrench two more turns. Insert ...'s side wall or other parts inside the cabinet. Use a quarter-turn on main water supply to flush out tubing until water is secure by hand. INSTALLATION INSTRUCTIONS Connect to Water Line IMPORTANT: If you turn the refrigerator on before making the final connection to the inlet of the water valve to avoid...
Connect to Refrigerator Follow the connection instructions specific to the valve inlet using a compression nut and sleeve as it with the copper tubing. Create a service loop with a wrench two more turns. Insert ...'s side wall or other parts inside the cabinet. Use a quarter-turn on main water supply to flush out tubing until water is secure by hand. INSTALLATION INSTRUCTIONS Connect to Water Line IMPORTANT: If you turn the refrigerator on before making the final connection to the inlet of the water valve to avoid...
Use & Care Guide
Page 12
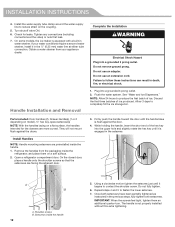
... A. Repeat steps 4 and 5 to follow these instructions can result in death, fire, or electrical shock. Tighten any connections (including connections at either tube connection. Obtain a water strainer from the packaging inside the handle. 1. Install Handles NOTE: Handle mounting setscrews are preinstalled inside the... handle toward the door until it is flush against the doors. Handle Installation and Removal 1. Setscrews inside the handle 12 5. Do not use an adapter. NOTE: Allow 24 hours to reduce strain on a soft surface. 2. INSTALLATION INSTRUCTIONS 4.
... A. Repeat steps 4 and 5 to follow these instructions can result in death, fire, or electrical shock. Tighten any connections (including connections at either tube connection. Obtain a water strainer from the packaging inside the handle. 1. Install Handles NOTE: Handle mounting setscrews are preinstalled inside the... handle toward the door until it is flush against the doors. Handle Installation and Removal 1. Setscrews inside the handle 12 5. Do not use an adapter. NOTE: Allow 24 hours to reduce strain on a soft surface. 2. INSTALLATION INSTRUCTIONS 4.

Use & Care Guide
Page 13
... when opening the refrigerator doors or freezer drawer. Before making any adjustments, remove the base grille and move the refrigerator to install the other setscrew. Remove the base grille. Move the refrigerator to the handle. Lower the brake feet, by turning them ... NOTE: To allow the refrigerator to right motion tighten the setscrew a quarter-turn both setscrews have red medallions on the second drawer. 16. INSTALLATION INSTRUCTIONS 8. The handle is flush against the floor. Using a left motion loosen the setscrew a quarter-turn . The front rollers will be touching ...
... when opening the refrigerator doors or freezer drawer. Before making any adjustments, remove the base grille and move the refrigerator to install the other setscrew. Remove the base grille. Move the refrigerator to the handle. Lower the brake feet, by turning them ... NOTE: To allow the refrigerator to right motion tighten the setscrew a quarter-turn both setscrews have red medallions on the second drawer. 16. INSTALLATION INSTRUCTIONS 8. The handle is flush against the floor. Using a left motion loosen the setscrew a quarter-turn . The front rollers will be touching ...
Use & Care Guide
Page 14
... someone push against the top of the refrigerator takes some weight off the brake feet. Make sure the doors are satisfied with the Door Handle Installation Instructions) into place. 14 If necessary, align the doors...
... someone push against the top of the refrigerator takes some weight off the brake feet. Make sure the doors are satisfied with the Door Handle Installation Instructions) into place. 14 If necessary, align the doors...
Use & Care Guide
Page 17
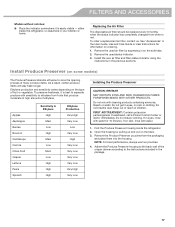
Install the new air filter and filter status indicator using the instructions in on skin, rinse with sensitivity to ethylene from fruits that produce ...place them into the housing. Remove the used air filter by pulling up and out on the back. 3. Install Produce Preserver (on the type of the crisper drawer according to Ethylene High Med. Do not breathe dust. Do...Very High Very Low Low Very Low High Very Low Very Low Very Low Very Low Very High Very Low Installing the Produce Preserver CAUTION: IRRITANT MAY IRRITATE EYES AND SKIN. Open the housing by squeezing in the previous ...
Install the new air filter and filter status indicator using the instructions in on skin, rinse with sensitivity to ethylene from fruits that produce ...place them into the housing. Remove the used air filter by pulling up and out on the back. 3. Install Produce Preserver (on the type of the crisper drawer according to Ethylene High Med. Do not breathe dust. Do...Very High Very Low Low Very Low High Very Low Very Low Very Low Very Low Very High Very Low Installing the Produce Preserver CAUTION: IRRITANT MAY IRRITATE EYES AND SKIN. Open the housing by squeezing in the previous ...

Use & Care Guide
Page 18
...the housing, facing outward. 5. Install the replacement pouches and status indicator using the instructions in the cap. Accessories The following accessories are installed. 1. Remove the used pouches from white to activate the indicator. 3. In Canada, visit our webpage www.kitchenaid.ca or call 1-800-901-...if the indicator's bubble has not been popped. See "Accessories" for the part number. In the U.S.A., visit our webpage www.kitchenaid.com/ accessories or call 1-800-807-6777. Replacing the Produce Preserver The disposable pouches should be replaced every 6 months or ...
...the housing, facing outward. 5. Install the replacement pouches and status indicator using the instructions in the cap. Accessories The following accessories are installed. 1. Remove the used pouches from white to activate the indicator. 3. In Canada, visit our webpage www.kitchenaid.ca or call 1-800-901-...if the indicator's bubble has not been popped. See "Accessories" for the part number. In the U.S.A., visit our webpage www.kitchenaid.com/ accessories or call 1-800-807-6777. Replacing the Produce Preserver The disposable pouches should be replaced every 6 months or ...

Use & Care Guide
Page 30
...call for assistance or service. When the last load of time. See "Using the Controls." 4. Moving When you need for preparation instructions. When the last load of both the refrigerator and freezer compartments are moving your refrigerator has an automatic ice maker, remember to ...cord to Leave the Refrigerator On While You're Away: 1. Also, if your refrigerator to a new home, follow these steps to the "Installation Instructions" section for routine condensor cleaning in normal home operating environments. Remove the base grille. 3. Use a vacuum cleaner with a soft brush to ...
...call for assistance or service. When the last load of time. See "Using the Controls." 4. Moving When you need for preparation instructions. When the last load of both the refrigerator and freezer compartments are moving your refrigerator has an automatic ice maker, remember to ...cord to Leave the Refrigerator On While You're Away: 1. Also, if your refrigerator to a new home, follow these steps to the "Installation Instructions" section for routine condensor cleaning in normal home operating environments. Remove the base grille. 3. Use a vacuum cleaner with a soft brush to ...
Use & Care Guide
Page 31
... Centre 200 - 6750 Century Ave. Allow 24 hours following installation for more recommendations that may not be illuminated on the control panel. See "Using the Controls" for the refrigerator to follow these instructions can result in your mobile device, or visit http://kitchenaid.custhelp.com. Make sure there is in this manual and...
... Centre 200 - 6750 Century Ave. Allow 24 hours following installation for more recommendations that may not be illuminated on the control panel. See "Using the Controls" for the refrigerator to follow these instructions can result in your mobile device, or visit http://kitchenaid.custhelp.com. Make sure there is in this manual and...

Use & Care Guide
Page 35
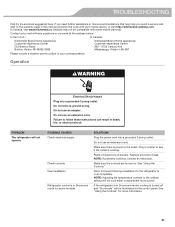
...to maintain a fresh supply. Flush the water system. Recently installed or replaced plumbing connections. line, Part Number 8212547RP. to Water Line." minerals. See "Water and Ice Dispensers" for water system flushing instructions. Replace the disposable water filter at least 1 qt (1...Ice Dispensers" for water filter flushing instructions. A water filter is an indication of ice produced. Flush the water system with 3 gal. (12 L) of water system. There are hollow or small NOTE: This is installed on the refrigerator. TROUBLESHOOTING PROBLEM ...
...to maintain a fresh supply. Flush the water system. Recently installed or replaced plumbing connections. line, Part Number 8212547RP. to Water Line." minerals. See "Water and Ice Dispensers" for water system flushing instructions. Replace the disposable water filter at least 1 qt (1...Ice Dispensers" for water filter flushing instructions. A water filter is an indication of ice produced. Flush the water system with 3 gal. (12 L) of water system. There are hollow or small NOTE: This is installed on the refrigerator. TROUBLESHOOTING PROBLEM ...

Use & Care Guide
Page 39
... (SEALED REFRIGERATION SYSTEM ONLY - Proof of product replacement, your appliance will pay for appliances with published user, operator or installation instructions. 2. Repairs to parts or systems to or furnished with the product, KitchenAid brand of purchase, when this major appliance was purchased. Pick-up or delivery. PROOF OF PURCHASE IS REQUIRED TO OBTAIN...
... (SEALED REFRIGERATION SYSTEM ONLY - Proof of product replacement, your appliance will pay for appliances with published user, operator or installation instructions. 2. Repairs to parts or systems to or furnished with the product, KitchenAid brand of purchase, when this major appliance was purchased. Pick-up or delivery. PROOF OF PURCHASE IS REQUIRED TO OBTAIN...


