User Guide
Page 4
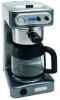
... that make brewing abundant amounts of coffee served at a leisurely pace, while "high" keeps coffee piping hot. The elegant die-cast metal housing and stainless steel brew basket will stand up to the heaviest use. An easy-to-set digital brew timer makes waking up to fresh coffee every morning simple. The KitchenAid® PRO LINE® Series: commercial quality for the discriminating home chef. The commercial, 1350-watt stainless steel heat pump brews quickly...
... that make brewing abundant amounts of coffee served at a leisurely pace, while "high" keeps coffee piping hot. The elegant die-cast metal housing and stainless steel brew basket will stand up to the heaviest use. An easy-to-set digital brew timer makes waking up to fresh coffee every morning simple. The KitchenAid® PRO LINE® Series: commercial quality for the discriminating home chef. The commercial, 1350-watt stainless steel heat pump brews quickly...
User Guide
Page 5
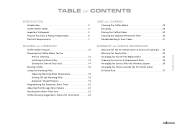
... Use Pre-Use Cleaning 13 Installing the Water Filter 13 Setting the Time-of-Day Clock 14 Brewing Coffee 16 Using the Warming Plate Adjusting Warming Plate Temperature 19 Turning Off the Warming Plate 19 Automatic Shutoff Feature 19 Programming the Automatic Brew Timer 20 Adjusting the Message Tone Volume 22 Resetting the Water Filter Icon 23 Coffee Brewing Suggestions: Advice for Great Taste 24 CARE AND CLEANING Cleaning the Coffee Maker 28 Descaling 29 Storing the Coffee Maker 30 Cleaning the Optional Permanent Filter 30 Troubleshooting & Error Codes 31 WARRANTY AND SERVICE...
... Use Pre-Use Cleaning 13 Installing the Water Filter 13 Setting the Time-of-Day Clock 14 Brewing Coffee 16 Using the Warming Plate Adjusting Warming Plate Temperature 19 Turning Off the Warming Plate 19 Automatic Shutoff Feature 19 Programming the Automatic Brew Timer 20 Adjusting the Message Tone Volume 22 Resetting the Water Filter Icon 23 Coffee Brewing Suggestions: Advice for Great Taste 24 CARE AND CLEANING Cleaning the Coffee Maker 28 Descaling 29 Storing the Coffee Maker 30 Cleaning the Optional Permanent Filter 30 Troubleshooting & Error Codes 31 WARRANTY AND SERVICE...
User Guide
Page 7
... following: 1. Do not use outdoors. 9. Allow to persons. 8. Do not use appliance for use of table or counter, or touch hot surfaces. 10. This product has been UL Listed for examination, repair, or adjustment. 7. Do not set a hot container on container. 13. Read all instructions. 2. To protect against electrical shock, do not immerse cord, plugs, or Coffee Maker in a heated oven. 11. Close...
... following: 1. Do not use outdoors. 9. Allow to persons. 8. Do not use appliance for use of table or counter, or touch hot surfaces. 10. This product has been UL Listed for examination, repair, or adjustment. 7. Do not set a hot container on container. 13. Read all instructions. 2. To protect against electrical shock, do not immerse cord, plugs, or Coffee Maker in a heated oven. 11. Close...

User Guide
Page 11
FEATURES AND OPERATION P R O L I N E® S E R I E S FEATURES AND OPERATION Features and Operation Section Contents Coffee Maker Features 10 Preparing For Use Pre-Use Cleaning 13 Installing the Water Filter 13 Setting the Time-of-Day Clock ......14 Brewing Coffee 16 Using the Warming Plate 19 Programming the Brew Timer ...........20 Adjusting Message Tone Volume ......22 Resetting the Water Filter Icon..........23 Coffee Brewing Suggestions 24 9
FEATURES AND OPERATION P R O L I N E® S E R I E S FEATURES AND OPERATION Features and Operation Section Contents Coffee Maker Features 10 Preparing For Use Pre-Use Cleaning 13 Installing the Water Filter 13 Setting the Time-of-Day Clock ......14 Brewing Coffee 16 Using the Warming Plate 19 Programming the Brew Timer ...........20 Adjusting Message Tone Volume ......22 Resetting the Water Filter Icon..........23 Coffee Brewing Suggestions 24 9
User Guide
Page 12
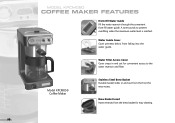
... for easy access. Model KPCM050 Coffee Maker Stainless Steel Brew Basket Durable basket slides in and out for easy cleaning. 10 MODEL KPCM050 COFFEE MAKER FEATURES Front-Fill Water Guide Fill the water reservoir through the convenient front-fill water guide. Brew Basket Insert Insert removes from the brew basket for convenient access to prevent overfilling when the maximum water level is reached. A tone sounds to the water reservoir and filter. Water Filter Access Cover Cover snaps in and...
... for easy access. Model KPCM050 Coffee Maker Stainless Steel Brew Basket Durable basket slides in and out for easy cleaning. 10 MODEL KPCM050 COFFEE MAKER FEATURES Front-Fill Water Guide Fill the water reservoir through the convenient front-fill water guide. Brew Basket Insert Insert removes from the brew basket for convenient access to prevent overfilling when the maximum water level is reached. A tone sounds to the water reservoir and filter. Water Filter Access Cover Cover snaps in and...
User Guide
Page 13
... Plate Temperature Switch Keep coffee heated to -set the brew timer and clock. To program the brew timer, turn the program-clock switch momentarily to indicate regular or decaffeinated coffee. The coffee maker or brew timer cannot be alternated to the "Clock" position. To activate or deactivate the automatic brew timer, turn the auto-on or the brew timer is on /off switch momentarily to indicate the time elapsed since the last carafe was brewed. FEATURES AND OPERATION 12-Cup Glass Carafe The Carafe features drip-free pouring...
... Plate Temperature Switch Keep coffee heated to -set the brew timer and clock. To program the brew timer, turn the program-clock switch momentarily to indicate regular or decaffeinated coffee. The coffee maker or brew timer cannot be alternated to the "Clock" position. To activate or deactivate the automatic brew timer, turn the auto-on or the brew timer is on /off switch momentarily to indicate the time elapsed since the last carafe was brewed. FEATURES AND OPERATION 12-Cup Glass Carafe The Carafe features drip-free pouring...
User Guide
Page 14
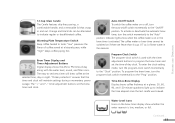
... last carafe is near full during filling. Filter also softens the water, which impair coffee flavor. Message Tones Convenient message tones instantly communicate coffee maker status. Optional Permanent Filter The permanent filter eliminates the need for maximum durability. Message tone volume can be replaced. The coffee maker will beep three times when a brewing cycle is activated without sufficient water in the reservoir, the coffee maker will also beep once when the reservoir is brewed. Stainless Steel Heat Pump The...
... last carafe is near full during filling. Filter also softens the water, which impair coffee flavor. Message Tones Convenient message tones instantly communicate coffee maker status. Optional Permanent Filter The permanent filter eliminates the need for maximum durability. Message tone volume can be replaced. The coffee maker will beep three times when a brewing cycle is activated without sufficient water in the reservoir, the coffee maker will also beep once when the reservoir is brewed. Stainless Steel Heat Pump The...
User Guide
Page 15
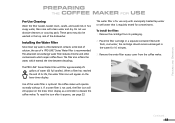
... the brew timer display. To reset the icon after it . Place the filter cartridge in hot, soapy water, then rinse with clean water and dry. FEATURES AND OPERATION PREPARING THE COFFEE MAKER FOR USE Pre-Use Cleaning Wash the filter basket, basket insert, carafe, and carafe lids in a separate container filled with fresh, cool water; Remove the cartridge from the coffee maker. the cartridge should remain submerged in the top rack of the dishwasher. Installing the Water Filter...
... the brew timer display. To reset the icon after it . Place the filter cartridge in hot, soapy water, then rinse with clean water and dry. FEATURES AND OPERATION PREPARING THE COFFEE MAKER FOR USE Pre-Use Cleaning Wash the filter basket, basket insert, carafe, and carafe lids in a separate container filled with fresh, cool water; Remove the cartridge from the coffee maker. the cartridge should remain submerged in the top rack of the dishwasher. Installing the Water Filter...
User Guide
Page 16
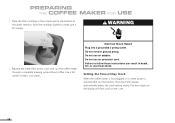
... water filter access cover and run the coffee maker through a complete brewing cycle without coffee. Failure to make sure it fits snugly. Push the cartridge slightly to follow these instructions can result in death, fire, or electrical shock. Do not remove ground prong. The hour digits on the display will flash until a time is restored after an interruption, the brew timer display automatically enters the clock-setting mode. Use a full carafe...
... water filter access cover and run the coffee maker through a complete brewing cycle without coffee. Failure to make sure it fits snugly. Push the cartridge slightly to follow these instructions can result in death, fire, or electrical shock. Do not remove ground prong. The hour digits on the display will flash until a time is restored after an interruption, the brew timer display automatically enters the clock-setting mode. Use a full carafe...
User Guide
Page 18
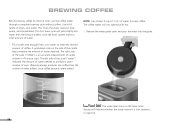
..., or near full. 16 The coffee maker will yield slightly less water than the volume of water added, since the brew system retains a small amount of water required. This rinses the water reservoir, heat pump, and showerhead. Fill a carafe with less. 2. BREWING COFFEE Before brewing coffee for the first time, run the coffee maker through a complete brewing cycle without coffee. The right side of clean, cool water. Remove the water guide cover and pour the water into the...
..., or near full. 16 The coffee maker will yield slightly less water than the volume of water added, since the brew system retains a small amount of water required. This rinses the water reservoir, heat pump, and showerhead. Fill a carafe with less. 2. BREWING COFFEE Before brewing coffee for the first time, run the coffee maker through a complete brewing cycle without coffee. The right side of clean, cool water. Remove the water guide cover and pour the water into the...

User Guide
Page 19
... cup flat-bottom paper filter or the optional permanent filter into the coffee maker as far as possible. 7. Continued... 17 Make certain the plastic brew basket insert is complete. To begin brewing, turn the Auto-On/Off Switch clockwise to overflow the brew basket. Slide the brew basket into the brew basket. Using the included scoop, fill the filter with one rounded scoop of the coffee maker. 6. Grasp the brew basket handle and remove the brew basket from the coffee maker until brewing...
... cup flat-bottom paper filter or the optional permanent filter into the coffee maker as far as possible. 7. Continued... 17 Make certain the plastic brew basket insert is complete. To begin brewing, turn the Auto-On/Off Switch clockwise to overflow the brew basket. Slide the brew basket into the brew basket. Using the included scoop, fill the filter with one rounded scoop of the coffee maker. 6. Grasp the brew basket handle and remove the brew basket from the coffee maker until brewing...
User Guide
Page 20
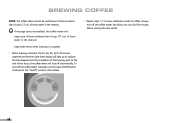
... starting the next carafe. 18 BREWING COFFEE NOTE: The coffee maker cannot be switched on if there are fewer than 4 cups (17 oz.) of brew water in the reservoir • beep three times when brewing is finished, the 30, 60, 90, and 120-minute segments on the time-since-brew display will light up to indicate the time elapsed since the completion of coffee. If message tones are enabled, the coffee maker...
... starting the next carafe. 18 BREWING COFFEE NOTE: The coffee maker cannot be switched on if there are fewer than 4 cups (17 oz.) of brew water in the reservoir • beep three times when brewing is finished, the 30, 60, 90, and 120-minute segments on the time-since-brew display will light up to indicate the time elapsed since the completion of coffee. If message tones are enabled, the coffee maker...

User Guide
Page 24
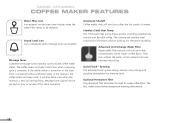
... level icon is reset 22 Timer Adjustment Buttons As the Timer Adjustment Buttons are held down continuously, the message tones will change the volume of the message tones. The sound level icon will be set high or low, or turned off for about 5 seconds to enable, disable, or change to high volume tones. The coffee maker will appear. When first used, the coffee maker automatically defaults to...
... level icon is reset 22 Timer Adjustment Buttons As the Timer Adjustment Buttons are held down continuously, the message tones will change the volume of the message tones. The sound level icon will be set high or low, or turned off for about 5 seconds to enable, disable, or change to high volume tones. The coffee maker will appear. When first used, the coffee maker automatically defaults to...
User Guide
Page 25
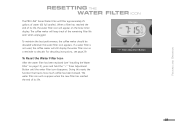
... much coffee has been brewed. When a filter has reached the end of water (60 full carafes). For descaling instructions, see "Installing the Water Filter" on the brew timer display. The coffee maker will filter approximately 25 gallons of its life. To Reset the Water Filter Icon After the water filter has been replaced (see page 29. If a water filter is not used, the coffee maker will appear on page 13), press and hold the "+" Timer Adjustment Button until the water filter...
... much coffee has been brewed. When a filter has reached the end of water (60 full carafes). For descaling instructions, see "Installing the Water Filter" on the brew timer display. The coffee maker will filter approximately 25 gallons of its life. To Reset the Water Filter Icon After the water filter has been replaced (see page 29. If a water filter is not used, the coffee maker will appear on page 13), press and hold the "+" Timer Adjustment Button until the water filter...
User Guide
Page 27
... when the water filter icon appears on the brew timer display. This rinses the water reservoir, heat pump, and showerhead, and eliminates any stale water within minutes. use a medium grind level appropriate for good coffee, and that are ground just before brewing. Continued... 25 Brew Water Purity The PRO LINE® Series water filter that comes with your coffee maker is to use the filter - Use a full carafe of coffee will maximize flavor and minimize bitterness. and replace it...
... when the water filter icon appears on the brew timer display. This rinses the water reservoir, heat pump, and showerhead, and eliminates any stale water within minutes. use a medium grind level appropriate for good coffee, and that are ground just before brewing. Continued... 25 Brew Water Purity The PRO LINE® Series water filter that comes with your coffee maker is to use the filter - Use a full carafe of coffee will maximize flavor and minimize bitterness. and replace it...
User Guide
Page 31
... coffee maker heat pump over time and impair brewing efficiency and coffee quality. If error codes continue to appear after cleaning, see the KitchenAid Warranty and Service section on page 13) and make certain the brew basket contains no coffee or coffee filters. 2. Descaling Steps 1. Rinse the coffee maker by running it through a second brewing cycle using vinegar, mix a solution of 6 cups vinegar and 6 cups water. Wash the brew basket, brew basket insert, carafe, and carafe lid in and continue. Error Codes During Descaling If "E1" or "E2" error codes...
... coffee maker heat pump over time and impair brewing efficiency and coffee quality. If error codes continue to appear after cleaning, see the KitchenAid Warranty and Service section on page 13) and make certain the brew basket contains no coffee or coffee filters. 2. Descaling Steps 1. Rinse the coffee maker by running it through a second brewing cycle using vinegar, mix a solution of 6 cups vinegar and 6 cups water. Wash the brew basket, brew basket insert, carafe, and carafe lid in and continue. Error Codes During Descaling If "E1" or "E2" error codes...
User Guide
Page 32
... the water drains from the unit. Avoid using abrasive cleansers or steel wool pads. Cleaning the Optional Permanent Filter After several uses, clean the filter with a soft brush or sponge. To empty, unplug the coffee maker, then remove the water guide cover, the water filter access cover, the water filter, and the brew basket. When the coffee maker is taken out of a dishwasher. 30 Hold the coffee maker over a sink, and repeatedly turn it will be used for...
... the water drains from the unit. Avoid using abrasive cleansers or steel wool pads. Cleaning the Optional Permanent Filter After several uses, clean the filter with a soft brush or sponge. To empty, unplug the coffee maker, then remove the water guide cover, the water filter access cover, the water filter, and the brew basket. When the coffee maker is taken out of a dishwasher. 30 Hold the coffee maker over a sink, and repeatedly turn it will be used for...
User Guide
Page 37
WARRANTY AND SERVICE INFORMATION COFFEE MAKER WARRANTY FOR PUERTO RICO A limited two year warranty for PRO LINE® Series Coffee Makers operated in Puerto Rico. to 5 p.m. to 8 p.m. (Eastern Time), or Saturday, 10 a.m. ARRANGING FOR HASSLE-FREE REPLACEMENT IF YOU RESIDE IN THE 50 UNITED STATES and your KitchenAid® PRO LINE® Series Coffee Maker should fail within two years of purchase extends to the purchaser and any succeeding owner for household use the carton and...
WARRANTY AND SERVICE INFORMATION COFFEE MAKER WARRANTY FOR PUERTO RICO A limited two year warranty for PRO LINE® Series Coffee Makers operated in Puerto Rico. to 5 p.m. to 8 p.m. (Eastern Time), or Saturday, 10 a.m. ARRANGING FOR HASSLE-FREE REPLACEMENT IF YOU RESIDE IN THE 50 UNITED STATES and your KitchenAid® PRO LINE® Series Coffee Maker should fail within two years of purchase extends to the purchaser and any succeeding owner for household use the carton and...
User Guide
Page 38
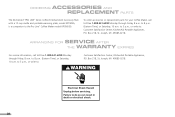
... 49085-0218. to 8 p.m. (Eastern Time), or Saturday, 10 a.m. ORDERING ACCESSORIES AND REPLACEMENT PARTS The KitchenAid® PRO LINE® Series Coffee Entertainment Accessory Pack with a 12-cup carafe and portable warming plate, model KPCMEA, is a companion to : Customer Satisfaction Center, KitchenAid Portable Appliances, P.O. to 5 p.m., or write to the Pro Line® Coffee Maker model KPCM050. WARNING Electrical Shock Hazard Unplug before servicing. Failure to : Customer Satisfaction Center, KitchenAid Portable Appliances, P.O. to 5 p.m., or...
... 49085-0218. to 8 p.m. (Eastern Time), or Saturday, 10 a.m. ORDERING ACCESSORIES AND REPLACEMENT PARTS The KitchenAid® PRO LINE® Series Coffee Entertainment Accessory Pack with a 12-cup carafe and portable warming plate, model KPCMEA, is a companion to : Customer Satisfaction Center, KitchenAid Portable Appliances, P.O. to 5 p.m., or write to the Pro Line® Coffee Maker model KPCM050. WARNING Electrical Shock Hazard Unplug before servicing. Failure to : Customer Satisfaction Center, KitchenAid Portable Appliances, P.O. to 5 p.m., or...

Parts List
Page 3
... 1 Literature Parts Use And Care Guide 8204573 U.S. 8211624 Canada 8212131 Repair Parts List 2 8211572 O−Ring, Top 3 8211573 O−Ring, Bottom 4 Housing 8211525 Pearl Metallic 8212157 Nickel Pearl W10191122 Onyx Black 5 8211521 Pump Assembly 6 8211515 Base−Cover 7 8211516 Foot 8 Base 8211744 Pearl Metallic 8212158 Nickel Pearl W10191124 Onyx Black 9 8211582 Seal, Ring A 10 8211583 Seal Ring B 11 8211522 Mount, Hot Plate 12 8211518 Hot Plate, Main 13...
... 1 Literature Parts Use And Care Guide 8204573 U.S. 8211624 Canada 8212131 Repair Parts List 2 8211572 O−Ring, Top 3 8211573 O−Ring, Bottom 4 Housing 8211525 Pearl Metallic 8212157 Nickel Pearl W10191122 Onyx Black 5 8211521 Pump Assembly 6 8211515 Base−Cover 7 8211516 Foot 8 Base 8211744 Pearl Metallic 8212158 Nickel Pearl W10191124 Onyx Black 9 8211582 Seal, Ring A 10 8211583 Seal Ring B 11 8211522 Mount, Hot Plate 12 8211518 Hot Plate, Main 13...


