Owners Manual
Page 1
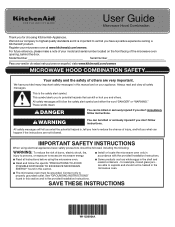
...messages in the provided Installation Instructions. Model Number Serial Number Para una versión de estas instrucciones en español, visite www.kitchenaid.com/owners MICROWAVE HOOD COMBINATION SAFETY Deberá tener a mano el número de modelo y de serie, que están ubicados en la ...you what can be followed, including the following: WARNING: To reduce the risk of your model and serial number located on your microwave oven at www.kitchenaid.com/owners. For future reference, please make a note of burns, electric shock, fire, injury to persons, or exposure to us...
...messages in the provided Installation Instructions. Model Number Serial Number Para una versión de estas instrucciones en español, visite www.kitchenaid.com/owners MICROWAVE HOOD COMBINATION SAFETY Deberá tener a mano el número de modelo y de serie, que están ubicados en la ...you what can be followed, including the following: WARNING: To reduce the risk of your model and serial number located on your microwave oven at www.kitchenaid.com/owners. For future reference, please make a note of burns, electric shock, fire, injury to persons, or exposure to us...
Owners Manual
Page 2
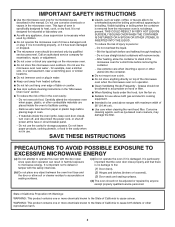
...in use. It is particularly important that the oven door close supervision is not always present. Do not overcook food. I The microwave oven should not be serviced only by qualified service personnel. Use extreme care when inserting a spoon or other combustible materials are ... liquid. I Liquids, such as lye-based oven cleaners, may damage the filter. - I Clean Ventilating Hoods Frequently - Do not use the microwave oven near a kitchen sink, in water. Corrosive cleaning agents, such as water, coffee, or tea are placed inside the oven ignite, keep oven...
...in use. It is particularly important that the oven door close supervision is not always present. Do not overcook food. I The microwave oven should not be serviced only by qualified service personnel. Use extreme care when inserting a spoon or other combustible materials are ... liquid. I Liquids, such as lye-based oven cleaners, may damage the filter. - I Clean Ventilating Hoods Frequently - Do not use the microwave oven near a kitchen sink, in water. Corrosive cleaning agents, such as water, coffee, or tea are placed inside the oven ignite, keep oven...
Owners Manual
Page 3
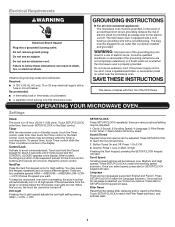
...4-Language; 5-Filter Reset; 6-Fan Timer; 7-Demo Mode; 8-Factory Reset. Repeat to reach the scrolling speed submenu. You may press this microwave oven. Vent Light Pressing Vent Light keypad adjusts the vent light setting among HIGH -> LOW -> OFF. Sound (Tones) Keypad tones and .... Consult a qualified electrician or serviceman if the grounding instructions are various options/setting may be turned off. The microwave oven is counting down. Cook functions may be grounded. Electrical Requirements WARNING GROUNDING INSTRUCTIONS Electrical Shock Hazard Plug into ...
...4-Language; 5-Filter Reset; 6-Fan Timer; 7-Demo Mode; 8-Factory Reset. Repeat to reach the scrolling speed submenu. You may press this microwave oven. Vent Light Pressing Vent Light keypad adjusts the vent light setting among HIGH -> LOW -> OFF. Sound (Tones) Keypad tones and .... Consult a qualified electrician or serviceman if the grounding instructions are various options/setting may be turned off. The microwave oven is counting down. Cook functions may be grounded. Electrical Requirements WARNING GROUNDING INSTRUCTIONS Electrical Shock Hazard Plug into ...

Owners Manual
Page 4
... press Popcorn repeatedly. Repeat to scroll through program options. Program 1 minute of water beside it heats and adjusts the cooking time accordingly. Microwave Oven Use Manual Cooking Touch number keypads to enter time, touch POWER (if not 100%), touch number keypads to activate. Sensor Cooking A ...; Objects with gold or silver trim or with metallic glaze ■■ Wax paper To Test Cookware/Dinnerware: Place dish in the microwave oven. Preset Soften/Melt Touch SOFTEN/MELT, repeatedly to Standby Power mode and dim the LCD brightness after 30 minutes). Rest on desired...
... press Popcorn repeatedly. Repeat to scroll through program options. Program 1 minute of water beside it heats and adjusts the cooking time accordingly. Microwave Oven Use Manual Cooking Touch number keypads to enter time, touch POWER (if not 100%), touch number keypads to activate. Sensor Cooking A ...; Objects with gold or silver trim or with metallic glaze ■■ Wax paper To Test Cookware/Dinnerware: Place dish in the microwave oven. Preset Soften/Melt Touch SOFTEN/MELT, repeatedly to Standby Power mode and dim the LCD brightness after 30 minutes). Rest on desired...

Owners Manual
Page 5
... slices, 4 oz (113g) each . COOK 1. Stir and let stand 2-3minutes after cooking. 5. Fresh Vegetables: Senses 1 - 4 cups (250mL - 1 L) Place in microwave-safe dish.Do not cover. 2. Cover with a fork. Add 2-4tbs (30-60 mL) water. Stir and let stand 2-3minutes after cooking. 3. Loosen cover on package...and closest to scroll through program options. Let stand 5 minutes after cooking. 4. Meat: 0.2-6.6 lbs (90g - 3 kg) Remove wrap and place in microwave-safe dish. Do not cover. 3. Cover with a fork. REHEAT 1. Rest on paper towel. Frozen Entrée : 10, 20, 40, 60 ounces...
... slices, 4 oz (113g) each . COOK 1. Stir and let stand 2-3minutes after cooking. 5. Fresh Vegetables: Senses 1 - 4 cups (250mL - 1 L) Place in microwave-safe dish.Do not cover. 2. Cover with a fork. Add 2-4tbs (30-60 mL) water. Stir and let stand 2-3minutes after cooking. 3. Loosen cover on package...and closest to scroll through program options. Let stand 5 minutes after cooking. 4. Meat: 0.2-6.6 lbs (90g - 3 kg) Remove wrap and place in microwave-safe dish. Do not cover. 3. Cover with a fork. REHEAT 1. Rest on paper towel. Frozen Entrée : 10, 20, 40, 60 ounces...
Owners Manual
Page 6
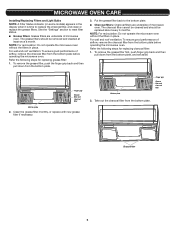
... filter: 1. The charcoal filter cannot be cleaned and should be replaced about every 6 months. NOTE: For recirculation: Do not operate the microwave oven without the filters in place. To remove the grease filter first, push finger grip back and then pull down from the bottom plate....3. Clean the grease filter monthly, or replace with new grease filter if necessary. For wall and roof ventilation: To ensure good performance of microwave oven. Put the grease filter back to reset filter status. ■■ Grease filters: Grease filters are underside of airflow, remove the...
... filter: 1. The charcoal filter cannot be cleaned and should be replaced about every 6 months. NOTE: For recirculation: Do not operate the microwave oven without the filters in place. To remove the grease filter first, push finger grip back and then pull down from the bottom plate....3. Clean the grease filter monthly, or replace with new grease filter if necessary. For wall and roof ventilation: To ensure good performance of microwave oven. Put the grease filter back to reset filter status. ■■ Grease filters: Grease filters are underside of airflow, remove the...
Owners Manual
Page 7
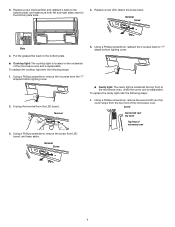
...the cooktop light refer the following steps: 1. Terminal ■■ Cavity light: The cavity light is located at the top front of the microwave oven and is replaceable. Using a Phillips screwdriver, remove the screw from the LED board. Terminal Screw 7 Replace a new LED, fasten the...the 4 screws back to "T" shape bottom lighting cover. ■■ Cooktop light: The cooktop light is located on the underside of the microwave oven, under the cover, and is replaceable. Unplug the terminal from LED board, and keep aside. 3. Terminal Screw Slots 4. Replace a ...
...the cooktop light refer the following steps: 1. Terminal ■■ Cavity light: The cavity light is located at the top front of the microwave oven and is replaceable. Using a Phillips screwdriver, remove the screw from the LED board. Terminal Screw 7 Replace a new LED, fasten the...the 4 screws back to "T" shape bottom lighting cover. ■■ Cooktop light: The cooktop light is located on the underside of the microwave oven, under the cover, and is replaceable. Unplug the terminal from LED board, and keep aside. 3. Terminal Screw Slots 4. Replace a ...
Owners Manual
Page 9
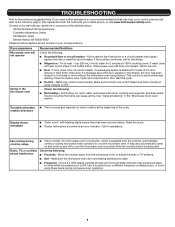
...or reset the circuit breaker. Check the following : ■■ Soil buildup - This occurs to cool the microwave oven's controls while the cooktop below : KitchenAid Brand Home Appliances Customer eXperience Center 553 Benson Road Benton Harbor, MI 49022-2692 Please include a daytime phone number.... Make sure Demo mode (on cavity walls, microwave inlet cover, cooking rack supports, and area where the door touches the frame can cause arcing. See "General Cleaning" in your mobile device, or visit www.kitchenaid.custhelp.com. Move the receiver away from the ...
...or reset the circuit breaker. Check the following : ■■ Soil buildup - This occurs to cool the microwave oven's controls while the cooktop below : KitchenAid Brand Home Appliances Customer eXperience Center 553 Benson Road Benton Harbor, MI 49022-2692 Please include a daytime phone number.... Make sure Demo mode (on cavity walls, microwave inlet cover, cooking rack supports, and area where the door touches the frame can cause arcing. See "General Cleaning" in your mobile device, or visit www.kitchenaid.custhelp.com. Move the receiver away from the ...
Installation Instructions
Page 1
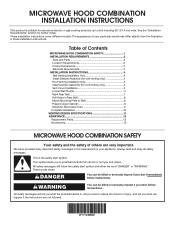
...symbol alerts you to Wall 8 Prepare Upper Cabinet 9 Install the Microwave Oven 9 Complete Installation 10 VENTING DESIGN SPECIFICATIONS 11 ASSISTANCE 12 Replacement Parts 12 Accessories 12 MICROWAVE HOOD COMBINATION SAFETY Your safety and the safety of your appliance. ...seriously injured if you what can be killed or seriously injured if you and others are not followed. Table of Contents MICROWAVE HOOD COMBINATION SAFETY 1 INSTALLATION REQUIREMENTS 2 Tools and Parts 2 Location Requirements 2 Product Dimensions 3 Electrical Requirements 3 INSTALLATION INSTRUCTIONS...
...symbol alerts you to Wall 8 Prepare Upper Cabinet 9 Install the Microwave Oven 9 Complete Installation 10 VENTING DESIGN SPECIFICATIONS 11 ASSISTANCE 12 Replacement Parts 12 Accessories 12 MICROWAVE HOOD COMBINATION SAFETY Your safety and the safety of your appliance. ...seriously injured if you what can be killed or seriously injured if you and others are not followed. Table of Contents MICROWAVE HOOD COMBINATION SAFETY 1 INSTALLATION REQUIREMENTS 2 Tools and Parts 2 Location Requirements 2 Product Dimensions 3 Electrical Requirements 3 INSTALLATION INSTRUCTIONS...
Installation Instructions
Page 2
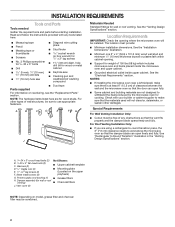
... x 4" (50.8 x 101.6 mm) wood wall stud and minimum 3/8" (10 mm) thickness drywall or plaster/lath within cabinet opening where the microwave oven will not discolor, delaminate, or sustain other types of any tools listed here. ■■ Measuring tape ■■ Pencil ■■ ...illustration in the "Venting Design Specifications" section. Power supply cord bushing (1) ■ Grease filters H. See "Rectangular to exist above the microwave oven so that the door can open fully. ■■ Some cabinet and building materials are for wall or roof venting. Check ...
... x 4" (50.8 x 101.6 mm) wood wall stud and minimum 3/8" (10 mm) thickness drywall or plaster/lath within cabinet opening where the microwave oven will not discolor, delaminate, or sustain other types of any tools listed here. ■■ Measuring tape ■■ Pencil ■■ ...illustration in the "Venting Design Specifications" section. Power supply cord bushing (1) ■ Grease filters H. See "Rectangular to exist above the microwave oven so that the door can open fully. ■■ Some cabinet and building materials are for wall or roof venting. Check ...
Installation Instructions
Page 3
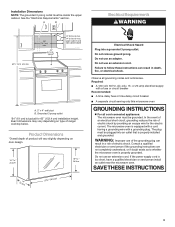
...a fuse or circuit breaker Recommended: ■ A time-delay fuse or time-delay circuit breaker ■ A separate circuit serving only this microwave oven GROUNDING INSTRUCTIONS For all governing codes and ordinances. Do not use of the grounding plug can result in a risk of electric shock. ...INSTRUCTIONS 3 Grounded 3 prong outlet *24" (61 cm) is too short, have a qualified electrician or serviceman install an outlet near the microwave oven. Product Dimensions *Overall depth of product will vary slightly depending on type of electric shock by providing an escape wire for 60" (152...
...a fuse or circuit breaker Recommended: ■ A time-delay fuse or time-delay circuit breaker ■ A separate circuit serving only this microwave oven GROUNDING INSTRUCTIONS For all governing codes and ordinances. Do not use of the grounding plug can result in a risk of electric shock. ...INSTRUCTIONS 3 Grounded 3 prong outlet *24" (61 cm) is too short, have a qualified electrician or serviceman install an outlet near the microwave oven. Product Dimensions *Overall depth of product will vary slightly depending on type of electric shock by providing an escape wire for 60" (152...

Installation Instructions
Page 4
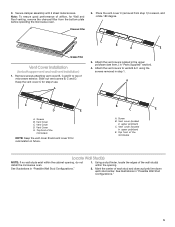
...the top, and the damper blade opens away from the microwave oven. Slide damper plate toward the front of microwave oven B. Damper plate Install Damper Assembly (for roof venting only) 1. Back of the microwave oven and lift up. Damper assembly C. Sheet metal ... opens fully. 2. Secure damper assembly with 2 sheet metal screws. D A. Top of microwave oven exterior. Install Damper Assembly (for wall venting only) 1. Remove screws attaching damper plate to top of the microwave oven 4 Diagonal wire cutting pliers B. Damper assembly C. Roof Venting Installation Only 1. A ...
...the top, and the damper blade opens away from the microwave oven. Slide damper plate toward the front of microwave oven B. Damper plate Install Damper Assembly (for roof venting only) 1. Back of the microwave oven and lift up. Damper assembly C. Sheet metal ... opens fully. 2. Secure damper assembly with 2 sheet metal screws. D A. Top of microwave oven exterior. Install Damper Assembly (for wall venting only) 1. Remove screws attaching damper plate to top of the microwave oven 4 Diagonal wire cutting pliers B. Damper assembly C. Roof Venting Installation Only 1. A ...
Installation Instructions
Page 5
... 3. Remove screws attaching vent cover B, C and D to area A, and rotate 180 degree. Screw B. Mark the center of the microwave NOTE: Keep the vent cover B and vent cover D for step 2 use. Place the vent cover C (removed from the bottom plate before operating... vents B & C using the screws removed in upper polyfoam) C. Vent cover (located in "Parts Supplied" section). 4. Using a stud finder, locate the edges of microwave exterior. Attach the vent covers located in the upper polyfoam (see item J in upper polyfoam) E. Vent Cover C. B C E A. Charcoal Filter C B A E...
... 3. Remove screws attaching vent cover B, C and D to area A, and rotate 180 degree. Screw B. Mark the center of the microwave NOTE: Keep the vent cover B and vent cover D for step 2 use. Place the vent cover C (removed from the bottom plate before operating... vents B & C using the screws removed in upper polyfoam) C. Vent cover (located in "Parts Supplied" section). 4. Using a stud finder, locate the edges of microwave exterior. Attach the vent covers located in the upper polyfoam (see item J in upper polyfoam) E. Vent Cover C. B C E A. Charcoal Filter C B A E...

Installation Instructions
Page 7
... on a minimum of 1 wall stud, preferably 2, using a minimum of the upper cabinet. Support tabs F. Mounting Template C. Centerline 2. Mounting plate center markers Mark Rear Wall The microwave oven must be 14¹⁄8" (35.9 cm) from the bottom edge of upper cabinet 7 Align the center markers on mounting plate) B. Wall stud centerlines...
... on a minimum of 1 wall stud, preferably 2, using a minimum of the upper cabinet. Support tabs F. Mounting Template C. Centerline 2. Mounting plate center markers Mark Rear Wall The microwave oven must be 14¹⁄8" (35.9 cm) from the bottom edge of upper cabinet 7 Align the center markers on mounting plate) B. Wall stud centerlines...

Installation Instructions
Page 9
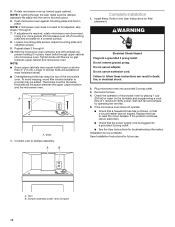
... Push the bolt with tape or thumbtacks. Insert a lag screw into both end holes. 3. Prepare Upper Cabinet 1. Disconnect power to move and install microwave oven. The "rear wall" arrows must be against the bottom of the upper cabinet and attach with toggle nut through the power supply cord hole... supply cord through the drywall and finger tighten the bolt to do not grip or use as guides ■■ If the wall behind the microwave oven (as installed) has a partial wall covering (for example, tile backsplash), be installed around it is being handled. 4. Securely tighten the ...
... Push the bolt with tape or thumbtacks. Insert a lag screw into both end holes. 3. Prepare Upper Cabinet 1. Disconnect power to move and install microwave oven. The "rear wall" arrows must be against the bottom of the upper cabinet and attach with toggle nut through the power supply cord hole... supply cord through the drywall and finger tighten the bolt to do not grip or use as guides ■■ If the wall behind the microwave oven (as installed) has a partial wall covering (for example, tile backsplash), be installed around it is being handled. 4. Securely tighten the ...
Installation Instructions
Page 10
...not remove ground prong. Replace the fuse or reset the circuit breaker. Tighten bolts until there is required, rotate microwave oven downward. Reconnect power. 4. NOTE: If microwave oven does not need to follow these instructions can result in place, insert bolts through 9. 7. A B Complete... Installation 1. WARNING Electrical Shock Hazard Plug into grounded 3 prong outlet. 3. Damper assembly (under vent) Compact 10 Rotate microwave oven up toward upper cabinet. Bolts 1. Failure to be added. If adjustment is no gap between the upper cabinet bottom and the...
...not remove ground prong. Replace the fuse or reset the circuit breaker. Tighten bolts until there is required, rotate microwave oven downward. Reconnect power. 4. NOTE: If microwave oven does not need to follow these instructions can result in place, insert bolts through 9. 7. A B Complete... Installation 1. WARNING Electrical Shock Hazard Plug into grounded 3 prong outlet. 3. Damper assembly (under vent) Compact 10 Rotate microwave oven up toward upper cabinet. Bolts 1. Failure to be added. If adjustment is no gap between the upper cabinet bottom and the...
Installation Instructions
Page 11
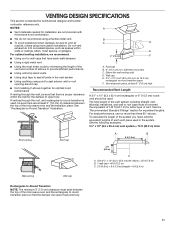
... best performance, use no more than three 90° elbows. To calculate the length of the system you need, add the equivalent lengths of the microwave oven and the transition piece. Wall cap E. 3¹⁄4" x 10" to 6" (8.3 x 25.4 cm to 15.2 cm) rectangular to -Round Transition" illustration. See the "...proper clearance within walls or ceilings, attics, crawl spaces, or garages. Vent extension piece, at least 3" (7.6 cm) of clearance between the top of the microwave oven and the rectangular to round transition piece so that there is used, be sure there are not provided with...
... best performance, use no more than three 90° elbows. To calculate the length of the system you need, add the equivalent lengths of the microwave oven and the transition piece. Wall cap E. 3¹⁄4" x 10" to 6" (8.3 x 25.4 cm to 15.2 cm) rectangular to -Round Transition" illustration. See the "...proper clearance within walls or ceilings, attics, crawl spaces, or garages. Vent extension piece, at least 3" (7.6 cm) of clearance between the top of the microwave oven and the rectangular to round transition piece so that there is used, be sure there are not provided with...

Installation Instructions
Page 12
...round transition piece must be used. The filler panels come in the User Guide. Each panel is round, a rectangular-to use when installing this microwave oven in a 36" (91.4 cm) or 42" (106.7 cm) wide opening , behind the door. ■■ Damper assembly ■... m) D. 2 ft (0.6 m) + 6 ft (1.8 m) straight = 8 ft (2.4 m) ASSISTANCE Call your authorized dealer or service center for details. Following is located behind the microwave oven door on the front facing of available replacement parts. You will need additional assistance, call us at our toll-free number listed in the...
...round transition piece must be used. The filler panels come in the User Guide. Each panel is round, a rectangular-to use when installing this microwave oven in a 36" (91.4 cm) or 42" (106.7 cm) wide opening , behind the door. ■■ Damper assembly ■... m) D. 2 ft (0.6 m) + 6 ft (1.8 m) straight = 8 ft (2.4 m) ASSISTANCE Call your authorized dealer or service center for details. Following is located behind the microwave oven door on the front facing of available replacement parts. You will need additional assistance, call us at our toll-free number listed in the...


