Owners Manual
Page 2
... container. - IMPORTANT SAFETY INSTRUCTIONS I Use the microwave oven only for its intended use as lye-based oven cleaners, may damage the filter. - It is removed from heated surfaces. Visible bubbling or boiling when the container is not designed for industrial or laboratory use . ...accumulate on top of table or counter. for storage purposes. I The microwave oven should be serviced only by qualified service personnel. Grease should not be allowed to be used by anyone except properly qualified service personnel. State of California Proposition 65 Warnings: WARNING: This...
... container. - IMPORTANT SAFETY INSTRUCTIONS I Use the microwave oven only for its intended use as lye-based oven cleaners, may damage the filter. - It is removed from heated surfaces. Visible bubbling or boiling when the container is not designed for industrial or laboratory use . ...accumulate on top of table or counter. for storage purposes. I The microwave oven should be serviced only by qualified service personnel. Grease should not be allowed to be used by anyone except properly qualified service personnel. State of California Proposition 65 Warnings: WARNING: This...
Owners Manual
Page 6
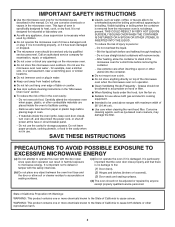
... and roof ventilation: To ensure good performance of microwave oven. Put the grease filter back to reset filter status. ■■ Grease filters: Grease filters are underside of airflow, remove the charcoal filter from the bottom plate. Charcoal filter 6 Refer the following steps for replacing charcoal filter: 1. The grease filters should be removed and cleaned at least once a month. To remove the...
... and roof ventilation: To ensure good performance of microwave oven. Put the grease filter back to reset filter status. ■■ Grease filters: Grease filters are underside of airflow, remove the charcoal filter from the bottom plate. Charcoal filter 6 Refer the following steps for replacing charcoal filter: 1. The grease filters should be removed and cleaned at least once a month. To remove the...
Owners Manual
Page 7
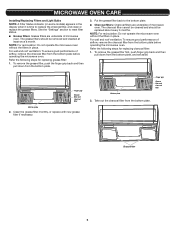
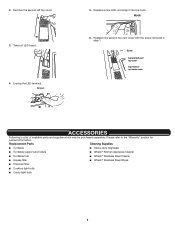
3. Put the grease filter back to "T" shape bottom lighting cover. ■■ Cooktop light: The cooktop light is located at the top front of micowave oven 3. Terminal ■■ ... from the top front of the microwave oven and is replaceable. To replace the cooktop light refer the following steps: 1. Terminal Screw 7 Replace a new charcoal filter and reattach it back to the bottom plate slots. 4. Using a Phillips screwdriver, remove the second left and right sides insert to the bottom plate, and...
3. Put the grease filter back to "T" shape bottom lighting cover. ■■ Cooktop light: The cooktop light is located at the top front of micowave oven 3. Terminal ■■ ... from the top front of the microwave oven and is replaceable. To replace the cooktop light refer the following steps: 1. Terminal Screw 7 Replace a new charcoal filter and reattach it back to the bottom plate slots. 4. Using a Phillips screwdriver, remove the second left and right sides insert to the bottom plate, and...
Owners Manual
Page 8
... ■■ Affresh® Kitchen Appliance Cleaner ■■ Turntable hub ■■ Affresh® Stainless Steel Cleaner ■■ Grease filter ■■ Affresh® Stainless Steel Wipes ■■ Charcoal filter ■■ Cooktop light bulb ■■ Cavity light bulb 8 Remove the second left vent top cover Top front of...
... ■■ Affresh® Kitchen Appliance Cleaner ■■ Turntable hub ■■ Affresh® Stainless Steel Cleaner ■■ Grease filter ■■ Affresh® Stainless Steel Wipes ■■ Charcoal filter ■■ Cooktop light bulb ■■ Cavity light bulb 8 Remove the second left vent top cover Top front of...
Installation Instructions
Page 2
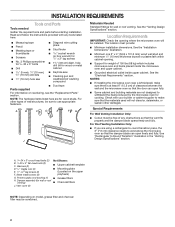
... cm) diam. Washers (2) ■ Upper cabinet template D.3/16" toggle nuts (2) E. 1/4" x 2" lag screws (2) F. Power supply cord bushing (1) ■ Grease filters H. Location Requirements IMPORTANT: Check the opening . ■■ Support for weight of any tools listed here. ■■ Measuring tape ■■ Pencil ■&#...■■ 7/16" socket wrench (or box wrench) for cooking. Vent cover (2) NOTE: Depending on model, grease filter and charcoal filter may be free of 150 lbs (68 kg) which includes microwave oven and items placed inside the microwave oven and ...
... cm) diam. Washers (2) ■ Upper cabinet template D.3/16" toggle nuts (2) E. 1/4" x 2" lag screws (2) F. Power supply cord bushing (1) ■ Grease filters H. Location Requirements IMPORTANT: Check the opening . ■■ Support for weight of any tools listed here. ■■ Measuring tape ■■ Pencil ■&#...■■ 7/16" socket wrench (or box wrench) for cooking. Vent cover (2) NOTE: Depending on model, grease filter and charcoal filter may be free of 150 lbs (68 kg) which includes microwave oven and items placed inside the microwave oven and ...
Installation Instructions
Page 5
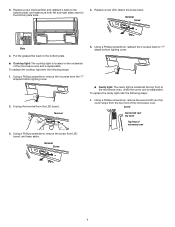
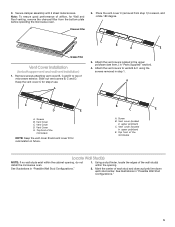
... To ensure good performance of the microwave NOTE: Keep the vent cover B and vent cover D for Wall and Roof venting, remove the charcoal filter from step 1) to area A, and rotate 180 degree. Place the vent cover C (removed from the bottom plate before operating the microwave oven.... a stud finder, locate the edges of each stud and draw a plumb line down each stud center. See illustrations in "Possible Wall Stud Configurations." 2. Charcoal Filter C B A E Grease Filter Vent Cover Installation (for step 2 use. B C E A. A 3. Slide out vent covers B, C and D. 3.
... To ensure good performance of the microwave NOTE: Keep the vent cover B and vent cover D for Wall and Roof venting, remove the charcoal filter from step 1) to area A, and rotate 180 degree. Place the vent cover C (removed from the bottom plate before operating the microwave oven.... a stud finder, locate the edges of each stud and draw a plumb line down each stud center. See illustrations in "Possible Wall Stud Configurations." 2. Charcoal Filter C B A E Grease Filter Vent Cover Installation (for step 2 use. B C E A. A 3. Slide out vent covers B, C and D. 3.

